Read time: 6 minutes
Emails are the conversational medium in the corporate world. They are the first and preferred mode of information transfer. The email client Outlook is used to perform various operations like reading, sending, composing emails, viewing attachments, etc. It utilizes the OST file to perform all these tasks, even in offline or low bandwidth conditions.
Moving further in this blog, you will understand various aspects of the Outlook OST file, such as what it is, why we need it, where to find it, issues with OST files, and solutions to fix them.
What is an OST file
Outlook Storage Table (OST) is a file associated with your Outlook account which enables the user to access and manage the emails even in offline mode. Outlook creates this file automatically when you integrate Outlook with an Exchanger or Office 365 account. With OST file, users can effortlessly access, read, delete, and compose emails like usual, even in the absence of a network. Later, Outlook will use the Cached Exchange Mode to synchronize the changes with the Exchange Server.
The availability of the emails and other mailbox data items can be specified as per user requirements. You can also configure the Cached Exchange Mode to sync and make emails available offline up to any user defined date.
Often, users mistakenly assume that both OST and PST files are same since they both are Outlook data files. However, this is not the case. Both files exist to serve different purposes, for a detailed difference and functionality of the two Outlook data files, refer to the blog OST vs PST.
Need for the OST file
The OST file is a feasible option for people who are continuously experiencing interference with Outlook operations due to network issues. This Outlook data file lets the user perform all the email-related tasks and can even access and print the email attachments in offline mode. The actions performed are saved in the OST file, which is later synced with the email server in the presence of a stable internet connection.
Note: To prevent any kind of synchronization issue between OST and Exchange Server, ensure a steady network connection.
The OST file is a copy of the mailbox files and folders present on the Exchange Server. Therefore, performing an OST file backup can serve as a great option to maintain a complete mailbox backup. In case of any calamity causing the data loss in Exchange Server, the offline OST file can save your day.
Where to find and access the OST file?
After understanding the need & importance of the OST file, let’s see how a user can access them. Knowing the location of your OST file can help in various situations, such as:
- Change location of OST file due to storage limitations.
- Creating mailbox backup through free methods to convert OST to PST.
- To access a corrupted OST file.
- It can help to solve oversized OST file issues.
- Export contacts from OST file.
- Extract calendar from OST file.
- Transfer OST file to another computer and then import OST to Outlook.
You can find the OST file linked to your Outlook at:
drive:\Users\User Name\AppData\Local\Microsoft\Outlook
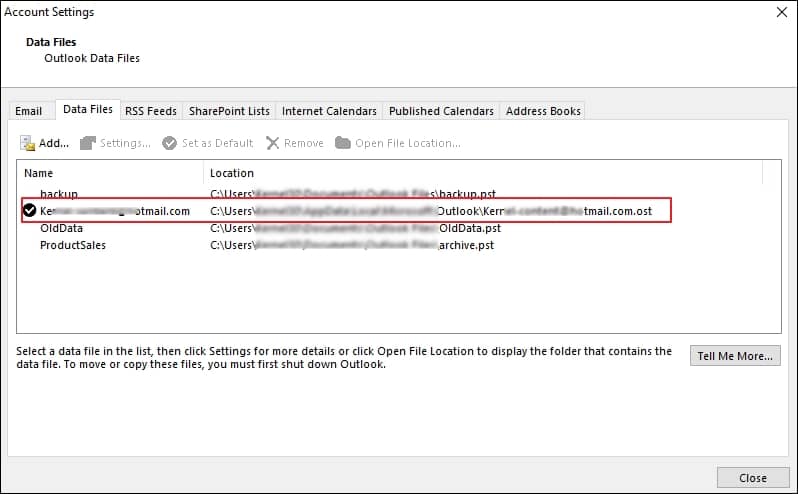
In case you have changed the OST file location in the past or can’t find it at the default location, then follow the below-mentioned steps to figure out the OST file’s current location.
- Open Outlook, click on File > Account Setting > Account Setting.
- Select the Data tab and select the data file associated with your email account.
- Navigate to the directory of the OST file mentioned here to find your OST file.
Issues with the OST file
Microsoft has tried its best to develop a robust file format that can lets users manage emails with & without a network. However, Outlook, being a complex accumulation of various functionalities, also gives space to some issues. Common problems users encounter with OST files are given below:
Overgrown OST file: As previously stated, the OST files are an offline replica of the mailbox items in the server online. Therefore, often, the size of these OST files grows exponentially, which can lead to issues like slow Outlook performance in Windows, corruption of Outlook data file, Outlook stuck on loading profile, etc.
Corruption: Abrupt termination of Outlook, faulty add-ins, excessive OST file size, etc., can easily welcome corruption in Outlook data file. This is a fatal threat to user’s data and requires immediate action to recover OST file data securely. However, there are some ways to view the mail items from corrupted OST file, but we recommend trying a complete data recovery.
Password-protected OST file: Many users choose to encrypt their Outlook data files with passwords to add an extra layer of security. Users often need to share OST files with someone; in such a scenario, a password can prevent unauthorized access to your files. However, frequently, the users forget the password, leading to inaccessible OST files.
Scenarios like corruption and large-size OST files can introduce various issues and errors in Outlook. Some of the frequent ones are Outlook can’t open your OST file, Outlook can’t open the set of folders, etc.
Apart from the problems discussed above, you may encounter situations like two OST files in Outlook, Outlook switched to Working Offline mode. Therefore, to ensure the proper functioning of Outlook, it is important to troubleshoot and fix all the potential reasons for Outlook’s failure. Performing various Outlook troubleshoots to increase performance, you will also need the Exchange Server address.
How to deal with corrupted OST file
Corruption in OST file is a serious issue that renders users unable to access email data and risks losing crucial data items like messages, attachments, contacts, tasks, etc.
To repair the corrupted OST file, you can get assistance from Microsoft’s in-house tool Inbox Repair tool. This tool can handle minor issues related to Outlook data files. However, for a severe corruption case, we recommend taking aid from professional software.
Kernel for OST to PST converter is an advanced tool empowered with powerful and smart algorithms to quicky access and aid in the OST file data recovery. It serves as a complete solution for all your OST file-related problems.
Salient features offered by the tool:
- Repair OST files and save them in multiple formats like PST, DBX, MSG, EML, etc.
- Migrate OST files to different platforms such as Gmail, Yahoo, iCloud, etc.
- Split OST file into multiple smaller PST files.
- Generate a graphical report of the process.
- Pre-analysis and verification of OST file to prevent incorrect operations.
- Easily access and convert even the encrypted OST files.
Conclusion
Availability of OST file in Outlook is very crucial for a seamless emailing experience. This blog has shed light on various elements related to OST files. In case you encounter any performance or email access issues due to corruption, then use the OST file converter. This tool can effortlessly access & recover corrupted OST file data and convert OST files to other formats with complete data integrity.
![How to Convert OST to PST Without Outlook? [Expert Guide]](https://www.nucleustechnologies.com/blog/wp-content/uploads/2026/04/ost-to-pst-without-outlook.webp)