Read time 9 minutes
Both OST and PST files hold important data and are important for an Outlook user. They function as storage containers of all the user’s data, including emails, contacts, tasks, calendars, etc. The only difference is that PST and OST store information in online and offline modes respectively.
Due to the vast quantity of information, the OST file size turns out to be oversized. It gets tricky to manage oversized OST files and in addition, corruption in any of these will result in Outlook data to suffer. To be prepared in advance for such possible future scenarios, the OST file size limit has to be your highest priority.
Hence, reducing the OST file size and solving one-way, oversized OST file issues in Outlook is crucial. Also, the file’s storage capacity depends on the MS Outlook application’s installed version.
| Outlook Version | OST File Size Limit |
| Outlook 2002 and earlier versions | 2GB |
| Outlook 2007 | 20GB |
| Outlook 2010 and later versions | 50GB |
How do OST files get oversized?
The OST file contains all the data you have generated or received since the account was activated on Outlook. It includes all emails (different folders), attachments, calendar schedules, tasks, contacts, notes, hidden items, public folders, etc. When you forget to delete unnecessary data, it gets piled up, exceeds the file storage limit, and causes corruption in the OST file and troubles in Outlook. Large-sized attachments also cause oversized OST files. So, if you don’t prioritize keeping the OST file size within the limit, potential difficulties may await you. Hence, it is essential to shrink Outlook OST file to prevent it from being oversized and keep it healthy.
Issues in Outlook due to oversized OST file
Once your OST file gets oversized, you will face several issues, such as:
- Cannot open or load .ost file document.
- Cannot add data to existing Exchange .ost file.
- Multiple pauses in MS Outlook program.
- Error messages during synchronizing process.
- Failure in fixing synchronization issues between OST file and MS Exchange Server.
Manual Solutions to Fix Oversized OST File Issues
There are multiple ways to fix oversized OST file issues so that you can prevent them from being corrupted and access their data anytime in Outlook. You can follow these basic activities before applying manual methods to shrink OST file to eliminate unused and unwanted data from the OST file.
- Delete unwanted emails from your OST folders permanently.
- Save crucial and large-sized OST file attachments on your system.
- Ensure clearing the Deleted Items folder in the OST mailbox is cleared.
- Rename your OST file from the default location and let it be generated again.
Now let’s explore the manual methods to fix oversized OST file issues and make them in perfect size for easy accessibility:
Method 1. Disable unnecessary add-ins from Outlook
Many add-ons in Outlook can take extra data from your OST file and hamper its functionality. To improve Outlook’s performance, disabling Add-ons is a suitable option to reduce OST file size. To perform this, follow below steps:
- In Outlook, click on File and select Options.

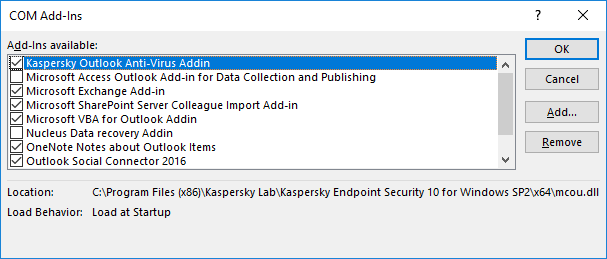
- In Outlook options, select Add-ins and go to Manage. Select COM Add-Ins, and click Go .
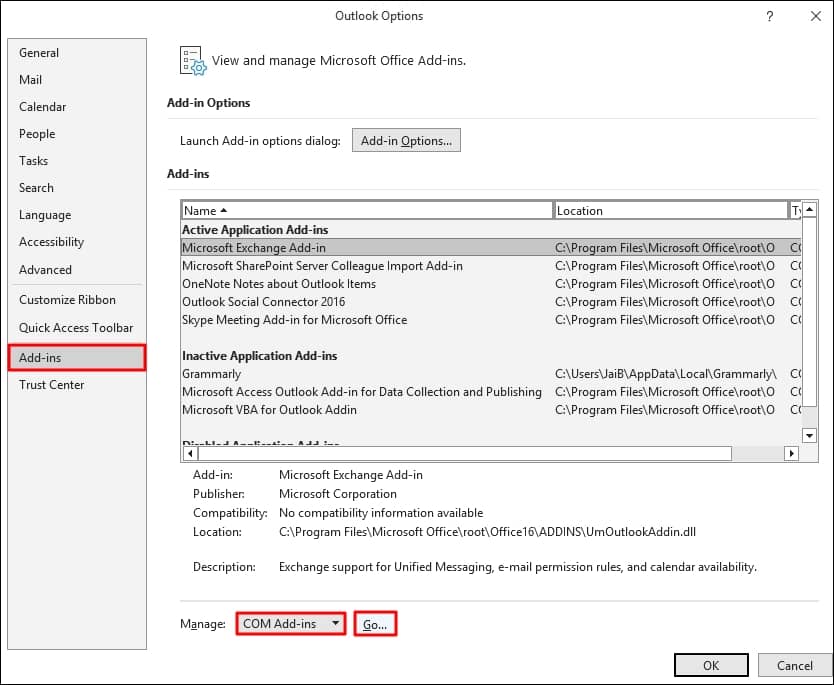
- Unselect all the Add-Ins that are currently not in use or non-functional and click OK.
Method 2. Archiving OST file data
Archiving OST file data might reduce OST file size and clear some space occupied on the server. You can change the archive OST file location in your system. Archiving an OST file may prevent your OST file from crossing a predefined size limit. To archive the file, follow the steps shared below.
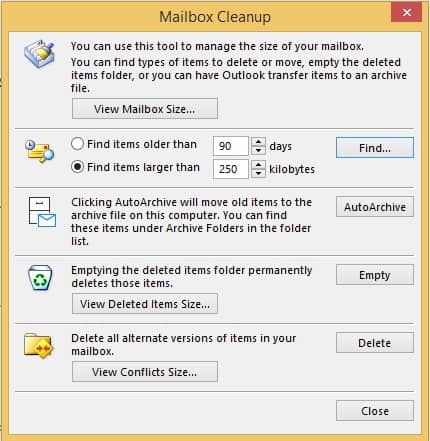
- Click on the File tab>click Tools>select Mailbox Cleanup.
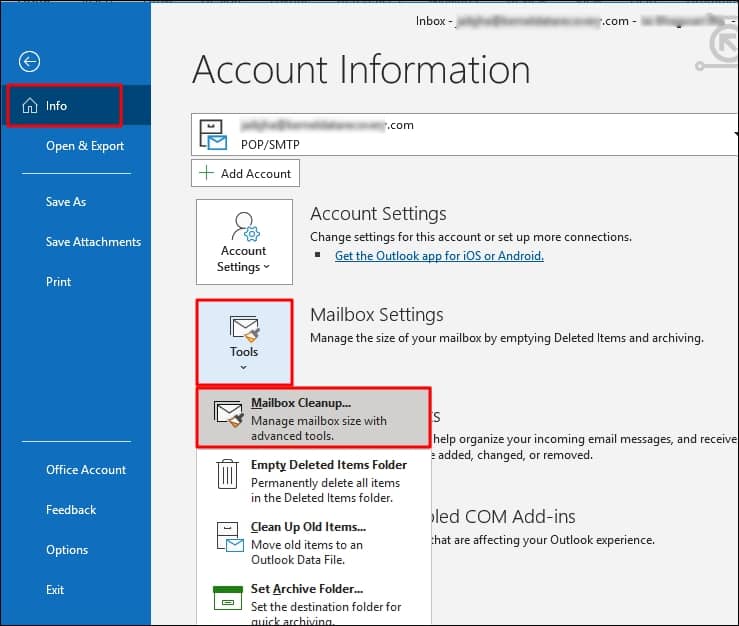
- Next, two options are available:
- You can move older items in the mailbox to an archive folder by clicking on the AutoArchive option.
- Click Empty and delete items from the Deleted items folder.
Method 3. Compress Outlook data file
Use the in-built utility in Outlook to shrink the OST file size. Reducing file size might help improve Outlook performance, provided the user has deleted substantial items. To reduce OST file size, follow the given steps:
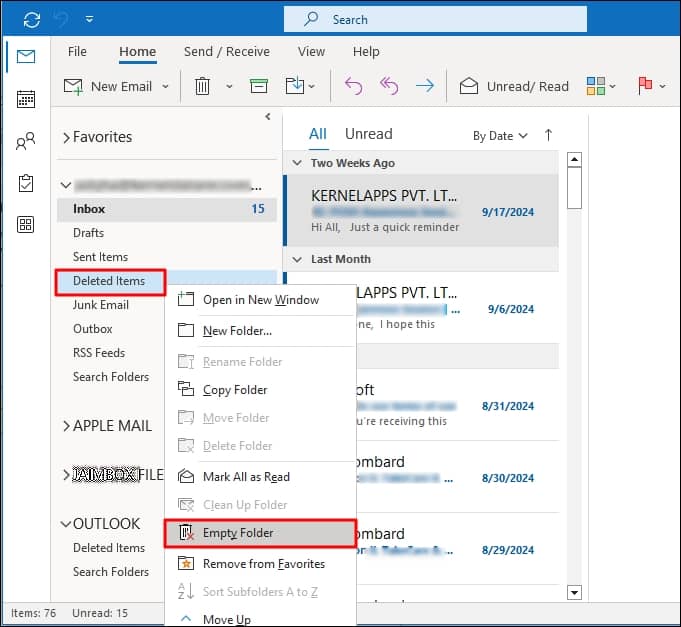
- Delete those items which are not required further.
- Open the folder list view, and in the Navigation pane, right-click on the folder, click Deleted items, and click Empty folder.
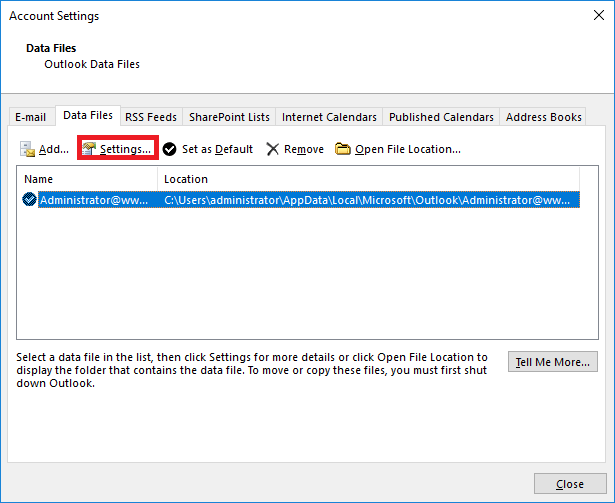
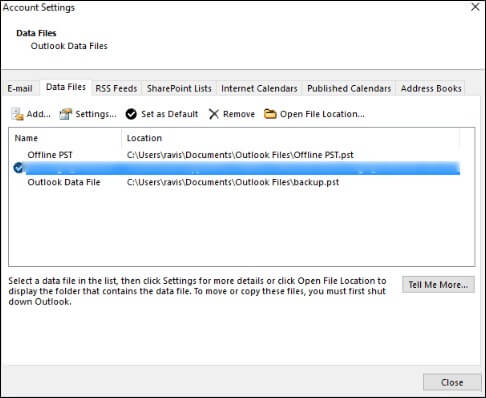
- In Outlook, click on the File tab and from Account Settings, select Account Settings.
- Click on the Data Files tab, select the data file required to reduce the file size, and click Settings.
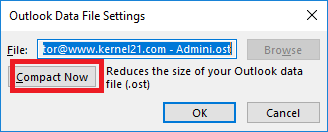
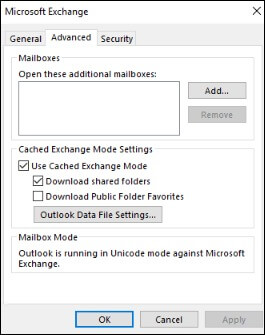
- In the opened dialogue box, click the Advanced tab and then click Outlook Data File Settings.
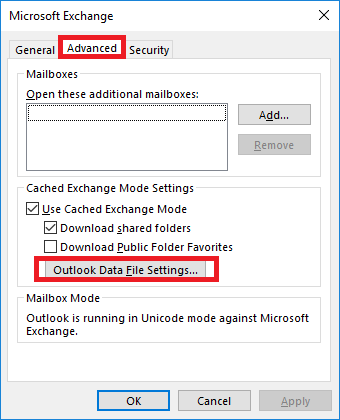
- In Outlook Data File Settings dialogue box, click Compact Now, which is the final step.
Method 4. Using clean-up option
As a means of reducing the size & having a compact OST file, it is possible to delete surplus emails and other items. Outlook provides a clean-up option for removing emails from the Deleted Items folder. Follow these steps to do so:
- Access Outlook & navigate to the File tab.
- Go to Tools and tap on Mailbox Cleanup.
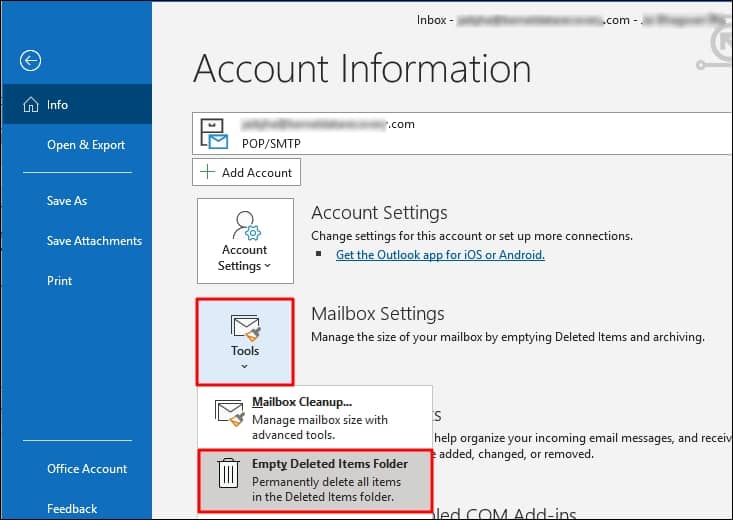
- Click on Empty under the “Emptying the deleted items folder, permanently delete those items.”

Method 5. Disable shared folder synchronization
A shared folder can also rapidly increase OST file size and cause oversized OST file problems and other Outlook performance problems. By following these steps, you can disable synchronization of Shared Folders and easily shrink OST file:
- Go to the File menu and navigate to Account Settings > Account Settings.
- From the Data Files tab, choose your OST file.
- In Settings, go to Advanced and select Outlook Data File Settings.
- Unmark the option Download Shared Folders and hit OK.
- Restart the Outlook application to finish.
The above-discussed methods might help reduce the OST file size or clear space on the server by moving these files to a different location. But if OST files become corrupt due to their size, you might lose their data. In case your OST file gets damaged, use an OST file repair tool instantly and fix the issue.
Note: You can also use the Inbox Repair tool, a Microsoft native solution, to repair an OST file having minor issues.
However, a professional tool like Kernel OST to PST Converter also helps to overcome oversized OST file issues if they have caused inaccessibility issues in Outlook.
Method 6. Reliable software to fix oversized OST file issues in Outlook
Kernel for OST to PST Converter is a useful utility that repairs OST files completely and converts them into PST files efficiently without losing any data. You can download “Trial Version” for free and retrieve your lost or inaccessible data in different formats as required. Features like an In-built search option, smart filters, splitting OST files, a complete preview of files, and a File Analysis report can be utilized through this utility. The user can use another remarkable feature, saving snapshot of the current process for future use by buying a “Full Version” of the utility.
With the ‘split PST’ feature of the OST converter tool, the user can resolve issues related to oversized OST files. The tool converts oversized OST file size to PST format and then, using Split PST feature, saves the file into multiple PST files and helps you to compact OST file.
Step-by-Step Process to fix oversized OST file issue:
- Launch the tool.
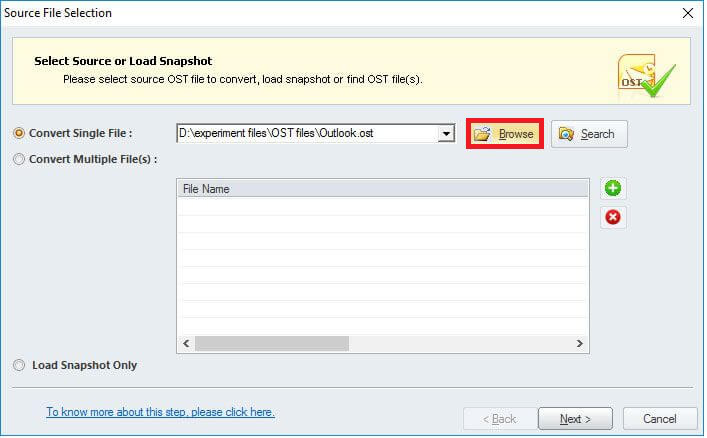
- On the Home Screen, click Browse to add the oversized OST file from the system location and click Next.
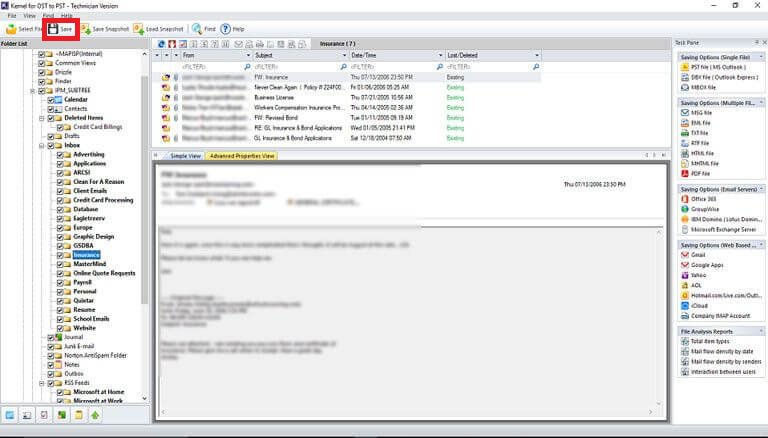
- Preview the retrieved OST mailbox data and click Save below the menu bar.
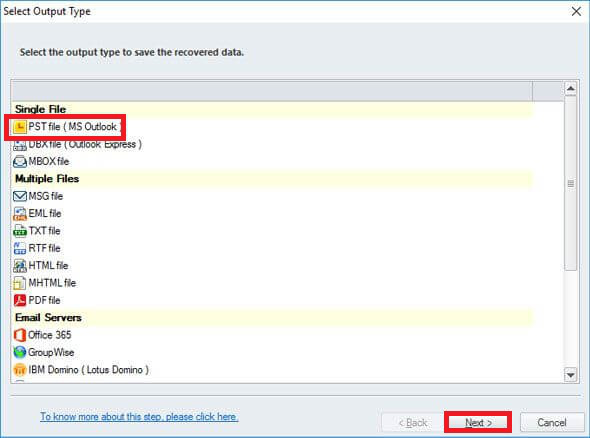
- Select PST File (MS Outlook) file from the list and click Next.
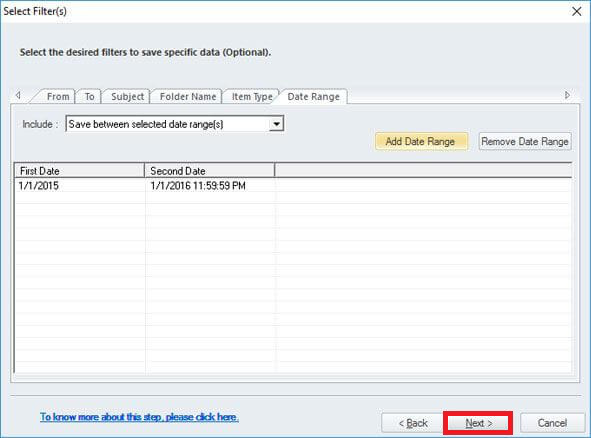
- Apply filters as per your choice and click Next.
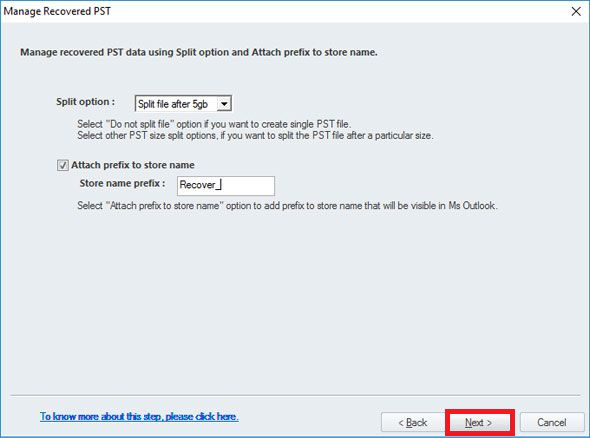
- Use Split option by selecting the splitting file size against it as per your requirements to compact OST file and click Next.
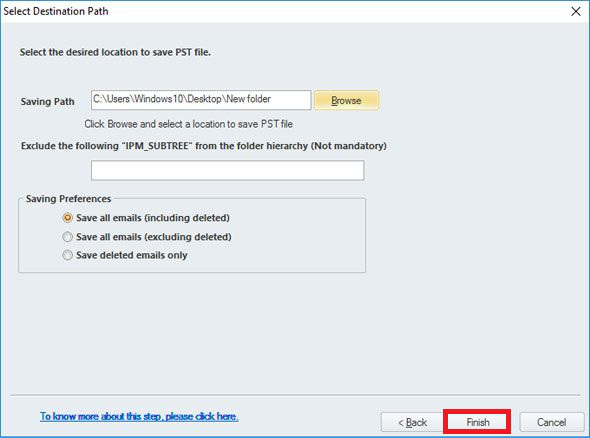
- Click Browse and provide the saving path for the PST files on your system. Click Finish.
- The software will start saving process and will finish soon.
Hence, dealing with oversized or corrupted OST files with this converter tool is quite easy. Also, you can shrink OST file to multiple file sizes according to your need.
Conclusion
Outlook and Exchange users suffer from issues, including data inaccessibility and synchronization issues, due to an oversized OST file. In such cases, many users also look for manual OST to PST conversion methods to regain access to their mailbox data. Also, it hampers the user’s working experience and abruptly pops up multiple errors. The blog suggests filtered, practical, and reliable solutions like disabling add-ins, archiving OST files, compressing OST files, etc., to shrink OST file. Afterward, you can easily manage your OST file and enhance your workflow.
FAQs
A- Outlook Offline Data (OST) files are a vital component of the Outlook application, as they store all mailbox data for users locally on their computers. Typically, the mailbox items make up much of the file size, but there are other items, such as public folders & hidden items, which may contribute to an increased file size. It is crucial to manage these items effectively to ensure that the OST file remains at a manageable size & prevents any potential productivity issues.
A- It is entirely possible to delete old OST files without any significant repercussions. This action will not result in any data loss as the file can be fetched back from the Exchange Server by downloading again when required. So, if you have any old OST files hanging around, taking up valuable space, you can delete them.
A- To clear the OST cache, follow the below steps:
To begin the process, it’s necessary to exit Outlook.
Next, click on the Start menu & choose Run.
A window will appear, & in the Open box, type “%LOCALAPPDATA%\Microsoft\Outlook\” and press OK.
Once you locate the .ost file, you will need to rename it.
If you cannot see the file, activate the Show Hidden Files and Show Extensions features.
Finally, restart the computer to complete the process.