Read time 5 minutes
Microsoft Exchange Server handles the substantial amount of business communication of enterprises and allows them to get emails without any latency. But, when there is an issue related to the performance of Exchange, then Outlook users need to run some troubleshooting like creating a new Outlook profile. Performing troubleshoots often raises the need for server specific information like the server’s address. So, users need to locate and find Microsoft Exchange Server address to maintain stable communication and collaboration within organizations. Now, we will go through the ways to find Exchange Server address along with simple methods for resolving Outlook’s common connectivity issues.
Methods to find Microsoft Exchange Server address?
Now that we have understood the need to find Microsoft exchange server address, let’s discuss how do i find my Exchange Server address using the convenient methods. Go for each methods mentioned below:
1. Find Exchange Server address using Outlook application
Outlook application connects with the Exchange Server to download and save the emails from the online server to the offline OST files. Outlook synchronizes with Exchange Server regularly after a constant period to keep the email status updated. For this synchronization, Outlook needs the server’s name and address. This server’s information is stored within the Outlook and can be located using the following steps:
Step 1. Start Outlook and verify the connection status. When Outlook has an active connection with Exchange Server, then it shows its status as ‘CONNECTED TO: MICROSOFT EXCHANGE.’ Ensure this connection to proceed further in the process.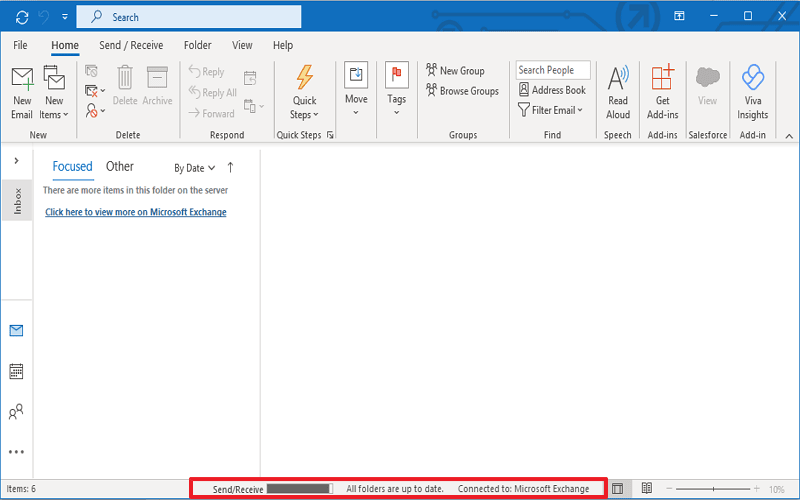
Step 2. Click the File option on the menu, click Account Settings>>Account Settings.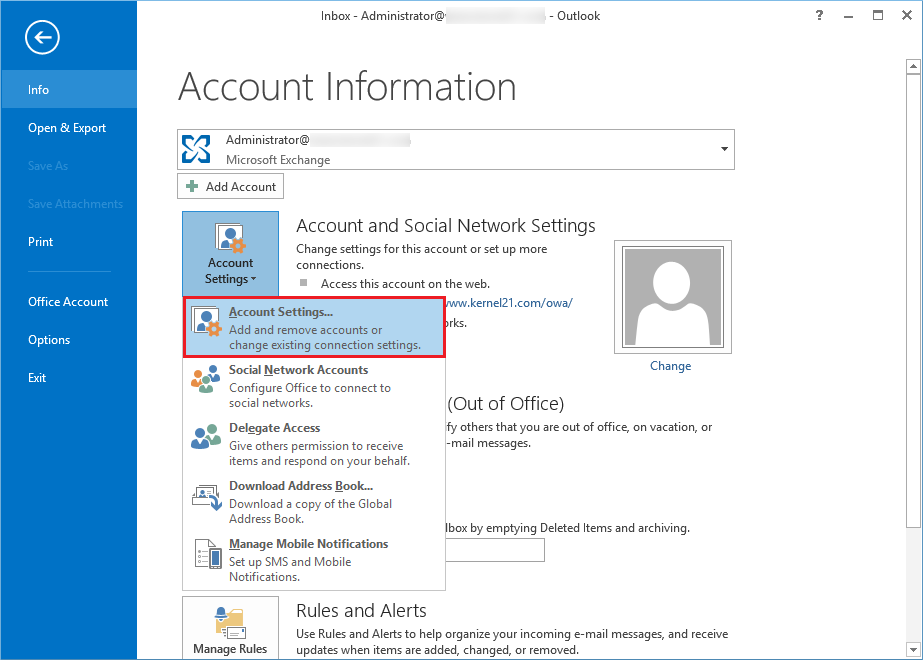
Step 3. Here, select the Exchange Account with the Server name you want to check and click Change.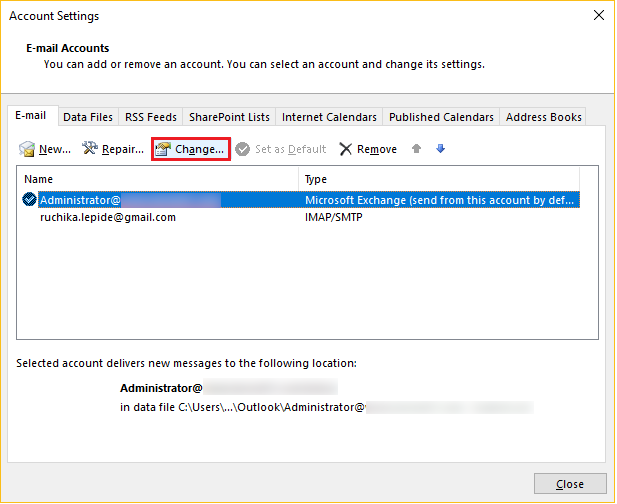
Step 4. In the Server Settings section, you can see the full name of your Exchange Server.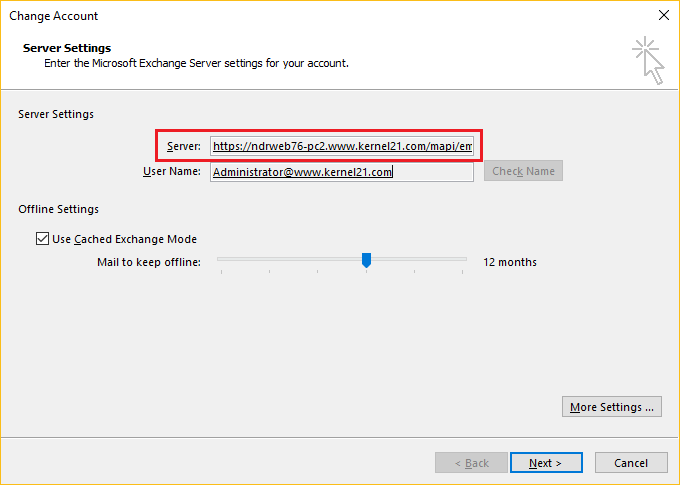
2. Find Exchange server address using Outlook Web Access
Outlook Web Access (OWA) is an online adaptation of Outlook’s desktop application which features all the functionalities available in Outlook’s offline version. To find out exchange server address with OWA you just need to navigate to
Settings>Mail>Options>Mail>Accounts>POP and IMAP>note down values from POP Setting & IMAP Setting.
3. Find Exchange Server address using Exchange Management Shell
If you have access to Exchange Server, then you can use the EMS to find Microsoft Exchange Server address. You can run the following command in the EMS as administrator to get all attributes of the Exchange Server including the address.
Get-ExchangeServe
After accessing your Exchange Server address, you can utilize it to fix issues with the incoming/outgoing messages. But in some conditions, Outlook faces problems in connecting with Exchange Server, and you keep shuffling between different methods to remove the problem. All in all, Get-ExchangeServer cmdlet is one of the best ways to get all the answers on how to find Exchange Server name and other related attributes.
Some standard Outlook’s connection troubleshoots
You can use the methods discussed how to find Exchange Server address and provide it to the server administrator to apply a feasible solution. However, we recommend some secure troubleshooting methods which any user can perform without being dependent on Exchange Administrator.
1. Restart Outlook
It is the simplest method to resolve the connection issue. If restarting Outlook does not work, then restart the computer. Many times, when the Internet is down, the connection with the Outlook and Exchange Server also does not establish. So, restarting Outlook should fix the connection issue that might have been introduced due to minor connection related problems. When restarting Outlook does not work, then move to the next troubleshooting method.
2. Disable the offline mode
Often, the users set the Outlook to the offline mode unknowingly, and it stops emails from incoming and outgoing. So, you should disable this option and reconnect Outlook with Exchange. Follow the steps mentioned below to toggle Outlook’s offline mode to online.
Step 1. Click the Send/Receive option on the menu.
Step 2. Go to the Work Offline button and click it.
Step 3. The status of the Outlook will change to ‘Trying to Connect’ from ‘Offline.’ Soon it will show the status as ‘CONNECTED TO: MICROSOFT EXCHANGE.’
3. Run a repair installation
Microsoft Office is equipped with a repair module to help users with minor issues. You can run a repair installation from the Control Panel to remove the connection issues.
Step 1. Close the Outlook application and go to the Control panel.
Step 2. Click Programs and Features.
Step 3. Select Microsoft Office and click Change.
Step 4. Click Repair and then select Continue.
Step 5. Restart the computer after completion of the repair process.
Step 6. Run Outlook and check its status.
4. Recreate the OST file
Because the OST file is stored on the local computer, there is a high chance that it may get corrupted due to any malware or hardware issues. A corrupt OST file can stop the Outlook application from connecting with Exchange Server. So, you can recreate the OST file again, and it may remove the connection issue of the Outlook.
Additionally, you can also try to disable your antivirus program. Sometimes such anti-malware applications mark the Outlook data files as a threat and block their access to Outlook. This ultimately led to connection issues.
Use the Scanpst tool to repair the corrupt PST file
Outlook offers a default scanning tool called scanpst.exe which repairs the PST file from minor corruption-related issues. You can run the free SCANPST tool and scan the OST file. It will check for errors and will prompt you to fix it if there is any corruption. Moreover, it can only repair minor corruptions up to 2GB of file size.
However, the situation becomes critical when the SCANPST fails and causes data loss due to severe corruption, oversized OST files, etc. So, relying on an automated and professional Kernel for OST to PST tool is safe and secure. It actively retrieves OST files data and converts into desired formats like PST, DBX, EML, MBOX, PDF, and many more. BY using this OST to PST Converter tool, you can also migrate the existing OST file to various mail servers and clients respectively while keeping data intact.
Conclusion
Thus, we have understood how to find my Exchange Server address effectively using the above procedures. When Outlook is not connecting to Exchange due to corruption in the data file, then you should not remain dependent on the manual troubleshooting methods which only check for the error but do not provide any concrete solution. Kernel for OST to PST Converter is an outstanding solution which can recover data from corrupt, orphaned, or inaccessible OST files and make its content usable again. You can save the recovered data in a PST file and access it in Outlook. Download today!
FAQs
A. To access your Exchange server, you’ll need the server address URL. This URL is essentially the link to your server’s web portal where you can manage your email, calendar, & other features. By default, the Exchange server address URL contains the fully-qualified domain name (FQDN) of your server in the format https://<ServerFQDN>/ecp. This means that once you input this URL into your web browser, it will direct you to your Exchange server’s Electronic Control Panel (ECP).
A. If you’re using Exchange 2016 or Exchange 2013, the default location of the server should be C:\Program Files\Microsoft\Exchange Server\V15. But if you’re working with Exchange 2010, then the default location would be C:\Program Files\Microsoft\Exchange Server\V14.