Do you want to access your mailbox data offline, or are you looking to overcome potential data loss issues or Exchange server problems? OST files store mailbox data, synchronized with the Exchange server, but lack capabilities of offline accessibility and are even prone to corruption. Also, sometimes OST file loses its connection with the original Exchange mailbox, which makes it orphaned and inaccessible in Outlook
What is the ideal solution? PST files can help you counter all these challenges with ease. Now, the question of how to convert OST to PST files becomes a common concern.
Not only you, but many users often seek free methods to convert OST files to PST format. We are here to provide you with top insights. This guide will help you learn step-by-step procedures for how to convert OST files into PST for free. We will also tell you how to convert orphaned OST to PST format using a professional utility. Let’s continue by exploring the benefits of this conversion!!!
Why Convert OST to PST Format?
Many reasons compel users to convert OST file to PST, allowing them to fulfill their business communication or other professional needs. Some of them are as follows:
- Recover data when users’ mailboxes get deleted from the Exchange Server
- Supports backing up a few Exchange mailboxes before mailbox deletion
- An Exchange user wants to rebuild its corrupt OST file, but the user has some unsaved data in the OST file
- The Exchange accounts are inaccessible due to corruption, but users urgently need access to their emails
- To re-establish email communication during Exchange downtime or unavailability
- If you’re switching from one email client to another and your new email client doesn’t support OST files, you’ll need to export OST file to PST without Outlook in order to access your old emails. In such migration cases, converting OST to formats like MBOX ensures accessibility across different platforms.
- If your email account is corrupted and you can no longer access it. So, try these free methods to convert OST files to PST format to access your old emails and potentially recover any lost data
- Access orphaned OST file data that has lost its connection with the original Exchange Server mailbox
Free Methods to Convert OST Files to PST
Now, let’s discuss a few free methods described below to convert OST file to PST. Go through each and pick them at your suitability:
Method 1. Convert OST File to PST using Export Feature
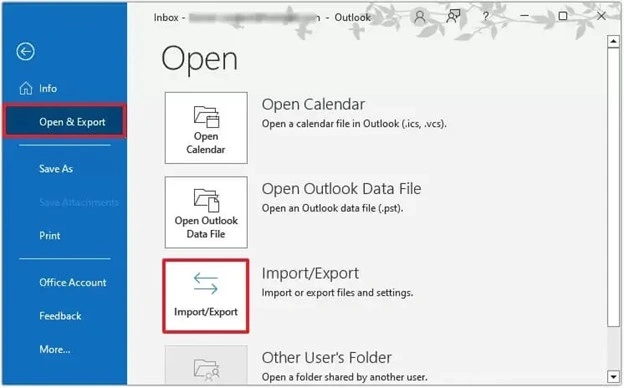
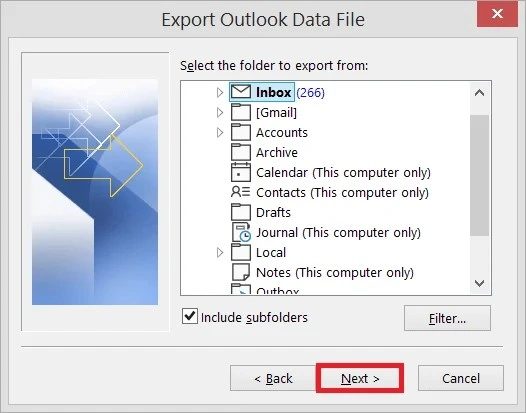
- Go to Files > Open & Export and click Import & Export.
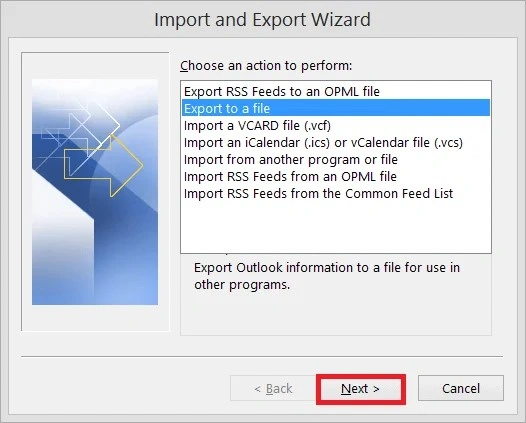
- Select Export to a file, then click Next.
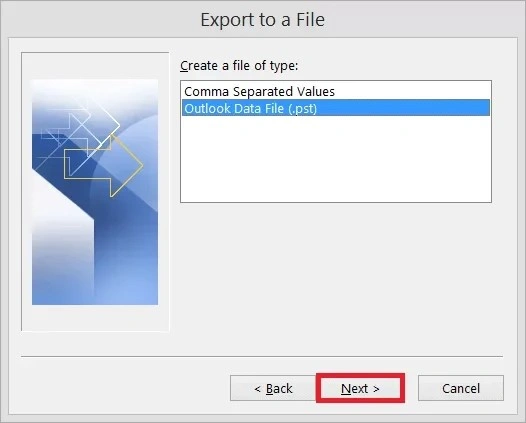
- Select the Outlook Data File (.pst) option, then proceed to Next.
- Select the folder(s) you want to export and click Next.
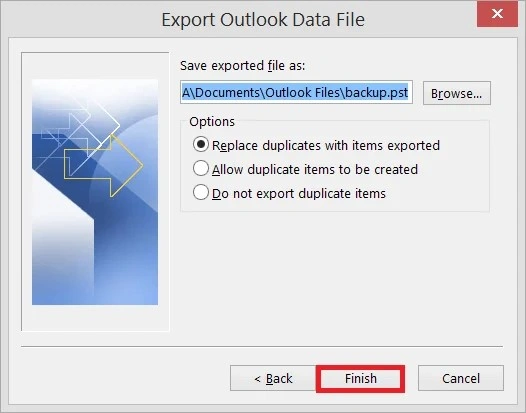
- Browse to the location where you want to save the new PST files and select 'Replace duplicates with items exported'. Click on Finish.
Note: This process is among the best ways to import OST into Outlook when Exchange connectivity is available.
Note: You also have the option to include subfolders
Note: Providing a password for the PST file is optional, but you can proceed without one if you choose not to.
Method 2. Convert OST Files to PST Using the Auto Archiving Feature
Enabling the Auto Archive method in Outlook allows you to save the items in your OST file in a separate PST file. This method helps manage mailbox size by automatically archiving older messages. For contact management specifically, Outlook also provides methods to export contacts from OST to PST, making it easier to back up and organize address books along with emails. To enable auto-archiving in Outlook, follow these simple steps.
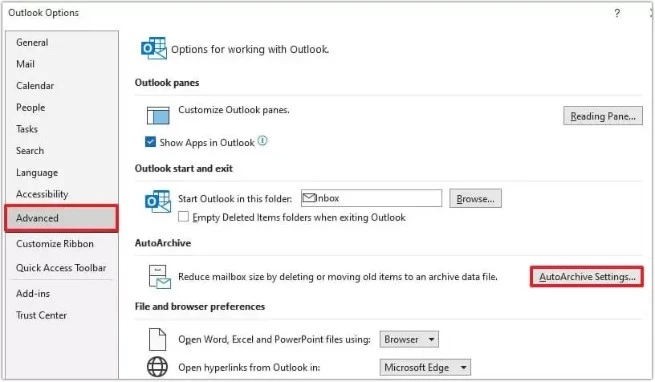
- Launch the Outlook application, go to File and click Options.
- Go to Advanced and click Auto Archive Settings.
- Now select the number of days in which you want to run auto archiving. Select the folder to save the archived file; provide the archiving options and click OK.
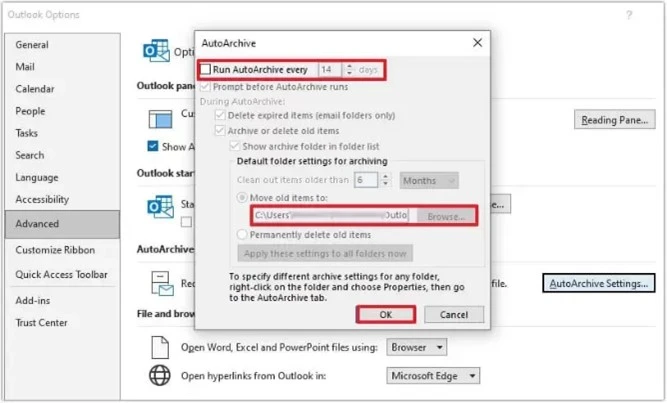
It will save your mailbox items from your OST file as per your archiving settings.
Method 3. Use the Drag and Drop Method to Move Limited Data
If you want to move only selected data from your Outlook account, you can create another data file in Outlook and then use the drag-and-drop option to move your files from other accounts. It also helps users to reduce the data file size.
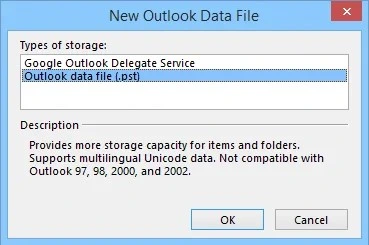
- To create a new data file in Outlook, click New Email, expand More Items, and choose Outlook Data File.
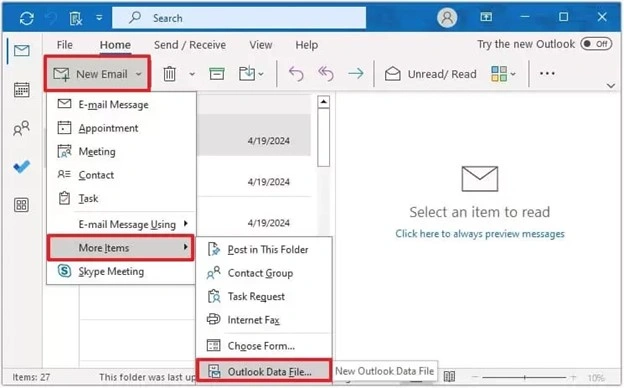
- Choose Outlook data file (.pst) and click OK.
- Save the PST file in an accessible folder, and a new data file is created. Then, you can select some data from the older account and try to drop it into the new account. It will ask if you want to move the folder inside the new account. Click Yes.

The data will be moved quickly, and you can access new content there.
Limitations of Free Methods to Export OST File to PST
Even with a good success rate, there are some restrictions with the manual methods. There are some setbacks that depend on your requirements. When you convert OST files to PST without any software, here are some demerits:
- Security risks: The use of unreliable methods carries some security loopholes. There is a possibility of malware or virus attacks in your OST file.
- Delay or Time Constraints: When you try basic conversion methods, you may face long delays in the conversion process. Even there is a chance of failure in conversion after spending so much time.
- Data loss: There are circumstances when you try to convert large OST files using standard and free methods, and you face data loss.
- Complicated process: Manual methods require you to follow all the steps carefully; otherwise, you can face difficulties in executing the conversion process perfectly.
- Can’t Convert Orphaned OST: It’s not possible to convert orphaned OST to PST using the manual method, as it requires an active Exchange connection to convert files.
How to Convert Orphaned OST to PST File Without Outlook?
Generally, you need Outlook with an original Exchange account when using free ways to convert OST to PST files. However, using Kernel OST to PST converter software makes your OST files accessible, allowing you to convert them to PST format without the need for Outlook. This automated tool stands out as the best one for converting offline OST files with many advanced filtering and saving options. It can also convert orphaned OST to PST created by webmail (IMAP) accounts. Also, you can convert multiple OST files at a time.
Conclusion
Now, you know the free methods to convert OST files to PST for backup or other business needs. However, when your Outlook does not open, or your email account is removed, you cannot access or convert your existing OST file.
To convert orphaned OST to PST, consider using a professional OST converter tool. With advanced support for multiple file formats, it ensures you can export OST not only to PST but also into different formats like MBOX, EML, and HTML with attachments depending on your requirements. However, you might get confused by the numerous tools available, so we suggest using the trustworthy software, which is fast, easy to use, and smooth. Download the trial version now to explore its features in real time.