How to Locate Scanpst for Different Outlook Versions?
 Written By: Sarthak Poswal
  Updated On September 22, 2026 Written By: Sarthak Poswal Updated On September 22, 2026
 Quick Answer: The Scanpst location differs based on the version of Outlook installed on your system. However, Windows 7, 8, 10, and 11 users can use Task Manager to quickly go to the folder where SCANPST.EXE is present.
Scanpst is an inbuilt utility provided by Microsoft, which is included as part of Microsoft Outlook email client system files. The main purpose of this inbuilt utility is to diagnose and repair damaged and corrupt Personal folders (.pst) and Offline Data (.ost) files. It is also known as the Inbox Repair Tool.
The exact Scanpst.exe location depends on the version of Outlook and the installation type. Since there are multiple versions of Outlook, many Scanpst locations exist. In this blog, we will share with you all the locations of the Scanpst file as per the Outlook version, along with a smart trick to directly go to the folder containing SCANPST.EXE.
At a basic level, the Scanpst tool scans the internal structure of the PST file, and if issues are found, they are repaired. On a higher level, Scanpst examines every folder and message for errors. The tool performs different checks and validates the data.
One thing to note is that if Scanpst fails to validate a data block, it may remove the corrupted block along with the data items associated with the damaged block in the PST file. So, during the repair process, you should expect that there can be data loss. Therefore, Scanpst always creates a .bak file that serves as the PST file backup during the repair.
As I said earlier, the Scanpst file location depends on the version of Office or Outlook installed. So, you need to know the version of your Office or Outlook to find Scanpst. However, in case you do not know the application version and do not want to waste time searching through hundreds of folders in your Program Files folder, you can use the Task Manager.
The Windows Task Manager application allows users to directly go to the location where all the installation files of Outlook are installed, including the Scanpst tool. This method is tested and verified for Windows 11, 10, 8.1, 8, and 7.
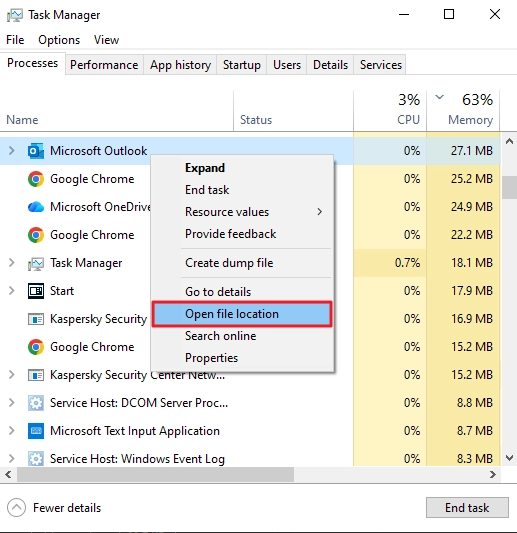
Note: You may not see the exact same interface in all versions of Windows. But the steps are similar.
You will see Windows Explorer opens the folder in which Outlook is installed. Scroll down to locate Scanpst.
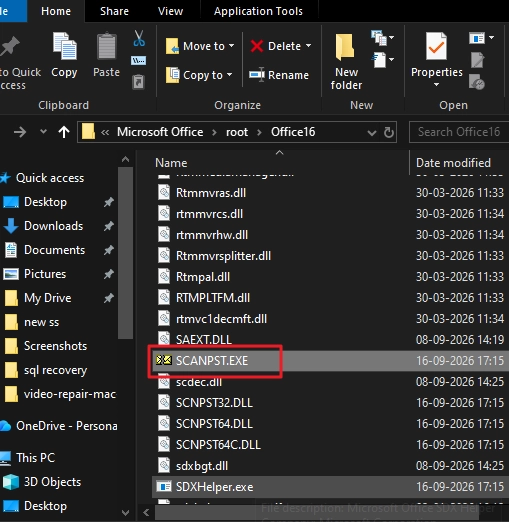
By default, Scanpst is in various locations according to versions of Outlook. Refer to the table below for different Scanpst locations:
| Outlook Versions | Scanpst file location |
|---|---|
| Outlook 2016 and later Click-to-Run installation on a 32-bit version of Windows | C:\Program Files(x86)\Microsoft Office\root\Office16 |
| Outlook 2016 and later Click-to-Run installation on a 64-bit version of Windows | C:\Program Files\Microsoft Office\root\Office16 |
| Outlook 2016 and later MSI-based installation on a 32-bit version of Windows | C:\Program Files(x86)\Microsoft Office\Office16 |
| Outlook 2016 and later MSI-based installation on a 64-bit version of Windows | C:\Program Files\Microsoft Office\Office16 |
| Outlook 2013 Click-to-Run installation on a 64-bit version of Windows | C:\Program Files\Microsoft Office 15\root\office15 |
| Outlook 2013 Click-to-Run installation on a 32-bit version of Windows | C:\Program Files(x86)\Microsoft Office 15\root\office15 |
| Outlook 2013 MSI-based installation on a 64-bit version of Windows | C:\Program Files\Microsoft Office\Office15 |
| Outlook 2013 MSI-based installation on a 32-bit version of Windows | C:\Program Files(x86)\Microsoft Office\Office15 |
| Outlook 2010 on a 64-bit version of Windows | C:\Program Files\Microsoft Office\Office14 |
| Outlook 2010 on a 32-bit version of Windows | C:\Program Files\Microsoft Office(x86)\Office14 |
| Outlook 2007 on a 64-bit version of Windows | C:\Program Files\Microsoft Office\Office12 |
| Outlook 2007 on a 32-bit version of Windows | C:\Program Files(x86)\Microsoft Office\Office12 |
| Windows NT and Windows 2000 | C:\Program Files\Common Files\System\Mapi\1033\NT |
| Windows 95 and Windows 98 | C:\Program Files\Common Files\System\Mapi\1033\95 |
Most people search for the Scanpst location when they have a corrupt PST file that they need to repair. If that was your intention as well, use the following steps to repair your PST file:
Step 1: Make sure Outlook is closed. Use Task Manager to check and close any Outlook process running in the background.
Step 2: Open the SCANPST.EXE application and click Browse.
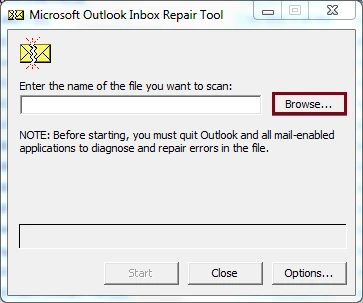
Step 3: Go to the location where the corrupt PST file is located and add it to the tool.
Note: If you do not know where the PST file is, refer to the steps in find PST file location on Windows.
Step 4: After adding the PST file, click Start to initiate the scan process.
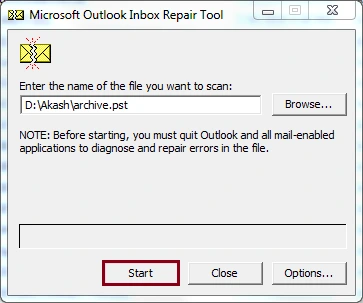
Step 5: If Scanpst found errors in the added PST file, it will show “Errors were found in this file”. Click Repair to fix the PST file corruption.
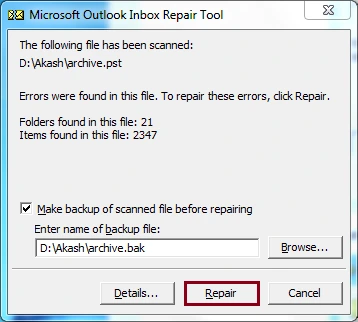
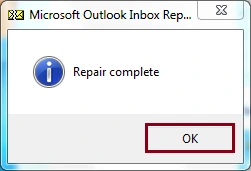
Step 6: Once the file gets repaired by the tool, it will show you a confirmation message saying, “Repair complete.” Click OK to finish the process.
Note:
Microsoft officially says that Scanpst may fail to fix a PST file whose internal structure is severely damaged. Moreover, running Scanpst multiple times may cause permanent data loss. If Scanpst is not working for you or you cannot afford to take the risk of deleted emails, then you should use a professional Outlook PST repair tool.
A reliable tool that can help you to repair a severely damaged PST file while maintaining the data integrity of your mailbox is Kernel for Outlook PST Repair. The tool allows you to fix UNICODE, ANSI, and password-protected PST files of any size and can also recover supported deleted mailbox items.
Furthermore, after repairing, the tool displays all the recovered data (folders, emails, attachments, contacts, calendar, etc.) and allows you to save the data in PST, MBOX, EML, HTML, and other formats.
The Outlook version you are using decides the exact Scanpst file location on your Windows system. Find the Outlook version and, based on it, use the table given above to locate Scanpst.
When repairing a PST file with Scanpst, make sure to back up the PST file. If the Inbox Repair Tool (Scanpst) fails, use the professional Kernel for Outlook PST Repair to safely fix corruption in the PST files.
Ans: The Scanpst file location depends more on the Outlook version and less on your Windows. The majority of the users (using Outlook 2016 and above) will find Scanpst at "C:\Program Files\Microsoft Office\root\Office16". However, for exact Scanpst.exe location, you must find out your Outlook version and installation type.
Ans: The Scanpst tool comes with classic Outlook installation by default. If you cannot find it, you may be looking at the wrong location, or someone may have deleted/moved the tool accidentally. In this case, you can try to reinstall Outlook to restore the tool.
Ans: No, Scanpst is not associated with the New Outlook. It is only available when you have installed a version of classic Outlook.