Outlook is a popular email client that comes with a wide range of features. However, users may find themselves in a situation where they need to recover deleted Outlook account. Sometimes, users accidentally delete their accounts and regret it because they face troubles in logging in.
Restoring a deleted Outlook account is a bit complicated, but not impossible if the retention period has not expired (generally 30 to 60 days). In this article, we will walk you through the steps to recover Outlook email account that was mistakenly deleted. But first, let’s know the common issues that occur in Outlook account recovery.
Common Issues in Outlook Account Recovery
There are multiple issues that a user may face while restoring their deleted Outlook email account. Some of the most common issues are:
- When a user inputs insufficient or incorrect information in the automated recovery form, it leads to failed verification form.
- Trying to recover deleted Outlook account from some new or other device.
- You no longer have access to the recovery email or phone number to receive recovery codes.
- Exceeding the request limits by attempting too many retries in submitting the recovery form, causing temporary blocking of account for 24 to 48 hours.
- Two-Factor Authentication lockout due to lost secondary device (authentication app or phone) and password.
- The account was inactive for more than a year, making it difficult to recover using standard procedure.
Now that we are aware of the common issues, let’s move towards the methods to recover deleted Outlook email account that was accidentally or intentionally deleted.
Ways to recover deleted Outlook account
This section will provide manual practices to help you recover deleted Outlook accounts. Choose the correct method wisely that suits your needs the best:
Method 1. Login before the retention period expires
If the retention period has not expired since you deleted your Outlook account, then there are chances that you might get back your account safely. Usually, the retention period ranges from 30 to 60 days. If you login into your account during this period, all data will be recovered. But if the retention period expires, your account might be deleted permanently.
Method 2. Contact Microsoft support agent
If you want to sign in and encounter the situation that your email doesn’t exist, it means your account was deleted before 60 days (about 2 months) or more. In such a case, you should contact Microsoft support agent to recover deleted Outlook account.
Method 3. Create a new Outlook profile with existing PST
If you have a backup PST of the account you deleted, then you can create new Outlook account using the existing PST file. Following are the steps to restore a removed Outlook account:
Step 1: First, go to the folder where PST file is stored on your system. Generally, it is stored in
C:\Users\yourusername\AppData\Local\Microsoft\Outlook
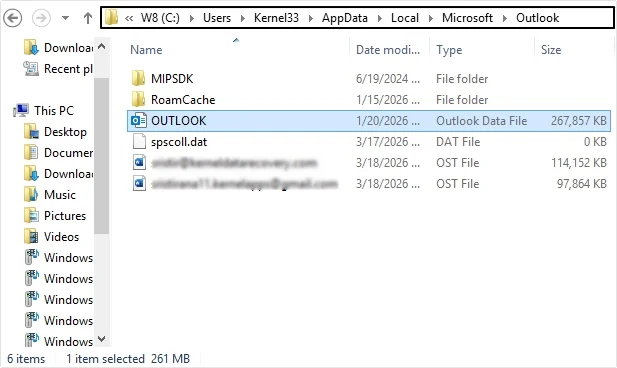
Step 2: Copy the PST file and save it to another location, where you can locate it easily.
Step 3: Launch Outlook and go to File >Open & Export >Import/Export.

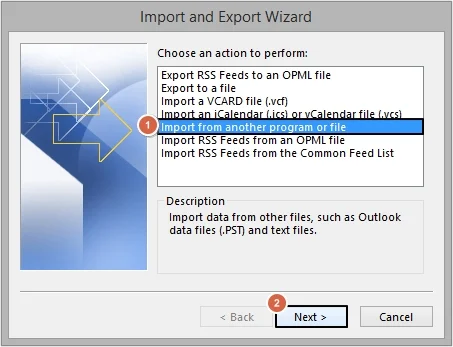
Step 4: Select Import from another program or file and click Next.
Step 5: Choose Outlook Data File (.pst) and click Next.

Step 6: Click Browse to add PST file, then click Next.
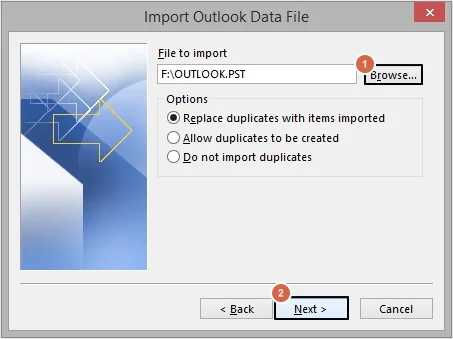
Step 7: After selecting the specific PST file, click Finish.
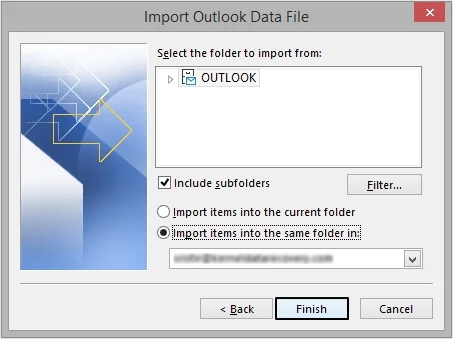
With these steps, you can restore a removed Outlook account easily. But make sure you restart your computer before accessing your Outlook account.
Tips for Preventing Account Deletion in Outlook
Here are some tips to prevent account deletion in Outlook based on Microsoft documentation and user experiences:
- Make sure you log into your account on regular basis to avoid permanent account deletion due to inactivity.
- Always remember to take a regular backup of your Outlook data for the safer side.
- Verify all customized rules to make sure they are not set to delete email messages.
- Disable AutoArchive feature to stop emails from vanishing from your account.
- Avoid turning on Forward Only feature, as it does not count as an activity.
What to do if your existing PST file gets corrupted?
In case your existing PST file got corrupted, then you need to repair it before importing it into Outlook. Microsoft provides inbuilt Inbox Repair Tool or ScanPST.exe solution that can be used to repair corrupt PST files manually. But, sometimes, the corruption level in a PST file is so high that it cannot be removed with manual techniques or tools.
In such scenarios, you need an alternate Outlook PST Repair solution that can fix PST files from every corruption stage and provide you with accurate PST data in the original hierarchy. Kernel for Outlook PST Repair is the best tool to repair severely corrupted PST files, irrespective of size and damage-level. The best thing about the tool is that it can also retrieve permanently deleted data from a PST file after repairing it.
Wrapping Up
This article discussed the best methods to restore deleted email account in Outlook in no time. However, if these practices fail, there may be corruption in the PST file. In such a scenario, use the recommended tool to restore your lost data and access it again securely. Perform complete Outlook PST recovery using the best features of the tool.
Frequently Asked Questions
Q: Can I recover old Outlook email account?
A: Yes, you can recover old Outlook email account (only if the account was not inactive for a year) by visiting Microsoft’s sign-in page and using the Forgot password option.
Q: How to recover deleted Outlook email account if it has been deleted?
A: To recover Outlook email account if it has been deleted, sign into Microsoft within 30-60 days of deletion, or you’ll lose it permanently.
Q: Can I recover Outlook email account after the retention period is over?
A: No, you cannot restore deleted email account in Outlook after the retention period (usually 30 days) is over.