The Outlook cache file is a storage location where Outlook stores a copy of email messages. Microsoft Outlook caches your data as you work. Typically, creating and storing cache helps Outlook to increase its operations. For instance, when you compose an email and specify a destination for it, the address of that particular destination gets cached to the memory as soon as you hit the Send button. The cached information automatically appears as a suggestion when you do a similar entry next time. Cache memory holds the data/key events that are most frequently entered by the user.
With each entry made by the user, the data gets accumulated into the cache, and over time it occupies a huge memory space in Outlook, which eventually affects the overall performance of the application. Fortunately, you can clear the cache storage whenever there is a performance issue due to the overloading of data. Moreover, clearing cache helps you get rid of auto suggestions when you reinstall the application.
Cleaning Outlook's cache
To clear the cache memory, first you need to find the location where the Outlook's cache data gets stored. Once you have located the directory, you can easily clear the data by deleting the entries in the folder. To do the task more precisely, follow the instructions given below:
- Press Win + R to launch the Run Command dialog box.
- Type %localappdata%\Microsoft\Outlook and hit Enter button..
- The above command will launch the cache data directory on your system.
- Double-click the RoamCache folder.
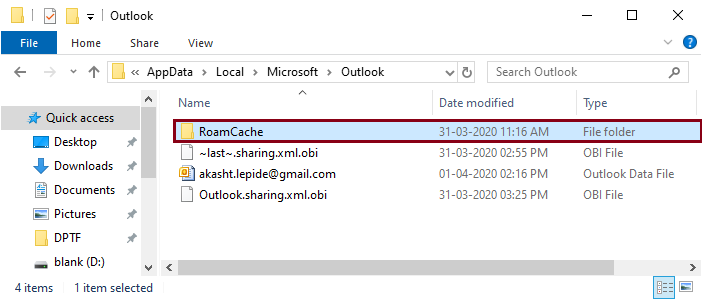
- Press Ctrl + A to select all cached data.
- Press Delete to clear the selected data.
This method clears the complete cache history of your Outlook application. In case, you want to clear individual entries or the Autocomplete cache data, you can do it manually by going through the below method.
Sometimes users want to clear an individual entry from the auto suggestions thrown by the cache.
Outlook facilitates removing individual entries as you work with forms like emails and contacts. All you have to do is compose an email and remove the auto-suggestions that while typing the destination email address. To give you a better understanding of how to remove individual entries, we have described the method below:
- Launch MS Outlook and click on the New Mail button.
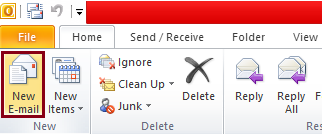
- In the New E-mail window, start typing the destination email address or the contact you wish to remove from the auto suggestions.
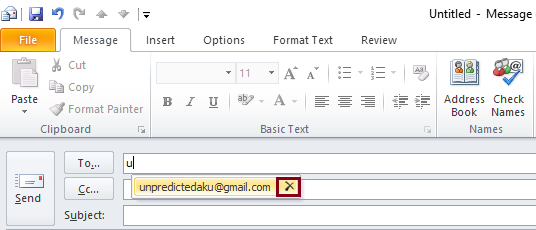
- Select the required email or contact and click on the "x" button to remove the data from cache memory.
Sometimes, due to frequent sharing of information, auto suggestion starts while typing names. A short way to remove all the suggestions is to clear the auto-complete cache data at once. You can clear Auto-complete Cache data by following the steps mentioned below:
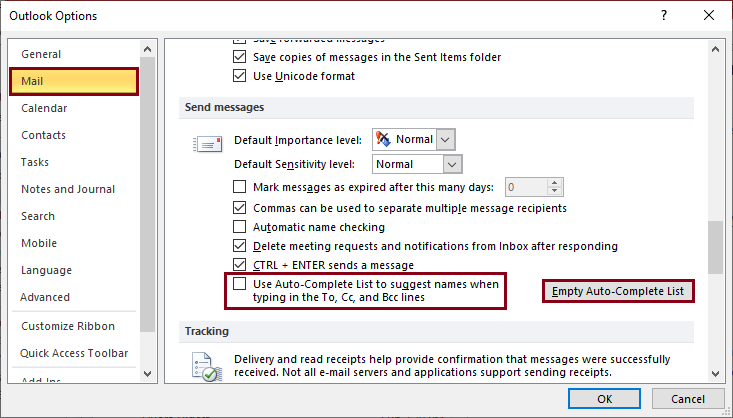
- Launch Outlook and go to File > Options.
- In the Options window, select the Mail tab.
- Under the Send messages section, uncheck check box "Use Auto-Complete List to suggest names when typing in the To, Cc, and Bcc lines"
- Click on the Empty Auto-Complete List button, and select Yes in the confirmation dialog box.
- Click OK to save the changes.
Regular performance issues can be sorted easily by clearing the cache memory, but Outlook also faces issues like duplication of data. Many users have repeatedly reported that their Inbox still shows the mails that are either deleted or moved to some other folder.
Duplicate data such as emails and contacts consumes unnecessary space in Outlook mailbox and can slow down the performance of the application. Unfortunately, Outlook doesn't provide any direct measure to delete duplicate data from mailbox. You must look out for third-party resources to filter your duplicate items and remove them permanently from your mailbox.
Kernel for Outlook Duplicates Remover help users to remove and manage duplicate items from Outlook PST files. The tool locates duplicate data based on criteria like text, contact, subjects, sender email, sender name, and other relevant information. Also, the software supports all versions of Outlook including 2019.
- This tool can accurately detect and remove duplicate items.
- This tool provides a quick duplicate search option to locate items in specific folders.
- You can efficiently manage your duplicate items by deciding actions like delete permanently, mark as expired, move to deleted folder, put flag and many others.
Conclusion
Many Outlook users face performance issues because of piling up of cache data. You can fix this issue easily by clearing the cache data in Outlook using the above-discussed methods. But if there is a duplicate items issue in Outlook, then you need to use a professional duplicate item removal tool. You can use Kernel for Outlook Duplicates Remover for removal of duplicate items from Outlook.