Outlook is a renowned email platform among users for a smooth flow of communication. You can send or receive emails along with attachments through it. Whenever the Outlook user opens or adds the emails’ attachments, a copy of these attachments gets stored at the sub-directory of the Outlook Temporary Internet Files folder. First, Outlook searches for the .OLK folder in the registry to save the temporary attachment files and if it does not exist, it creates the new folder itself. This takes place to ensure that received attachments are secured at another place.
Where are Outlook temporary files stored in Windows?
Outlook temporary files are the default copies of the email attachments as well as the cache data saved automatically by Microsoft Outlook within your system’s drive. It allows users to access their attachments swiftly when opening them through the emails, such that there is no recurring download of the same item. These files are stored within the secured OutlookSecureTempFolder on your device.
The basic path location for this temporary internet file for attachments is
C:\Users\%username%\AppData\Local\Microsoft\Windows\Temporary Internet Files\Content.Outlook\
Now, we know about the Outlook temporary files and its creation but, it is still not clear why we need to delete Outlook temp files.
Why do temporary Outlook files need to be deleted?
The Outlook user faces the following problems due to Outlook temporary files:
- Security Risks: Sometimes, even if the attachments are deleted, opened and then closed or the Outlook has been shut down accidentally, then also the copy of these attachments get stored at the temporary folder location. And a person with knowledge of this location can easily gather confidential information within these attachments. So, to secure your confidential or sensitive information from data theft, it is recommended to delete the temporary Outlook files from your system.
- Disk Space: Users often face issues in accessing the Outlook attachments from their emails as there is no space within the Outlook temporary files folder. It happens when a load of attachments has been received in Outlook with time, and the temporary file folder is untouched. It directly affects Outlook performance, and the user has to suffer. Hence, the user must delete the Outlook temporary files to fix ‘Outlook attachments unable to access’ issue.
- Helps improve speed: When there are several temporary files lying within the Outlook storage, there can be delays in sending/receiving emails. This overstuffed temp folder, in turn, causes performance issues. It might restrict you from opening the desired attachments and performing other tasks. Removing these files lower the burden on your Outlook application, eventually improving Outlook’s speed.
- Resolve autocomplete Outlook error: The email addresses entered in Outlook when sending emails are saved within the contacts list of Outlook. Whenever you enter email addresses in To, Cc, or Bcc, Outlook suggests email addresses that are already saved. Sometimes, some of these are either deactivated/ disabled by the users or become outdated. When you clear Outlook Temp Files in New Outlook, you’re fixing this autocomplete error.
- Fix synchronization errors: Outlook account creates an offline data file whenever configured within an Outlook application. This file stores complete mailbox data, including emails, contacts, attachments, etc. Sometimes, when there is corruption in the data file or Outlook data file is too large, there can be issues in syncing data. Clearing cache from Outlook allows you to fix such errors.
These above-mentioned reasons point to the need for deleting the temporary Outlook files. Now, let us know how you can locate and then remove Outlook temporary files from the temporary folder created on your system.
How to delete Outlook temporary files? Manual Solution
The following section describes the methods to remove Outlook temporary files or temporary files of Outlook on Windows 10 system. Let's learn about them in detail:
Method 1. Delete Outlook temporary files through windows registry
For different versions of Outlook, the OLK folder path is different which you can get directly from the registry key created by Outlook. Locate the registry key as per your Outlook versions by following the given paths.
Outlook 2016-HKEY_CURRENT_USER/Software/Microsoft/Office/16.0/Outlook/Security
Outlook 2013- HKEY_CURRENT_USER/Software/Microsoft/Office/15.0/Outlook/Security
Outlook 2010- HKEY_CURRENT_USER/Software/Microsoft/Office/14.0/Outlook/Security
Outlook 2007- HKEY_CURRENT_USER/Software/Microsoft/Office/12.0/Outlook/Security
Outlook 2003- HKEY_CURRENT_USER/Software/Microsoft/Office/11.0/Outlook/Security
Note: Outlook 2019, 2021, and 2024 all run on the same Office 16.0 framework in the Windows Registry. This means the registry path and the steps to find or remove Outlook temporary files are the same across all three versions.
Here are the steps to locate temporary files with Windows registry. Follow the steps carefully:
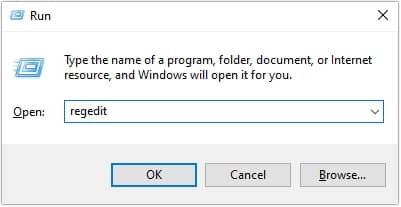
Step 1. Press Windows + R key to open the Run dialogue box.
Step 2. Now, type regedit and hit OK.
Step 3. The Registry Editor window will appear on your screen. Follow the path according to your Outlook’s version. (We have used the path of Outlook 2016)
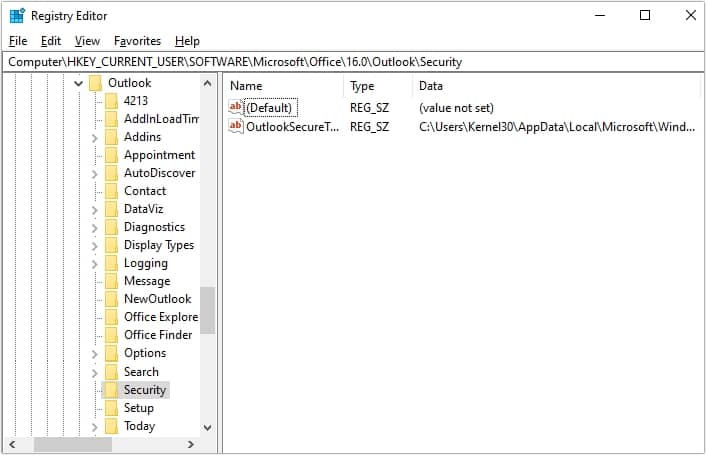
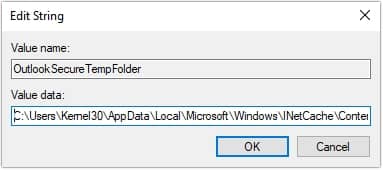
Step 4. Double click on OutlookSecureTempFolder and copy the path.
Step 5. Moving ahead, press Windows + E keys to open Windows Explorer.
Step 6. Paste the copied path in the search bar and press Enter.
Step 7. All the temporary files will get listed on your screen. Remove the unnecessary Outlook files.
Step 8. Restart your Outlook and work smoothly without any issues.
Method 2. Manually locate and clear temporary files
The above method is effective for cases when the Outlook is well configured, the ‘OutlookSecureTempFolder’ field exists in the registry and its value points to a valid location on your machine. But, if any of these conditions are not met, the Windows Operating System uses the Temporary Internet Files folder as the parent folder for storing its temporary files. It creates a new folder under the Temporary Internet Files folder with a randomly generated name. In this scenario, you will need to locate this path in a different way as it will not be available through the method discussed above.
The path of Temporary Internet Files varies from one version of Windows to another. In the below section, we will provide the path of Outlook temporary files location on Windows based on the Operating System version:
For Windows XP Operating System C:\Documents and Settings\ username\Local Settings\Temporary Internet Files\Content.Outlook
For Windows 7 and Windows Vista Operating System C:\Users\ username \AppData\Local\Microsoft\Windows\Temporary Internet Files\Content.Outlook
For Windows 8 and higher versions C:\Users\username\AppData\Local\Microsoft\Windows\INetCache\Content.Outlook
Now, we have provided the default path for each of the Windows Operating Systems. But there is a small difference that comes into picture based on the version of your Outlook application as well.
For each of the Window's versions, you will find a subfolder with a randomly generated name for Outlook 2007 and higher versions. You can directly go to this path mentioned above and find the randomly generated folder and remove Outlook temporary files to get rid of all the Outlook temporary files.
However, if you are using an older version of Outlook such as Outlook 2003, you will need to look into the ‘Temporary Internet Files’ folder for a name as per the registry entry. Then only you will you be able to find the folder containing temporary Outlook files to remove Outlook cache.
Method 3: Using Disk cleanup tool to remove temp files
In Windows 10, one can easily use an inbuilt cleanup tool to delete the temporary and junk files from the system by following the steps:
Step 1. Type ‘disk cleanup’ in the search bar and open it. Here you can choose the option of driving where you want to run the cleanup.
Step 2. Choose Drive C and click the ok button. Here a list of options will appear.
Step 3. Select the checkboxes for deletion of the folder. Now, you can see the total data that you will delete. Click the ok button. A pop-up box will appear with the message you want to delete the file permanently.
Step 4. Click Delete File. Now all files will get deleted permanently.
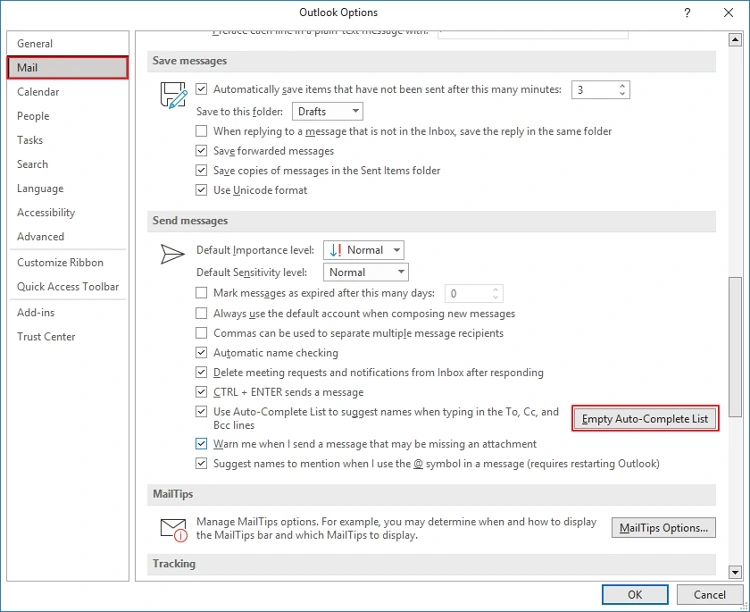
Method 4: Clear cache from Autocomplete list
With time, email addresses saved within the Outlook contacts become outdated. To resolve the issue, you need to delete them using the following steps:
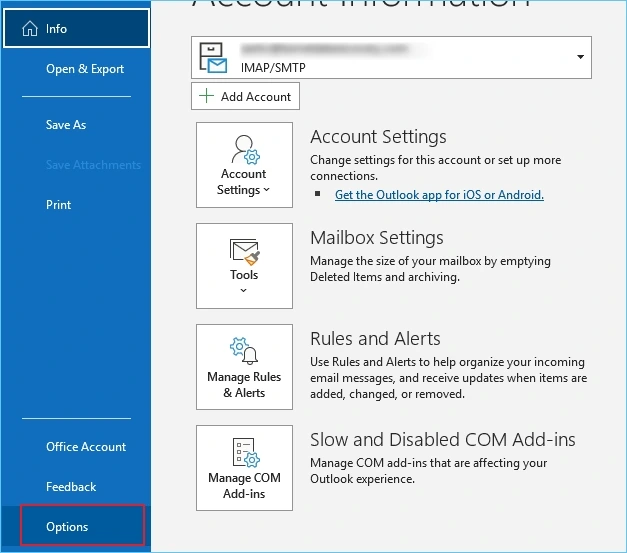
Step 1: Open Outlook on your computer and then go to File.
Step 2: Click on Options and then Mail.
Step 3: Scroll down the screen to reach Send Messages section.
Step 4: Click on the Empty Auto-Complete list button and then click OK.
What if your PST file gets corrupted? Instant Solution
So, we have covered two methods to identify the location of the folder containing temporary Outlook files. You can use any of the methods that suit you and delete Outlook temporary files. This should also help you in fixing the ‘Attachments not opening’ issue. But this is one of the possible resolutions for attachments issue. If it doesn’t fix it for you, you may be having corrupt PST. If that is the issue, you need a promising and efficient tool such as Kernel Outlook PST Repair. It is an efficient Outlook PST Repair tool that can fix Outlook issues in very quick and easy steps.
The tool offers a wide range of features to resolve Outlook PST corruption issues in no time and will make your PST file healthy again. Once your PST file gets repaired, you can save it into different formats including EML, MSG, MBOX, PDF, HTML, etc.
Conclusion
Clear Outlook Temp Files in New Outlook with the manual methods that we have mentioned in the above write-up. However, if the issue persists, then there are chances that your PST file is corrupted. To fix corrupted PST files, we have recommended Kernel for Outlook PST Repair software. Avail the software’s benefits such as convert PST to Doc, MBOX, MSG, EML, etc.
Frequently Asked Question
Q. Where are Outlook temp files in Windows 10 computer?
A. To find out the location of Outlook temp files on your Windows 10 PC, follow the given path:
C:\Users\username\AppData\Local\Microsoft\Windows\INetCache\Content.Outlook.