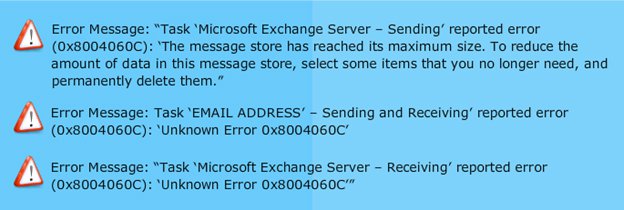
Organizations and business individuals prefer to work with Microsoft Outlook as it comprehensively manages all the activities on a single platform. It plays a key role in the day-to-day activities of an organization. When a user encounters an Outlook error, it can disrupt communication and meetings of an organization. Any such error needs to be acted upon and fixed as quickly as possible. Error 0x8004060C is one such error that can impact all the capabilities of Outlook application, thereby making the user standstill in terms of usage.
This error can even result in turning all the emails and other items inaccessible to the user. 0x8004060C can occur in different scenarios, and based on that, the error message may differ, although the error code remains the same - 0x8004060C.
Reasons behind Outlook 0x8004060C error
Since the errors differ in these scenarios, the causes that led to this error will vary too. There can be many possible logical or physical corruptions that could have caused this error. Some of the most common causes are:
- Exchange server outage
- Synchronization problem between Microsoft Outlook and exchange server.
- A corrupt PST or OST file.
- Virus infection or malware attack.
- Outlook has reached its maximum defined storage capacity.
Manual methods to fix Outlook error 0x8004060C
The most common reason behind encountering this error is an oversized PST or OST file. Let's explore all the possible methods to fix Outlook error 0x8004060C:
Method 1. Empty Deleted Items Folder in Outlook
As you might have observed, Outlook doesn’t directly delete the items that you have chosen to be deleted. It, however, moves those items from the active folders to a Deleted Items folder. This is done to help you recover any email or meeting that was deleted by mistake. But the size of this folder can grow immensely because this folder is not cleaned up by the users manually. Hence, it needs to be emptied to retrieve some space quickly.
Standard way of deleting the emails:
Step 1. Launch Outlook and click on File >Tools >Empty Deleted Items Folder.
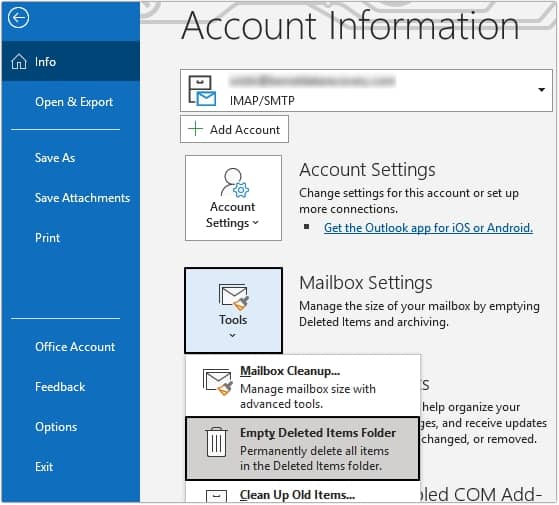
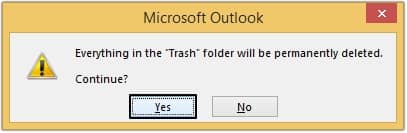
Step 2. A new window will pop up, press Yes.
In this way, you can delete all the emails that are stored in the deleted items folder.
Advanced way of deleting the emails:
Now, to make sure that the size of the Deleted items folder is always in check, you need to turn on the settings to empty this folder whenever you exit the Outlook application. This option will automate the cleaning of the Deleted Items folder for you. Follow the steps to do so:
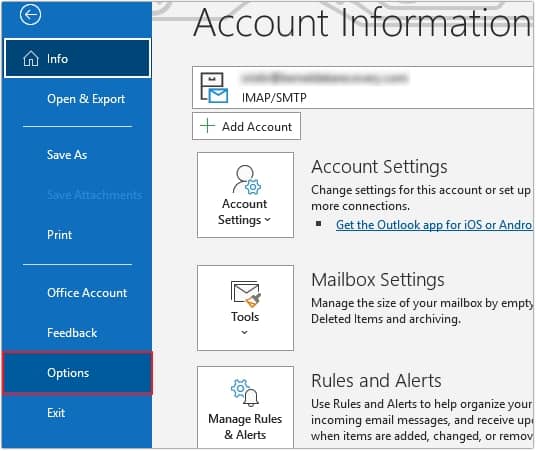
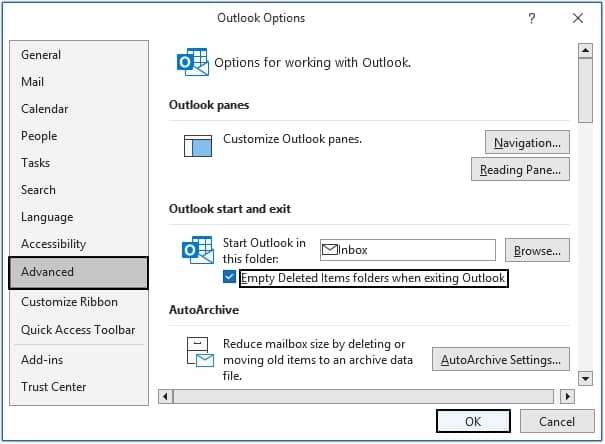
Step 1. Click on the File button on the menu bar of the Outlook application. Click on Info.
Step 2. Choose the Options menu button on the left.
Step 3. Click on Advanced, then under Outlook start and exit, tick the option for ‘Empty Deleted Items folders when exiting Outlook’ and click OK.
Method 2. Mailbox Cleanup
If the above methods have not fixed the issue for you, there is a high probability that most of the space is consumed by your active folders and needs to be cleaned up. Deleting a few emails can only temporarily fix the issue for you. The issue will occur again in a few days. So, you need to clean up some considerable space and further ensure that the free space is maintained. Follow the steps outlined below to cleanup Outlook mailbox:
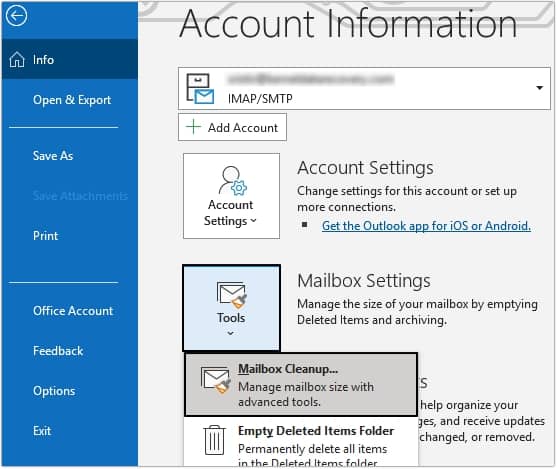
Step 1. Launch Outlook and select File >Tools > Mailbox Cleanup from the list.
Step 2. It will open a new window. Select the ‘Find items larger than’ option and select the size you find appropriate. The default is set to 250 KB. Then click on the Find button.
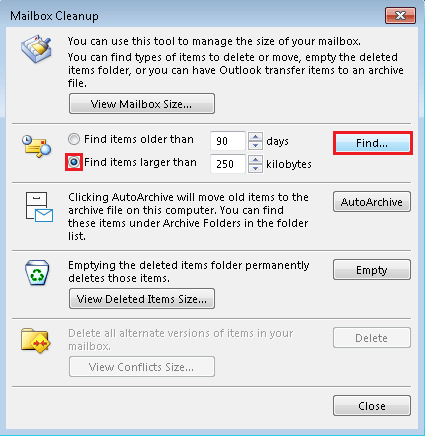
Step 3. It will scan your Outlook items and list down all the mail and other objects which are greater than 250 KB. You can then delete those items and free up considerable space without manually scrolling through your emails.
Method 3. Auto Archiving
Archiving the old emails may help you to reduce the Outlook mailbox size. Following are the steps to archive emails in Outlook:
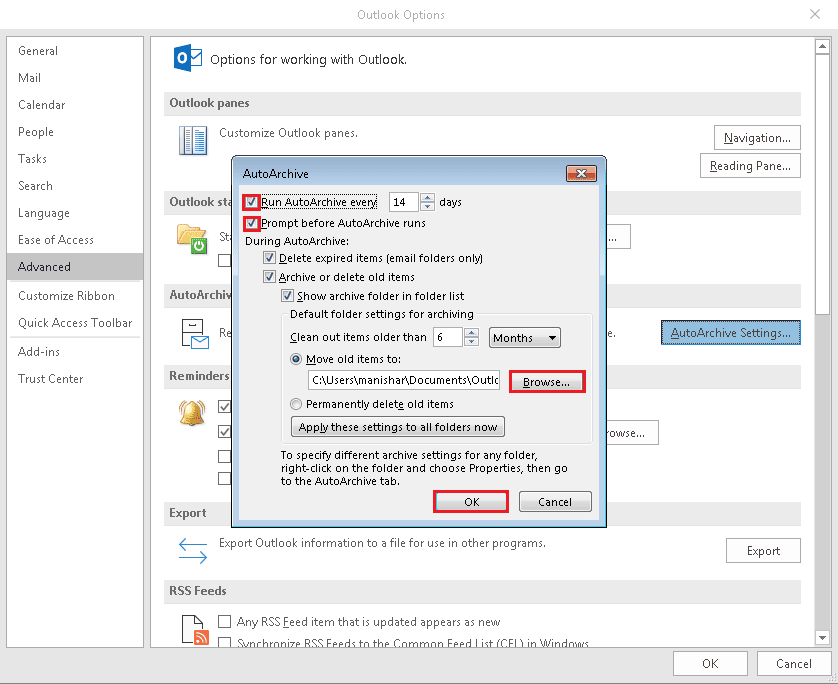
Step 1. Open Outlook and click on the File option, then click on Options.
Step 2. Click on Advanced option and under Autoarchive heading, click on the AutoArchive Settings button.
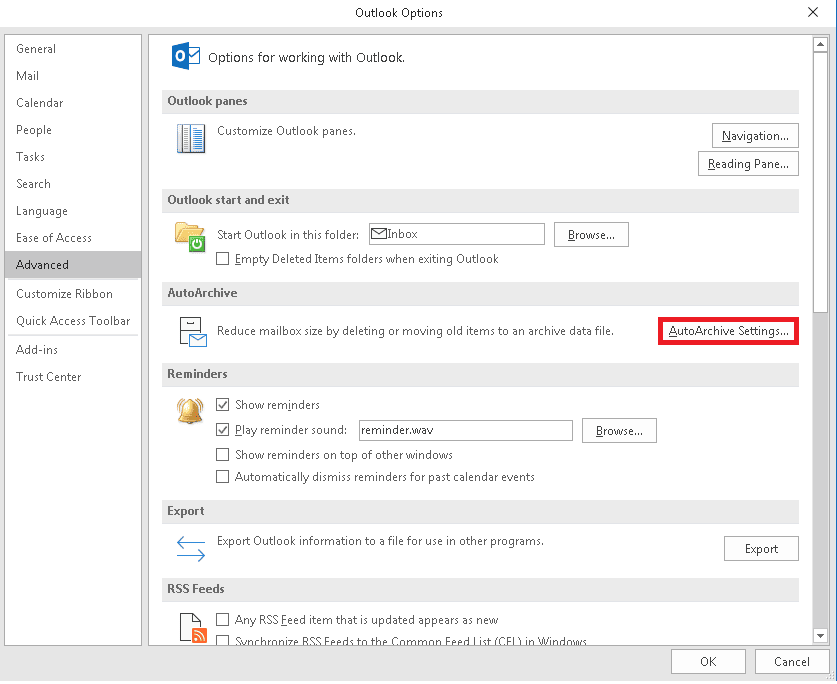
Step 3. It will pop open a new window, select the ‘Run autoarchive’ option and select the number of days next to it. It is optional to check the Prompt user option. Click on the Browse option to select the location where old items will be moved. Then click on OK.
Method 4. Remove duplicate e-mails
By default, a copy of every email that you forward to your associate resides in your Inbox and your Sent Items folder. In this way, the copied emails occupy unnecessary Outlook space. To eliminate these copied forwarded files, you can follow effective measures:
Manual Method:
Step 1. Go to Sent Items folder and sort it by the recipient.
Step 2. Click on the header to accomplish the task.
Automatic Settings:
Step 1. Go to the File Tab.
Step 2. Select Options and click Save Message section.
Step 3. Go to the Send Section and uncheck the option ‘Save a copy of forwarded message’.
Step 4. Click OK to save the changes you have made.
Method 5. Recreate a new Outlook profile
If none of the above-mentioned methods work for you, then you can try to create new MS Outlook profile to get out of this scenario. Sometimes, the Outlook profile you are working with starts having some issues. Which in return shows errors in the application. Recreating a new profile in the Outlook method proves to be helpful in many ways, as a new and fresh profile is set up to manage all the Outlook emails, contacts, events, etc.
Method 6. Resolve Outlook 0x8004060C error with an expert solution
Sometimes due to corrupted PST file chances of encountering Outlook error 0x8004060C increases. You can use Inbox Repair tool to fix the corrupted PST file. It is an inbuilt utility that comes pre-installed to fix minor corruptions in Outlook.
However, if your PST file is highly corrupted, then Inbox Repair tool may not work. You can use third-party software to fix Outlook error 0x8004060C. We recommend using Kernel for Outlook PST Repair software. It is the best Outlook PST repair tool, which can fix any Outlook issues in no time. You can repair your corrupt PST file and then save it into multiple formats including PST, DBX, MBOX, etc.
Conclusion
Outlook error 0x8004060C causes many issues while accessing the emails. Through this write-up, we tried to provide you with the best methods to resolve this error code quickly. However, these methods lack in providing the accurate result. In this case, we suggested a robust utility, known as Kernel for Outlook PST Repair. This software allows you to convert PST to MBOX, DBX, EML, MSG, etc. and to Office 365, Exchange Server, etc. as well.
Repair PST files and save to PST, MBOX, Office 365 & Exchange.