Exchange Server 2007 users migrate their on-premises mailboxes to Office 365 through staged migration and Exchange Server 2010 provides cutover migration method to move the mailboxes. But both these methods are designed to migrate the primary mailboxes only. The main mailbox is transferred to Office 365 where it will be accessible for instant usage. But, if you want to migrate public folders of your accounts, then you require additional methods that provide security to this shared data and migrate to the desired account too.
Download automated tool Kernel Migration for Exchange to migrate Exchange Server 2007, 2010, 2013, 2016 and 2019 Public Folders to Office 365.
Generate the Public Folder Mailboxes in Exchange Online
Migration from public folder to Office 365 can be categorized into 10 sufficient steps:
You are in for a bumpy ride!
Download the Migration Scripts
Unfortunately, there is no easy tool provided by Microsoft to do the migration, we must use a collection of PowerShell scripts and cmdlets to do the work for us.
Download all the following scripts;
- https://www.microsoft.com/en-us/download/details.aspx?id=38407
- https://www.microsoft.com/en-us/download/details.aspx?id=46381
Save them all to C:\PFScripts feel free to change this location but make sure all the scripts are in the same place.
Only the following versions of Exchange server are supported by these scripts
- Exchange 2010 with SP3 and at least RU8
- Exchange 2007 with SP3 and at least RU15
If you don’t have these versions of Exchange you will have to upgrade and unfortunately if you have Exchange 2003 you can’t migrate your public folders to Exchange Online.
You need to follow the following steps on your Exchange server before attempting the migration, if you miss any of these the scripts won’t work properly.
General Steps:
- Make sure no orphaned public folders exist in AD (i.e. there are AD Objects for public folders that no longer exists)
- Check that the SMTP address for any public folder objects in Exchange match the AD Objects
- Remove any duplicate public folder objects in AD (If you have performed say a 2003 to 2007 public folder migration before it's common to have something like "FolderName" & "FolderName54334533" in AD for the same public folder
Run the through the following steps on the Exchange Server that you are migrating the public folders from
- We have to add the onmicrosoft domain for your 365 tenant to the Exchange server. To do this open the Exchange Shell as an administrator and type this
New-AcceptedDomain -Name "PublicFolderDestination_OnMicrosoft" -DomainName example.onmicrosoft.com -DomainType InternalRelay
- We need to find any public folder names with backslashes in, to do this,
- On Exchange 2010 run
Get-PublicFolderStatistics -ResultSize Unlimited | Where {( $_ .Name -like "*\*" ) -or ( $_ .Name -like "*/*") } | Format-List Name, Identity
- On Exchange 2007 run
Get-PublicFolderDatabase | ForEach { Get-PublicFolderStatistics -Server $_ .Server | Where { $_ .Name -like "*\*" }}
- Then simply remove the backslash from any folders that it finds.
- On Exchange 2010 run
- Make sure there isn’t any remnants of a previous failed or successful Public Folder Migration
- Run this command to check the Public Folder Migration Status
Get-OrganizationConfig | Format-List PublicFoldersLockedforMigration , PublicFolderMigrationComplete
- If either PublicFoldersLockedforMigration or PublicFolderMigrationComplete shows as $true then you need to run this to reset the value
Set-OrganizationConfig -PublicFoldersLockedforMigration: $false -PublicFolderMigrationComplete: $false
- Once you’ve reset the migration status you have to wait for these settings to refresh in Exchange, this could take a couple of hours.
- Run this command to check the Public Folder Migration Status
- If you are using Azure AD connect you must remove public folder objects from the sync.
- Open Azure AD Connect
- Under Additional Task select Customize Synchronization options
- Enter your credentials
- On the Optional Features screen make sure the Exchange Mail Public Folders is unticked
Now that the Exchange Server is ready to go it’s time to move onto setting up Exchange Online.
- Make sure there are no pre-existing public folder migration requests, if there are delete them.
- Check that there are no public folder mailboxes already in Exchange Online, if there are check for existing public folders. You will want to remove any public folders and public folder mailboxes before carrying on.
Time to dig out those scripts! Create a folder called C:\PFMigration and then open an Exchange Management shell change directory to the scripts directory (C:\PFScripts) now run the following scripts
-
.\Export-PublicFolderStatistics.ps1 "C:\PFMigration\foldertosizemap.csv" "exchangeserver.domain.local"
(make sure to change the name here to the name of your server) -
.\PublicFolderToMailboxMapGenerator.ps1 16106127360 "C:\PFMigration\foldertosizemap.csv" "C:\PFMigration\foldertomailboxmap.csv"
Have a look through your folder to mailbox map file, if there are more than 1000 rows you will need to simplify your public folder layout.
Next, we need to create the public folder mailboxes in Exchange Online, these mailboxes are what actually host the content for your public folders. To do this it’s more PowerShell commands so open up the Exchange shell and run
.\Create-PublicFolderMailboxesForMigration.ps1 -FolderMappingCsv C:\PFmigration\foldertosizemap.csv -EstimatedNumberOfConcurrentUsers: > estimate >
Update the estimate with the max number of concurrent users you expect, this isn’t massively important but it might help performance in bigger organisations.
Up until now everything has been prep work for this stage, now it’s time to start syncing our data.
- Synchronize the mail enabled public folders, run this on the old Exchange server. Use your Office 365 Admin account credentials when prompted.
Sync-MailPublicFolders.ps1 -Credential ( Get-Credential ) -CsvSummaryFile: C:\PFMigration\synclog.csv
- We need to get some more information before we can run the migration
- Find the LegacyExchangeDN of your Exchange Admin account
Get-Mailbox > ExchangeAdminAccount> | Select-Object LegacyExchangeDN
- Get the ExchangeLegacyDN of the Mailbox Server that hosts the public folder database
Get-ExchangeServer > exchangeservername> | Select-Object -Expand ExchangeLegacyDN
- Find the FQDN of the Outlook anywhere URL.
Get-OutlookAnywhere | Format-Table Identity,ExternalHostName
- Find the LegacyExchangeDN of your Exchange Admin account
- Now switch to Office 365 PowerShell, it’s time to update the info we just got into Exchange Online, first we need to set some values, then we can actually create the migration request!
- Get the credential of the old Exchange server admin
$Source_Credential = Get-Credential domain\exchangeadmin
- Get the Legacy Exchange DN from above for this same user
$Source_RemoteMailboxLegacyDN = "userDNgoeshere"
- Get the Legacy Exchange DN for the server from above
$Source_RemotePublicFolderServerLegacyDN = "serverDNgoeshere"
- Get the FQDN for Outlook Anywhere from above
$Source_OutlookAnywhereExternalHostName = "OutlookFQDN"
- Get the credential of the old Exchange server admin
- At last, we can create the migration request (again in Office 365 Shell)
$PfEndpoint = New-MigrationEndpoint -PublicFolder -Name
PublicFolderEndpoint -RPCProxyServer
$Source_OutlookAnywhereExternalHostName -Credentials $Source_Credential
-SourceMailboxLegacyDN $Source_RemoteMailboxLegacyDN
-PublicFolderDatabaseServerLegacyDN
$Source_RemotePublicFolderServerLegacyDN -Authentication Basic
[byte[]] $bytes = Get-Content -Encoding Byte
C:\PFMigration\foldertomailboxmap.csv
New-MigrationBatch -Name PublicFolderMigration -CSVData $bytes
-SourceEndpoint $PfEndpoint.Identity -NotificationEmails email@domain.com - Finally, start the migration process
Start-MigrationBatch PublicFolderMigration
We are getting there! But don’t say I didn’t warn you about this being a complicated process. At this stage, we can actually use the EAC to check in on the Migration Process
- Login to EAC (Office 365)
- Go to Mailbox > Migration
- Find the migration that you just created and click view details
Only 3 steps left!
Now we need to stop users updating, editing and accessing the old public folders, we don’t want them to make any changes that won’t be synced. Depending on a few factors the migration process could take a while (how much data you have, Exchange performance, bandwidth etc..) and during this time Public Folders will effectively be offline, any mail that comes in for them will remain queued and users will have no access. You may need to make provisions for this. So back to the shell (old Exchange server).
Set-OrganizationConfig -PublicFoldersLockedForMigration: $true
Public folders are now locked, if you have multiple public folder servers you will have to wait for them to replicate before continuing.
We are so close at this point I can practically taste it, time to finish the migration. Once you run this command, Exchange does one final sync of the data and then that’s it. In 365 Shell run this
Complete-MigrationBatch PublicFolderMigration
If you have Hybrid Exchange you will also need to run this
Set-OrganizationConfig -RemotePublicFolderMailboxes $Null -PublicFoldersEnabled Local
We are finally done, time to test! Run all these commands in 365 Shell.
Run this command to give yourself access to the public folders.
Set-Mailbox -Identity > Test User < -DefaultPublicFolderMailbox > Public Folder Mailbox Identity >
Login to outlook, if the public folders look ok to you then it’s time to give everyone else access.
Get-Mailbox -PublicFolder | Set-Mailbox -PublicFolder -IsExcludedFromServingHierarchy $false
Everyone will now have access to the public folders through outlook (assuming they had permissions to do so before the migration). Finally run this command
Set-OrganizationConfig -PublicFoldersEnabled Local
That’s it. Done.
If you do not want to go through this tiresome process, then you can always choose a much safer option - a third-party tool like Kernel Migration for Exchange which conducts a flawless migration of public folder to Office 365. With this Exchange Migration tool, You can choose to run a pre-migration analysis to know the possible migration time. Also, it synchronizes source and destination data and migrates limits and permissions too.
To understand how Kernel Migration for Exchange performs a swift migration, first download and install the application and then follow the given steps:
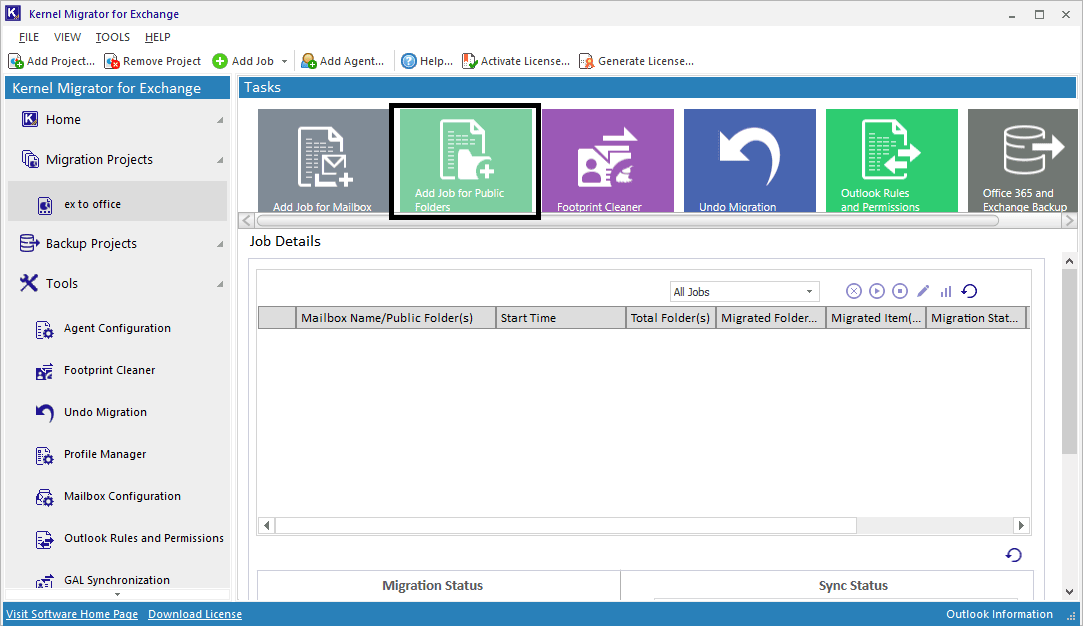
- Start the Kernel Migration for Exchange software application. Click on the Add Project option to add a project for the migration process. Enter a project name and click OK. A migration project will be created. Now click on Add Job for Public folders.
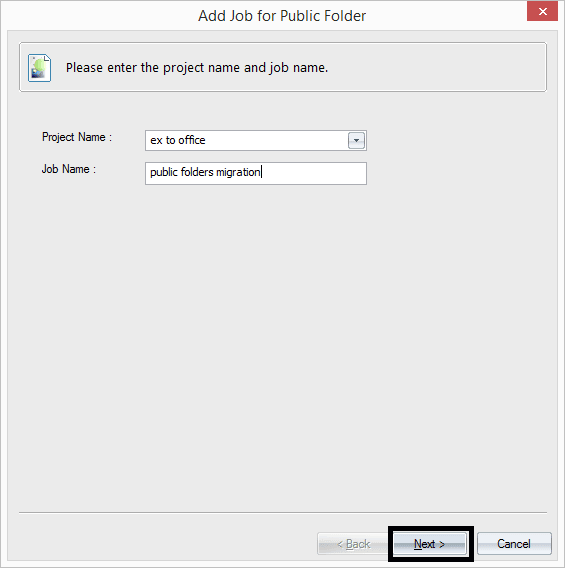
- Provide a job name and click Next.
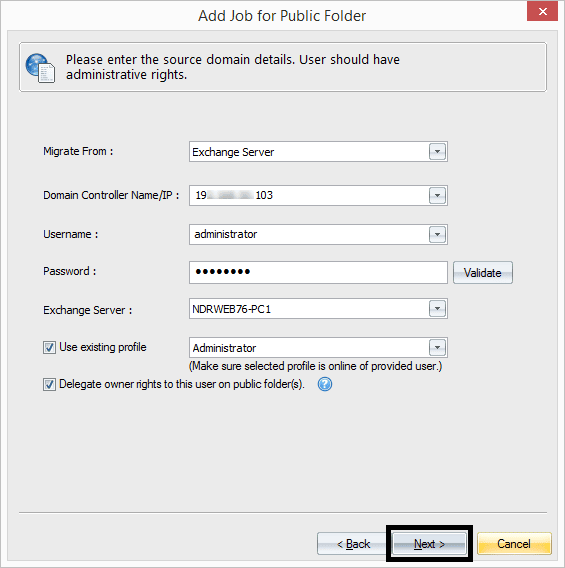
- Enter the source domain (Exchange 2010) login details. Perform validation of the details with Validate option. With this tool, you can Use existing profile and also delegate owner rights to this user on public folder(s). After providing the complete information, click Next.
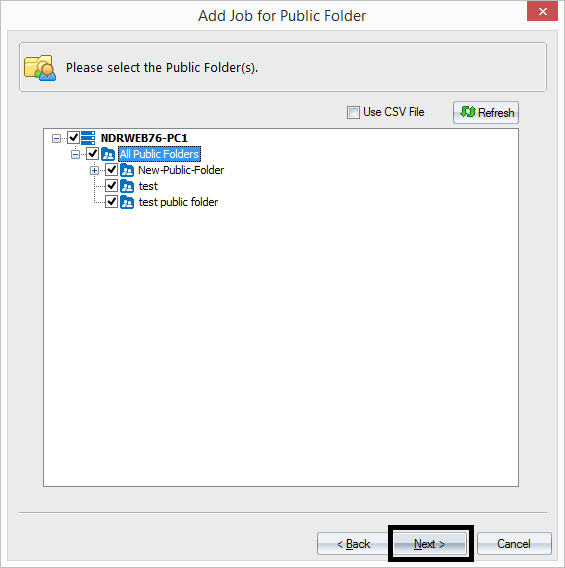
- Select the public folders you want to migrate from the list and click Next.
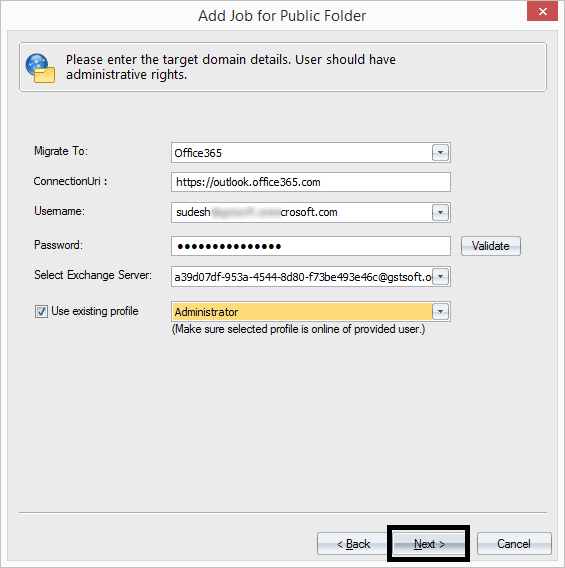
- In the next dialogue box, enter the target domain (Office 365 account) details like username and password. Here also, you can validate the details. If required, use the existing profile and finally click Next.
- Users can filter the data with filters like Message classes, Date range, etc. After filtering, click Next.

- Users can manage bad items and synchronization settings with the options provided. Then click Next.

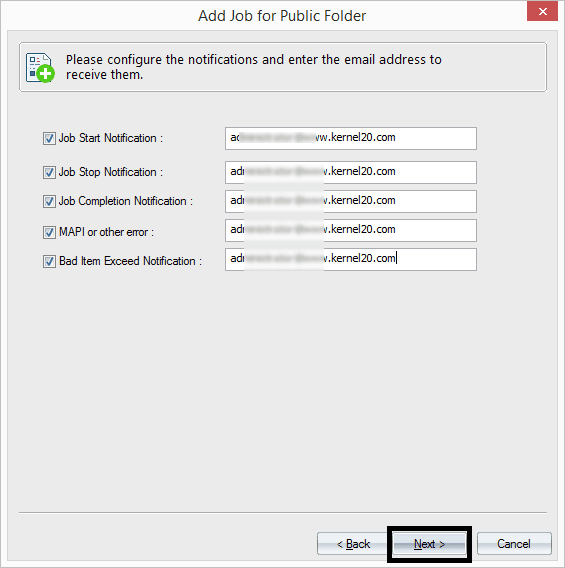
- Set the job notifications by providing the email address (if needed) and click Next.
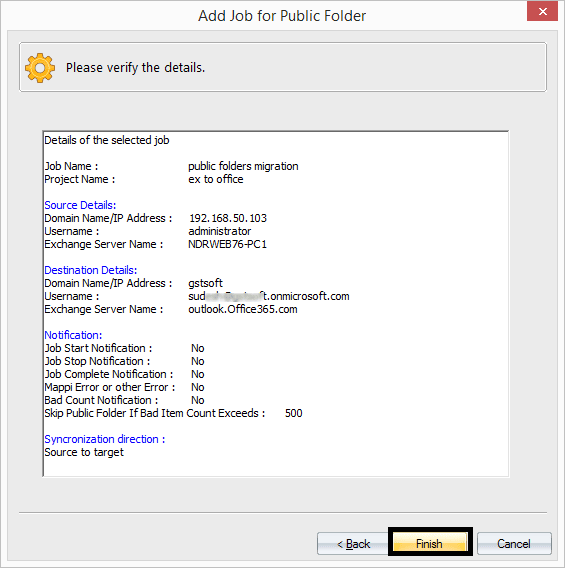
- Confirm the job details given in the summary and click Finish to start the migration.
Depending on the data to be migrated, the software will take some time for migration. Once the migration of Exchange public folders to Office 365 is completed, migration status will be shown as completed or successful.
Conclusion
Though there are some manual ways to migrate public folders to Office 365 from the older versions of Exchange, many Exchange administrators prefer professional tools over them. In this article, users get to know about how Kernel Migration for Exchange migrates public folders. Also, this tool facilitates migrations between Exchange versions, from Office 365 to On-premise Exchange and between two Office 365 tenants.