Gmail is a prolific web-based email client solution which caters to the needs of individuals and organizations of various sizes. But realizing the suitability of Office 365 for enterprise-level uses, many organizations are moving over to it. However, if you are looking forward to migrating your mailboxes and its associated data from Gmail or G Suite to Office 365, here are some steps you need to follow:

Try an automated tool Kernel IMAP to Office 365 to Migrate emails from Gmail to Office 365. The software also supports other IMAP email cliemts, like, Yahoo, AOL, Zimbra, iCloud etc.
To Migrate G Suite data including, Google Hangout Chats, Contacts, Calendar, & Mail, etc. one can download Kernel G Suite to Office 365 migration Tool.
Firstly, you need to verify to Office 365 that you own the domain you used for your Gmail Account. But if you use your Office 365 subscription instead of using your own custom domain, you can just add users after creating them in Office 365.
- Before creating users, a relevant license is required. Each user should be assigned to a mailbox to expedite the email migration process.
- Now, from the Admin center, click on Users on the right panel > Active Users > Click on the More button, > Import Multiple Users option.
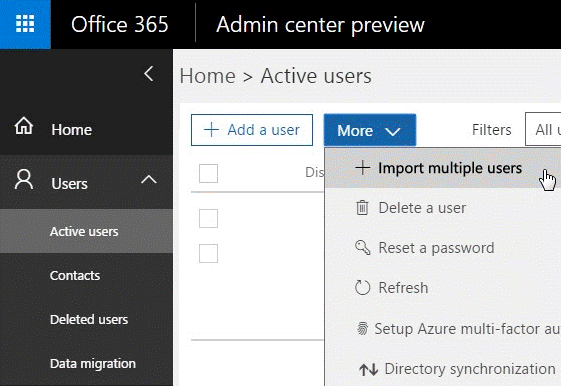
- For Single User Entry, click on Add a user from the above screen and enter the values manually. Using Import Multiple Users, you can download a sample excel sheet, and use it as a reference to add your users.
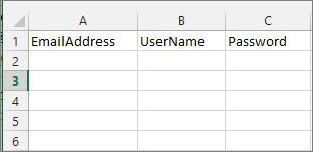
- Some of the important fields of this CSV file include Username, First Name, Last Name, Display Name, Age, Mobile Number, etc.
- The User Name column must contain the email address. For example, this will be anik@example.com
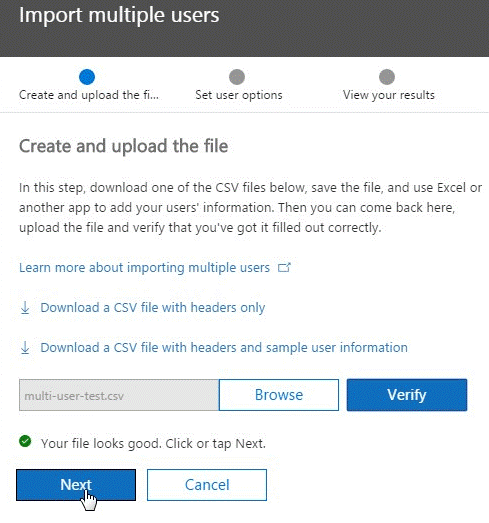
- After compiling the excel sheet with the list of surnames, click on Browse from the Create and upload file screen. After this click on Verify. When you get the confirmation, File looks good, click on Next.
First, compose an Excel File that contains a compiled list of Gmail mailboxes to migrate to Office 365. At the time of creating the migration file, you must know the password of each Gmail mailbox you want to migrate. Temporary passwords can be assigned to the mailboxes during migration. You must be an administrator in G Suite to reset passwords. Mailboxes can be migrated in batches as per the convenience of the user.
- Sign in to G Suite admin console using your administrator username and password.
- Choose Users.
- Select List of users in the Google admin center.
- Select each user to identify each user’s email address. Write down the address.
- Sign in to the Office 365 admin center and go to Users > Active users.
- Start Excel. Enter credentials like email address, username, and password for each mailbox you want to migrate. Enter one mailbox per row.
- Save it as a CSV file.
For successful migration of Gmail mailboxes to Office 365, a simplified communication channel is established with Gmail. To do this, Office 365 uses a migration endpoint. Migration endpoint is a terminology that encompasses the settings implemented for the establishment of a connection to enable smooth migration of the mailboxes. Following Steps help you to create the migration endpoint
- Go to the Exchange admin center.
- In the Exchange Admin Center, go to Recipients > Migration and click ... > Migration endpoints.

- Click New +.
- On the new page, select IMAP.
- On the IMAP migration configuration page, enter the details like:
MAP server: imap.gmail.com
Settings: defaultClick Next. The migration service uses the settings to establish the connection to Gmail system. If the connection works, the ‘Enter general information page’ opens.
- Type a Migration endpoint name in the Enter general information page, for example, Testcase-endpoint.
Leave the other two boxes empty. Click New.
To migrate Gmail to Office 365, a migration batch with Gmail mailboxes are to be created.
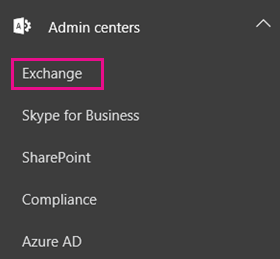
- In the Office 365 admin center, go to Admin centers > Exchange.
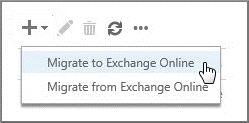
- In the Exchange admin center, navigate to Recipients > Migration.
- Click New (+) followed by ‘Migrate to Exchange Online.’
- Select IMAP migration > Next.
- On Select the users screen, click on browse and select the previously created CSV file for migration. Click on Next.
- After validation, Office 365 displays the Gmail mailboxes. Click Next.
- On Set the migration endpoint screen, select the migration endpoint (the one you created in the previous step), and click Next.
- On the IMAP migration configuration window, continue with the default values, and click Next.
- On the Move configuration page, type the name (no spaces or special characters) of the migration batch in the box—for example, Test1234-migration. Also, provide the names of the folders to excluded. Click Add (+) icon to add them to the excluded list.
- On the Start the batch page, provide the required options and start the migration.
Email systems employ a DNS record called an MX record to seek out the exact address for email delivery. During the email migration process, your MX record was pointing to your Gmail system. It’s time to point your MX record to Office 365. After you change your MX record, email sent to your Gmail Account is delivered to Office 365 mailboxes.
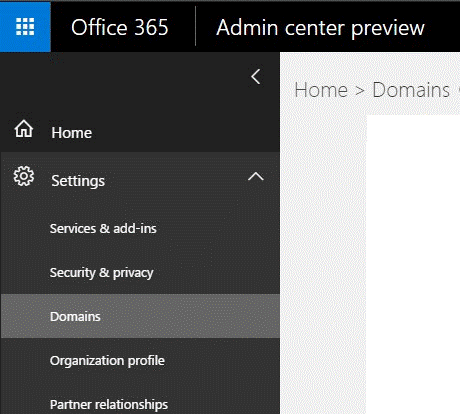
- To do this, from the Admin Center > click on Settings on the left panel
- Click on Domains and then Select your domain name. It would normally display Setup in progress.
- Another notification would be there which would suggest Setup completed.
For example, if your domain name is example.com
example.com (Default) – Setup in progress
example.onmicrosoft.com – Setup completed
Click on the default example.com; this will display Setup your online services screen with the following two options:
- Add records for me – This option will connect to your DNS domain (For example, GoDaddy) and update the MX records automatically.
- I’ll manage my own DNS records – This option gives you the flexibility of inserting a list of DNS entries (MX record values) that follows the manual addition process from your domain registrar.
Click on the 2nd option, and now you need to add MX Records on your DNS. For every domain, the MX record value will be different.
If you are planning to migrate emails from Gmail account to Office 365 account, then you might require third-party tools or utilities like Kernel IMAP to Office 365. It facilitates incremental mailbox migration. IMAP to Office 365 software has the following facilities:
- Facility to migrate mailboxes from Gmail to Office 365 without any loss of data
- It skips already migrated files and avoids redundancy in data migration from source to destination.
- It ensures complete accuracy and security of entire dataset throughout the migration process.
- Migrates Gmail data to both hosted and on-premises Exchange deployments.
- Comes with smart filters option that permits you to migrate selected mailbox data using multiple attributes like date range and item-type filters (emails, contacts, etc.).
Summary
As the manual procedure to migrate Gmail to Office 365 is error-prone and time-consuming, it has been suggested to try third-party tools in migrating Google data to Office 365.