Moving from an in-house emailing platform to a cloud emailing platform is a difficult task even if both the platforms are from the same developer (like Exchange and Office 365). So, migration from on-premises Exchange Server to Office 365 requires careful planning and systematic execution.
Migration options for Exchange to Office 365
For Exchange users, three methods are available to migrate mailboxes from Exchange to Office 365.
- Express migration: Express migration is suitable when the number of mailboxes is less than 2000. Migration can be started from Exchange admin Center (EAC). However, due to the prolonged time it takes to migrate 2000 mailboxes, try to migrate only 150 mailboxes or less.
Express migration can be used for migration from Exchange 2003, 2007, 2010, and 2013 versions. - Staged migration: Use Staged migration when the number of mailboxes is more than 2000. Staged migration can be performed if you are migrating from Exchange 2003 or 2007 versions.
- Hybrid migration: Hybrid migration maintains both on-premises and online mailboxes, and gradually migrates data to Office 365. Always use hybrid migration if you want to migrate Exchange 2010 mailboxes (150 to 2000 in member) to Office 365 in small batches. And this is the best option to migrate Exchange 2013 to Office 365.
For exchange 2013, hybrid migration is the best option as it supports migration of a large number of mailboxes in batches. This method allows the user to move mailboxes to Office 365.
Before conducting hybrid migration, it is suggested to create migration end points. A migration end point has the login credentials and connection settings of the source Exchange Server. Then follow the steps to enable the Mailbox Replication Proxy Service (MRSProxy service):
- In Exchange Admin Center, go to Servers > Virtual Directories
- Choose the Client Access Server, select the EWS virtual directory, and click Edit
- Enable MRSProxy (by checking the checkbox) and click save
In the Office 365 tab of the Exchange Admin Center, you have the remote move migration wizard that helps you move mailboxes from on-premises Exchange to Exchange Online (and vice versa). Follow the steps below to migrate on-premises Exchange mailboxes to Office 365 (Exchange Online).
- In EAC, go to Office 365.
- Under Recipients > Migration, click Add +, and choose Migrate to Exchange Online.
- Select Remote move migration on the Select a migration type page; click Next. It will take you to the Select the users page.
- Click Add+. Here you can select the on-premises Exchange users you want to migrate to Office 365. Click Add, then OK, and then Next.
- Input the credentials of on-premises administrator on the Enter the Windows user account credential page.
- Ensure that your on-premises Exchange Server (FDQN) is listed on the Confirm the migration endpoint page, and click Next.
- Create a migration batch on the Move configuration page by providing the required details; click Next in the end.
- Finally, at the Start the batch page, choose one recipient to receive the report after the batch completion. Check the Automatically complete the migration batch box. Click New.
Note: After the completion of the migration, batches can be deleted (this can be done from Recipients > Migrations).
It was the complete hybrid migration process which will perform Exchange 2013 to Office 365 migration. It is quite lengthy and time taking. It is quite unlikely that a non-technical user can correctly follow all the steps and complete the migration successfully. That is why it is better to use third-party applications which can migrate Exchange mailboxes to Office 365 more efficiently.
Kernel Migration for Exchange
It is a powerful Exchange Migration tool which moves mailboxes from an Exchange Server/Office 365 to another Exchange Server or Office 365. It has a great number of features that simplify the migration process. It runs a pre-migration analysis, migrates mailboxes/public folders and all associated information, and performs synchronization between source mailbox and destination mailbox for effective co-existence.
To know how the tool actually works, follow the steps given below.
- Launch the software. Click Add Project, enter a name and click OK.
- Now, click Add Job for Mailboxes, add a Job Name and then click Next.

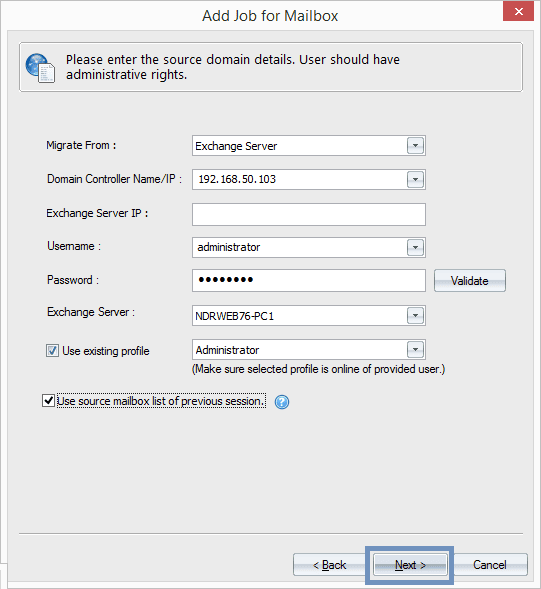
- Now, enter the source details - Exchange Server 2013 account details and validate them; select the desired options and then click Next.
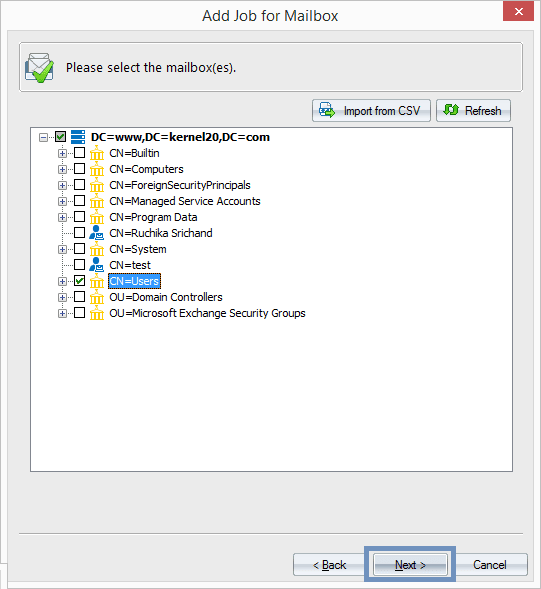
- Choose the required mailboxes and then click Next.
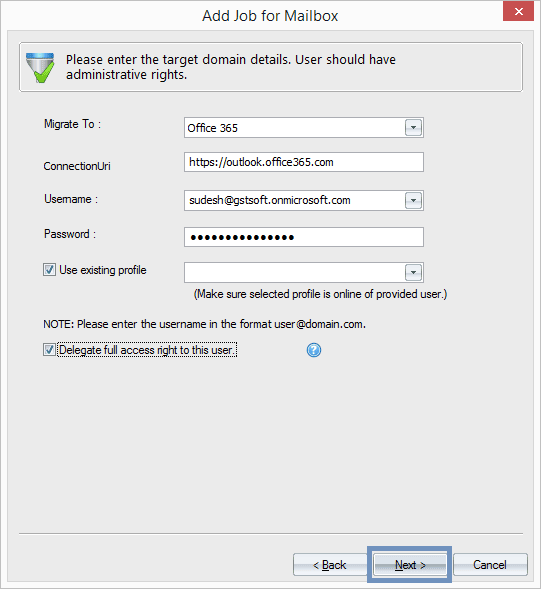
- Enter the target Office 365 details (can delegate full access rights to the user) and then click Next.
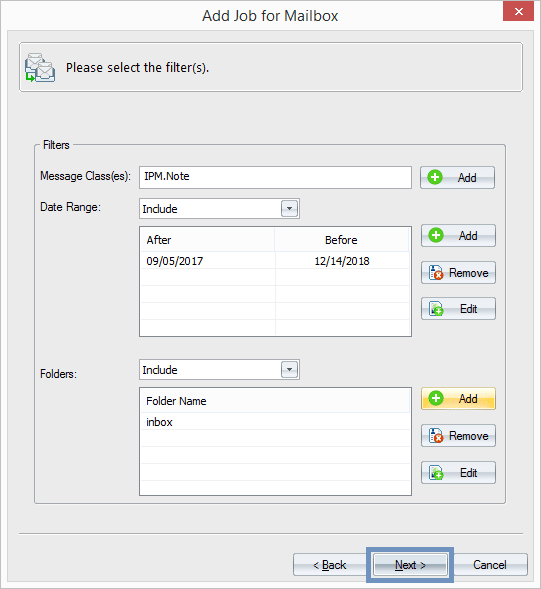
- Apply different filters as required and then click Next.
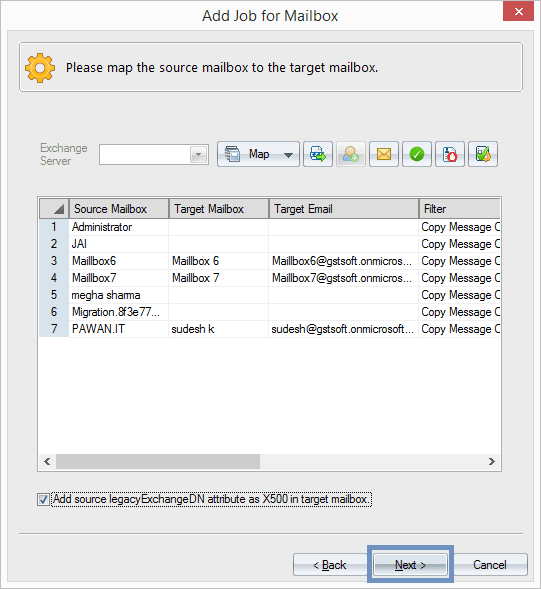
- Now, map the source and destination mailboxes and click Next.
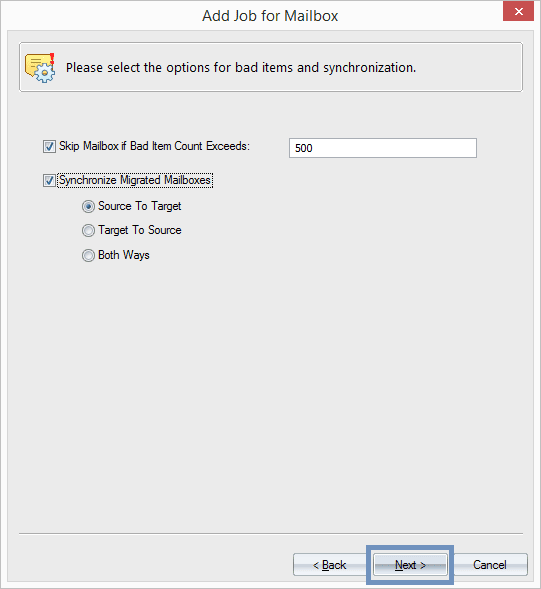
- Manage bad items and synchronization between the source and target by choosing the appropriate options. Then, click Next.
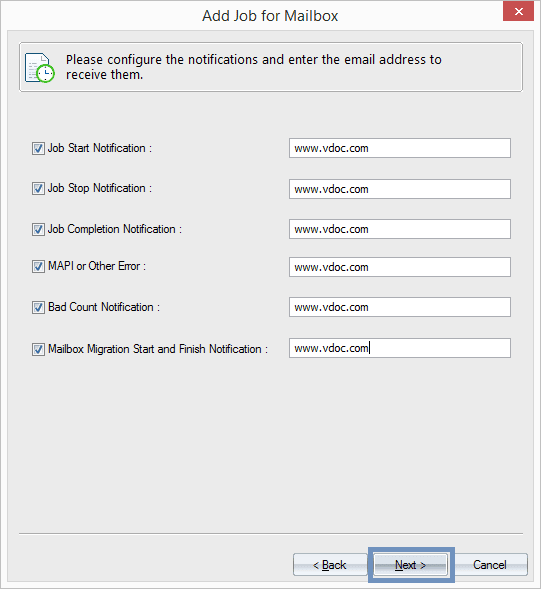
- Set notification settings by providing an email address to get notified for different jobs. Click Next.
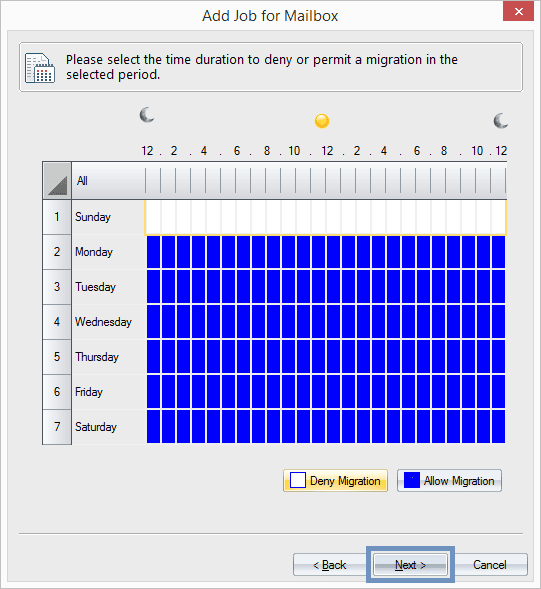
- Users can deny or allow the migration at specific day and time. Choose as per your need and then click Next.
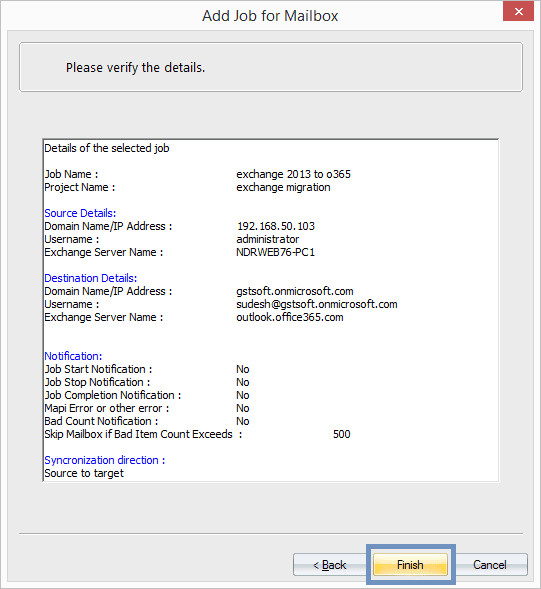
- View the summary of migration and check if it is okay. Then click Finish.
The Exchange 2013 to Office 365 migration will start and take some time to get completed. After completion, you will be notified with the success notification and migration report.
So, as you have seen, migration from Exchange 2013 to Office 365 is an easy task for the software.