Exchange Online is the ultimate component of the Office 365 suite. It stores all your mailboxes, including emails, calendars, notes, and appointments. Many organizations use Exchange Online to do their day-to-day conversation or business deals. To keep their data safe and secure, organizations need to regularly backup Exchange Online mailbox to PST. After taking the backups, you can easily restore that data in any Exchange Online account.
In this article, we will discuss both manual and automated methods to back up Exchange Online mailbox data to PST.
Why is it necessary to back up Exchange Mailboxes?
Multiple scenarios often ask for Exchange mailbox backup, such as:
- To export the data to Outlook PST.
- To backup Exchange data for compliance requirements.
- To export Exchange mailboxes to Office 365 in the form of PST.
- To access the Exchange mailboxes in case of emergency.
These reasons are enough to tell you why it is necessary to have a backup of Exchange mailboxes. Now, let’s move ahead to the manual methods to back up Exchange Online mailbox to PST.
Download Kernel Export Office 365 to PST as the instant solution to take unlimited backup of Exchange Online mailboxes to simple PST files.
Method 1: Backup Exchange Online Mailbox to PST using eDiscovery
Office 365 has multi-advanced features that can give you seamless data management services. To export the whole mailbox items to PST you can use the eDiscovery export method for Exchange Online backup. It’s the only method that can protect your Office 365 data or migrate Office 365 data to MS Outlook.
To export the mailboxes, you must be a global administrator or have the eDiscovery Manager permission assigned to you. After you have assigned the required permissions, follow the steps to export Office 365 mailboxes to PST using the eDiscovery Export tool:
- Step 1: Go to https://purview.microsoft.com
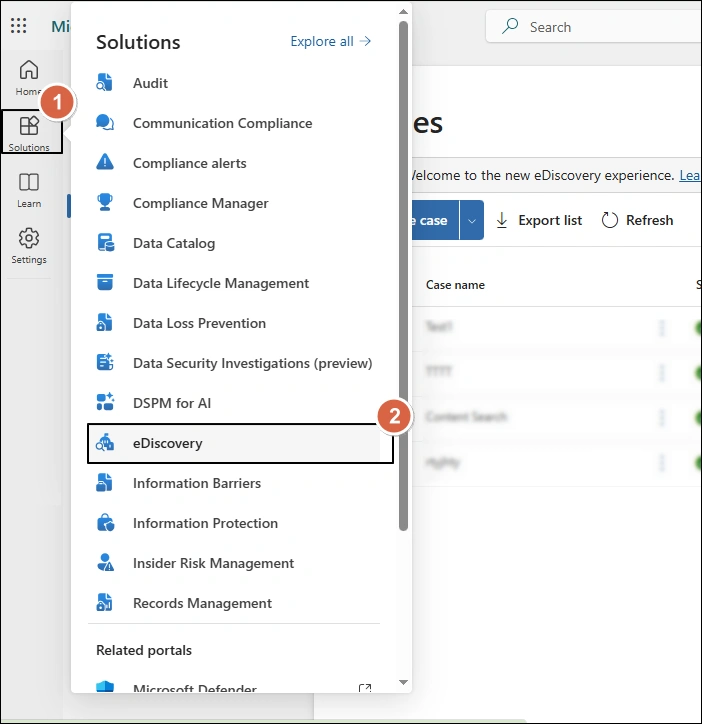
- Step 2: In the left side pane, click Solutions and select eDiscovery option.
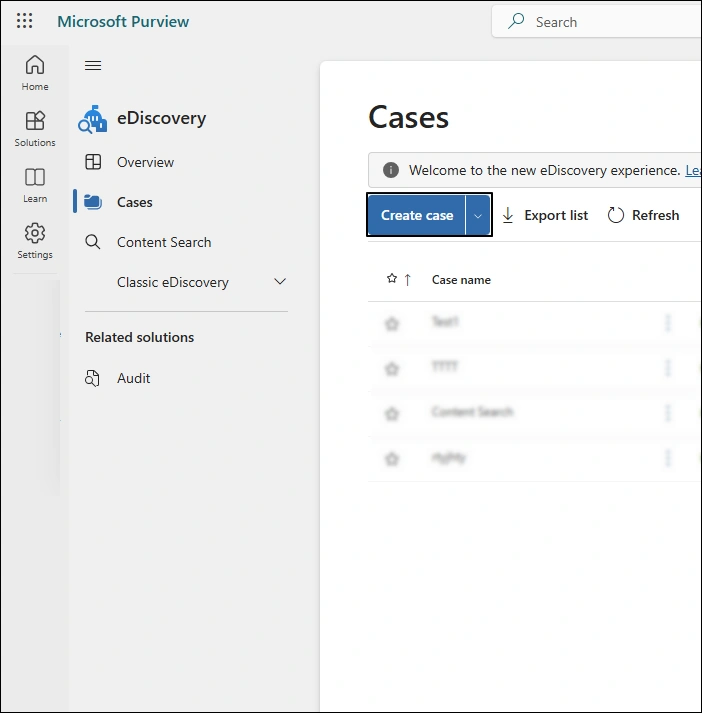
- Step 3: In the Cases section, click on the Create case button.
- Step 4: In the New Case window, provide a Case name and a Description. Then, click Create.
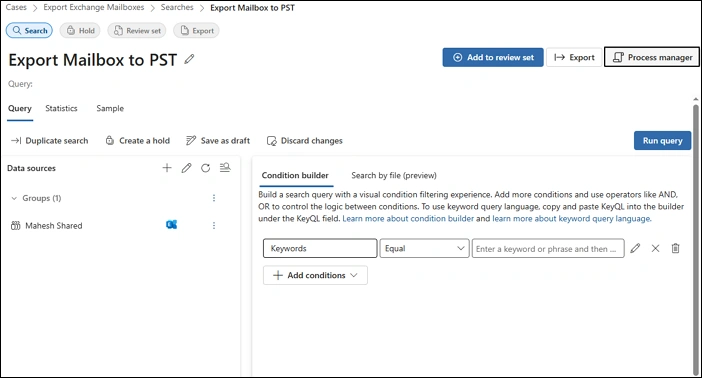
- Step 5: Click on Create a search button to create a new search.
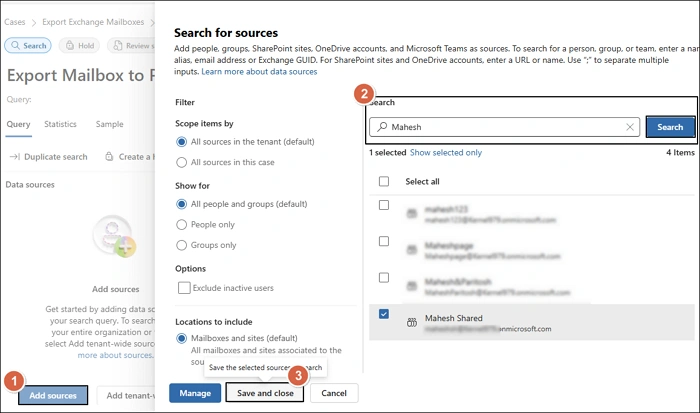
- Step 6: Now, click on the Add sources button. Then, in the new window on the right-hand side, search for the mailbox, select it, and click the Save and Close button. You can search and add as many mailboxes as you want.
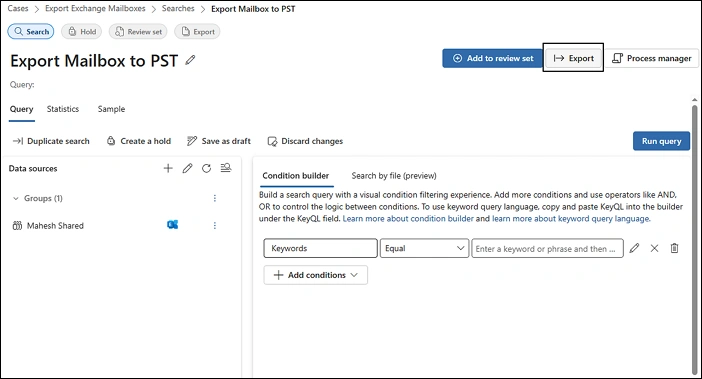
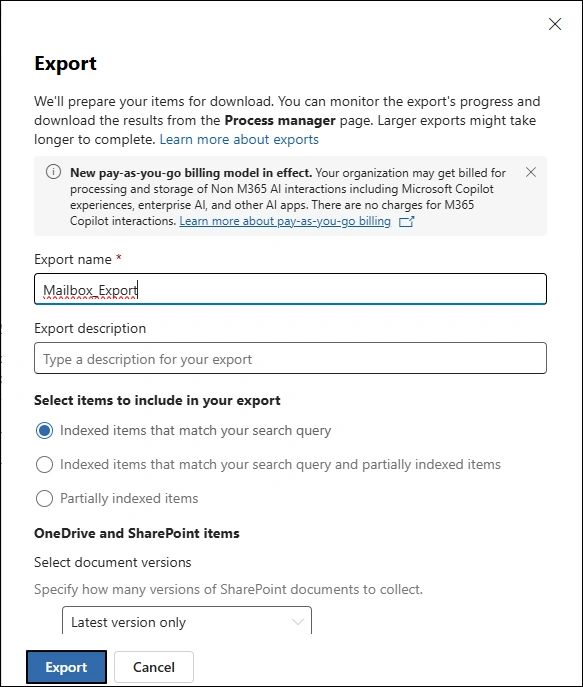
- Step 7: Click on the Export button to create a new Export mailbox request.
- Step 8: Provide a name for the export and again click on the Export button.
- Step 9: You will get a confirmation message when the export starts.
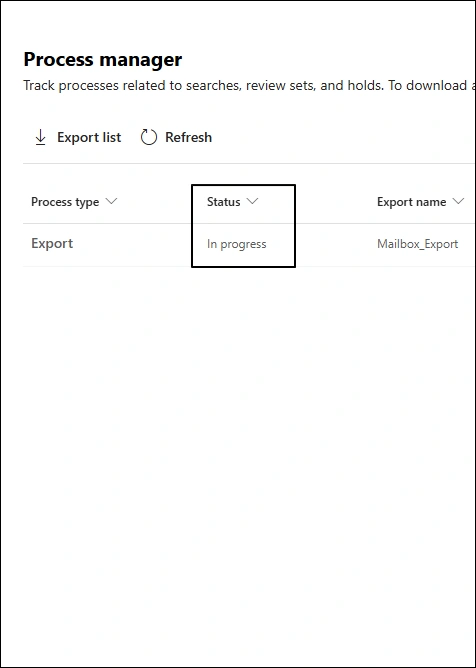
- Step 10: Now, click on the Process Manager button to view the status of the export request you created in the previous step.
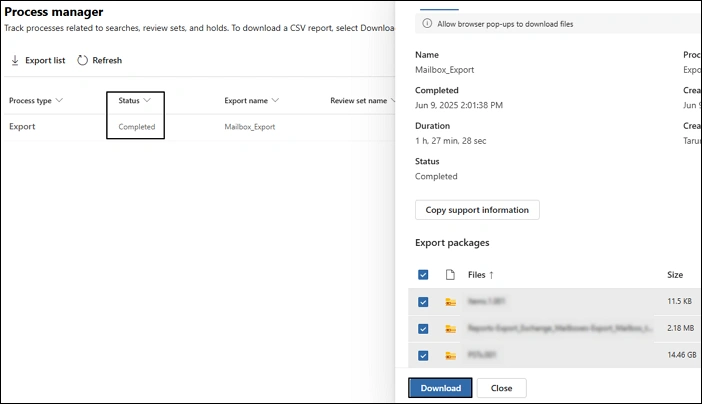
- Step 11: Notice the status will show as In Progress. When the status turns to Completed, click on the export name.
- Step 12: Select the files you want to save and click Download.
Method 2: Backup Exchange Online Mailbox to PST with Outlook
Using eDiscovery allows you to export multiple mailboxes simultaneously. However, if you want to backup a single Exchange mailbox, you can use the Outlook email client. To backup Exchange mailbox, your Outlook must be configured with the same Exchange account whose mailbox you want to backup.
For Exchange Online backup mailbox to PST, we will use Outlook’s Import/Export feature:
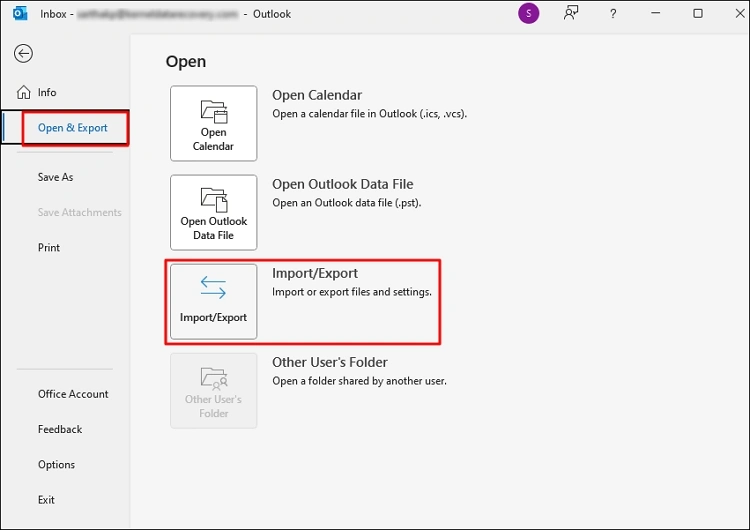
- Step 1: Click on the File tab in Outlook and select Open & Export > Import/Export.
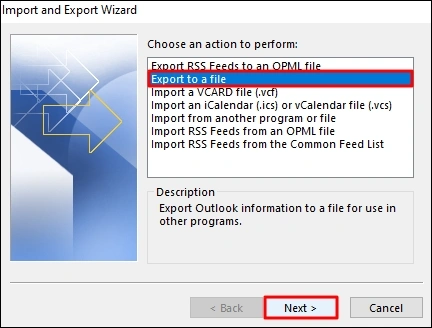
- Step 2: Select Export to a file option and click Next.
- Step 3: Select the option Outlook Data File (.pst) and click Next.

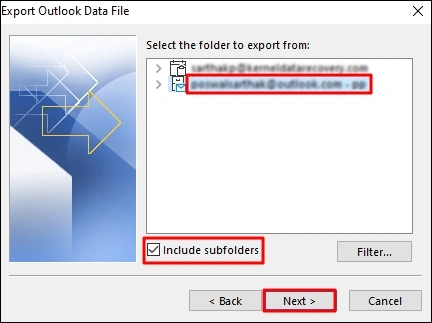
- Step 4: Choose the email account you want to backup. Also, make sure to check the Include subfolders option. Click Next to proceed.
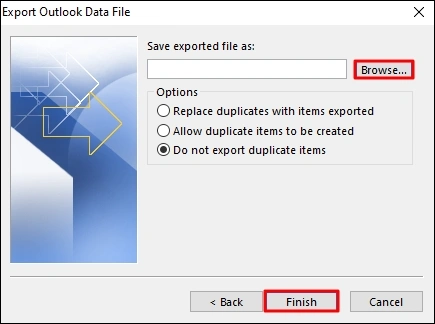
- Step 5: Click the Browse button and specify where to save the PST file on your system. Finally, click Finish to backup Exchange Online mailbox to PST.
The methods above might seem straightforward but are very complicated to execute and time-consuming. Additionally, these methods do not guarantee 100% results. A better approach to easily backup complete or selective Exchange Online mailboxes is relying on a third-party backup tool.
Method 3 - An Automated Tool to Backup Exchange Online Mailbox to PST [Recommended Solution]
The above-mentioned manual method is a little bit risky with a high chance of data loss. If you don’t want to take any risk, then you must use an automated Kernel Export Office 365 mailbox to PST tool that saves Exchange/Office 365 mailboxes in PST file format. It has advanced filter features that can back up your selective data from Exchange Online.
Follow the below-mentioned steps to back up Office 365 mailboxes.
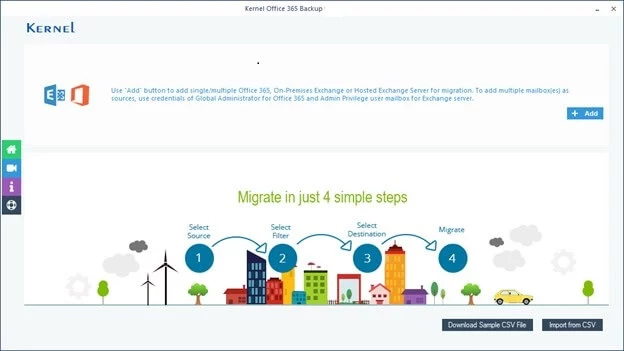
- Step 1: Launch the software and click on Add to choose the Office 365 account.
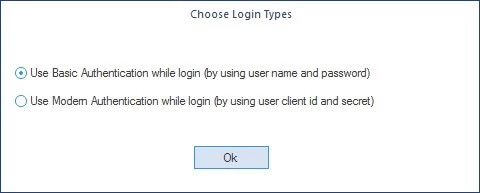
- Step 2: Choose the login method to link your account, then hit OK.
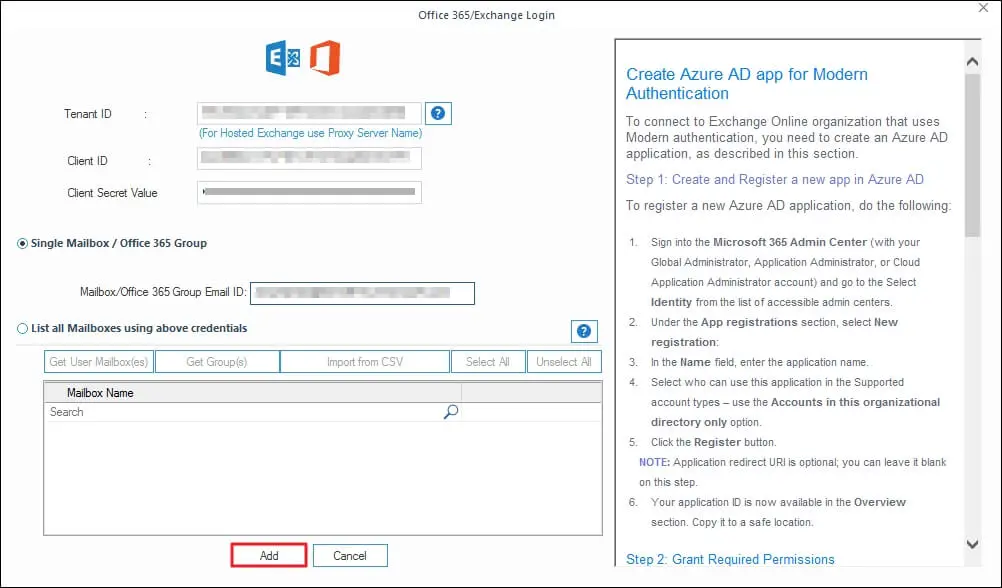
- Step 3: Provide the details of your Office 365 account and provide the mailbox that you want to backup to PST. To backup multiple mailboxes, select the List all Mailboxes option and click Get User Mailbox(es). Then, select the mailboxes from the list and click on the Add button.
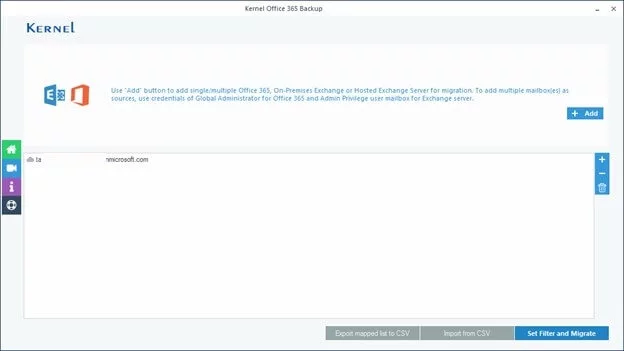
- Step 4: Select the mailbox account and click on Set Filter and Migrate to extract mailbox items.
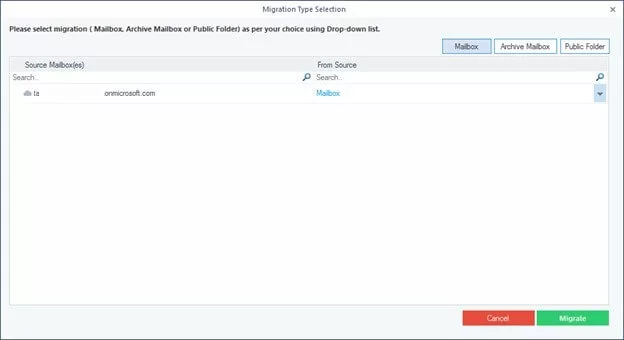
- Step 5: Select your mailbox folders from Mailbox, Archive Mailbox, and Public Folder, and click on Migrate.
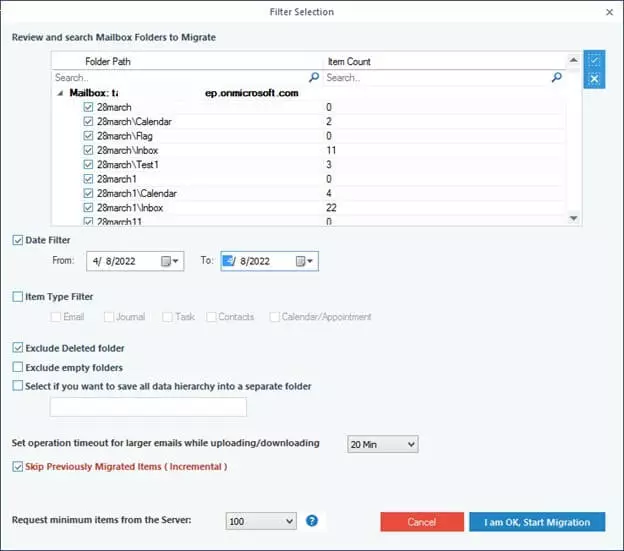
- Step 6: Apply the required filters to save the mailbox data selectively. Finally, click on I am OK, Start Migration.
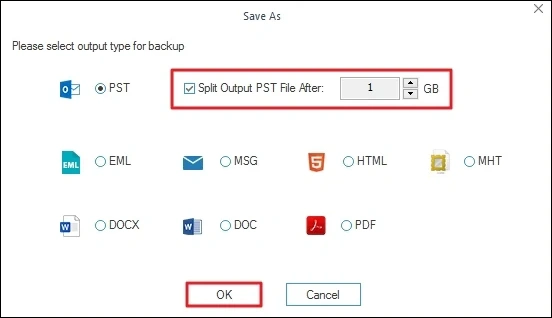
- Step 7: Select PST as the output format and click on OK.
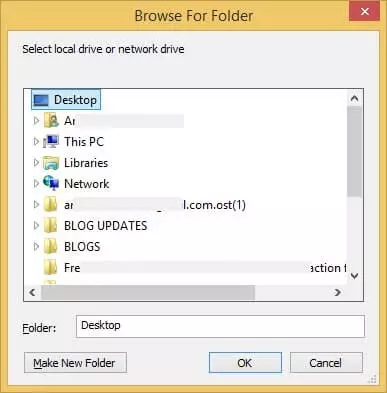
- Step 8: Provide a saving destination for the PST file anywhere in your system and select OK.
- Step 9: The tool will start Exchange Online backup mailbox to PST.
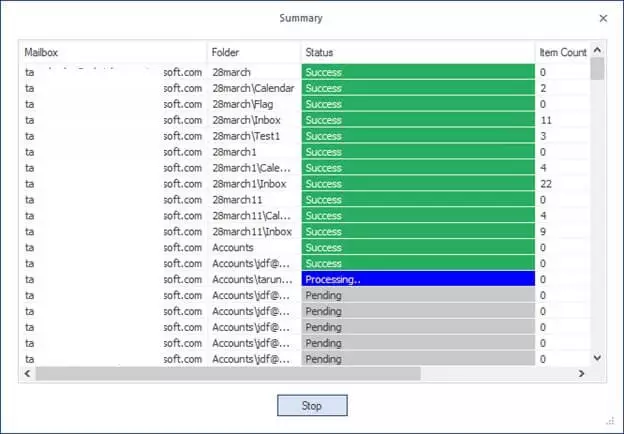
It is the simplest method to export Office 365 mailboxes to PST file format.
Conclusion
Backup Exchange Online mailbox to PST to safeguard your important data in the Exchange database. We discussed three different methods to export Microsoft 365 emails to PST. Use any method you want. However, since I have tried all three mentioned in this blog, I can say with full surety that relying on the Kernel Export Office 365 to PST is the best choice. The tool has everything from a secure connection to smart filters to quickly backup complete mailbox.
Kernel Export Office 365 to PST
Backup Office 365/Exchange online mailboxes to PST without Outlook