Exchange mailbox is an essential platform that stores all your mailbox items, including emails, calendars, notes, and tasks. There are some instances where you have to extract Exchange mailboxes and then import them to another account to retrieve all your essential data. However, the process of exporting Exchange mailboxes to PST and importing them to Office 365 is not easy to perform. In this article, we have mentioned the manual method as well as automated tool to export and import Exchange mailboxes into Office 365.
Instant Solution
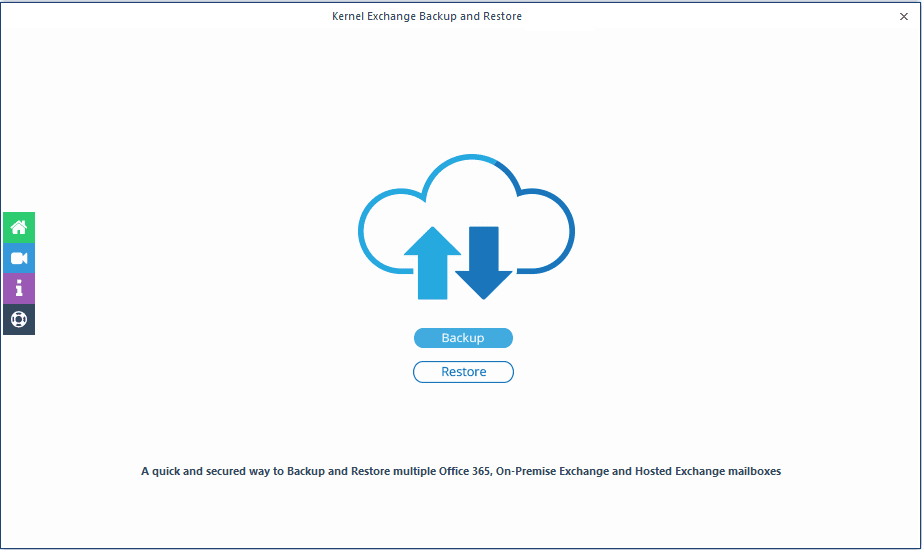
Download Kernel Exchange Backup & Restore tool to Export Exchange mailbox to PST and vice a versa in quick time.
How to export Exchange mailbox to PST from Outlook?
Outlook has many built-in robust features, including Import/Export, that help you to move your whole OST files, including emails, contacts, notes, calendars, and appointments into PST format. It’s one of the best methods that is available in the desktop versions of Outlook.
Outlook 2019/2016/2013
Follow the below steps to upload your PST file in Outlook 2019, 2016, and 2013 versions:
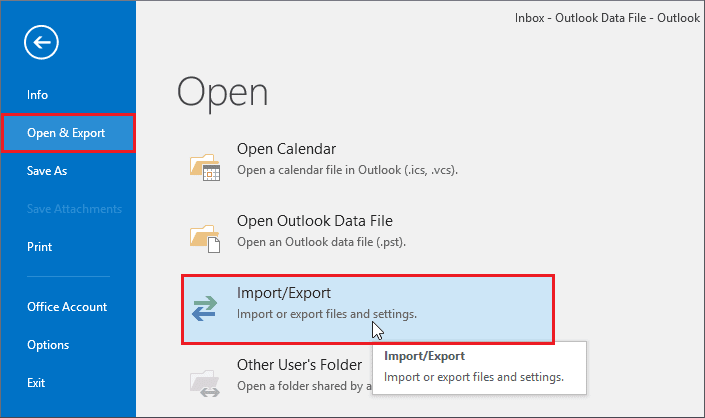
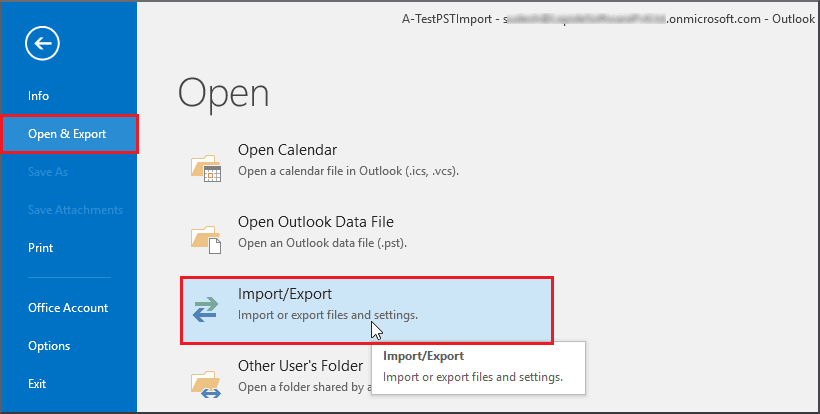
- Step 1. Go to File > Open & Export > Import/Export.
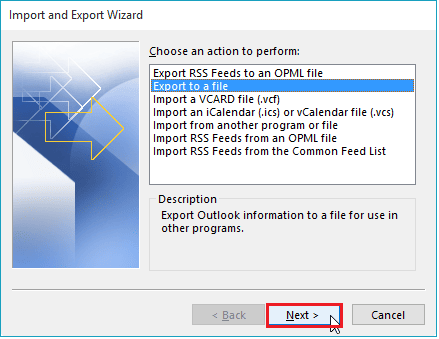
- Step 2. Select Export to a file and click Next.
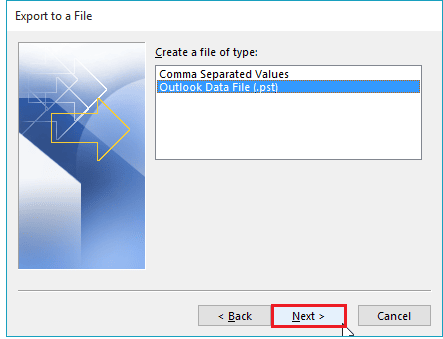
- Step 3. Select Outlook Data File (.pst) and click Next.
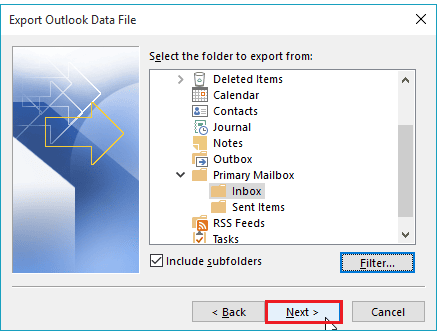
- Step 4. Select the Exchange mailbox folder that you want to move. Tick the checkbox ‘Include subfolders’, use the Filter option if required, and click Next.
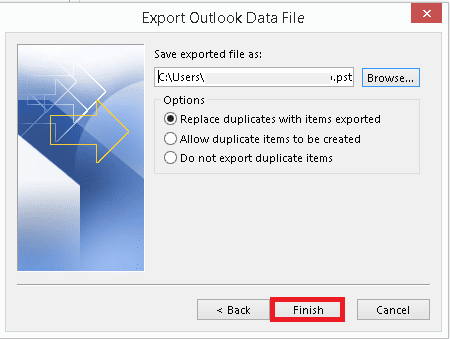
- Step 5. Browse the saving location and choose the required option among the three for managing Outlook duplicate items. Click the Finish option finally
After uploading your Exchange mailbox folder to a PST file, you can easily move it to an Outlook account associated with Office 365. To import PST to Office 365, follow the below steps
- Step 1. Select the File menu from the ribbon, and then click Open & Export > Import/Export.
- Step 2. In Import and Export wizard, select the Import from another program or file option, and click Next.

- Step 3. Select Outlook Data File (.pst) and click Next.

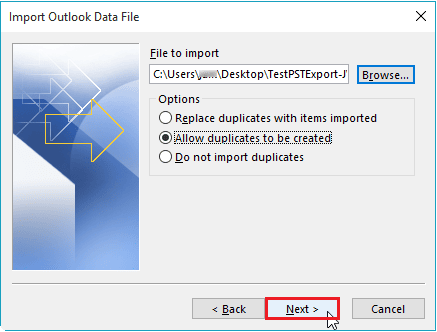
- Step 4. Browse and select the PST file downloaded earlier and choose the desired option. Then, click on Next.
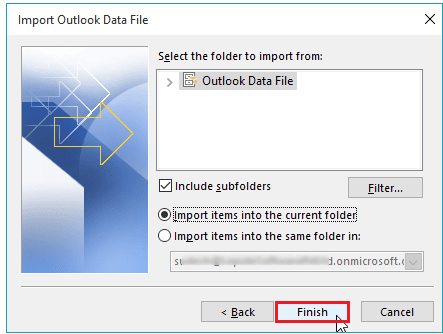
- Step 5. Select the folder to which the PST file is to be imported, by providing the Office 365 account email address. Click Finish.
Manual method comes with several limitations. Some of them are mentioned below:
- Only a single user can export or import mailboxes.
- It cannot be considered like a professional backup solution.
- It is not suitable for public folder backup.
- It is totally dependent on the MS Outlook application.
- There is no incremental backup option in manual process.
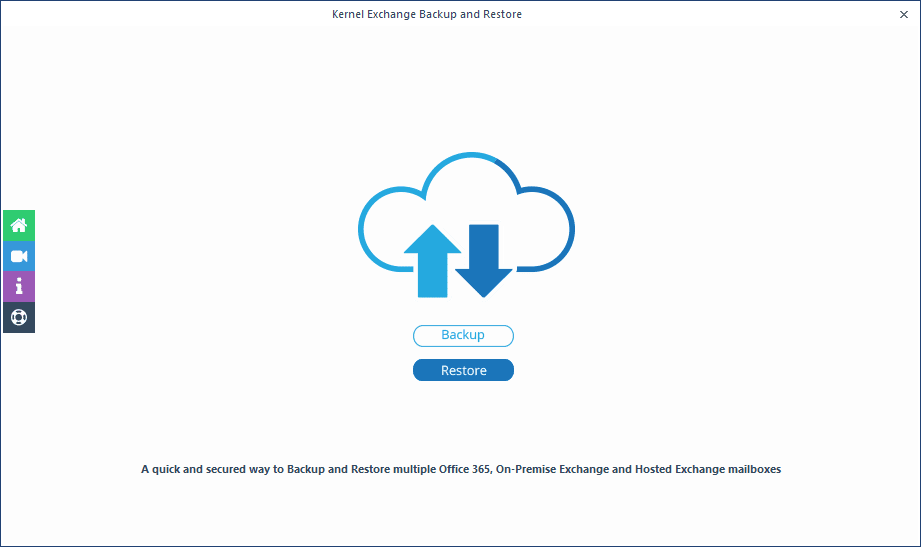
A more straightforward method is to use an automated like Kernel Exchange Backup & Restore tool that can perform both tasks of saving the Exchange mailbox data in a PST file and later restoring that converted PST file to Office 365 through a single platform. It conducts the effortless EDB to PST migration process and provides a migration report in CSV format.
The software facilitates the advanced export feature that can extract mailbox from EDB file to PST format. You can select the necessary filters and export selective files. Follow the steps below to use the tool effortlessly.
- Run the software and select the Backup option.
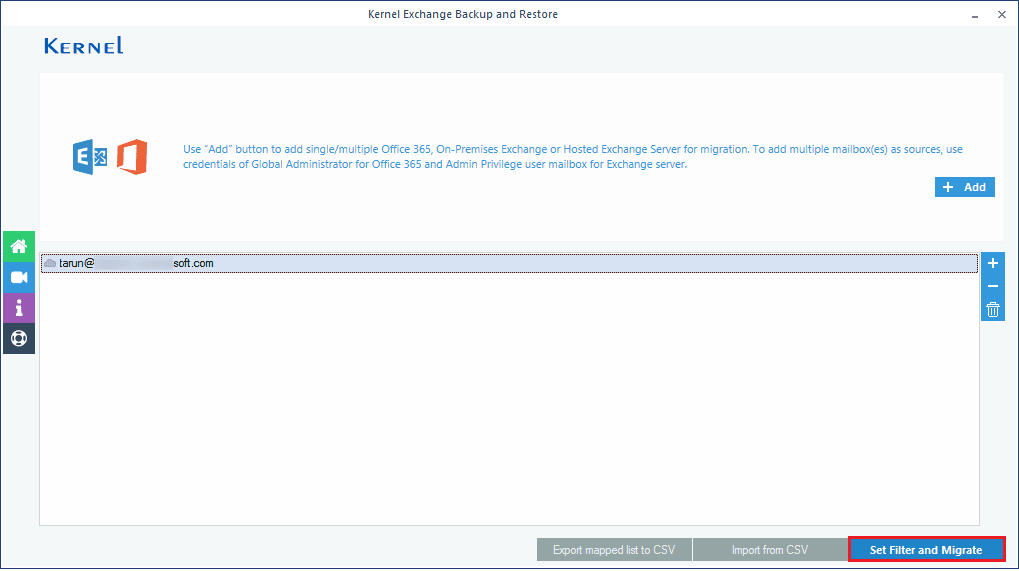
- Click the Add button to add the source Exchange account.
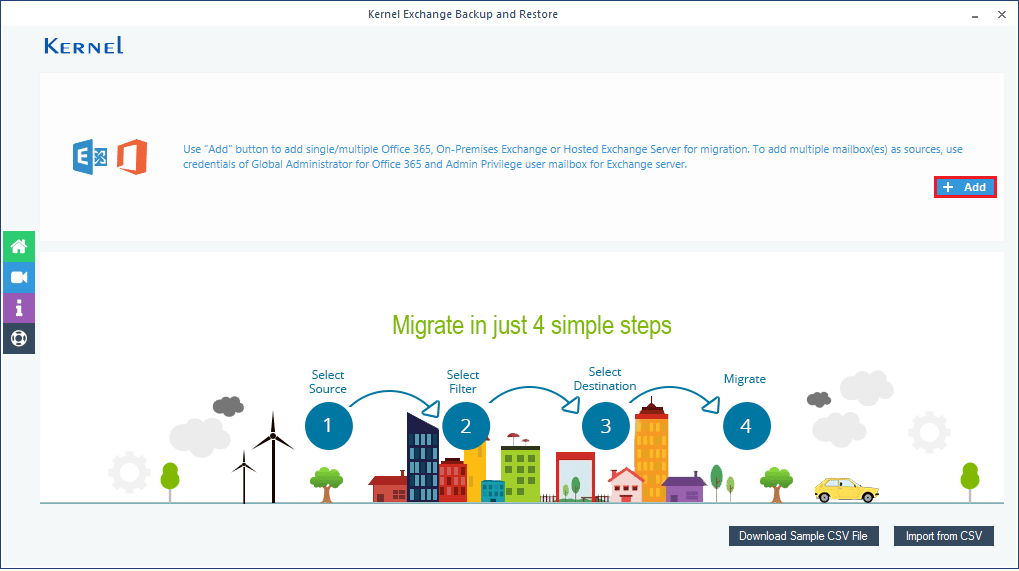
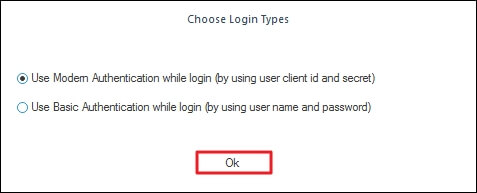
- Select the login mode according to your needs.
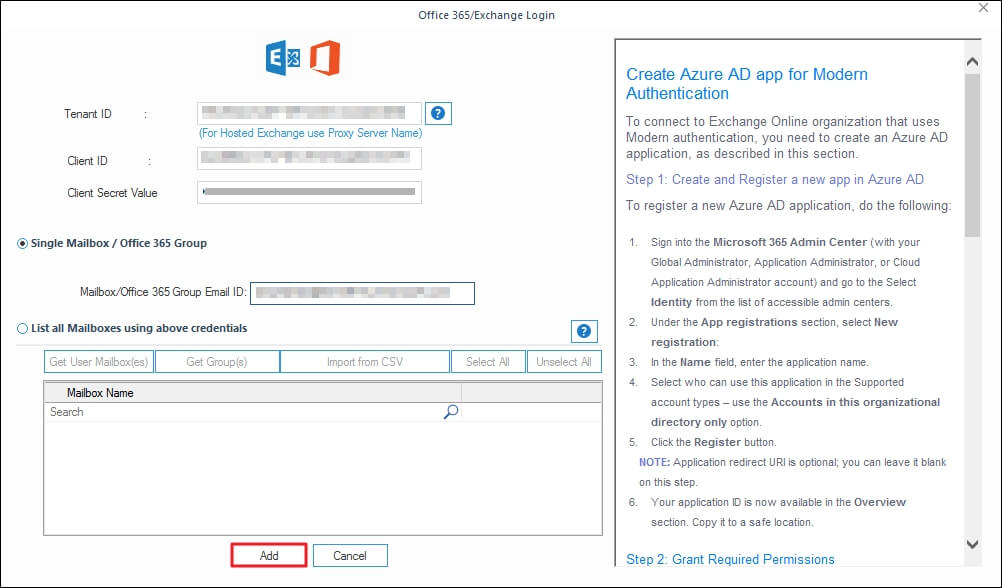
- Input Exchange credentials like Tenant ID, Client ID, Client Server Value, and Mailbox/Office 365 Group Email ID. Now, proceed to Add to link the Exchange account.
- After adding the account, click the ‘Set Filter and Migrate’ option.
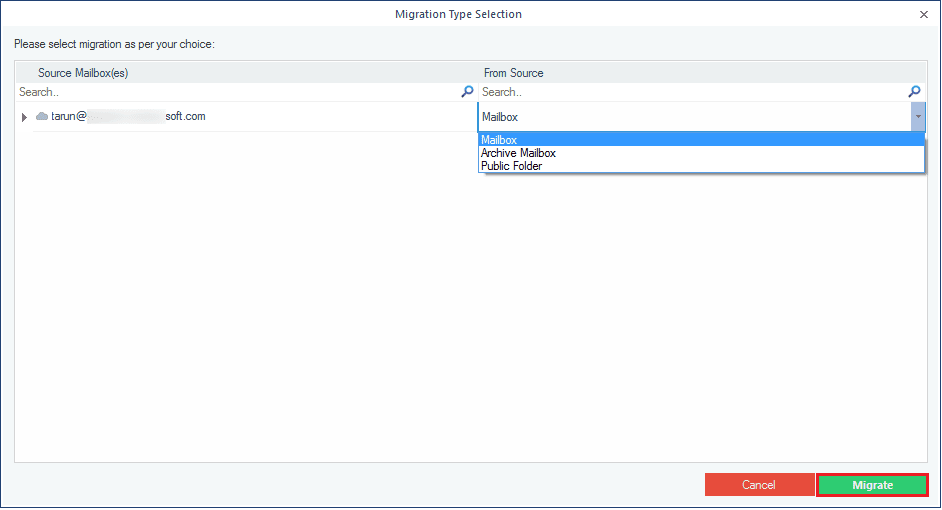
- Select the mailbox data, including Mailbox, Archive Mailbox, and Public Folder, accordingly, that you want to move and proceed to Migrate.
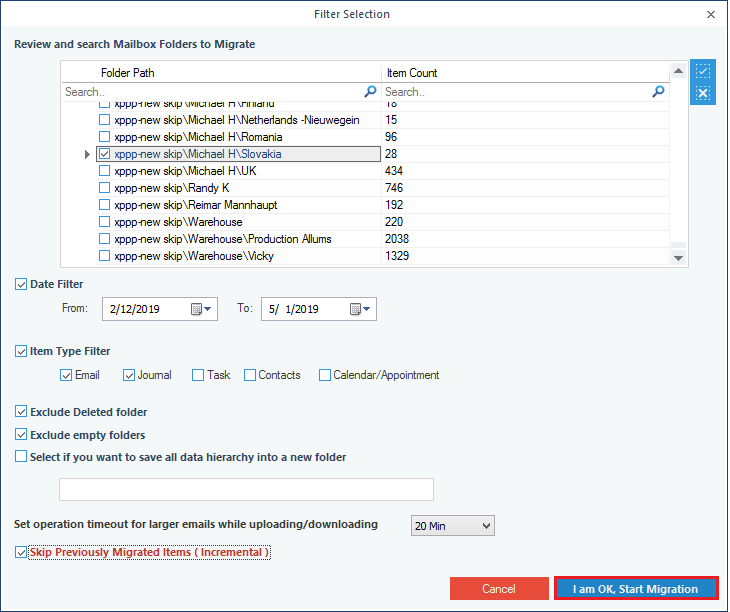
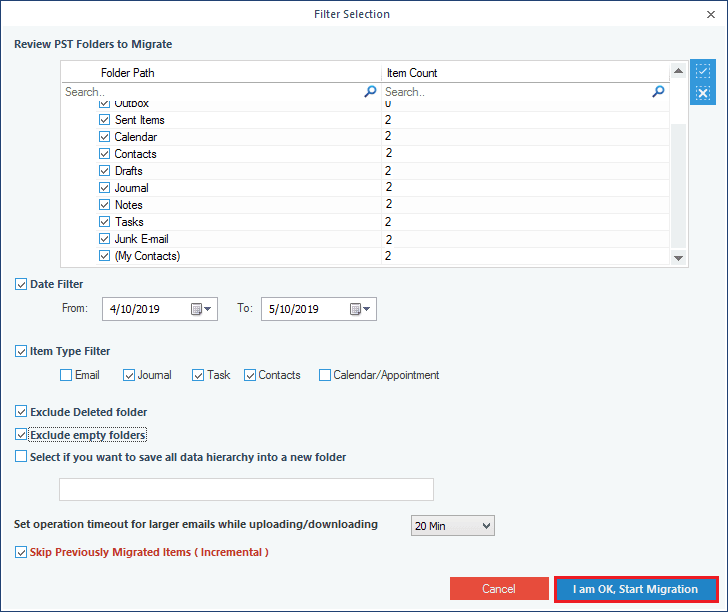
- In the Filter Selection wizard, use different filters such as Folder Filter, Date Filter, Item Type Filter, etc., then hit I am OK, Start Migration.
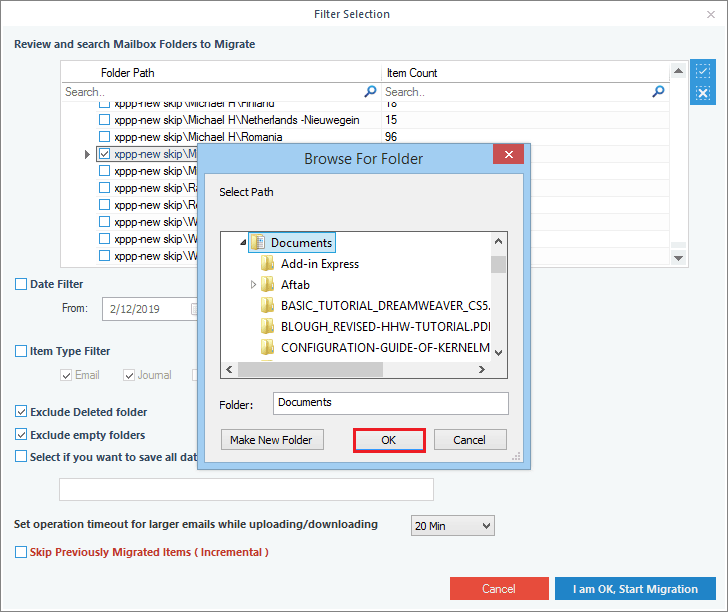
- Provide the destination folder to the PST file. Click OK.
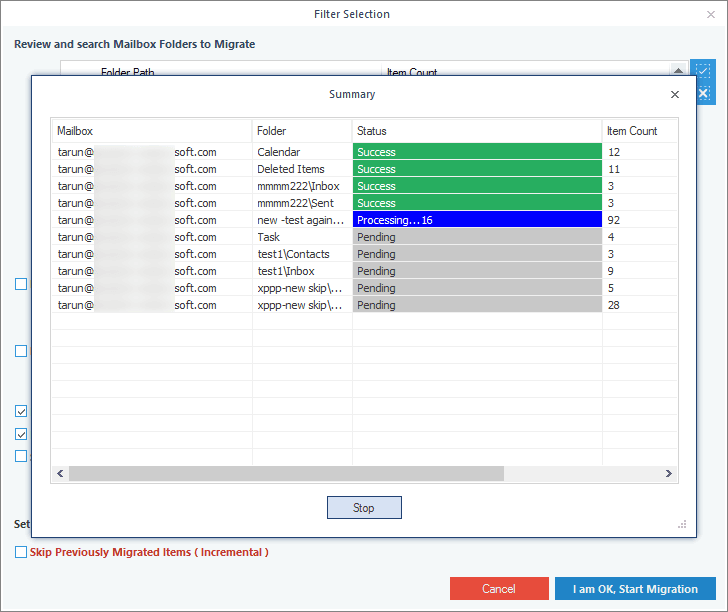
- Once the migration process begins, check the live progress of files.
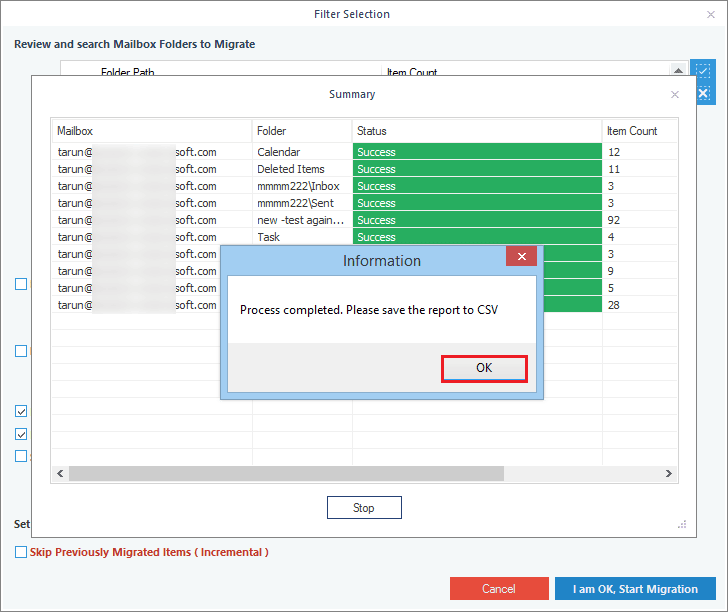
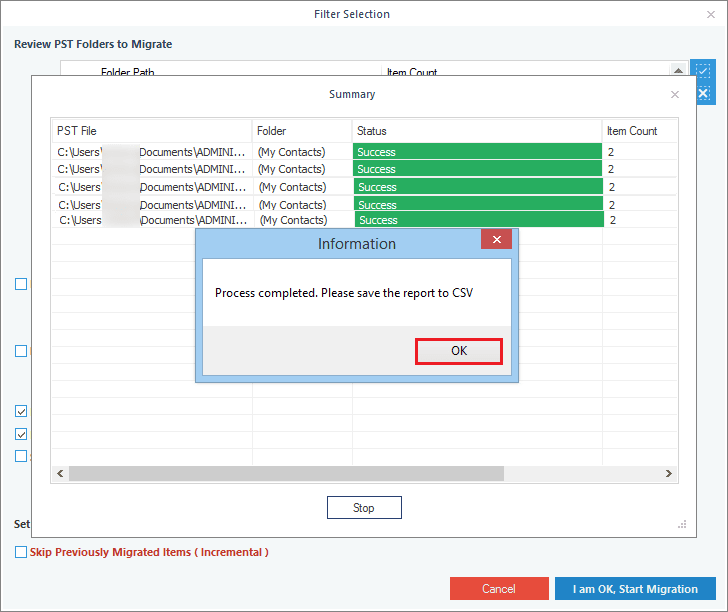
- Once the process is completed, you will get a confirmation pop-up, then click OK.
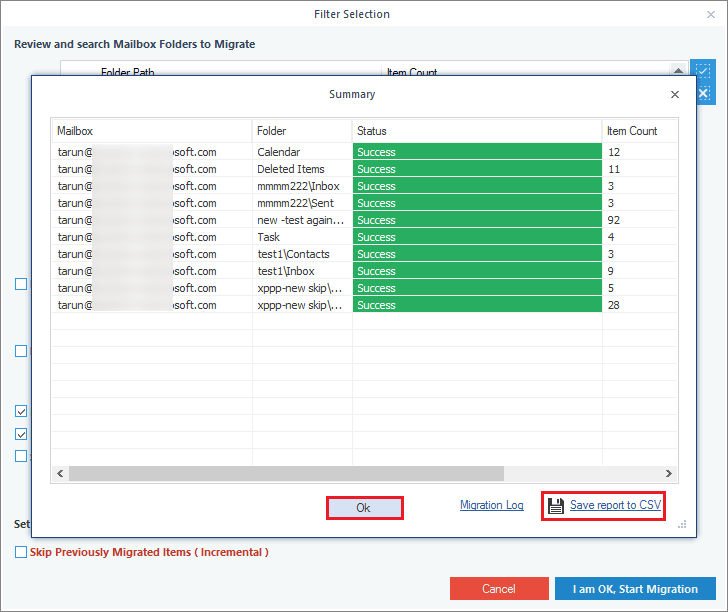
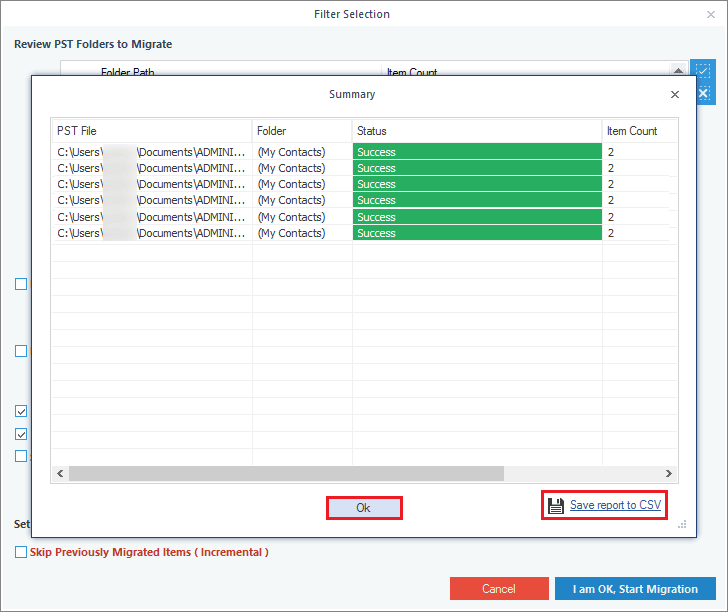
- At last, click on Save report to CSV to download a detailed CSV report and hit OK. .
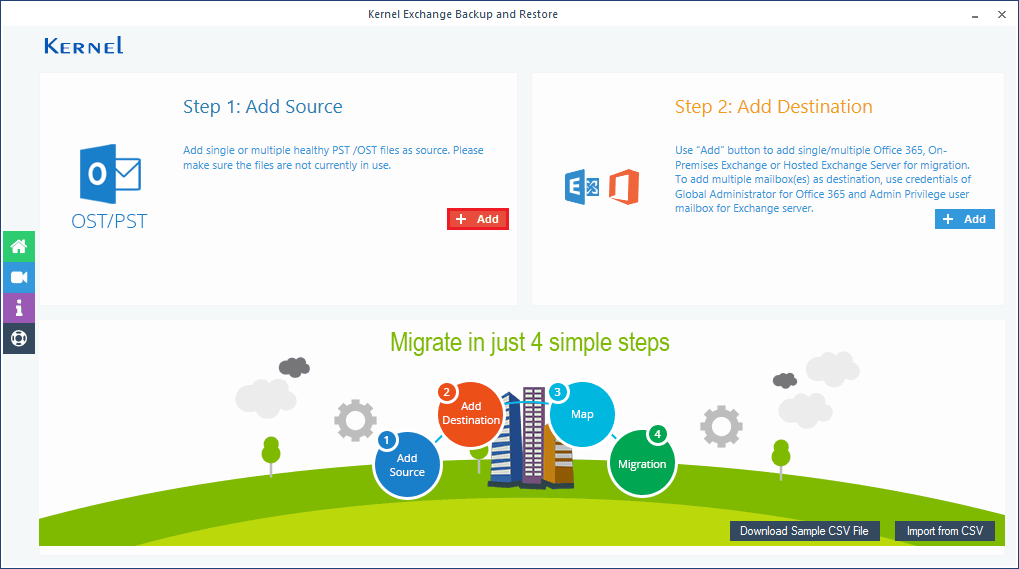
Import PST file to Office 365 mailbox
Now when we have exported the PST files, it’s time to import that PST file into the Office 365 mailbox. Follow the below-given steps to initiate the import process:
- Start the software and click the Restore option.
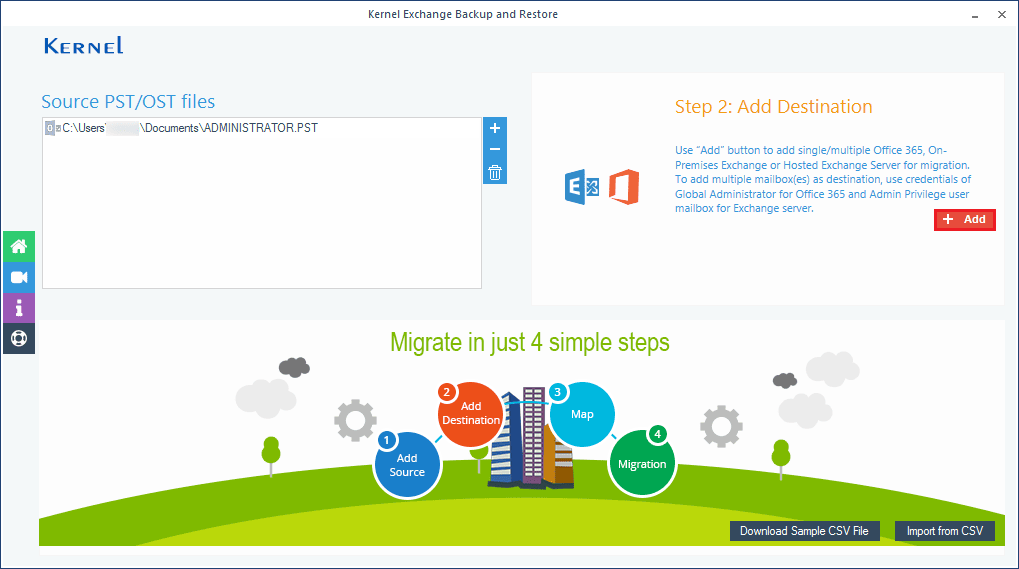
- Click the Add option and browse the PST file. You can add multiple PST files accordingly. Now, in Add Destination section, tap on Add to link a destination account.
- Select the login type as Use Modern Authentication while login (by using user client id and secret).
- Input destination Office 365 account details, choose Single Mailbox/Office 365 Group, and tap on Add.
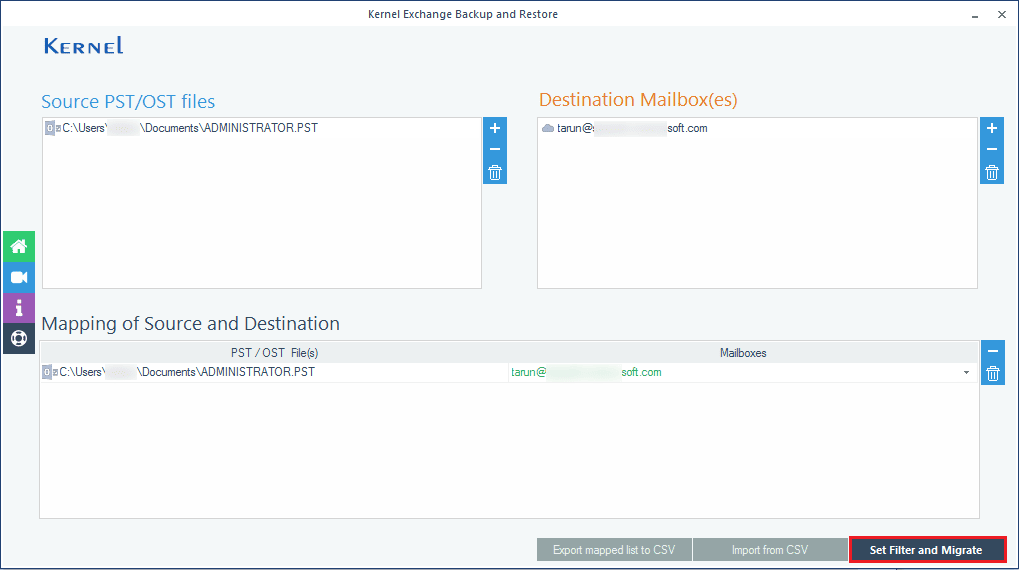
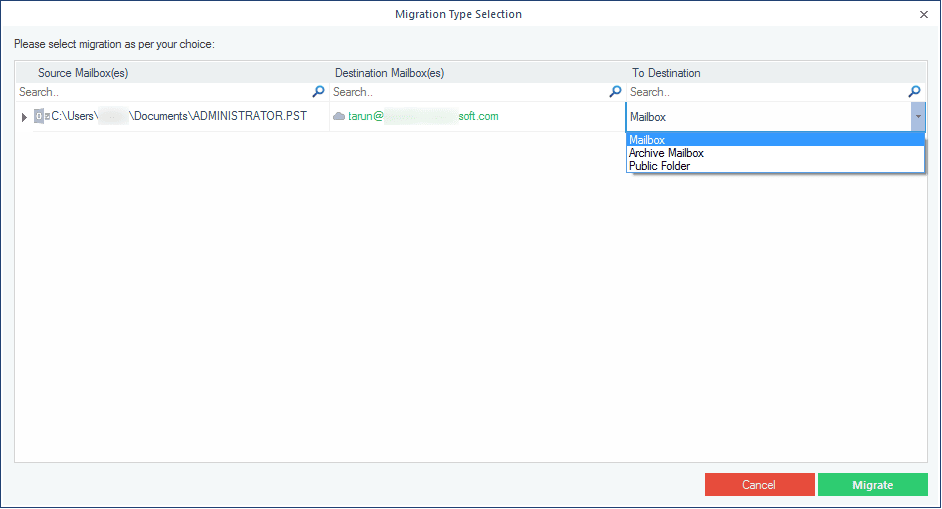
- Map the source PST and destination mailbox using the drop-down menu.
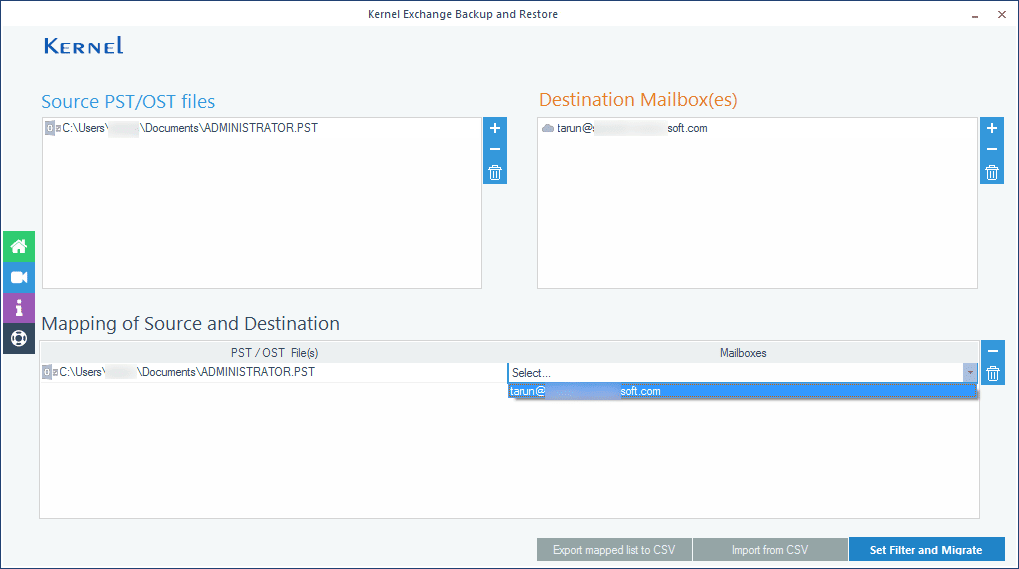
- Click the Set Filter and Migrate option.
- Select the folder among Mailbox, Archive Mailbox, or Public Folder where you need to save the PST file content. Then click the Migrate button.
- Select the most useful filters as per your need and click the I am OK, Start Migration.
- After migration, the tool provides a success message. Click OK.
- Finally, save the report to a CSV file and click the OK button.
Final words
Exporting and importing the Exchange mailbox is difficult, but with the above-mentioned manual method, you can easily export and import PST files in Outlook. However, manual methods are a little bit risky and time-consuming. So, instead of trying manual methods, use the recommended Kernel Exchange Backup and Restore tool. It can easily synchronize your PST files with Exchange and import all your files quickly.
Exchange Backup & Restore for any version of Exchange Server.