If you are using MS Outlook for professional or personal purpose, then you might know the importance of each and every item it has. Be it tasks, calendar, emails, attachment, journals, notes, or contacts everything has its own role to play. So, make sure to avoid having unnecessary items, especially duplicate items. Having irrelevant items may lead to many unwanted problems like taking a lot of space, slowing down of MS Outlook, and many other annoying situations. So, we will discuss the main reasons that lead to duplicate contacts and possible solutions for them.
There are many reasons behind having duplicate contacts, and they are:
- Importing contacts from various devices that have same contacts
- Single user with multiple email accounts
- Synchronizing with multiple social media platforms like Twitter, Instagram, Facebook, etc.
- Importing contacts from other online or email platforms
So, this is why you might have duplicate contacts in Outlook, but there can also be duplicate emails in Outlook which can cause even more trouble. You can tackle them easily if you know the reasons for having duplicate emails in Outlook.
How to remove duplicate contacts from Outlook?
We are listing a few simple methods to deal with the issue of duplicate contacts.
- Try removing duplicate contacts one by one
Yes, the very first manual way to remove duplicates is to perform it by selecting contacts one by one. For this, you need to open Outlook, select the People sign dedicated to contacts, now select the Phone icon, mentioned in the current view ribbon on the top of the Home screen. Now select duplicate contacts one by one by holding the Ctrl key. Once you have selected all the duplicate contacts, delete them by pressing Ctrl + D. This is a hectic approach and nearly impossible if you have a lot of contacts. - Try using Import/Export option
With Import/Export utility, you can remove duplicate contacts, and it is easier, or you can say less hectic then removing emails one by one. Let’s get started:
Phase 1: First you need to open contacts and create a new folder there and then select all your contacts from the contact list and move them to the newly created folder. Now your contact folder is empty; this is the time when you start the import/export process from the File menu. Start the process just like you do with emails and select Export to proceed and go for Comma separated values. Now, in the process, select the new folder you created and save the file.
Phase 2: Now, you need to import the contacts back to Outlook again. For that, start the Import/Export process again from the File menu and select Import from another program or file this time. While proceeding further, browse the file newly created file again, and select Do not import duplicate items and opt for the primary contact folder for the destination, as we left it empty. Finish the process.
Phase 3: Now copy the contacts from the duplicate folder and add it back in the primary folder. So, to start, open the newly created folder and select all the contacts and move them to the primary contact folder. While transferring select Update information of selected contact if Outlook prompts action for a duplicate item. After this select update if you do not want the duplicate of that specific item, if you want this action for all duplicate items, select update all. Once all contacts are migrated, finish the process and delete the folder you created recently. - Try Kernel for Outlook Duplicates Remover
Kernel for Outlook Duplicates Remover is a cut short way to remove the duplicate items from MS Outlook. These items could be emails, journals, contacts, notes, calendars, attachments, and notes, basically, every item Outlook has. Let’s see how you can remove duplicate contacts:- Install and run the software in the system.
- Click Add Task to add the information about the process.
- The next step, give a Task Name and Task Description. Click on Next to proceed.
- Now, the list of Outlook folders will be on display. Select contacts folder from there.
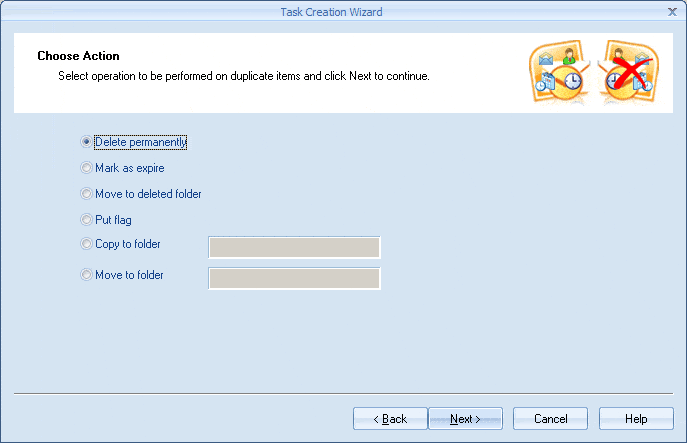
- In this step, select Delete Permanently from the list of actions and click on Next button to proceed.
- In Duplicate Comparison Criteria dialogue box, select your preferences on which you want the results. Click on Next to proceed.
- Once the process is done the whole report will be displayed to you by the software if you want to save it click on Save Report.
- Click the Finish button to end the process.

Now, go and check your contacts folder, all duplicate contacts must be gone for sure.
Conclusion
We have stated manual and automated method to separate duplicate contacts from the original ones. After reading all about duplicate contacts and how to get rid of them, you might be quite confused about which method to go for. But which method is better and how? As a user, I experienced that using an automated method for removing duplicates was a quicker and easier method to perform. The automated method is not only fast and easy to use but also provides accuracy and assurance of retaining all original contacts at once. The best thing about this tool is that it not only helps in removing duplicate contacts, but also aids to remove duplicate items in MS Outlook.