Read time: 6 minutes
A video playback error is a typical problem that can happen often in media players. It occurs when Windows or a media player cannot properly decode, load, or display a video file. During video playback errors, several issues may appear. A few of them are:
- The video won’t open.
- A black screen with audio.
- The video freezes or stutters.
- Videos won’t play in Windows 10.
- The video displays 0xc00d3e8c error.
- Streaming videos buffer continuously or fail to load.
- Windows Media Player or Movies & TV displays an error code.
Then, it’s critical to identify the primary cause and act accordingly with video playback troubleshooters to resolve video playback error in Windows 10. So, let’s start by looking at the causes first, then solutions!
What Causes Video Playback Errors in Windows 10?
There are different reasons that can lead to this error. Some common causes have been listed for you below:
- Outdated graphics drivers
- Missing or unsupported codecs
- Hardware acceleration issues
- Outdated Windows or WMP version
- Browser-specific and codecs issue problems
- Damaged Windows system files
- Corrupted or damaged video files
- Insufficient system components (CPU, RAM, and GPU)
Top 7 Solutions to Resolve Video Playback Error in Windows 10
Follow these video playback troubleshooting methods when you have video playback error in Windows 10 & 11:
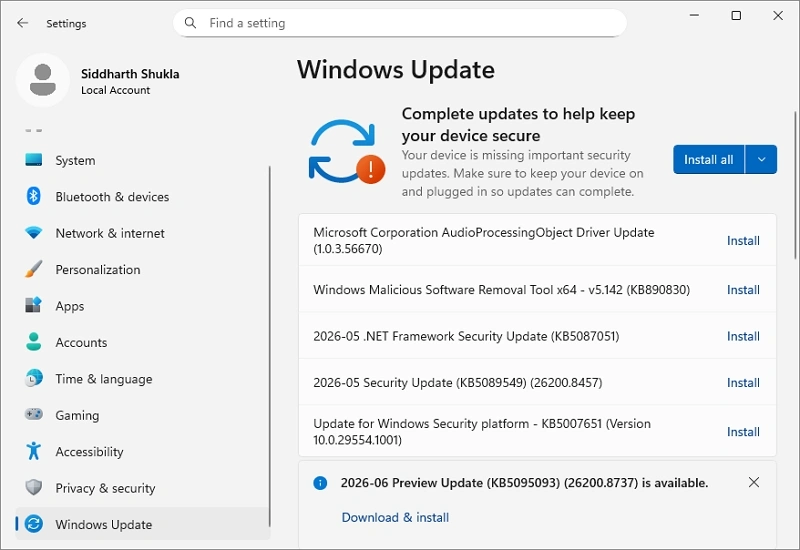
Method 1: Install the Latest Windows Updates
Windows updates can fix issues with multimedia components, graphics compatibility, and security. So check for them and update them immediately. To check for updates:
- Open Settings, then go to Windows Update.
- Click Check for updates and install all available updates.
- Restart your computer and try to play video again.
Note: Also, make sure to have an optimal device with sufficient system components (CPU, RAM, and GPU).
Method 2: Check and Update Display Drivers of the System
Upgrading the system display drive can also help to fix video playback errors. To do so, upgrade these drivers from the official website of your system’s brand. The steps are as follows:
- Press Windows + X and select Device Manager.
- Expand Display adapters and right-click your graphics card, and select Update driver.
- Choose Search automatically for updated driver software.
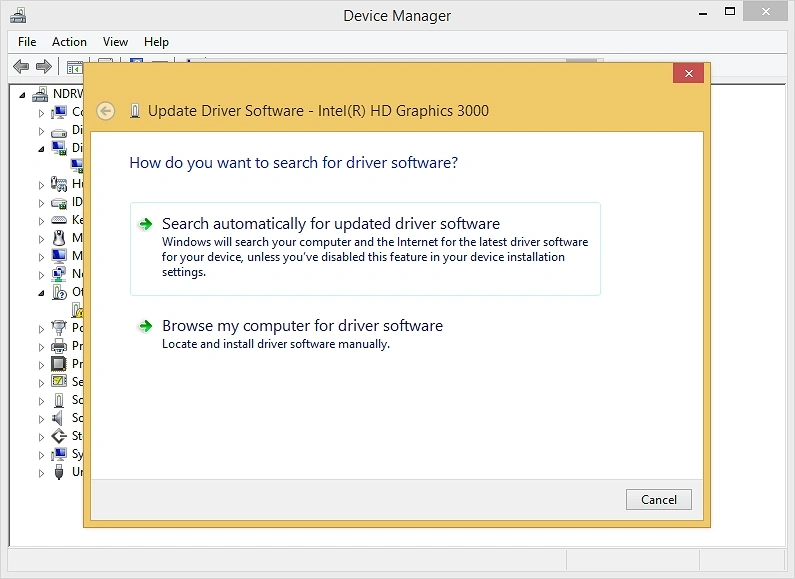
- After the installation completes, restart your computer.
Note: If needed, restart your graphics driver using the keyboard shortcut:
Windows + Ctrl + Shift + B
Method 3: Troubleshoot Windows Media Player
The troubleshooter feature is present in your systems, which helps the users to detect and then fix video playback error in Windows 10. It runs a deep scan to fix all common problems that you are facing. Follow these steps to run the troubleshooter:
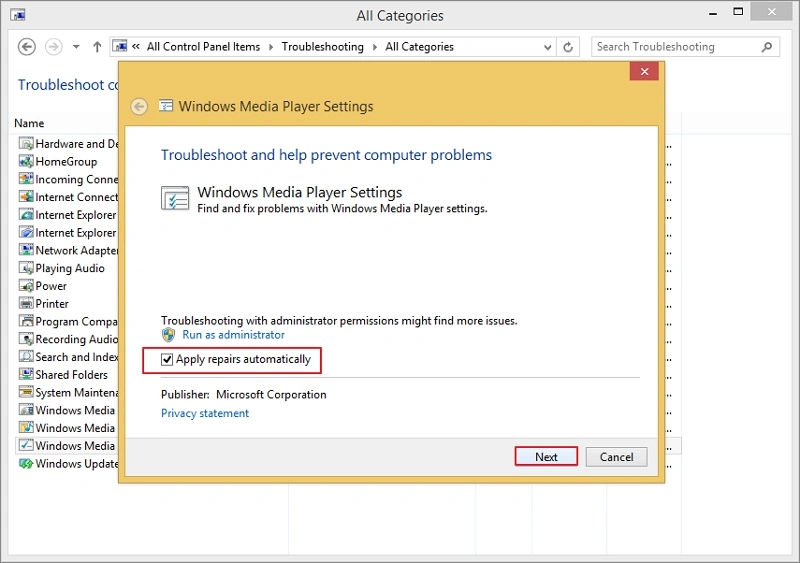
- Move to the Control Panel and click on Troubleshooting.
- Click View all and tap on Windows Media Player Settings.
- In Advance, check the Apply repair automatically Click Next.
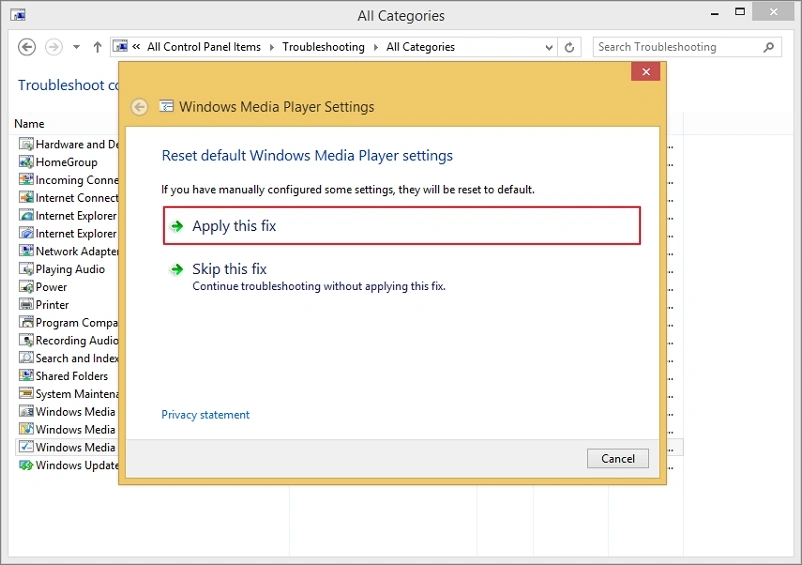
- After checking the issue, click on Apply this Fix, then close.
Note: Reinstall Windows Media Player and then play your video file.
Method 4: Check and Get Required Codec Pack
Having the right supporting codec can be a video playback troubleshooter. For that, follow the steps mentioned below:
- Start by uninstalling the Codec Packs, then reboot the system.
- Now, launch Windows Media Player troubleshooting packs and check if the native Codec pack is intact.
- Finally, download the new codec pack for your system.
Formats that Need Additional Codec Support
| Video File Format | Possible Issue in them |
|---|---|
| MP4 | HEVC (H.265) codec missing |
| MOV | Apple codec compatibility |
| MKV | Unsupported codec inside the container |
| AVI | Legacy codec not installed |
| HEVC/H.265 | Windows edition may lack codec support natively |
Method 5: Disable Hardware Acceleration
In media players, hardware acceleration uses the system graphics processor to improve video playback performance. But outdated GPU drivers lead to video playback errors and failures as well. Disable it temporarily by navigating to Settings, then Videos and Hardware Acceleration. After that, restart the media player and try to play your video files again.
Method 6: Try Another Media Player
If you are facing playback errors, you must try to play the video on another video player. The problem might be with your media player and not with the video. This hit and trial way works often, but sometimes the video playback error remains the same on multiple media players.
Method 7: Change the Power Plan Settings
To change the power plan settings from Control Panel, follow the steps mentioned below:
- Open the Control Panel and in the search tab, type power.
- From the search results, select Edit Power Plan.
- Now, click on Change advanced power settings.
- In the Power Options dialogue box, go to Processor Power Management.
- Select Maximum processor state and see if the Plugged-in percentage is 100% or not. If it is not, then do it 100% and click on OK. Then, restart your system.

Bonus Tip: If you’re facing playback issues in browsers or online videos buffer, freeze, or display video playback errors, then these fixes will help you:
- Clear your browser cache & cookies.
- Disable browser extensions
- Update your browser
- Disable browser hardware acceleration
- Stabilize your Internet connection
Still, if you’re facing the same error, the video itself is likely corrupted or damaged.
How to Identify and Repair Corrupted Video Files?
The reasons behind video file corruption involve sudden recording interruption due to power loss, battery failure, or device shutdown or the file transfer was improper or incomplete. A corrupted video restricts playback even after applying fixes, be it device-specific or browser-specific. A few symptoms of corruption issues in video file are:
- The file won’t play in Windows 10 or any media player.
- Visuals are not smooth.
- The thumbnail doesn’t appear in File Explorer.
- The file size is unusually small or 0 KB.
- An error message appears regardless of the media player used.
Repair the Video Using VLC Media Player
The VLC media player has the capability to repair corruption and errors in videos. However, it works on AVI video format only and is limited to fixing minor-level corruption. Follow these steps to repair the video using VLC:
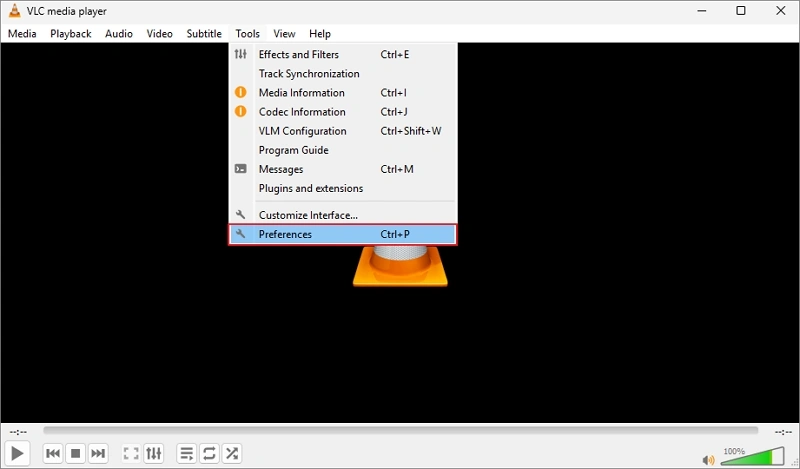
- In the VLC Media Player, click on Tools, then Preferences.
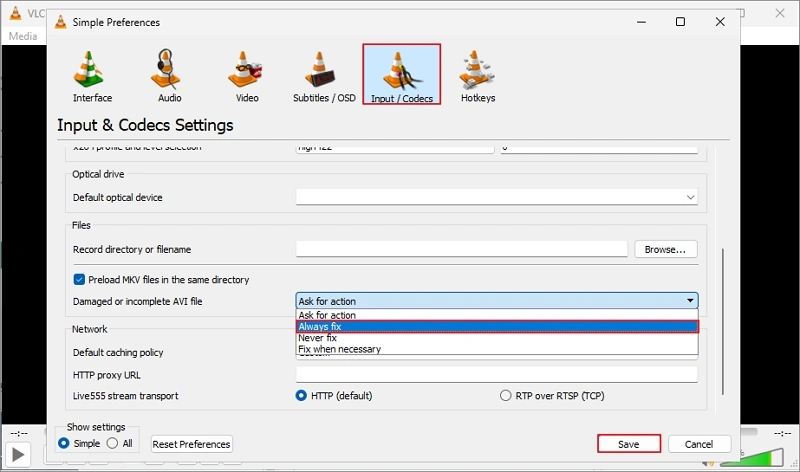
- Move to the Inputs & Codecs section and click Browse to add your video files.
- Select Always fix in the Damaged or incomplete AVI file and tap on Save.
Note: You can change your video to any format manually or repair via VLC. However, VLC may help if the damage is minor, but it cannot repair:
- Severely corrupted video headers
- Damaged audio and video streams
- Interrupted camera recordings
- Broken MP4 or MOV file structures
- Videos with missing data blocks
If you have expertise with the command line, then use FFmpeg to repair video files. Moreover, video transcoding may also help.
Repair Severely Corrupted Video Files
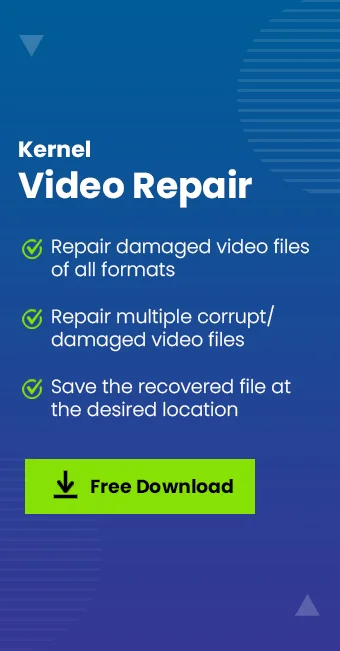
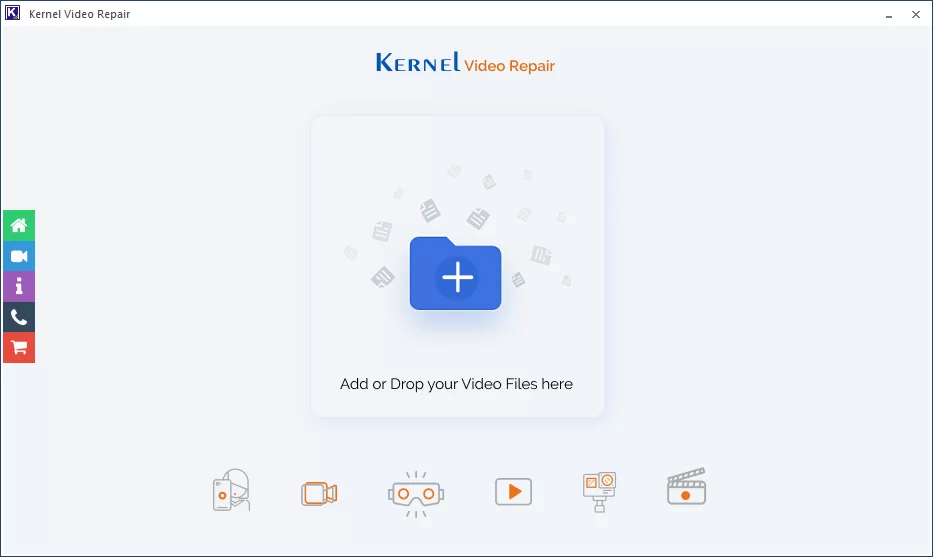
When manual video playback troubleshooting methods, VLC or FFmpeg don’t work for smooth playback, get a professional video repair tool for resolution. Kernel Video Repair fixes any sort of corruption in a wide range of video file formats, no matter how severe it is. So, let’s know how this tool can help you to fix video playback error in Windows 10 system which you are getting:
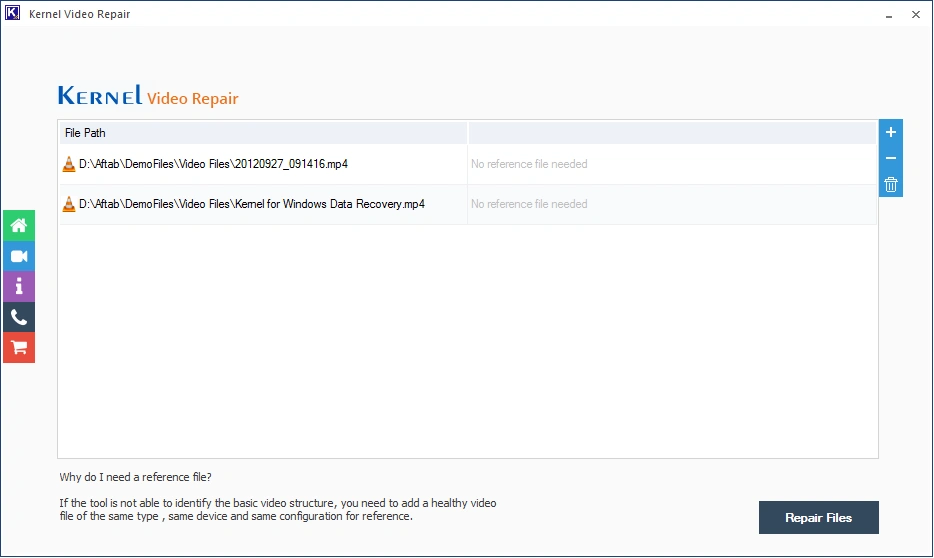
- Open Kernel Video Repair, and click on the Add (+) icon to add the corrupted video files.
- Click Repair Files to repair the corrupt video files.
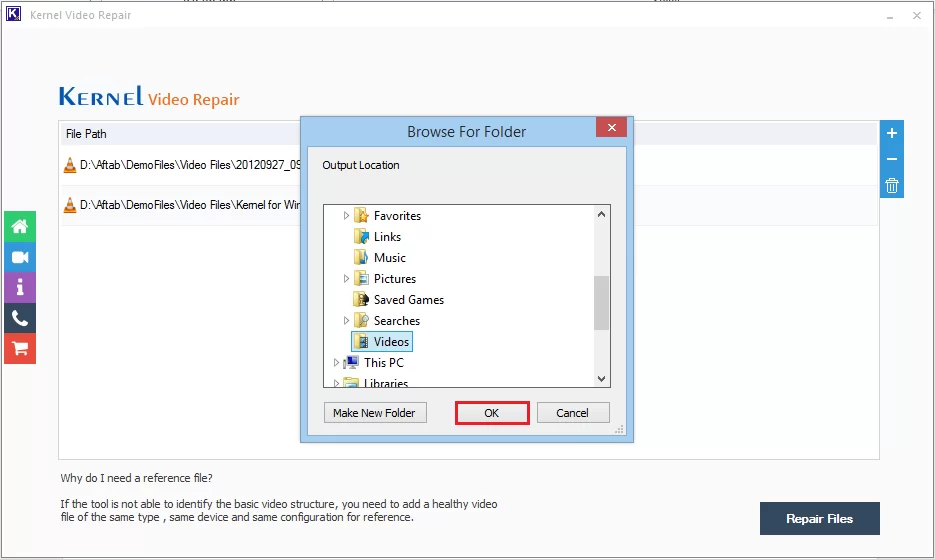
- Click OK after selecting a folder location.
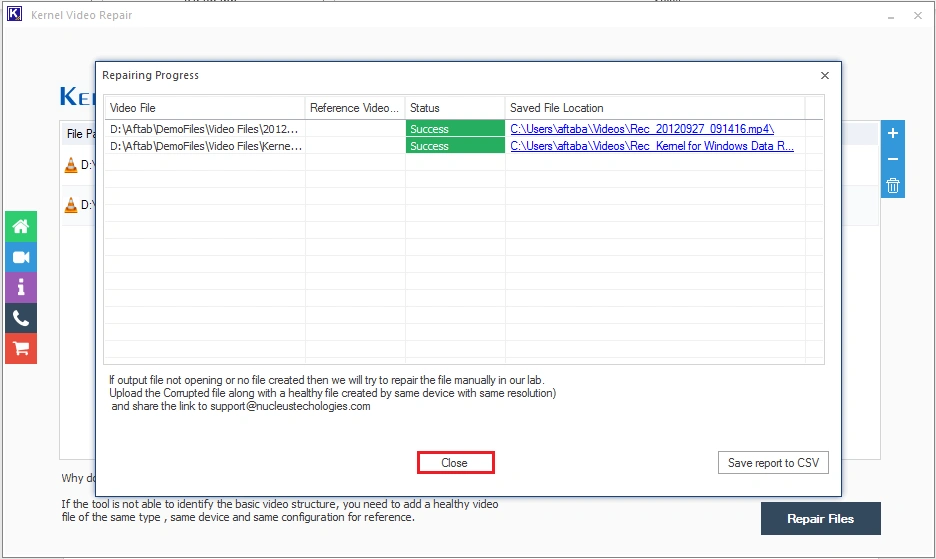
- Finally, click Close option when the tool has successfully recovered the video files.
Final Words
Video playback issues and errors can actually spoil your well-planned day with your friends and family. To avoid such problems in the future, keep your system drivers and codec packs up to date, and take special care of your system’s security.
If the video playback error occurs, start fixing device issues, browser issues, as well as video file issues specifically. To fix video file-related issues, always keep Kernel Video Repair accessible to fix video not playing issues for quick solution, and continue with your great video experience.