

Do you want to migrate Apple Mail to Office 365, but your mailbox data is the biggest concern? It is quite understandable because mailbox data handling in Apple Mail is difficult from other email clients. It stores emails locally under “On My Mac” mailboxes alongside the server.
Also, it handles non-email items such as contacts, calendars, notes, and reminders through native integration with the Apple ecosystem and shared account sync services. Each situation requires a different migration approach that we will cover here, along with their prerequisites and limitations.
Essential Prerequisites Before You Start the Migration
Check out the section below to know all the required details to move Apple Mail mailbox data to Office 365.
1. Understand Apple Mail Data Storage
Here is an overview of the mailbox data types in Apple Mail and where they are stored.
|
Data Type |
Storage Location |
Export Format |
|
On My Mac Mailboxes |
Locally on Your Mac |
Export as MBOX. |
|
IMAP Mailboxes |
On the Mail Server |
Usually no export needed for an IMAP migration. |
|
iCloud Mail |
Apple’s Servers |
Accessed through Apple Mail. |
|
Exported MBOX Files |
A File on Your Mac |
Import into a compatible application & export. |
|
Contacts |
The Contacts App (On My Mac, iCloud, or Another Account) |
vCard (.vcf) |
|
Calendars |
The Calendar app (On My Mac, iCloud, or Another Account) |
Calendar (.ics) file |
2. Check Your Apple Mail Data Type (Source)
First, identify the email account configured in Apple Mail and where its messages are stored.
- Identify local mailboxes under the On My Mac section.
- Check whether the original email account is still active.
- Determine whether you already have exported MBOX files.
- Identify the mailboxes, folders, and date range you need to migrate.
- Check whether your account uses IMAP, POP, iCloud Mail, or another service.
3. Prepare the Microsoft 365 Account (Destination)
Make sure the destination environment is ready before you migrate.
- Verify the active status of destination mailboxes.
- Confirm that you have sufficient mailbox storage.
- Create the required Microsoft 365 user accounts and mailboxes.
- Decide whether you want to import data into a primary or archive mailbox.
- Get the required administrator permissions for Exchange Admin Center or Microsoft Purview.
4. Create A Backup of Apple Mail Data
Keep the original data and exported files until you have verified the migration.
5. Check the additional Migration Requirement
Consider these final requirements before proceeding.
- A stable internet connection for synchronization.
- Confirm that you have the required account credentials.
- Decide the selected folders and date ranges for migration.
- Plan a separate migration for Apple Contacts or Calendars.
- Identify how you want to organize the migrated folders in Microsoft 365.
Manual Ways to Migrate Apple Mail Mailbox Data to Office 365
Once you have prepared your source and destination then apply the migration methods based on your source type. For this, go through this section carefully.
Way 1. Migrate Apple Mail to Office 365 Using IMAP Migration (Only Emails)
Once you have prepared your source and destination, apply the migration methods based on your source type. Follow the given steps carefully.
Step 1. Go to the Exchange admin center to proceed.
Step 2. Navigate to Migration and Add migration batch. 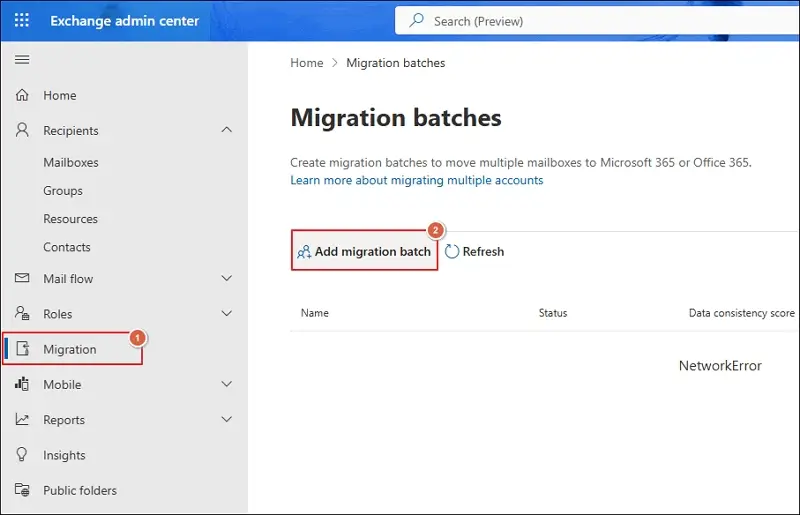
Step 3. Give migration batch a unique name and select a path. Then, click Next.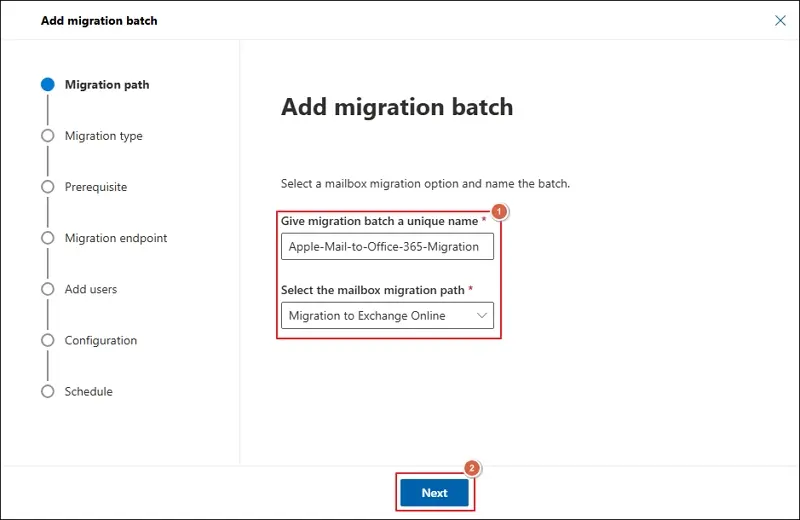
Step 4. Select the migration type as IMAP Migration and proceed to Next. 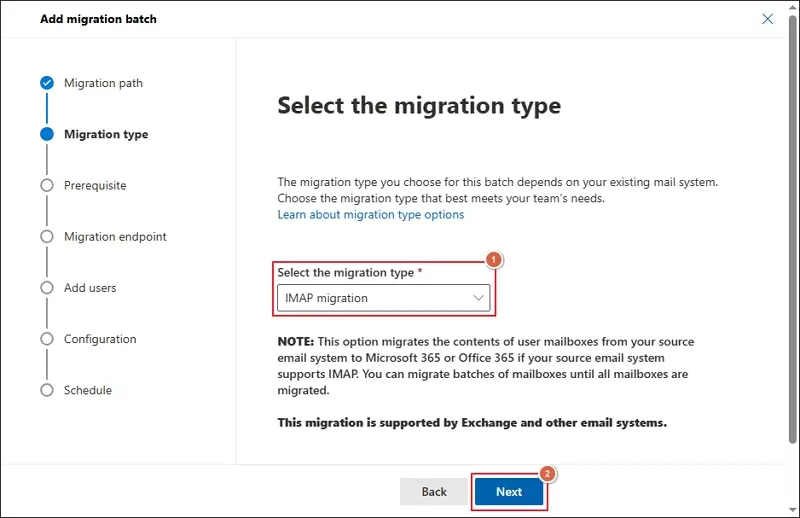
Step 5. Complete all the Prerequisites for IMAP migration and click Next.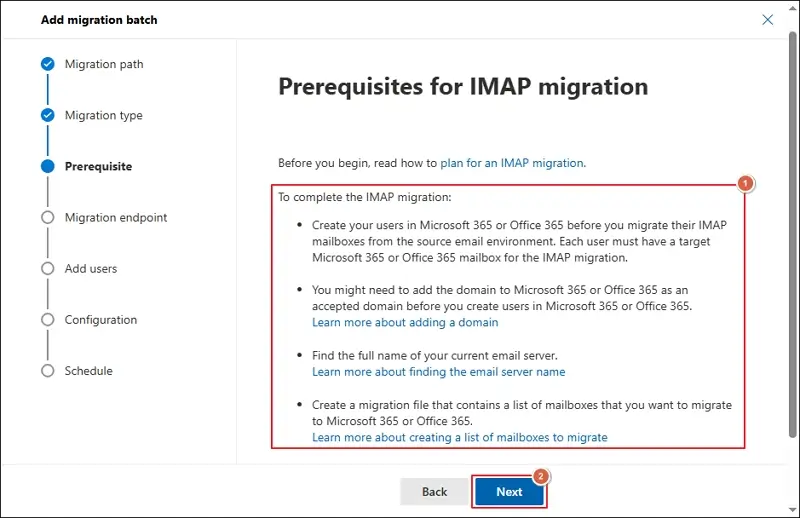
Step 6. Set a migration endpoint and proceed to Next. 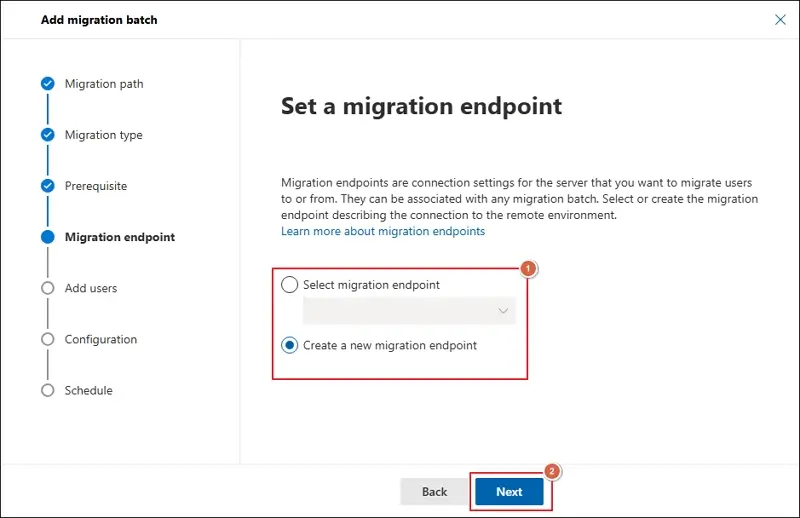
Step 7. Enter the Migration endpoint name and maximum concurrent limits. Then, click Next. 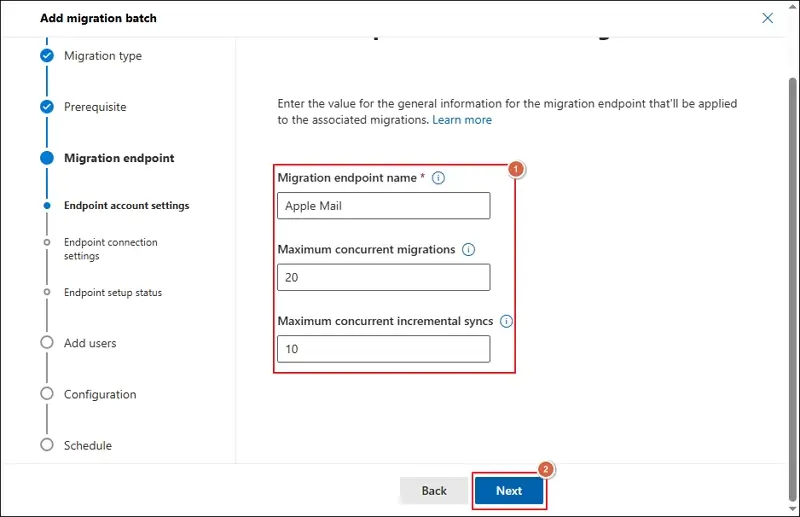
Step 8. Provide details for IMAP migration configuration and hit Next. 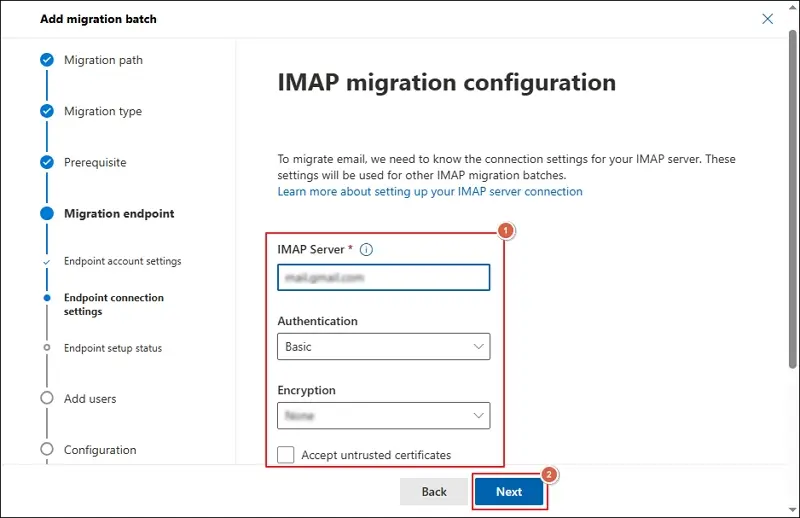
Step 9. Check endpoint setup status and click Next. 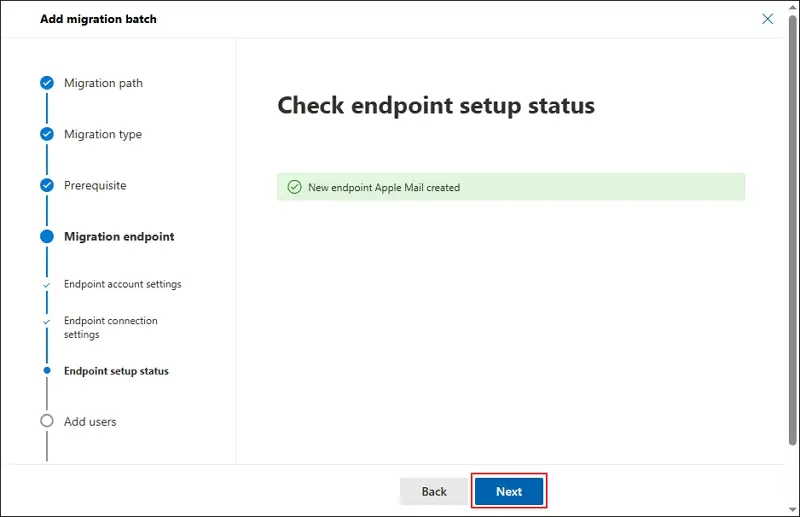
Step 10. Download a CSV file as needed to add users. Then, Import CSV file again and proceed to Next. 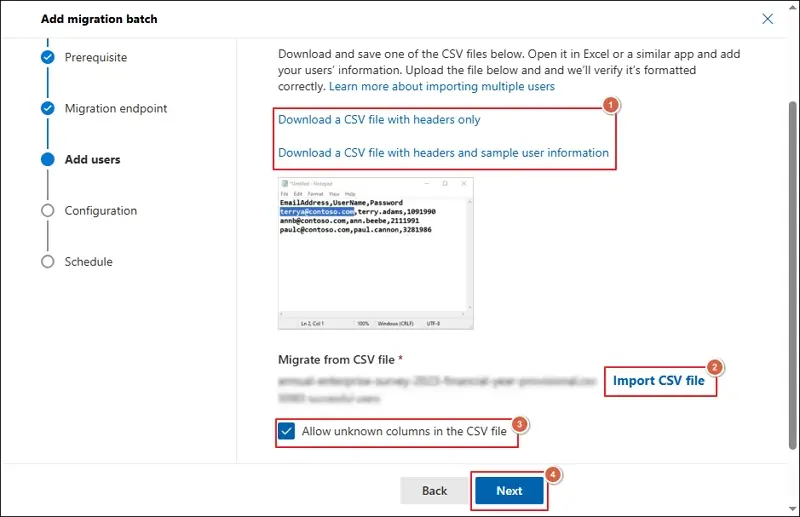
Step 11. Apply the filter if required and click Next. 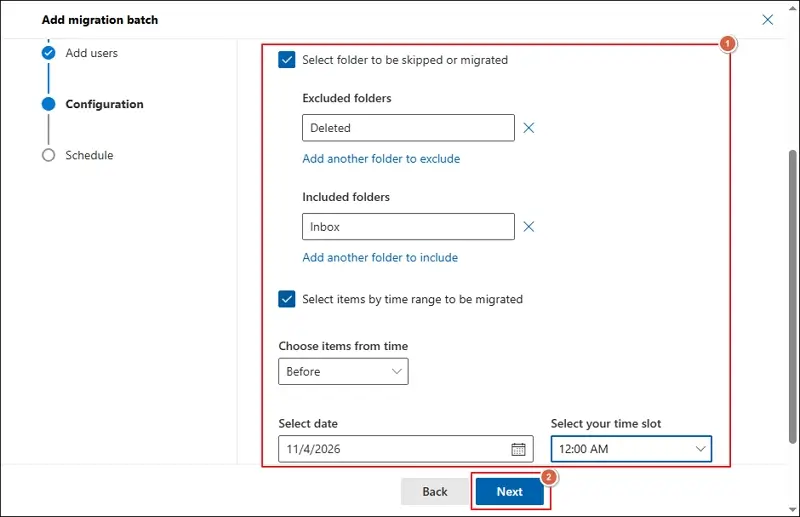
Step 12. Schedule batch migration and proceed to Save option.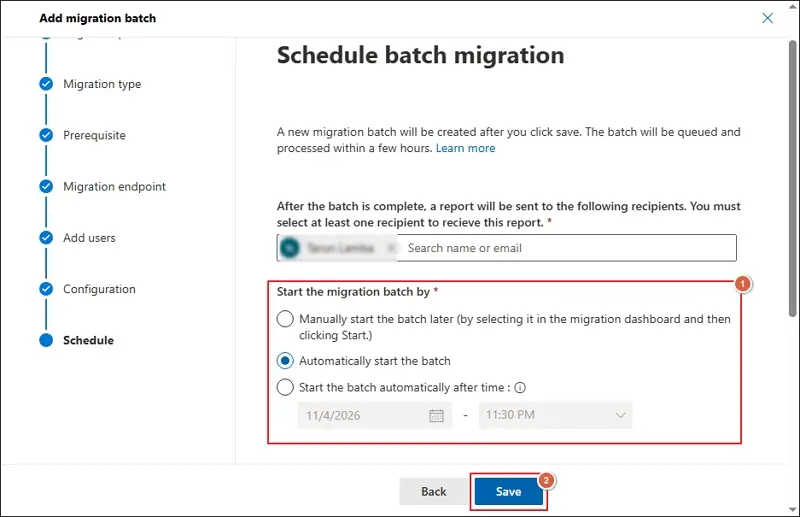
Way 2. Move Apple Mail Mailbox Data to Office 365 Using Network Upload (Complete Transfer)
If you want to migrate your emails stored in MBOX files, POP3 downloaded mailboxes, and On My Mac mailboxes, then use this method. Follow the simplified sections carefully to apply the steps.
Section 1. Import the MBOX Files to Apple Mail Client
First, import the locally stored MBOX files to Apple Mail with these steps:
Step 1. Access Apple Mail on your Mac system.
Step 2. Click on File and proceed to Import Mailboxes. 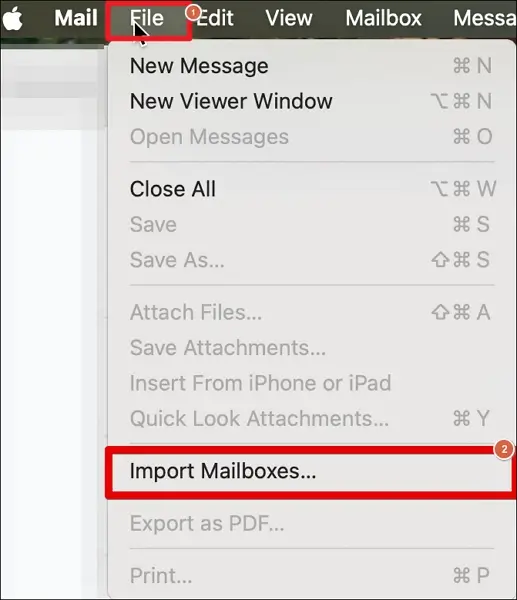
Step 3. Select the Files in mbox format option and proceed to Continue.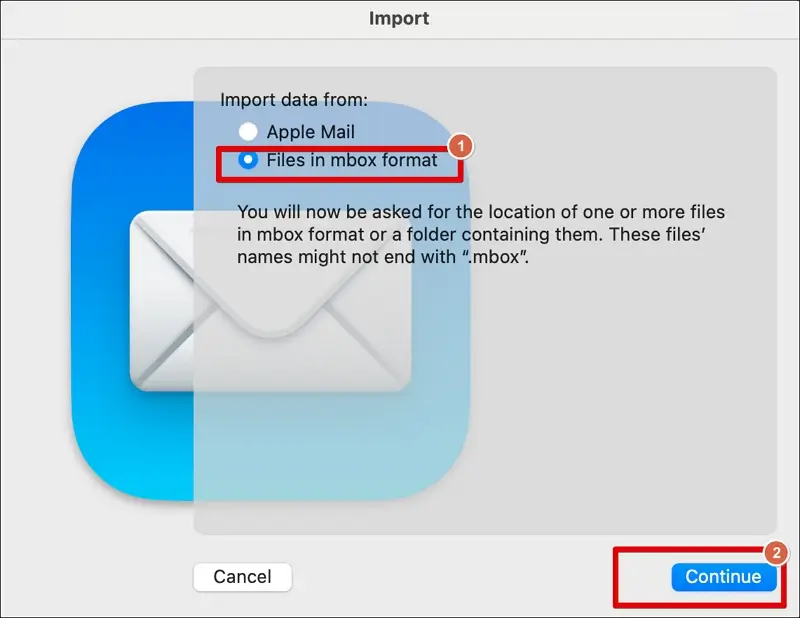
Step 4. All the imported emails will appear under the folder named Import.
Step 5. Reorganize the imported emails to the server-associated mailboxes (like Inbox or other folders) by using drag and drop.
If you want to convert your MBOX files directly to PST format, then consider using Kernel Mac MBOX Converter. The software allows you to convert single or multiple MBOX files at once.
Section 2. Configure the Apple Mail Account In Outlook For Windows
Here are the detailed steps to configure the same email account in Outlook that is configured in Apple Mail.
Step 1. Open Outlook > File > Info > Add Account.
Step 2. Provide the Email Address and expand the Advanced options.
Step 3. Tick mark the Let me set up my account manually option and click Connect.
Step 4. Choose the suitable Advanced setup to proceed. Here, we are adding an IMAP account.
Step 5. Enter the required IMAP Account Settings and click Next. 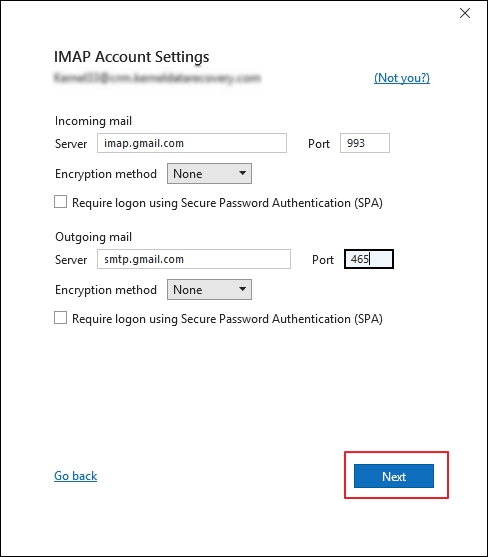
Step 6. Type the Password and proceed to Connect option.
Step 7. Click the Done option once the account is added.
Section 3. Export the Mailboxes to PST Format With Outlook For Windows
Now, export the required mailboxes to PST format using these steps:
Step 1. Click on File tab > Open & Export > Import/Export.
Step 2. Select the Export to a file action and hit Next.
Step 3. Choose the Outlook Data File (.pst) and click Next.
Step 4. Select the folder and apply the Filter. Then, click Next.
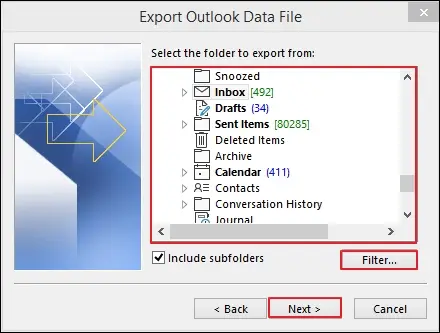
Step 5. Browse to choose the file saving path.
Step 6. Apply the necessary Options and click Finish. 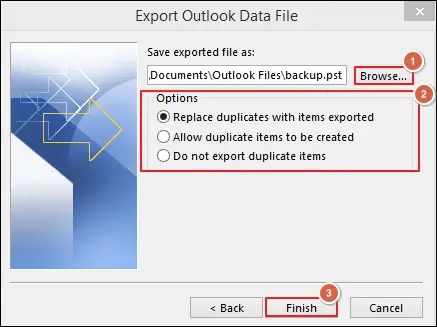
Step 7. Now, you have the Apple Mail data in the PST format.
Section 4. Upload the Exported PST Files to Microsoft 365 With Network Upload
At last, use the Network Upload to import PST files to Office 365 by following the steps below:
Step 1. Download the AzCopy tool using the copied SAS URL.
Step 2. Upload the desired PST files to Microsoft 365 with the help of the AzCopy tool.
Step 3. Verify the uploaded list of PST files in Office 365.
Step 4. Create a PST Import mapping file to determine target mailboxes.
Step 5. Then, go to Import Server and create a new PST Import job.
Step 6. Apply filters to sort data and start a PST Import job.
Migrate Apple Mail Contacts & Calendars to Office 365
You use this method to access your Apple Mail contacts and calendars in Microsoft 365. Here’s how:
Part 1. Export the Contacts And Calendars Data
Follow the given steps to export calendars and contacts from the Mac System.
For Contacts
Step 1. Open the Contacts app on your Mac.
Step 2. Choose one or more contacts as needed.
Step 3. Go to File and select the Export vCard option.
Step 4. Select the destination path and click Save.
Step 5. You will get the calendar data in vCard format.
For Calendars
Step 1. Open the Calendar app on your Mac system.
Step 2. Tap on the name of the calendar in the list.
Step 3. Click on File > Export > Export.
Step 4. Select the location to save the file and hit Export.
Step 5. It will export the calendar data to an .ics file.
Part 2. Import the Contacts & Calendar Data to Outlook for Windows
Here are the detailed steps to import Contacts and Calendars in Outlook for Windows:
For Contacts
Step 1. Click on File > Open & Export > Import/Export.
Step 2. Choose Import a VCARD file (.vcf) and click Next.
Step 3. Select the VCARD file and Open it.
Step 4. It will import the contacts file into the Outlook app.
For Calendars
Step 1. Go to File > Open & Export > Import/Export.
Step 2. Select the Import an iCalendar (.ics) or vCalendar file (.vcs).
Step 3. Then, click Next to continue.
Step 4. Choose the iCalendar file and click OK.
Step 5. Select the appropriate option to open it in Outlook:
- Open as New
- Import
Step 6. It will import the calendar file into the Outlook app.
Part 3. Get the Contacts & Calendars Data In PST Format
Once you import the contacts and calendars to Outlook, export them using the Import/Export utility. In the folder selection pane, choose the contacts & calendars folders to export them in PST format.
Part 4. Upload the Exported PST Files to Microsoft 365
Finally, import the exported PST files to Office 365 using Network Upload. All the steps are the same as above.
Conclusion
Here, we have covered a detailed guide to migrate Apple Mail to Office 365. You can apply the provided solutions to migrate emails, attachments, contacts, calendars, and other mailbox data yourself. However, if you have MBOX data files, converting them into PST format first can make the import into Office 365 easier. Choose the method that matches where your data is stored, and verify the results after migration.
People Also Ask
A. Microsoft 365 Network Upload method is one of the best methods for migrating multiple mailboxes from Apple Mail to Office 365.
A. Yes, attachments and email folders can be retained when the messages are successfully transferred through a supported migration method. However, results may depend on the source format, conversion process, and destination.
A. IMAP migration transfers email messages directly from a compatible source email server to Microsoft 365. On the other hand, Network Upload transfers mailbox data from PST files to Microsoft 365 through Microsoft Purview.
A. Yes, you can migrate your iCloud Mail account using the Microsoft 365 IMAP migration method.