Office 365 shared mailbox is one of the best features of the platform, which is generally used to hold the data commonly shared by many users. With a shared mailbox, multiple users can access and manage the data from a single mailbox. Moreover, it can also be used to send/receive emails from a single mail address by all the users added to the shared mailbox.
But there often come certain situations like inadvertent data deletions, data loss risks, and other requirements where users need to backup Office 365 data including shared mailboxes. In this article, we will cover all the manual aspects of exporting shared mailbox to PST and an automated tool to make your export easy and error free.
Feasible methods to export Shared mailboxes to PST format
Let’s discuss the different methods that allow you to export your Shared mailboxes to PST format without any hassle. Follow each given method with its proper step-by-step instructions to quickly accomplish the export task.Method 1: Using in-built eDiscovery utility
While talking about shared mailbox backup, it is not that simple, especially for new users, as they don’t have enough knowledge of using the Admin Center. So, here is a brief process of how you can export shared mailboxes to PST using the in-built eDiscovery utility. Perform export by following the given steps:
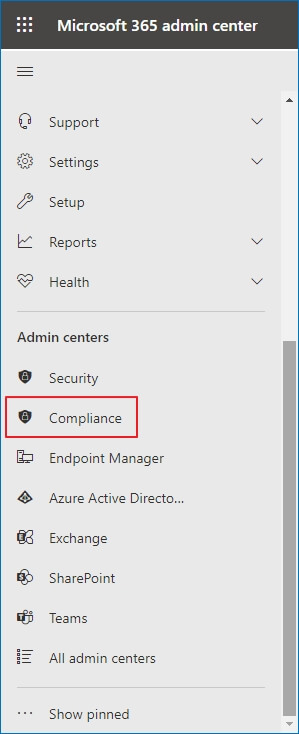
- Login to Microsoft 365 admin center using Administrator credentials and choose Compliance among the admin centers.
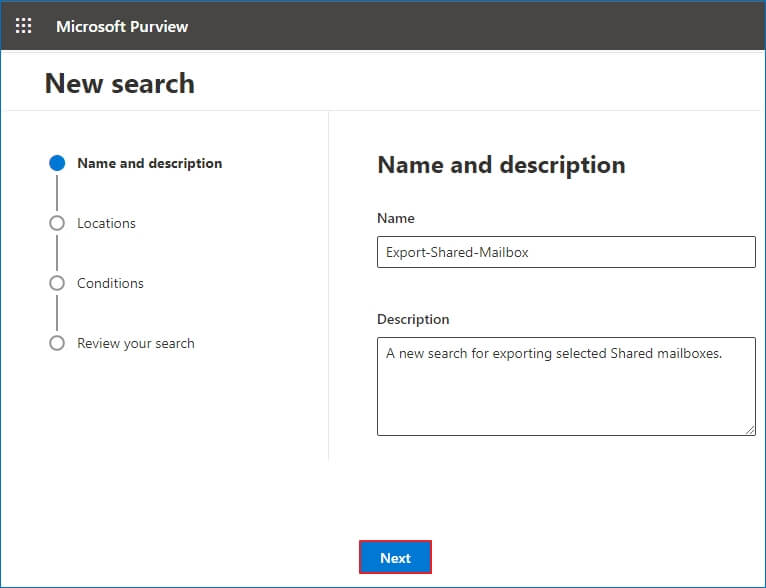
- Look for Content Search and create a search by clicking on ‘New Search’ option.

- Provide a name and a description (optional) to the content search.
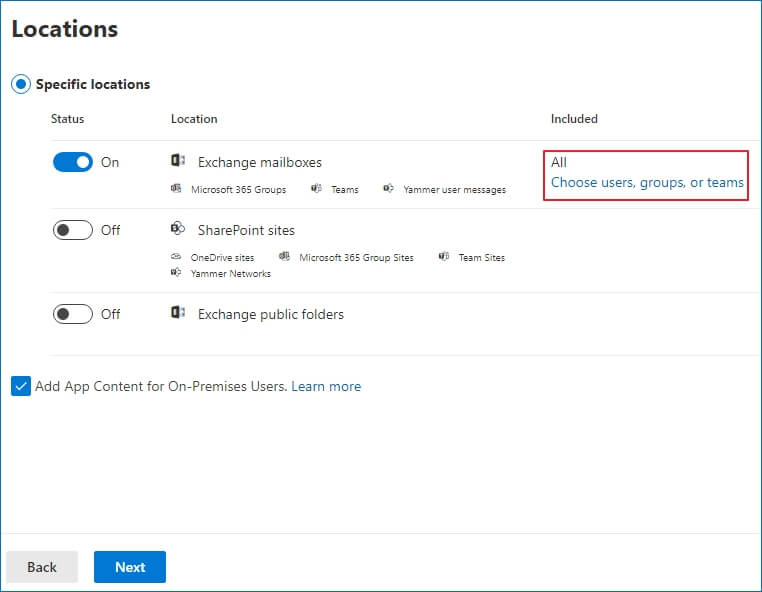
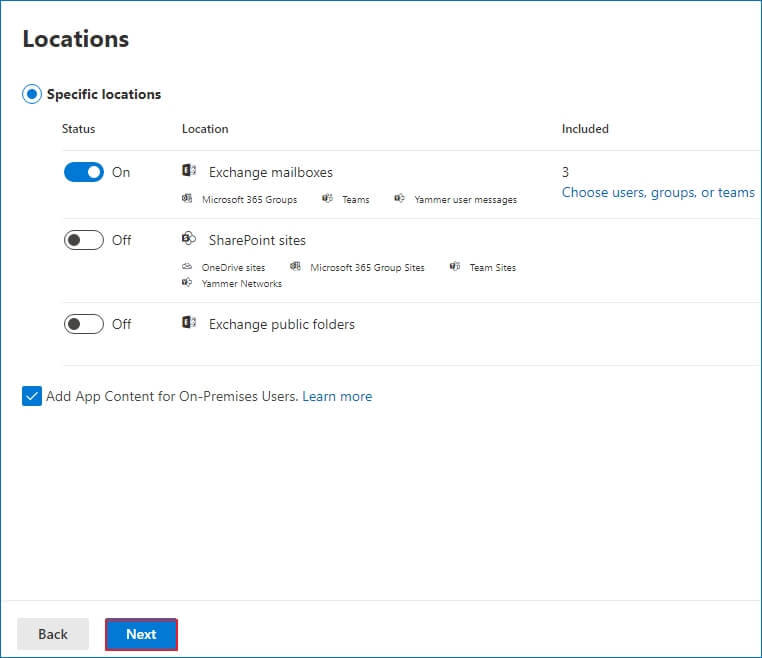
- Enable the option for selecting Exchange mailboxes by moving the toggle. Then, click ‘Choose users, groups, or teams.’
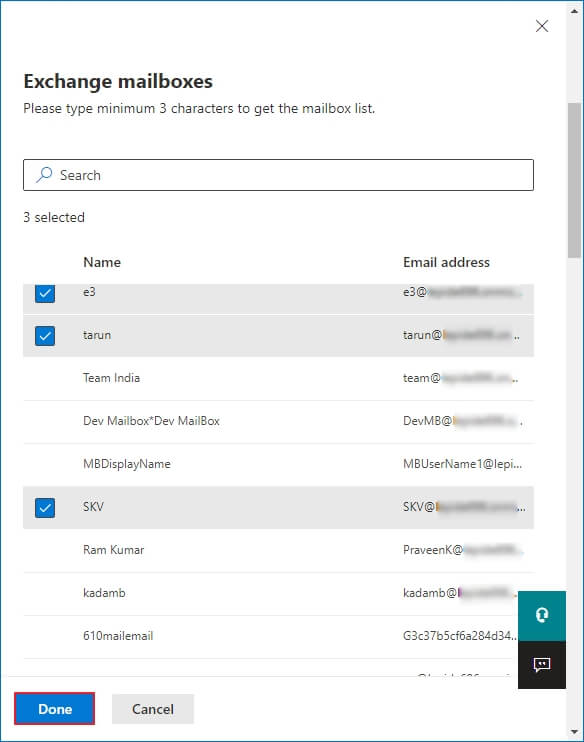
- Select the shared mailboxes with the help of checkbox. Then, click Done.
- Click Next.
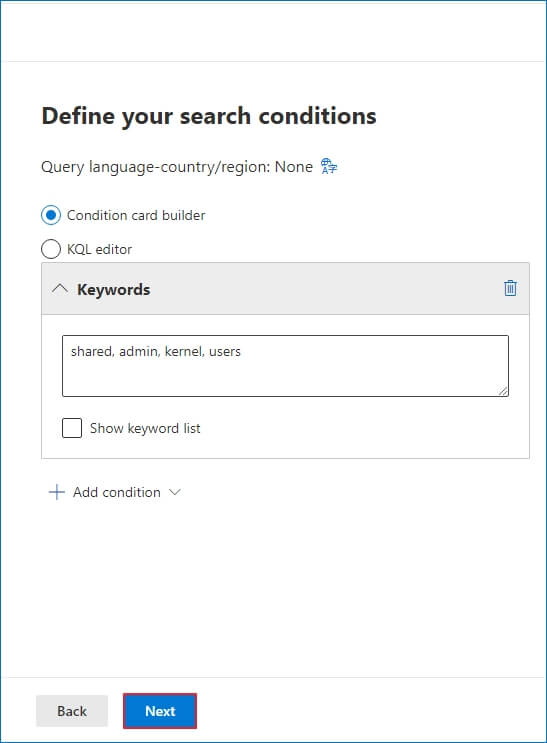
- Use the necessary keywords to create the search deeply. You can also add several conditions for checking the specific items. Click Next.
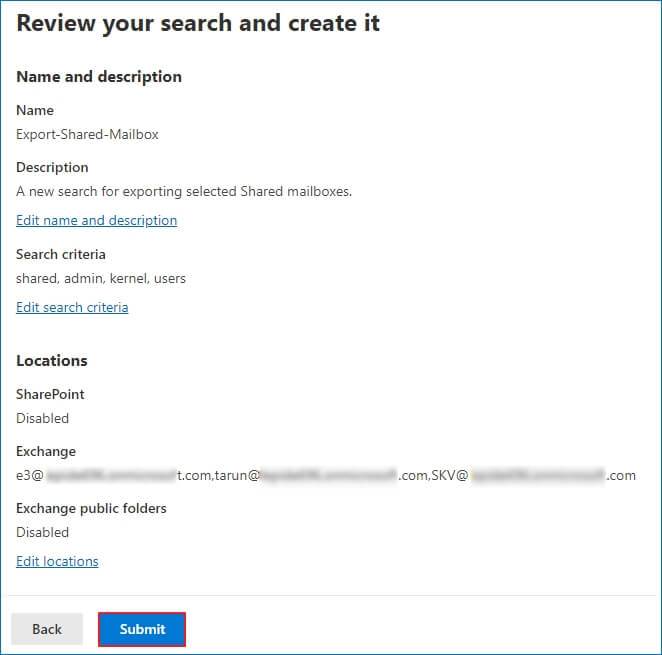
- Review the new search and click on the Submit option to create it.
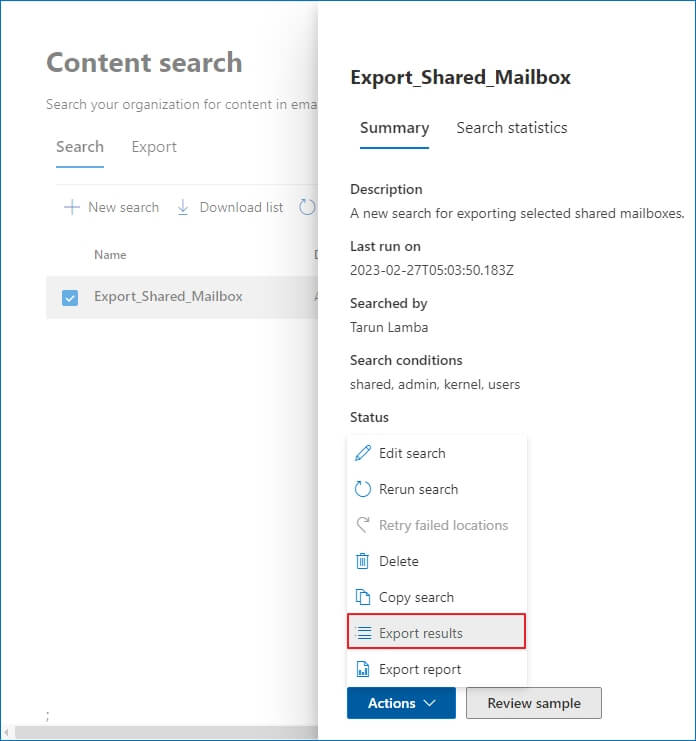
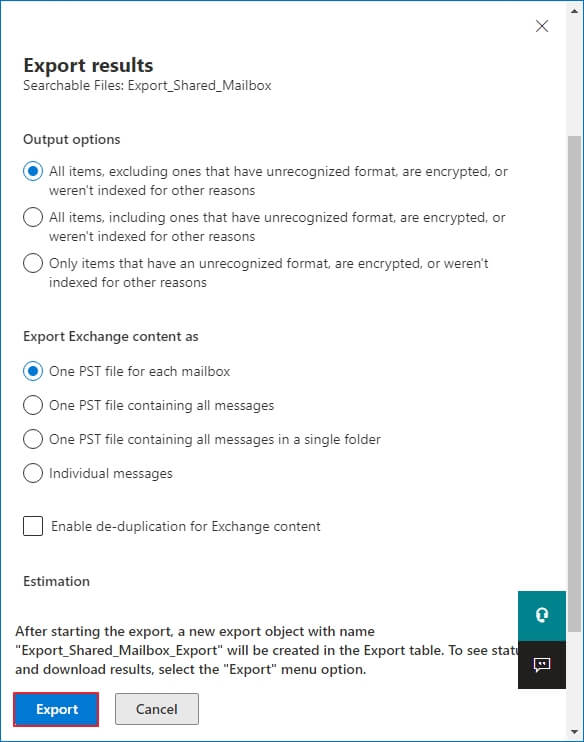
- Once the search is complete, then you can click on it, and when you click on Actions, then choose Export Results.
- Maintain the Output options and the creation of PST files. Finally, click on the Export button to export mailboxes to PST files.
Method 2: Using Outlook’s Import/Export feature
You can even export your shared mailbox using Outlook’s in-built Import/Export feature. It will easily export your whole mailbox into PST form and then you can import them in any Outlook account. Follow the steps below to complete the exporting process:
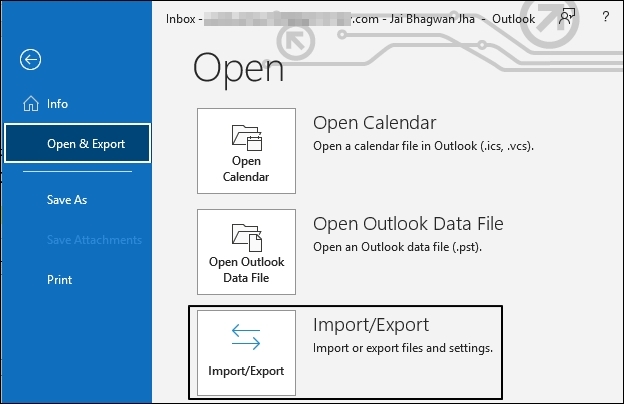
- Open Outlook, click on the File.
- Click on Open & Export > Import/Export.
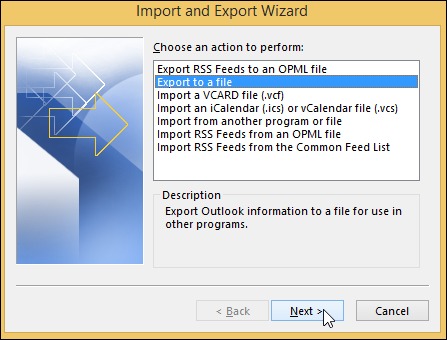
- When the Import & Export Wizard appears, select Export to a file & click Next.
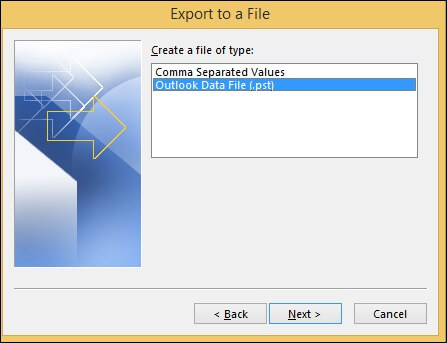
- Choose the Outlook Data File (.pst) option, then click Next.
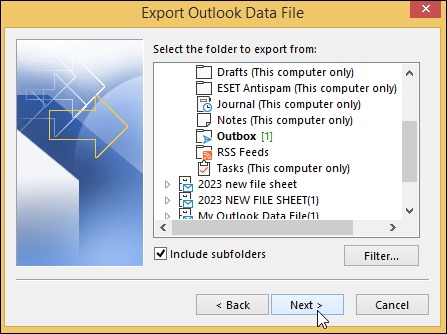
- Choose the shared mailbox you want to export from the list of options presented to you. Also, make sure to tick the Include subfolders checkbox to include all of the mailbox's folders. If you wish to filter the export, click on the Filter to customize the export settings to your liking. Once satisfied with your selections, click Next.
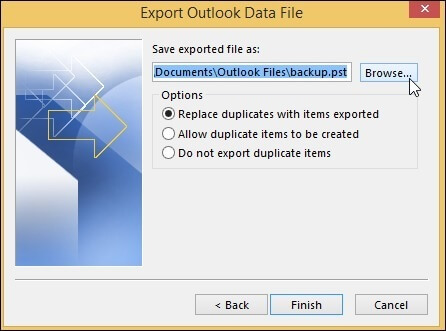
- Enter the desired file name & location you wish to save the exported mailbox file to. When ready, click Finish to begin the export process.
Method 3: Using Exchange Management Shell
For Office 365 to export a shared mailbox to PST using Exchange Management Shell (EMS), you have to follow a series of technical steps. Once you are logged in, you can use the New-MailboxExportRequest command to initiate the mailbox exporting process.
This command allows you to specify various parameters such as the -Mailbox flag to select the mailbox you want to export, the -FilePath flag to set the path to the PST file you wish to create, & the optional -IncludeFolders flag to select specific folders within the mailbox to export.
Most importantly, remember to grant the necessary permissions to the user account used to run the New-MailboxExportRequest command. This will ensure that the mailbox is properly exported to the designated path.
By utilizing EMS & its vast command set, you can easily export shared mailboxes to PST with speed & efficiency & save you valuable time & resources.
Seeing the above steps, you might have got an idea about how complicated and tricky the manual process is. Also, it is not recommended for naïve users who are not well-versed with Office 365 functionalities.
Thus, to avoid such a lengthy and unreliable method to transfer Office 365 shared mailboxes to Outlook PST files, you can try a reliable Office 365 Backup & Restore software.
Method 4: Use a reliable third-party automated tool
The above-mentioned methods can help you export your whole shared mailbox into PST files. While manual methods need to be handled by a techy person, and if you miss any step, then you can face data loss. To avoid these circumstances, use Kernel Office 365 Backup & Restore software. It is the most prominent tool that helps you to take a backup of your shared mailbox into PST. It is a great utility that not only export Office 365 mailbox to PST files, but also helps in restoring the PST file back to the Office 365 environment.Some robust features of this tool
- Effectively backup your Exchange Server database.
- Backup the entire mailbox with attachments.
- Takes back ups of primary, archive, shared mailboxes, groups, and public folders.
- Export files into multiple formats, including PST, MSG, PDF, DOC, DOCX, etc.
- Download the detailed backup and restore report in CSV format.
That’s how you can easily export Office 365 mailboxes to PST.
Conclusion
Office 365 export shared mailbox to PST as a backup is essential, as it contains valuable information related to employees and clients. We have mentioned all the manual solutions to back up shared mailboxes. However, manual methods are risky and there is a high possibility of data loss. So, to avoid these limitations, use the recommended Kernel Office 365 Backup and Restore tool. It can effortlessly back up your shared mailbox to PST format.
FAQs
Q - Can you restore a shared mailbox Office 365?
A - Restoring a shared mailbox in Office 365 can be done with ease, as long as the mailbox was deleted by deleting the corresponding user account. All you have to do is restore the user account in the Microsoft 365 admin center, & the mailbox should be restored alongside it.
Q - Can emails be sent from a shared mailbox?
A - Yes. Once the shared mailbox is added to Outlook & integrated with Office 365, you're able to send emails from the shared mailbox account easily.
Q - What is the limit of a shared mailbox?
A - The limit for a shared mailbox without a license is 50 GB. While this might seem like a large amount of space, busy teams can easily fill it up in no time. To boost the limit to 100 GB, you'll need an Exchange Online Plan 2 license.
A simple tool to Backup Exchange/Office 365 mailboxes to PST & Restore them