Read time 11 minutes
Keeping your Office 365 email inbox neat and tidy can make your workday a lot smoother. However, those emails occupy a larger space in your Office 365 account, and they become a mess for any user. Sometimes, important messages can get lost in chaos, causing confusion.
The solution to this problem is email archiving. In Office 365, there’s a special feature called the Archive folder. It’s an ideal solution for your older emails that you don’t need right now. The great thing is that when you archive emails, they don’t clutter up your main inbox, so you have more space.
Mail archiving is the process of moving old or unused email messages from the primary Inbox to a separate storage location, usually a different folder. You can easily retrieve any of these archived emails. This process helps your organization to free up space in their mailbox while preserving all the important emails.
Today, we’ll show you how to use the Archive folder in Office 365 to keep your inbox organized. It is an easy way to make sure you can always find important emails when you need them.
What are the benefits of email archiving?
Besides making the right email available at the right time, Office 365 email archiving has many advantages. Many users are unaware of the various benefits that email archiving has to offer:
- A clear and organized inbox that ensures a clear separation of all emails in the main mailbox.
- Archived mail can be easily accessed from any device and location using Outlook 2013 and higher versions.
- The search option enables users to find the right message at the right moment.
- The archived emails are protected with the same level of security as that of the main mailbox.
- The storage space is unlimited with separate storage limits for the primary and archive mailbox.
- Any email can be archived easily, either manually or automatically, so no time is wasted in finding emails.
How to enable archive mailbox in Office 365
Before moving to the methods to archive mails in Office 365, you first need to enable archive mailbox feature. There are two ways to enable archive mailbox in Office 365 such as using Compliance Centre and PowerShell. Let’s discuss them in detail:
Method 1: Archive mailbox in Office 365 using the Compliance Center
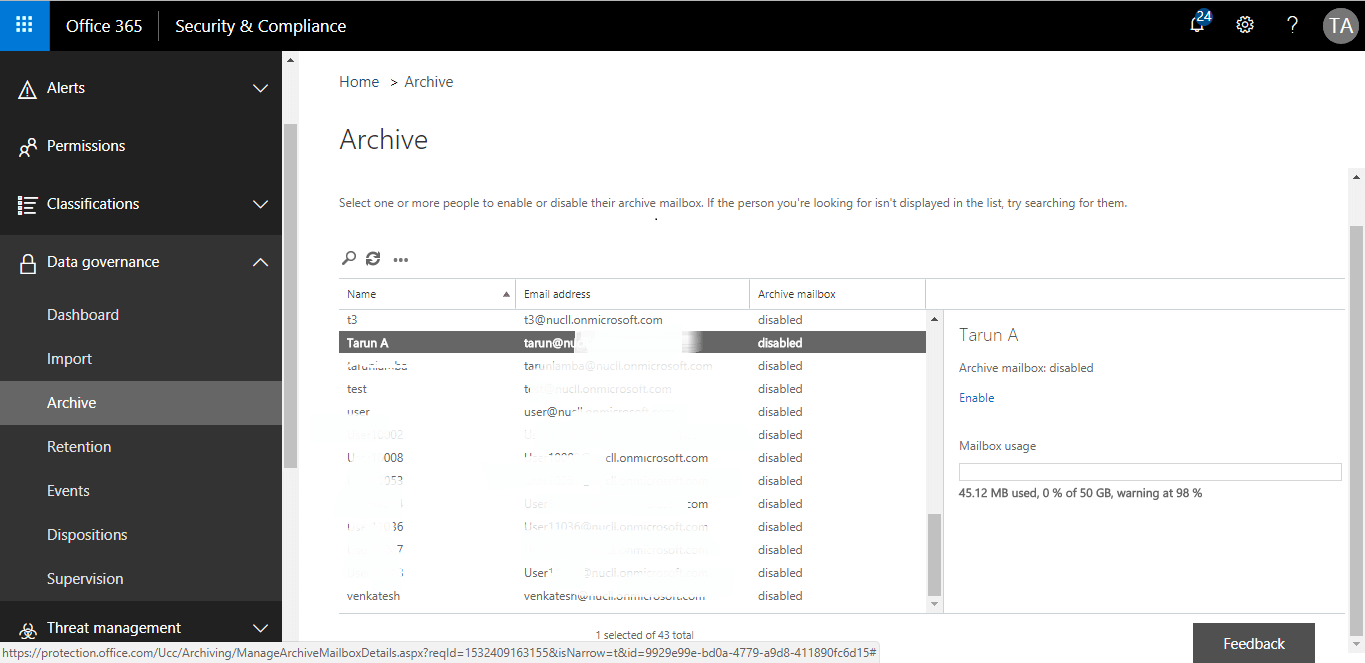
First, check the Archive page in the Exchange admin center for all the sufficient permissions to enable archiving. Before starting the procedure, Exchange administrators can assign the Mail Recipients role to the account (by default, this is given to Organization Management and Recipient Management role). Once this permission is given, the Archive page will appear in the Exchange admin center, and then you can follow these steps-
- Visit https://protection.office.com/ and sign in with your Office 365 credentials.
- In the “Security and Compliance Center,” select “Data governance,” and then click “Archive.”
- The “Archive” page will be displayed on the screen. You will see all the mailboxes that are connected to your Office 365 account. Also, the archive mailbox column will show whether an archive mailbox has been enabled or not.
- Now, select the mailbox for which you want to enable “Archive mailbox.” Click Enable.
- A warning will be displayed on your screen as shown below. Click “Yes” to enable the archive mailbox.
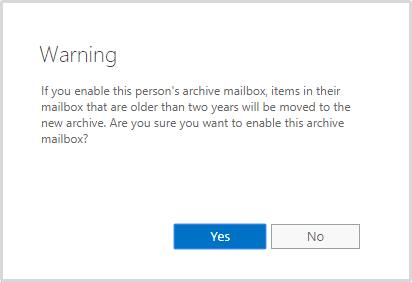
It will take a few seconds to create the “Archive mailbox.” Once it is created, the user will be able to see the archive mailbox.
You can also enable the archive mailbox using Microsoft PowerShell. However, that method might get complex for all novice users. That’s why the Compliance Center method is always recommended.
Method 2: Enable Microsoft Office 365 archive mailbox via PowerShell
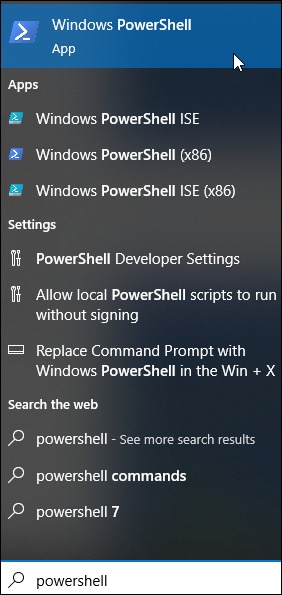
PowerShell is an automation and configuration framework that helps users enable or disable multiple functions in their system. It also allows you to enable Microsoft Office 365 archive mailbox.
- Start by typing “powershell” in the Start menu, then select the PowerShell application from the list.
- Using the below PowerShell Commandlet (cmdlet), connect to Exchange Online PowerShell.
Connect-ExchangeOnline
- A sign-in window will appear after the Exchange Online module loads.

- Put in your username and password.
- The command line for Office 365 will appear once it is connected.
- Type up the below command to enable mailbox archiving for the selected use.
Enable-Mailbox -Identity -Archive

- You can enable archive mailboxes for all users by running the following command.
Get-Mailbox -Filter {ArchiveGuid -Eq “00000000-0000-0000-0000-000000000000” -AND RecipientTypeDetails -Eq “UserMailbox”} | Enable-Mailbox -Archive
- Run the below cmdlet to disable an archive mailbox for a single user.
Disable-Mailbox -Identity -Archive
- You can disable archive mailboxes for all users by running the following cmdlet.
Get-Mailbox -Filter {ArchiveGuid -Ne “00000000-0000-0000-0000-000000000000” -AND RecipientTypeDetails -Eq “UserMailbox”} | Disable-Mailbox -Archive
With the methods mentioned above, you can easily enable archive mail in Office 365. Additionally, we will move to the methods to archive your mail in Office 365.
How can Office 365 users archive emails?
Now, we will explore all the essential methods to archive mail in Office 365 and Outlook. Go through all methods and their step-by-step instructions.
If the archive mailbox is enabled, Outlook or Outlook on the Web users can archive mails in Office 365 by following these steps:
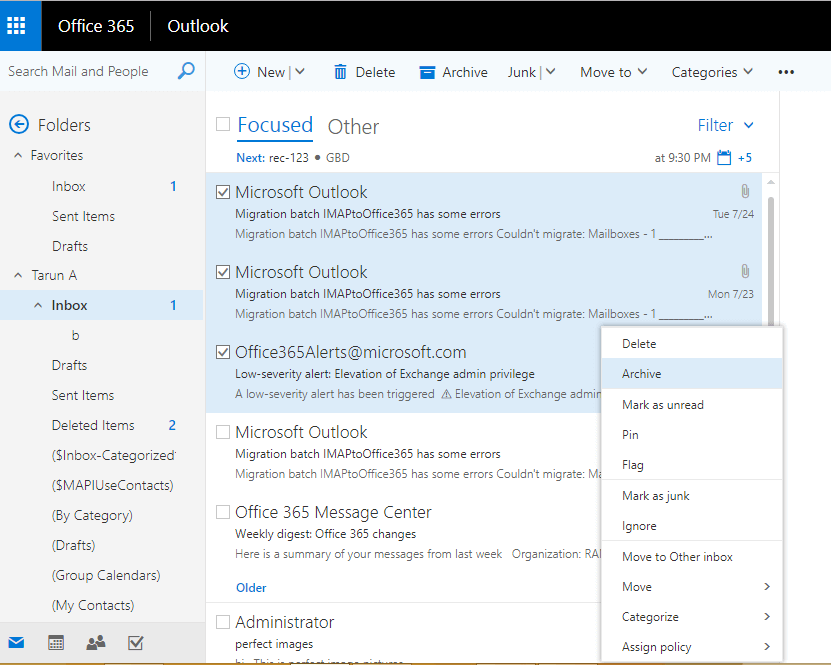
- Log in to Outlook using an Office 365 account. Now, open the folder from where you want to archive emails.
 Note: You can also perform this action by selecting the specific emails and then clicking the “Archive” icon on the top pane of the Office 365 account.
 - Select the specific emails and right-click on them. A wizard will appear on the screen. Hit the “Archive” button to move these emails to the archive mailbox.
If you have configured an Office 365 account in Outlook, you can use the archive feature of Outlook to archive old emails. However, please remember that emails are archived locally in the Archive folder of Outlook.
- Open Outlook on your desktop and select emails from your inbox or any other folder.
- Now, right-click on those selected emails, and click “Archive” to move emails to the archive mailbox.
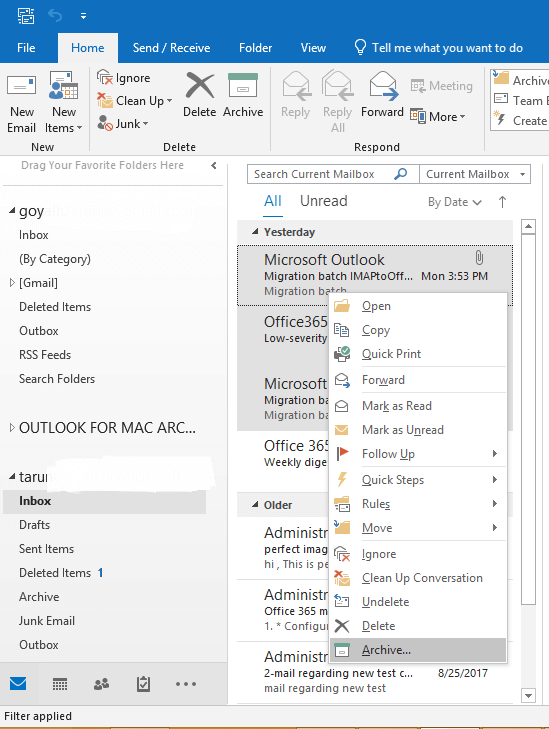
Note: You can also perform this action by selecting emails and clicking “Archive” in the ‘Delete’ group (of the ribbon). You can also use the “backspace” button on the keyboard to directly archive the selected emails.
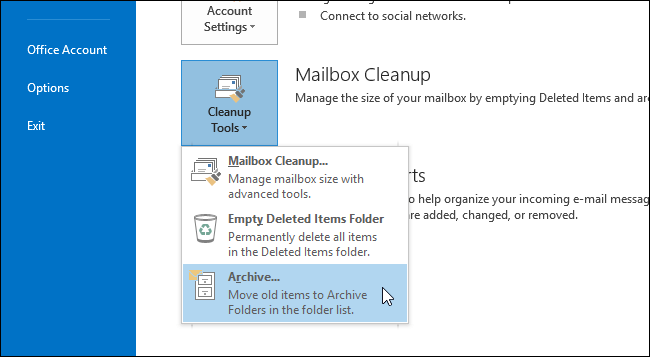
This method is for the users of Outlook 2013 and 2010. The process and steps are similar in both 2013 and 2010. Follow the stepwise guide to archive your mails:
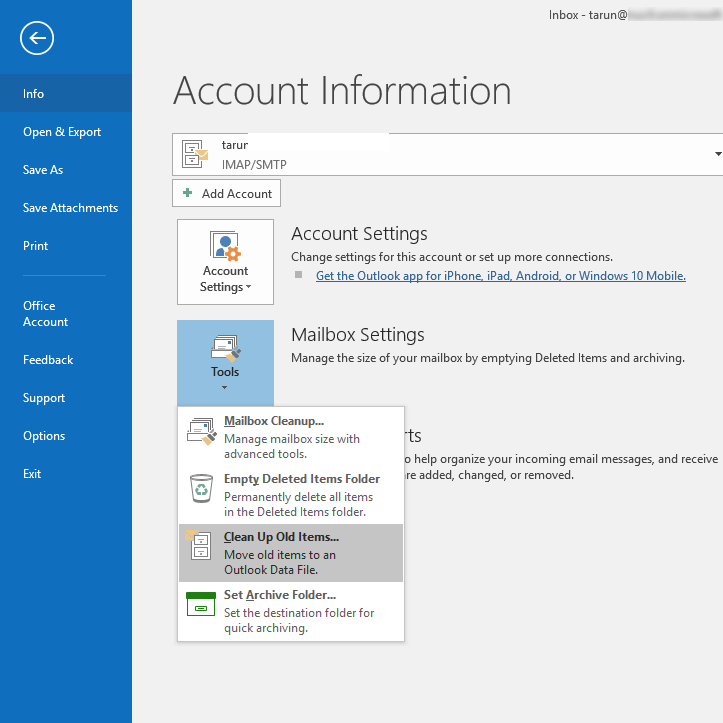
- Open Outlook and go to the “File” tab.
- Now, choose “Cleanup Tools” and select “Archive” from the drop-down menu.
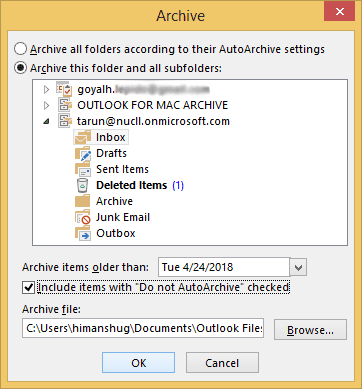
- A pop-up window will appear on the screen with all the folders of Outlook, select the specific folder that you want to move to the archive mailbox.
- Select the date from which you want to archive the emails. Also, you can include emails that have enabled “Do not Auto Archive.” Select the location on your system where you want to save this archive file and click “OK.”
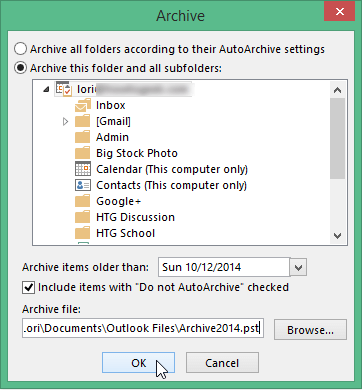 This archive will be saved to the chosen location.
Now, we know the archiving mail in Office 365, it’s time to turn off the AutoArchive in Office 365. So, any user can take their necessary mails in their mailboxes.
How to Archive an Outlook folder?
With the above-mentioned methods, we know how to archive emails in Office 365 and Outlook. Now, it’s time to learn about archiving an Outlook folder. So, instead of any single file, we can achieve the whole Outlook folder containing emails.
- To move a whole folder to archive, then go to the “File” tab and select “Tools.” Now from the drop-down menu, select “Clean up old items.”
- A window will appear on the screen with all the folders of Outlook. Select the specific folder that you want to move to archive. In this section, you can select the date from which you want to archive the emails. Also, you can include emails that have enabled “Do not Auto Archive.” Select the location on your system where you want to save this archive file and click “OK.”
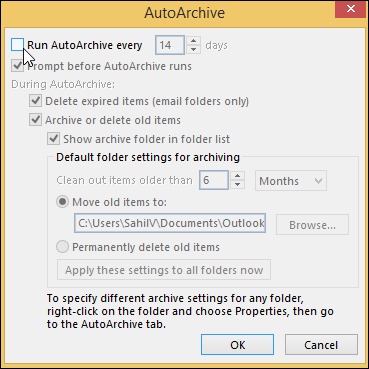
If you are done with your AutoArchiving in Office 365. It’s time to turn off AutoArchive; it will help you to store your mail in Primary, Public, and Office 365 Groups mailboxes.
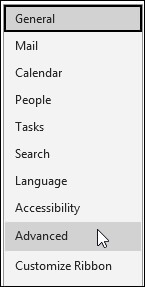
- Tap on File, go to Options & click on the tab Advanced.
- Within the AutoArchive section, click on AutoArchive Settings.
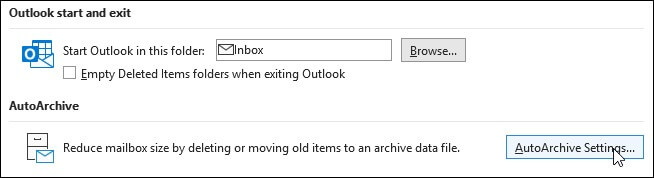
- You need to uncheck the option Run AutoArchive every n days checkbox.
A professional solution for Office 365 email archiving
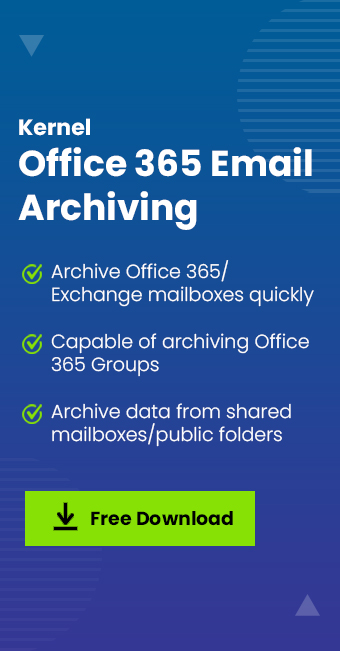
If you need a direct, convenient, and more flexible solution to archive emails in Office 365, then you should consider a professional tool like Kernel Office 365 Email Archiving. It is a smartly designed tool that readily supports archiving selected or all Office 365 data to a secure file format. It is well capable of archiving data from Office 365 mailboxes, groups, public folders, shared mailboxes, and archive mailboxes and saving it into any of these formats- PST, EML, DOC, DOCX, HTML, HMT, PDF, and MSG.
Conclusion
With the increasing email flow in Office 365 mailbox, it becomes challenging for users to manage it. That’s where the need to archive mails in Office 365 arises. In this article, we have mentioned different methods to archive mail in Office 365 and Outlook. These manual methods are effective but risky and time-consuming. If you don’t want to take any risk, then use the recommended Kernel Office 365 Email Archiving tool to archive your mails effortlessly.
A- If you choose to delete a message, it will be sent to your trash folder, where it can be recovered or permanently erased. However, if you opt to archive mails, it will be moved to the Archive folder (or All Mail on Gmail/Google Apps) by default. It means that the message will still be accessible, but it will no longer clutter your inbox.
A- Office 365 users can take advantage of the archiving feature in Microsoft Purview to store up to 100 GB of additional email data once an archive mailbox is enabled. It comes in handy for those who receive many of emails or need to store large attachments. If that’s not enough, auto-expanding archiving provides users with up to 1.5 TB of additional storage in archive mailboxes.
A- The benefits of archiving in Office 365 include:
- Prevents data loss
- Improves server performance
- Simplifies backup and restore
- Saves time in data recovery
- Eliminates mailbox quota requirements