Read time: 9 minutes
As a business owner, you must know that staying organized and keeping your data secure is essential. When it comes to office productivity, Microsoft Office 365 is the gold standard. But did you know that you can set up Office 365 AD Sync to keep all your user data in sync between your on-premises Active Directory and Azure Active Directory?
Doing this allows the business organizations to set up a hybrid environment by syncing users between on-premises and cloud platforms. Syncing Office 365 AD eliminates the need to implement individual user management for both environments while lowering the overhead costs.
In this article, we will walk you through how to set up Office 365 AD Sync using Azure Active Directory Connect.
Setting up Office 365 AD sync (detailed steps)
There are many complex steps involved in setting up Office 365 AD Sync, but don’t worry – we are here to guide you through every step of the process.
1. Azure AD Connect
It is a tool that connects on-premises Active Directory to Azure Active Directory. It allows you to synchronize your on-premises users and computers with Azure Active Directory. You can use Azure AD Connect to connect to multiple on-premises forests. You can also connect Azure Active Directory to multiple Office 365 tenants.
To set up Azure AD Connect, you need the following:
- If you don’t have an Azure subscription, you can create a free account.
- A domain controller running Windows Server 2008 or later in the on-premises environment.
- The forest functional level must be at least Windows Server 2008.
- If you want to synchronize passwords, the domain controller must be running Windows Server 2012 or later.
- The account you use to install Azure AD Connect must be a member of the Enterprise Admins group and the Schema Admins group.
2. Preparing the environment
Before installation, there are some tasks that need to be completed in your on-premises environment and Azure Active Directory:
In your on-premises environment:
- Create a user account to run Azure AD Connect.
- Verify that the user account to run Azure AD Connect has Directory Changes permission.
- If you plan to synchronize passwords, verify that the user account that will be used to run Azure AD Connect has been assigned Reset Password permission.
- If you plan to use group filtering, create a global security group in your on-premises Active Directory environment and add the users who should be synchronized to this group.
- If you want to filter objects other than groups (for example, contacts or computers), you need to create an organizational unit (OU) for each type of object that you want to filter and then move the objects that you want to filter into the appropriate OU.
In Azure AD:
- Verify that Azure AD Connect can communicate with your Azure Active Directory instance.
- If you plan to synchronize passwords, verify that the synchronization account has the MS-DS-Consistency attribute populated.
Network requirements:
Make sure to fulfill the given requirements for the Office 365 AD sync and have a stable network connectivity:
- TCP 443 HTTPS to sync data with Azure AD
- TCP 80 HTTP for SSL/TSL certificate verification
- TLS 1.2 on a windows machine
- Outbound HTTPS connection to the Microsoft 365 servers
3. Making the domain routable
If you want to use an intranet name for your on-premises domain (for example, contoso.com), you need to make sure that this name is routable on your network. To do this, you need to add a DNS entry for the intranet name on your DNS server and then configure firewall to allow traffic to this DNS entry.
4. Adding the new UPN suffix
To be able to synchronize users from your on-premises Active Directory to Azure Active Directory, you need to add a UPN suffix for your on-premises domain to Azure Active Directory. To do this, you need to use the Azure portal.
- In the Azure portal, click Azure Active Directory, and then click Properties.
- In the UPN Suffixes box, add the UPN suffix for your on-premises domain (for example, contoso.com).
- Click Save.
5. Editing the UPNs for existing users
If you have existing users in your on-premises Active Directory, you need to change their UPNs to reflect the new UPN suffix you added in Step 4. To do this, you can use the Set-User cmdlet in PowerShell.
6. Edit the email proxy attributes
If you want to synchronize users from your on-premises Active Directory to Azure Active Directory so that they can be used with Office 365, you need to edit the email proxy attributes for these users. To do this, you can use the Set-User cmdlet in PowerShell.
For example, to change the email proxy address for a user with the User Principal Name (UPN) of john@contoso.com to smtp:john@contoso.onmicrosoft.com, you would use the following PowerShell command:
Set-User -Identity john@contoso.com -EmailAddresses SMTP:john@contoso.onmicrosoft.com
7. Check usernames in the O365 admin center
After you have synchronized users from your on-premises Active Directory to Azure Active Directory, you can check to see if the synchronization was successful by looking at the usernames in the Office 365 admin center.
- In Office 365 admin center, click Users.
- Click Active users.
- You should see a list of all the users who have been synchronized from your on-premises Active Directory.
- If you don’t see any users, make sure that Azure AD Connect is configured to synchronize your on-premises Active Directory with Azure Active Directory.
8. Install & configure Azure AD Connect
Now that you have prepared your environment and made sure that your users are synchronized, you can install and configure Azure AD Connect.
- Install Azure AD Connect on the server by logging in as a local administrator. The sync server should be the server you want to use.
- Navigate to AzureADConnect.msi and double-click it.
- Click Continue after selecting the box agreeing to the license terms.
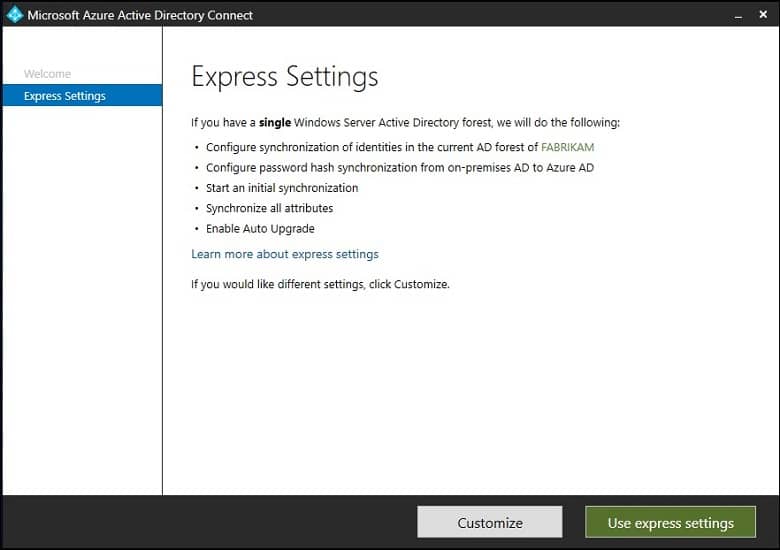
- Click Use Express settings on the Express settings screen.
- Connect to Azure AD by entering a global administrator’s username and password. Click Next.
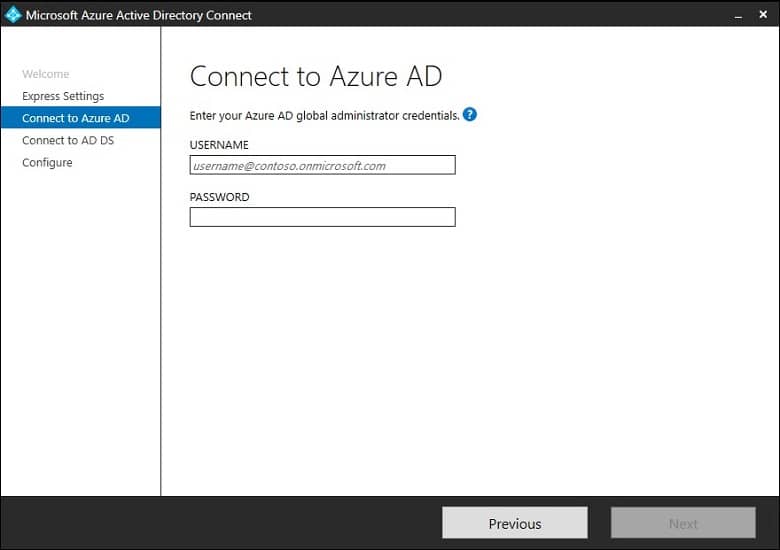
- Troubleshoot connectivity problems if you receive an error and have a connectivity problem.
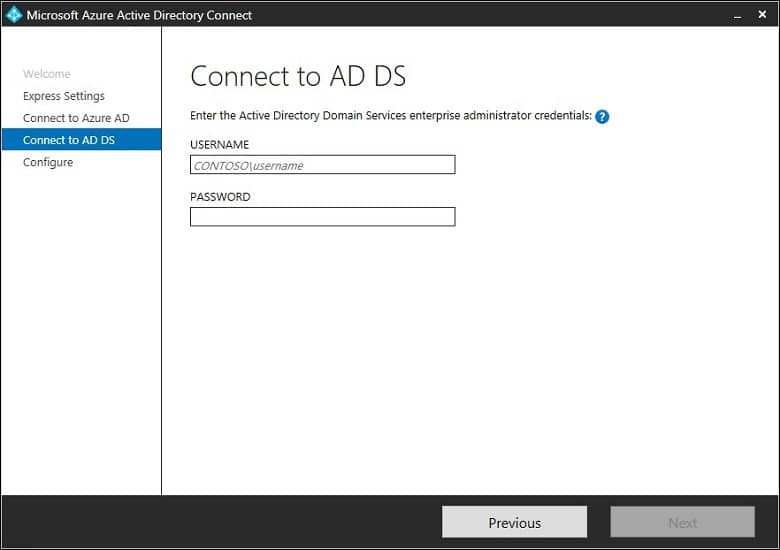
- Enter the username and password of an enterprise administrator on the Connect to AD DS screen. NetBios or FQDN is acceptable for the domain part. Proceed to the next step.
- Unless you have completed the prerequisites and verified your domains, the Azure AD sign-in configuration page will not appear.
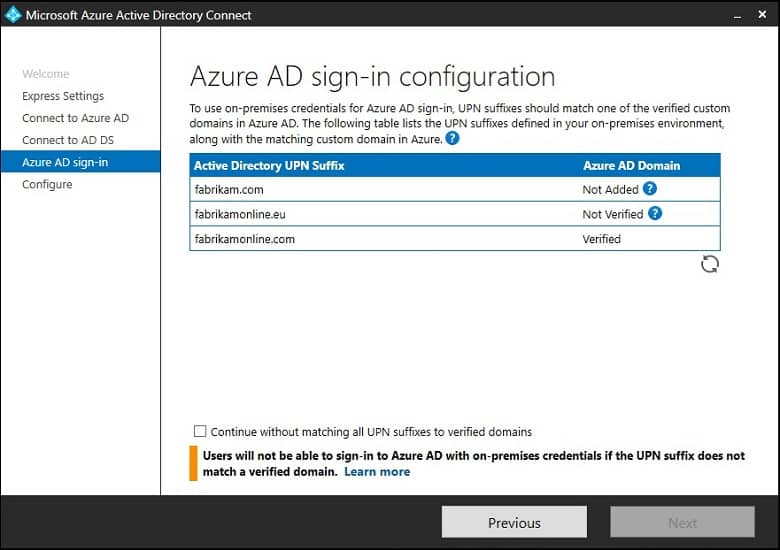
- Make sure to check all domains that have been marked as Not Added and As Not Verified if you see this page. Once your domains are verified in Azure AD, click the Refresh symbol.
- Within the Ready to configure window, tap on Install.
- You can also unselect the Start the synchronization process as soon as the configuration is completed checkbox on the Ready to configure page. To configure additional settings, such as filtering, you should unselect this checkbox. In this case, the wizard will configure sync but leave the scheduler disabled. You must run the installation wizard again to enable it.
- When this checkbox is enabled, all users, groups, and contacts will be synchronized immediately to Azure AD once the configuration has been completed.
- If you have Exchange installed in the Active Directory on-premises, you can also use Exchange Hybrid deployment. Using this option will allow you to have Exchange mailboxes on-premises as well as in the cloud.
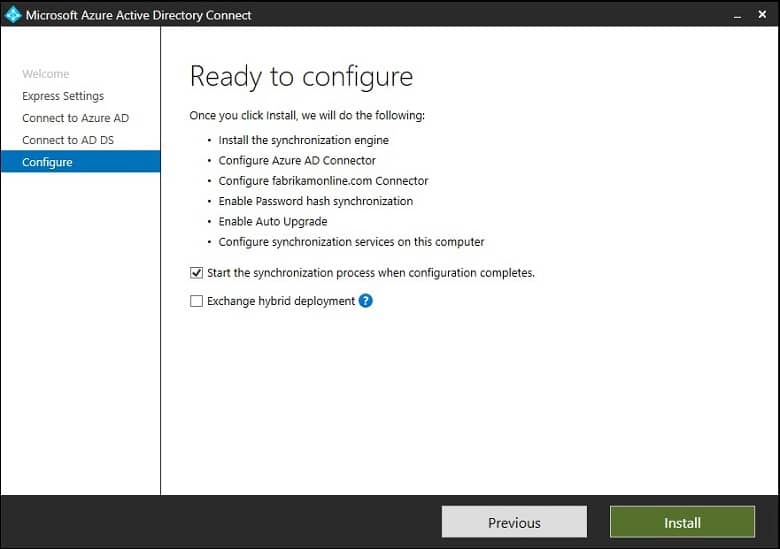
- Click Exit when the installation is complete.
- If you wish to use Synchronization Service Manager or Synchronization Rule Editor after the installation has been completed, sign off and log in again.
9. Exporting Azure AD Connect configuration
After installing and configuring Azure AD Connect; you can export the configuration so that it can be deployed to other servers. You can export the Azure AD Connect configuration by using the Azure AD Connect Import/Export Settings Wizard.
To export the Azure AD Connect configuration using the Azure AD Connect Import/Export Settings Wizard, follow these steps:
- Run the Azure AD Connect Import/Export Wizard.
- On the Welcome screen, click Next.
- Navigate to the tab Customize and choose Import synchronization settings.
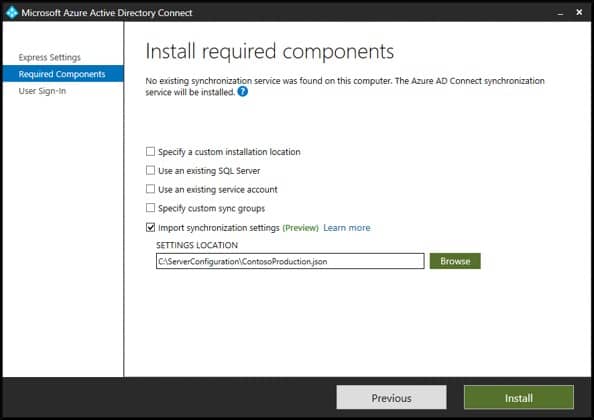
- Lastly, hit Install, and you are good to go with the export configuration process.
10. Office 365 AD Sync via PowerShell commands
You can use PowerShell commands to force synchronization between your on-premises Active Directory and Azure Active Directory. To do this, follow these steps:
- Launch the Azure AD Module for Windows PowerShell.
- Run the following cmdlet:
Start-ADSyncSyncCycle -PolicyType Delta
- Verify that the synchronization has been completed successfully by running:
Get-ADSyncScheduler
- You should see a status of “Enabled” and the Last Sync Result of “Success.”
- If you want to synchronize your on-premises Active Directory with Azure Active Directory immediately, you can run the following cmdlet:
Start-ADSyncSyncCycle -PolicyType Initial
This will start the synchronization process immediately. However, this may take some time to complete and show the results of Office 365 AD sync.
How does third-party tool help in securing Office 365 data?
After a successful Office 365 AD Sync, it is also important to keep your Office 365 data secured and well backed up!! Keeping Office 365 data files as a backup is the safest option to boost the measures of your data security. Here we are with the easy-to-use and most reliable backup tool for you that seamlessly allows taking backup of Microsoft 365 data. Kernel Export Office 365 to PST is one of the most comprehensive solution to export emails from Office 365 to Outlook. It offers a wide range of features that allow you to create backups in multiple formats, including PST, HTML, MSG, PDF, DOC, & DOCX. It also features an automated backup option that uses an inbuilt CSV file. This makes it easy to create backups on a schedule that suits your needs.
Additionally, this utility offers smart filters with which you can select specific data when you Export Office 365 to PST files. This ensures that you only back up the data that is important to you. As a result, this tool is an excellent choice for anyone who wants to ensure their Office 365 data is safely backed up.
Wrapping Up
Office 365 AD Sync is a powerful approach that can save your organization’s time and money. It is important to take the time to set it up correctly, to reap all its offered benefits. By following these simple steps, you can sync your Office 365 account with Active Directory in no time. And remember to keep a copy of our tool on your system as the safest backup plan at times of emergency and server failure.