How to Create an Admin Account in Exchange Server?
 Written By: Sarthak Poswal
  Updated On September 15, 2026 Written By: Sarthak Poswal Updated On September 15, 2026
 An administrator in the Exchange Server on-premises or online holds specific capabilities that allow them to manage the server. Microsoft has designed the Exchange Server in such a manner that any user, be it new or existing, can become an admin. However, only the user who has at least the Organization Management role can add someone to the administrator role group to grant them admin-level rights.
In this guide, we will discuss what the role of an admin in Exchange Server is and how to create Exchange admin account in both the Exchange Server On-Premises and the Exchange Online.
It's a special user account in Exchange that has the power and role assigned to manage the Exchange Server's email infrastructure, user mailboxes, security, mail flow rules, public folders, etc.
With the Exchange administrator role, one can recover deleted mailbox items, set up archive and data retention policies, create a shared mailbox, and perform other crucial tasks. In addition to these, other tasks include:
Exchange Server uses role-based access control (RBAC) and offers various roles for specific tasks. When you create an admin account in Exchange Server, you use these roles to grant the user the power to control the whole organization or limit them to a specific service. A few of the important roles in Exchange are:
| ROLE | PURPOSE |
| Organization Management | View the properties of any object in the Exchange organization. |
| Recipient Management | Create or modify Exchange Server recipients within the organization. |
| Records Management | Configure retention policy tags, message classifications, mail flow rules, etc. |
| Compliance Management | Configure and manage Exchange compliance settings as per the policy. |
| Hygiene Management | Configure the antivirus and antispam features of Exchange Server. |
| Help Desk | View and modify options for " Outlook on the web " of any user in the organization. |
| Discovery Management | Grant permission to search for mailboxes as per the criteria. |
| Public Folder Management | Allows to manage public folders on the server. |
You can grant admin-level access and permissions to a user using the Exchange Admin Center or the Exchange Management Shell. Let's see the process for both.
Note: Only a user who already belongs to the Organization Management role group can grant a user admin-level rights.
To create an admin account in Exchange Server, you do not start from scratch. Instead, an existing Exchange Server user with standard permissions is added to a special group with administrator-level permissions.
You can choose any existing member of the Exchange Server, no outside member, and grant them the power of an admin using the steps given below. However, if you want a new user to be the admin, then first create a new user before following the steps below.
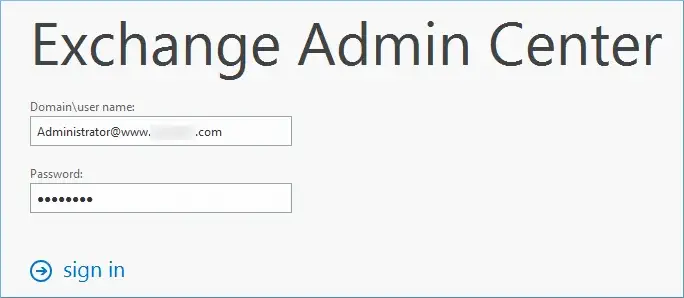
Step 1. Login to Exchange Admin Center.
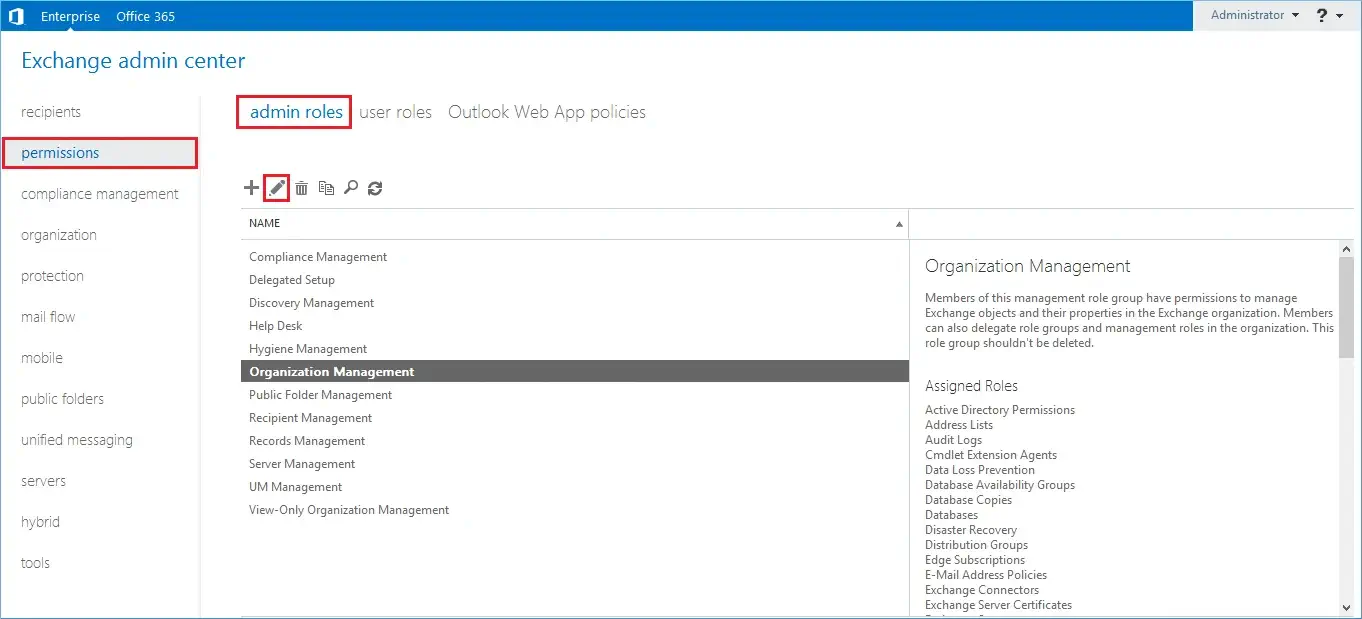
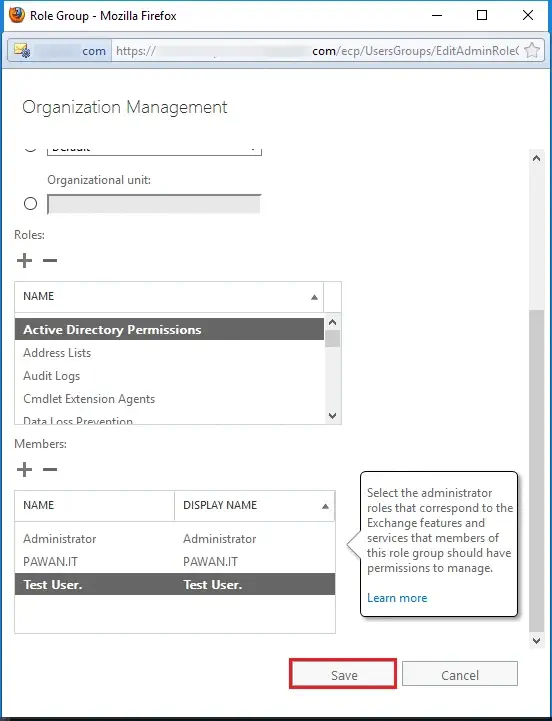
Step 2. In the permissions category, go to admin roles, and then select the category of Organization Management. Finally, click the Edit button.
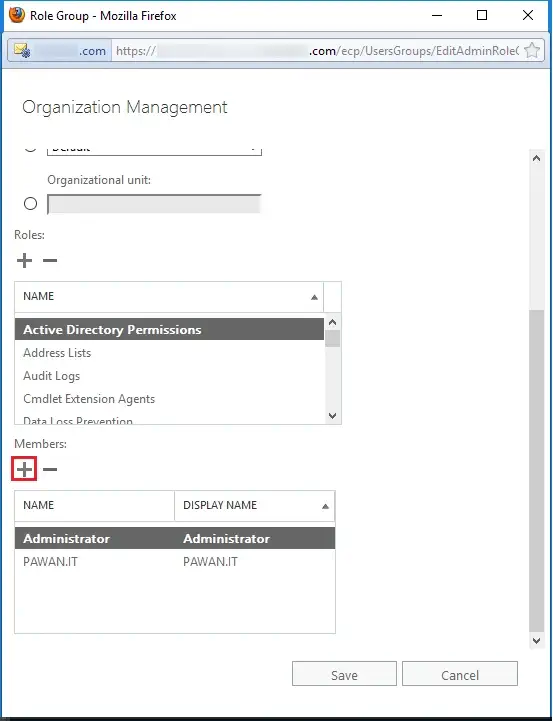
Step 3. Click the Add () button to add the member to the respective role group.
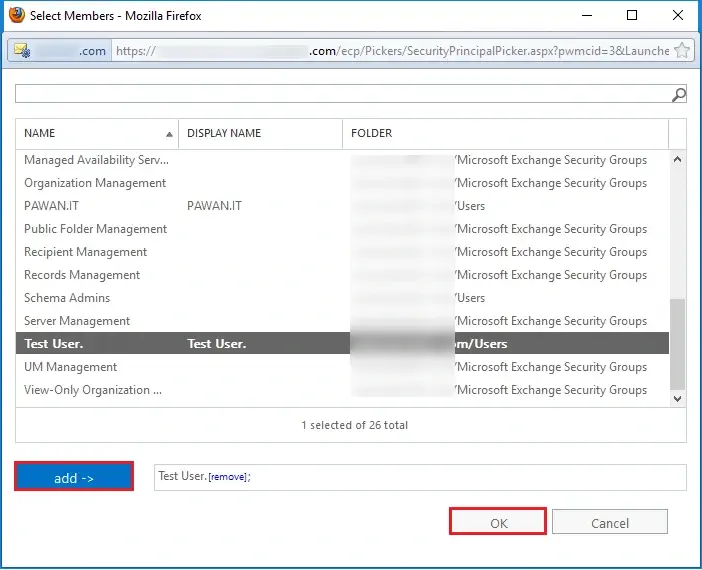
Step 4. Select the user which you need to add as an administrator. Click the Add button and then click OK.
Step 5. The new user is now a member of the Organization Management. Click the Save button.
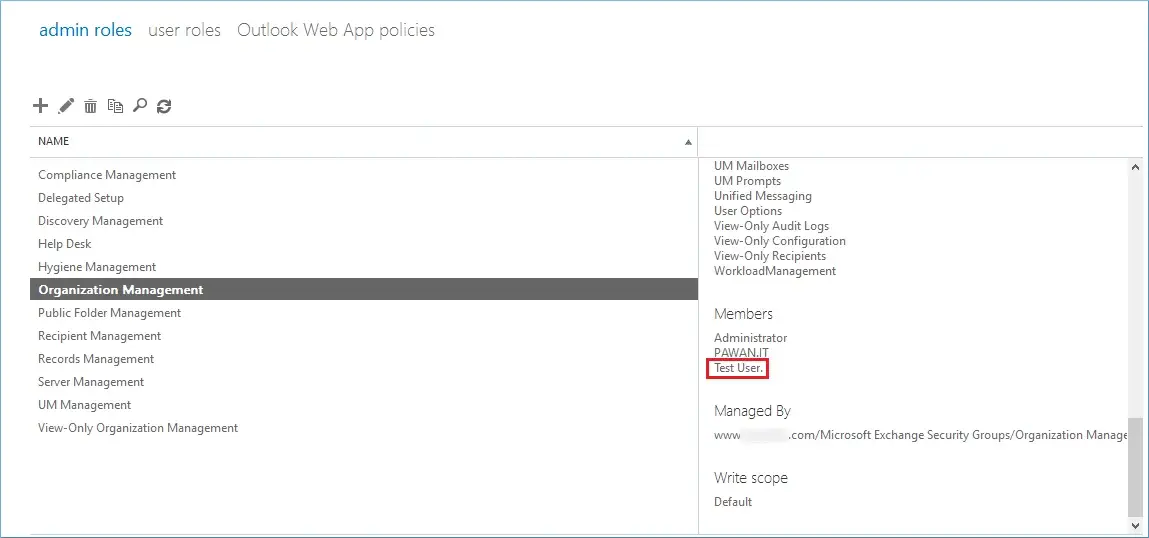
Step 6. You can see the new user in the list which has all the rights of the group.
Another way to add users to an admin-level role group is using the Exchange Management Shell with the following steps:
The above command will add a user to the Organization Management role group. You can use any role group as per your requirement. However, the Organization Management or an equivalent role group is necessary for creating an Exchange Server administrator account.
Just like Exchange Server on-premises, to create a new admin account in Exchange Online, you have to add a standard user (new or existing) to the Organization Management role group. The steps to do that are given below:
Note: Only a user who has permission to manage role groups can add a user to the administrator role. Also, the user you want to make an admin must already exist in Microsoft Entra ID.
Step 1. Go to the Exchange Online Admin Center and log in with admin credentials.<
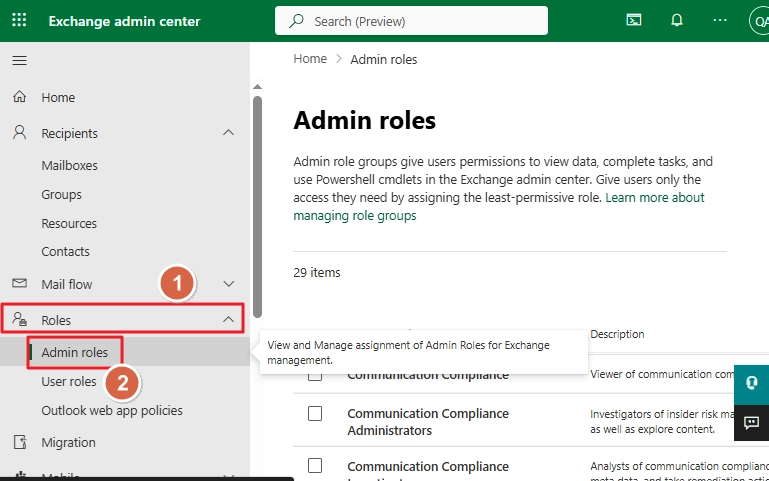
Step 2. From the left navigation menu, click Roles > Admin roles.
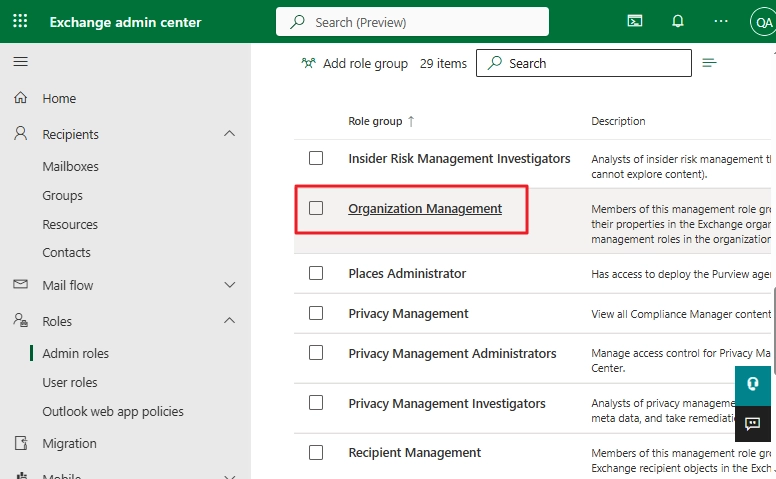
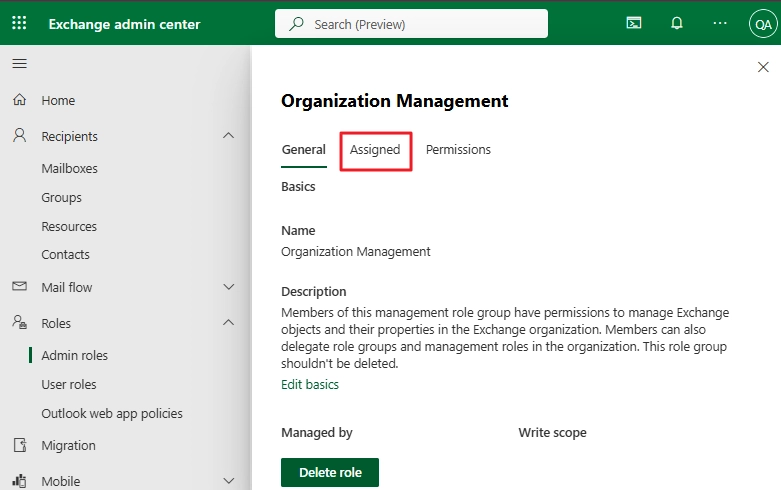
Step 3. From the role groups, select Organization Management. A new window will pop up.
Step 4. Click Assigned.
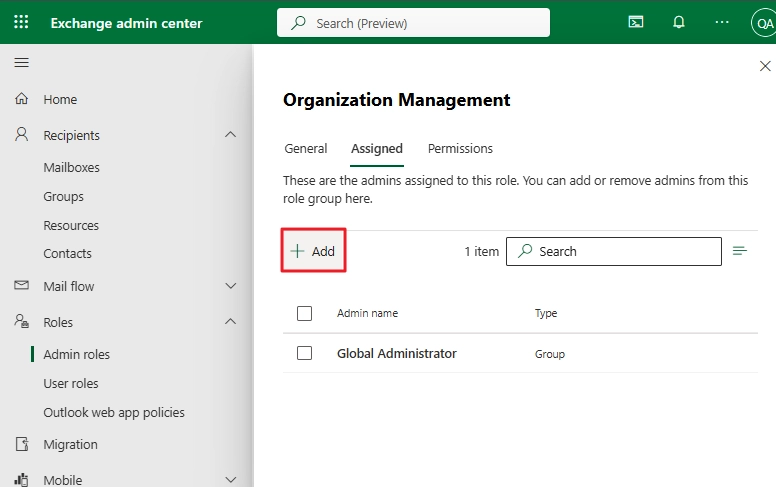
Step 5. Click Add.
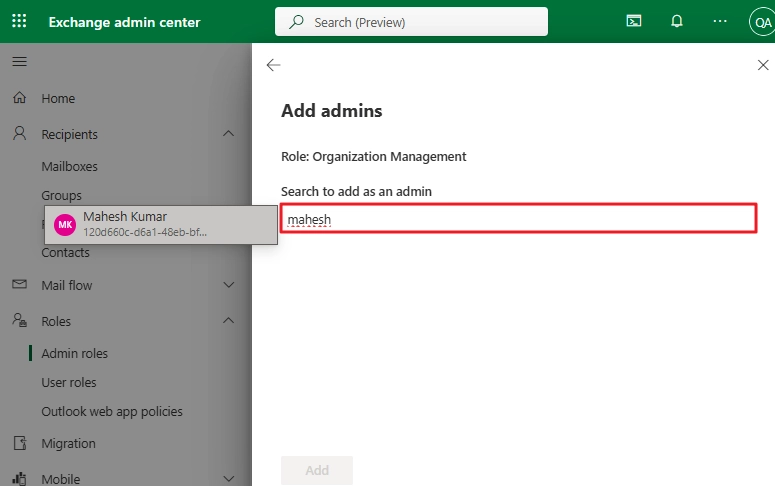
Step 6 Search and select the user that you want to make an admin.
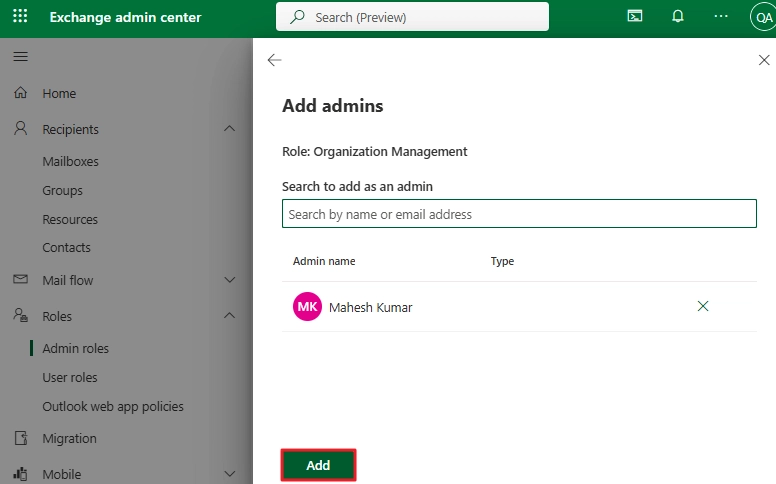
Step 7 Click Add.
Some common issues and their solutions when adding the user to the admin-level role group:
When you create an admin account in Exchange Server, there’re certain tips that you can follow. These instructions will help you preserve the confidentiality of your business data.
By following the steps we discussed in this guide, you will be able to create an admin account in Exchange Server with correct permissions. However, an Exchange administrator's work involves more than just managing Exchange Server. They must be experts in fixing common Exchange errors and recovering data from corrupt EDB files.
In addition to native troubleshooting, experienced admins also trust professional Exchange database recovery tool. One such reliable tool is Kernel for Exchange Server. It is a standalone tool to help admins recover data from severely corrupt EDB files, archive user mailboxes, and solve various Exchange issues.
Ans. Yes. It is possible to create Exchange admin account using the PowerShell commands. You can assign the administrative role to a user with this command: Add-RoleGroupMember -Identity "role-group-name" -Member "user@domain.com"
Ans. To verify the administrators permission of a user, you can check if the user is listed in the role group they were assigned using EAC or PowerShell.
Ans. Yes. You can add multiple users to the administrator role group in Exchange.
Ans. To create an Exchange Server administrator account in Exchange 2016, follow these steps: