Read time: 7 minutes
Gmail has more than 1.8 billion active users accessing their online accounts. However, users often encounter issues with their Gmail OST (Offline Storage Table) files getting corrupted & leads to loss of vital information, including contacts, emails, calendar entries & tasks. A corrupted OST file can cause a serious disruption to one’s work & cause decreased productivity & lost business opportunities. We will help you to counter it all & take you through the causes of Gmail OST File corruption & provide an in-depth guide on how to fix corrupted Gmail OST file issue like an expert.
Reasons for corrupted Gmail OST file issue
There are many possible reasons for the corrupted Gmail OST file issue. The following given below are the most common ones:
- Abrupt system shutdown during OST file synchronization can cause corruption.
- Malware or virus attacks to the storage medium of the OST file.
- Using an older version of Outlook or a version conflicting with the installed operating system.
- Inaccurate or incomplete OST file data synchronization.
- Oversized OST files can get corrupted due to errors during the conversion process, which is one of the primary reasons for corruption in OST files.
- Hardware or system failure during an email sync or data transfer process.
- Multiple user access or simultaneous usage of the same OST file can also cause corruption.
4 Quick methods to fix corrupted Gmail OST file issue
The 4 latest methods to fix corrupted Gmail OST file issue are given below. Follow each method one by one & see what method suits your situation the best.
Method 1. Disable the Gmail 2-step verification
Gmail’s 2-step verification protocol is designed to enhance security & require users to enter a verification code in addition to their password when accessing an account on a new device or email client. While this is a vital security measure, it can cause issues when syncing an Outlook OST file with your Gmail account.
To fix this problem, disabling the 2-step verification protocol is the first step you need to take. Go to your Google Account, tap on the Security tab & disable the 2-step verification. This will allow Outlook to stop synchronizing the OST file with the Gmail server & use an app-specific password to establish a secure connection.
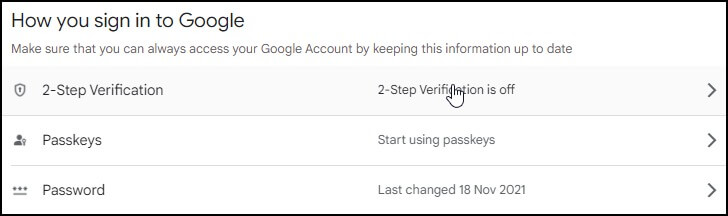
As you disable the 2-step verification protocol, you can prevent further corruption of your Gmail OST file & allow you to continue using it seamlessly. However, it is crucial to re-enable this security measure once the problem has been resolved to maintain the security of your Gmail account.
Method 2. Creating a new Outlook profile
When dealing with a corrupted Gmail OST file issue, one quick solution is to create a new Outlook profile. This can help resolve the inaccessibility issue of the Gmail account in Outlook. To perform this fix, follow these steps:
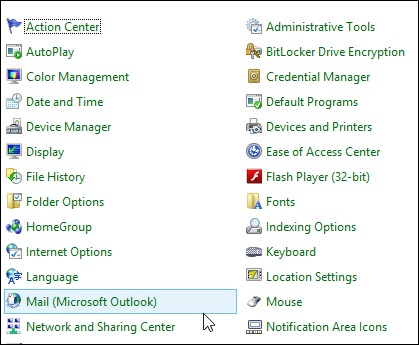
- Go to the Control Panel on your PC & select the Mail option.
- Within the Mail setup window, click Show Profiles & select the Add option.
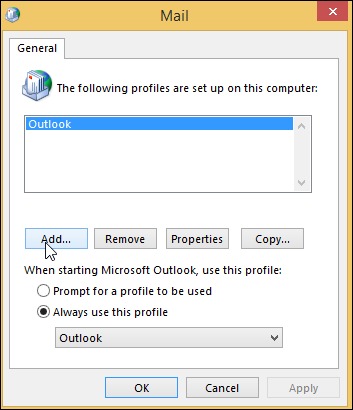
- Enter a new profile name for your Outlook account & hit OK.
- A new Outlook profile will be successfully created.
- Access Outlook, tap on File & select the option to Add an account.
- Type up the Gmail address & click Connect.
- Enter the Gmail password & click Next to continue.
- Make sure to read the prompt message carefully & select Allow & hit Done to proceed.
- Restart Outlook & check the Folder Panel to ensure your Gmail emails are visible.
Method 3. Rebuilding the OST file
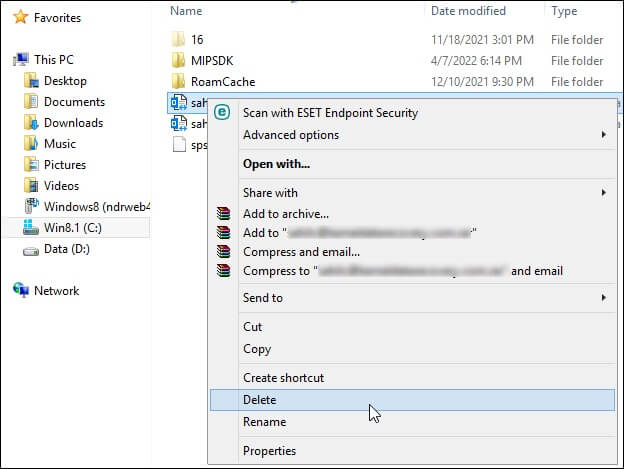
If you’re facing a corrupted Gmail OST file issue, you can rebuild the OST file to restore its functionality. Rebuilding the OST file recreates a new OST file based on the mailbox information available on the server. It also creates a new Outlook profile, which guarantees that the corruption is eliminated. The following are the steps you should follow to rebuild the OST file in Outlook:
To delete the existing OST file, navigate to the default location of OST files on your computer (typically “C:\Users\username\AppData\Local\Microsoft\Outlook”). Locate the file with the same name as your mailbox & delete it.
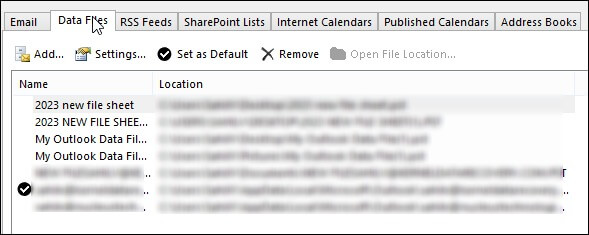
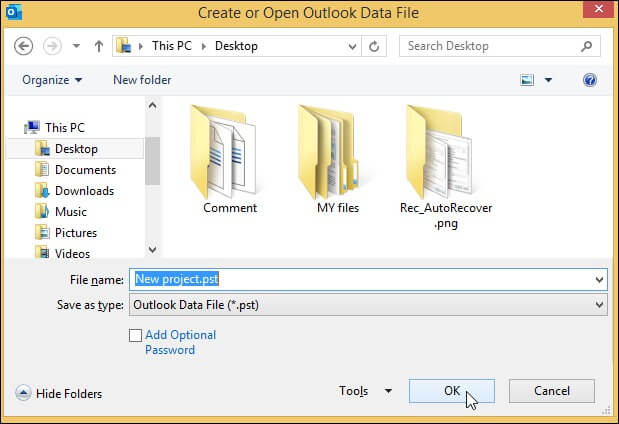
- To recreate the OST file, open Outlook, go to File & select Account Settings. Then, choose the Account Settings option again & tap on the Data Files tab.
- Click Add & select Outlook Data File. Choose a location to save the file & provide a name for it.
Now, give Outlook some time to synchronize the changes. This process may take some time depending on the size of the mailbox & the speed of your internet connection.
After rebuilding a corrupt OST file, it’s crucial to check for missing mail items. In case of missing emails, Kernel OST to PST Converter software is an advanced software that can help to extract mail items from the backup OST file & save them in PST. This powerful tool not only converts OST files to PST, but also supports live Exchange & Office 365.
Also, the tool enables users to save their OST emails to IMAP servers like Gmail & Outlook. This best OST to PST software also boasts a unique feature, as it can quickly convert large-sized files & doesn’t impose any file size restrictions.
Method 4. Microsoft Support & Recovery Assistant (MSRA)
To fix a corrupted Gmail OST file issue can be a challenging task without the necessary expertise & tools. However, using Microsoft Support & Recovery Assistant (MSRA) can fix the issue in no time. Here is how to use MSRA to resolve the corrupted Gmail OST file issue:
- Start the MSRA tool on your Windows system. You can download the tool from the official Microsoft website.
- After launching the tool, Tap on Advanced diagnostics.
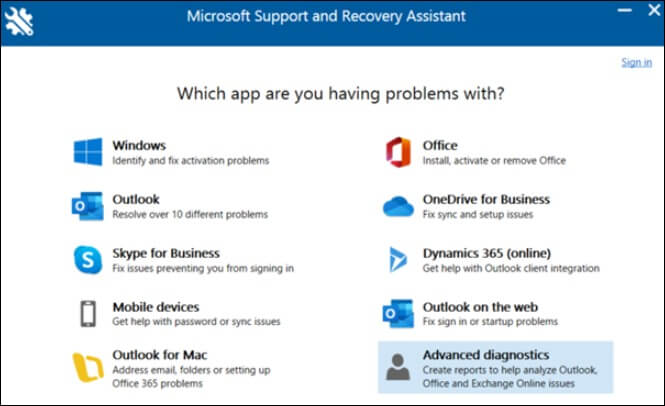
- Select Outlook from the list of Microsoft applications for advanced diagnosis & click on the Next button.
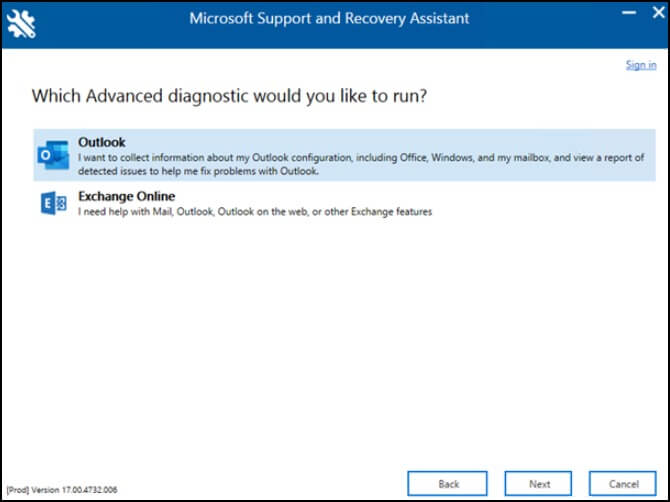
- When prompted to run the diagnostic, choose Yes & tap on Next.
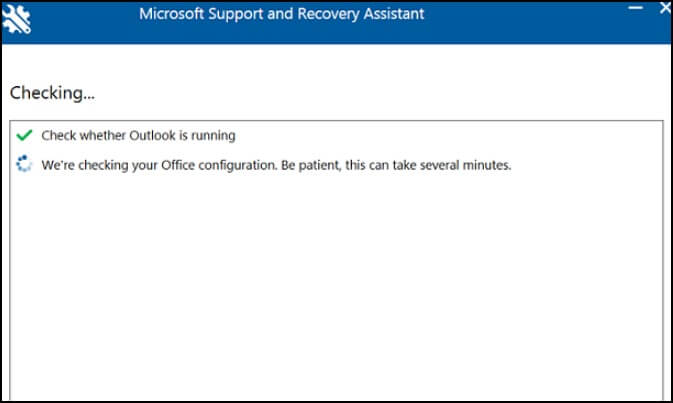
- Follow the on-screen instructions to fix corrupted Gmail OST file issue. The tool will guide you through several options to identify & fix the issue.
- Once the process is complete, restart Outlook & check if the corrupted OST files are now working.
Closing notes
Corrupted Gmail OST file issue can be efficiently resolved by including any of the four methods discussed in this post. However, whatever method you opt for to fix corrupted Gmail OST file issue, timely detection & resolution is important to avoid data loss. It is also advisable to make regular backups of your important mailboxes so that you do not have to face a similar problem in future.
Moreover, it is always best to invest in a reliable third-party OST converter tool if you are finding difficulty fixing the issues manually or if you need quick recovery with fewer data loss risks.
FAQs
A. When deleting an old Outlook OST file, users may worry about losing their email messages. However, in most cases, the emails will not be deleted. Users can easily sync their account with Exchange Server & retrieve all Outlook data. This means that users can safely delete their old OST files without the fear of losing their important emails.
A. With just a few quick & easy steps, you can import your OST file into Gmail.
- First, click on Open & then Email Data Files.
- From there, select the OST option & hit Export.
- Finally, choose the Gmail option.