Read time: 11 minutes
A SharePoint server administrator would want to keep data secure while allowing access to site visitors, users, and owners for effective collaboration and data sharing. Based on the priorities and needs, he can assign roles or permissions like Full Control, Read, Design, Edit, Contribute, etc.
Only a technically skilled person should customize permissions in SharePoint. Careless handling & managing of these permissions can generate critical data access troubles. Therefore, only admins are allowed to grant, edit, or remove permissions in SharePoint.
These permissions work as their name suggests. So, let us understand the concept first and then head on to the method to customize, change, and set permissions in SharePoint.
What is default SharePoint permissions
When you create a site in SharePoint, the collaborative platform configures and applies certain default permissions for the site access. You can modify these permissions accordingly. Most of the permissions are inherited from the root site or parent site. More on SharePoint permissions & their inheritance is given below:
- A SharePoint site inherits permissions from the Site Collection’s root site.
- A subsite inherits permissions from its parent site.
- Documents, folders, and lists inherit permissions from their site.
This permission inheritance breaks automatically when an individual item, like a document, is shared. However, if you break the inheritance and change the permissions in SharePoint, then the shared item will not have those permissions from the parent item. In the coming sections, we will understand how to break the permission inheritance, assign unique permissions, and edit the permissions.
How to remove permission inheritance in SharePoint Online?
If you want to change permissions in SharePoint or customize permissions in SharePoint for a specific list, library or survey, first, you need to break the permission inheritance. You can remove the inherited permissions from the SharePoint List or Document by following the steps mentioned below:
Stop permission inheritance in SharePoint Lists
To remove permission inheritance for List in SharePoint, perform the steps below:
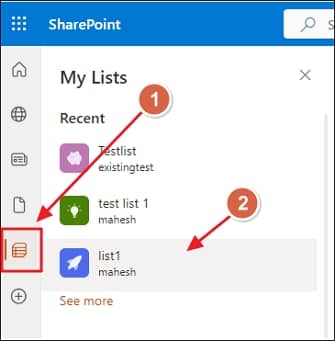
- Open SharePoint Online; on the left pane, click My lists icon to view all the current lists.
- Select the List for which you want to stop permission inheritance.
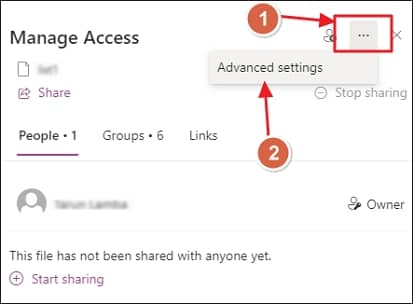
- On top right, select the Manage access button. Then, in the pop-up window, select the 3-dot icon and click Advanced settings.
- Click the option Stop Inheriting Permissions.
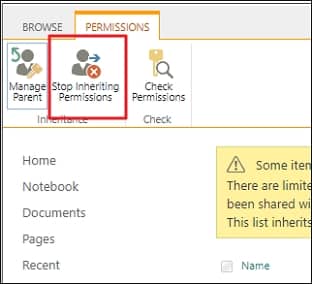
- A pop-up will appear. Select OK to remove the inheritance.
Stop permission inheritance in SharePoint Document
To remove the inheritance permission from a Document of any SharePoint site and customize permissions in SharePoint, follow the steps mentioned below:
- Open SharePoint Online, click My sites from the left menu pane, and select the site containing the Document.
- When the site opens, under the site name, select the Documents option to view Documents associated with the site.
- Now, from the list of documents choose the desired Document. Click the 3-dot icon & select Manage Access.
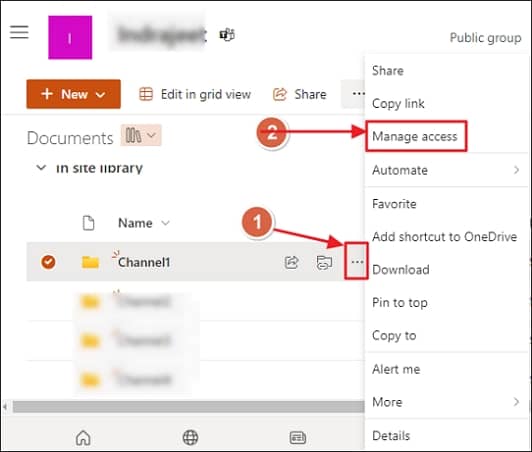
- A Manage Access pop-up window will appear like in the case of List.
- Select the 3-dot icon and click Advanced setting.
- Then, select the option Stop Inheriting Permissions. Click OK if a pop-up regarding the changes appears.
Following the above process, you can safely stop the permission inheritance. However, the user must be aware of the following points:
- You can’t break permissions inheritance if the list or library accommodates more than 100,000 items. However, individual files inside such a list are not excluded from this limitation.
- Similar limitations can be seen with any folder with more than 100,000 items.
- However, when a user shares a document or any item, the inheritance on that element is automatically broken.
How to access SharePoint site permission
SharePoint site permission allows the identification of the site owners, members & visitors. However, when altering the site permissions, users must be cautious. Allowing high-level access to the wrong person will welcome unintended data breaches.
To view & customize permissions in SharePoint, follow the steps mentioned below:
- Open SharePoint Online and navigate to the site where you want to change the permissions.
- Click on the gear icon at the top-right and select the option Site permissions.

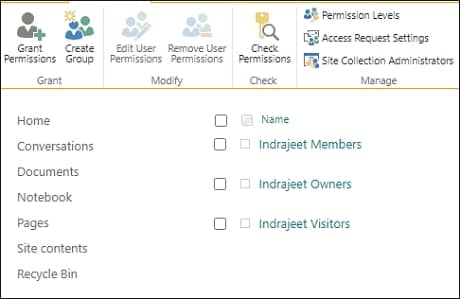
- This will open the Permission window. Here, you can view the Site owners, Site members, & Site visitors. To customize SharePoint site permissions, click Advanced permissions settings.
- Choose the required action, you can Grant Permissions, Create Group, Remove User Permissions, and more in this section.
How to assign unique permissions in SharePoint Online?
As you have broken the permission inheritance in the above section, it’s time to assign or grant unique permissions to the users. To grant permissions, we will need to navigate the permission section. We will show you how to reach the Permission section and add unique permissions for SharePoint Lists and then for Documents.
Add unique permissions for SharePoint Lists
To navigate to the permission page, form the SharePoint List page & assign permissions, follow the steps mentioned below:
- Open SharePoint Online & go to the desired List for which you want to customize permissions in SharePoint.
- Select the Manage Access option from the top-right corner. A pop will open, click Grant Access icon to grant access to a user.
- To access advanced permission, click the 3-dot icon next to Grant Access icon and select Advanced setting.
- This will open the permissions page. Now click Manage Parent option from the top menu.
- From here, you can Grant Permission, Create Group, and access several other permission options.
Add unique permissions for SharePoint site Document
To add permission to the Documents of SharePoint site, follow the steps mentioned below:
- Open SharePoint Online. Go to the desired site and select Documents option from the menu list on left.
- Now click the 3-dot icon next to the Documents folder name for which you want to modify SharePoint permissions.
- Select the Manage Access option. A pop will open.
- The rest of the steps are similar to the previously discussed List section.
How to change permissions in SharePoint Online?
To edit the permission levels, inheritance must be broken, and that we have learned already. So, to edit permission levels, perform the steps below in sequence:
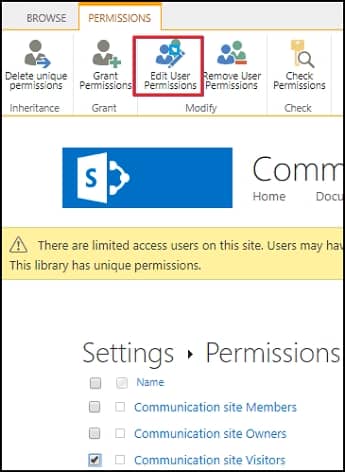
- To edit the permission for List or Document, first navigate to the PERMISSIONS tab like we did in add unique permission section above
- Select any user or group and click Edit User Permissions.
- Now, select the permissions you want to assign and click OK.
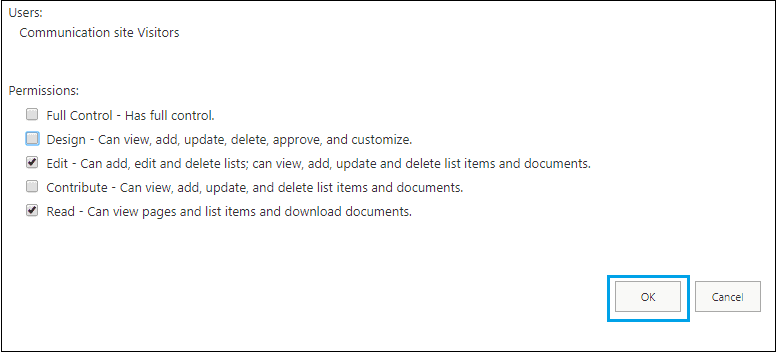
- Hence, you have changed the permissions for the selected user.
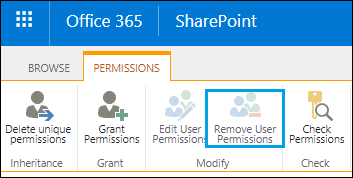
Note: It’s also easy to remove the assigned user permissions in SharePoint. Select the user and click the Remove Remove User Permissions option under the PERMISSIONS tab.
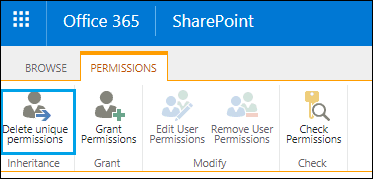
Note: To remove the custom permissions set by you and restore the inheritance, just click the Delete unique permissions option under the PERMISSIONS tab. However, if no unique permission was assigned previously, then this option will not be visible.
Finally, a dialogue box will pop up asking you for confirmation. Click OK to confirm, and the broken inheritance is restored again.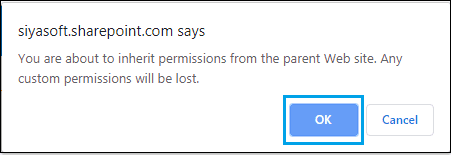
How to add a custom permission level in SharePoint?
By default, SharePoint provides you with some permission levels that you can assign to users based on requirements. However, if you want to create a permission level customized to your needs, then SharePoint allows that too. To access the various permission levels and add a custom one for your sites, follow the steps below:
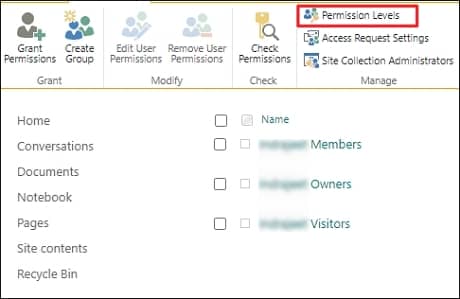
- Just like in all the sections above, first, navigate to the PERMISSIONS tab.
- Click Permission Levels.
- In the next window, click Add a Permission Level option.
- Provide Name and Description for the Permission. Select all the permissions you want to associate with the new level.
- When you are done with assigning permissions, scroll to the bottom and click Create.
Note: To delete any previously created permission level, select Delete Selected Permission Levels. However, the default levels cannot be deleted.
How to check user-assigned permissions?
So far, we have learned how to access, remove, and customize permissions in SharePoint from Sites, Lists & Documents. However, SharePoint also allows the users to check the various permissions that are assigned to any user.
To check the number of permissions assigned to any user in SharePoint, follow the steps below.
- Navigate to the PERMISSIONS tab and click the option Check Permissions.
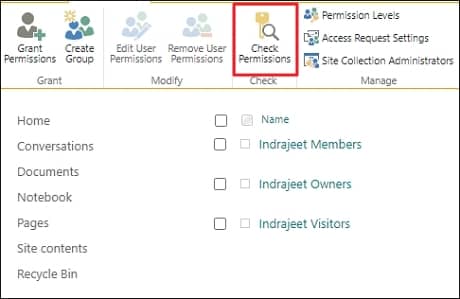
- Enter the name of the user or group for which you want to check the permissions. Click Check Now to list the assigned permissions.
Migrate SharePoint permissions & data effortlessly
Customizing permissions in SharePoint or adding/removing unique permissions requires adequate skills and proficiency. After a SharePoint data migration, the admin often has to redo all the permission assignment work. Such operations are expensive and are not ideal for any business.
However, specific third-party tools like Kernel Migration for SharePoint exist that can save organizations from such an expensive operation again & again during SharePoint migration. The professional SharePoint migration tool can effortlessly migrate permissions in SharePoint along with complete data.
Also, the tool supports all SharePoint versions, and unlike the manual methods, it allows the user to migrate to any SharePoint version easily. It can be used to migrate SharePoint 2010 to SharePoint 2019 or upgrade from SharePoint 2016 to 2019.
Note: Before you begin any data migration, we recommend creating SharePoint backup to prevent any data loss.
Final words
SharePoint Server permissions are needed to access any file/item on server. These are also required to manage external sharing in SharePoint. Here, we have discussed how to customize permissions in SharePoint. Moreover, we have talked about the procedure to stop permission inheritance, assign unique permissions, and check user-assigned permission in SharePoint. For SharePoint migration we recommend employing the automated tool, Kernel Migration for SharePoint. The tool ensures complete data integrity and preserves the original item/folder hierarchy. The tool also allows you to migrate data in bulk to SharePoint.
Frequently Asked Questions
Ans: To view the permissions, you have to navigate to the Site permissions in your SharePoint site. Then click on the “Check Permissions” tab, enter the username, and click “Check Now” to see all assigned permissions for that user.
Ans: Yes, using tools like SharePoint Migration Tool (SPMT) or a reliable third-party tool like Kernel Migration for SharePoint, you can migrate data with all the permission settings. Migrating SharePoint permissions eliminates the need to reassign them manually post-migration.
Ans: Yes, you can create custom permission levels. You can do this by going to the “Permission Levels” section. There, click on the “Add a Permission Level” option, provide a Name and Description, and choose which permissions to associate with the new level.