Read time: 8 minutes
“I use VLC Media Player to play almost every video file. But, recently, while opening an MP4 video with VLC, I faced an error – ‘Unable to open the file.’ Although every other video file format was working fine, only the MP4 video was not working. Is there an issue with the VLC media player or the MP4 video?”
Queries like these can be commonly found on the internet by users related to the VLC not playing MP4 videos error.
Get Kernel Video Repair software to fix the VLC not playing MP4 video issue. Besides MP4 videos, this tool also repairs other popular video file formats like MOV, MPEG, MJPEG, MTS, M4V, MKV, AVI, AVCHD, WEBM, etc.
* Download trial version and save repaired video up to 30 seconds for free.
VLC is a popular media player that supports almost all types of video formats. However, you may encounter issues while playing MP4 files on VLC. This is a common problem faced by many users. The reasons could be many, like codec issues, corrupted files, or outdated VLC versions.
But don’t worry, you don’t need to be a technical expert to solve the problem. In this blog, we’ll guide you on how to fix VLC not playing MP4 videos. As a bonus tip, we recommend using Kernel Video Repair, a reliable solution to fix any video corruption issues.
Reasons for VLC not playing MP4 videos
The VLC media player is amongst one of the widely used media players that support almost every video file format, and MP4 is one amongst them. However, sometimes, users are unable to open their MP4 videos with VLC, which can take place due to various reasons.
- Using an older version of VLC
- MP4 codecs are missing
- Video settings are not enabled
- MP4 file is corrupt
Is the issue with MP4 format or VLC player?
It’s important to deduce what exactly is causing MP4 files to malfunction. Is VLC causing these issues or does the problem lie with the MP4 file itself? We’ve explained this in detail in the table below.
| Issue | Why it happens? |
|---|---|
| Codec not supported issue | HEVC/H.265 or AVI codec of MP4 file is unsupported |
| Black screen issue | Hardware acceleration issue of VLC |
| 0-second video duration issue | Damaged MP4 header/missing moov atom |
| MP4 plays in another media player | Improper settings are configured in VLC player |
| Only one MP4 file crashes in VLC | Corruption in MP4 file |
Methods to fix the ‘VLC not playing MP4 videos’ issue
Below, we talk about multiple solutions to fix ‘VLC player not playing MP4 videos’ issue. But before proceeding to the methods, it’s necessary to verify whether the MP4 file is corrupt or whether VLC is the culprit. To know the actual problem, do the following:
- Update your VLC media player to the latest version.
- Play the MP4 file with other media players. If it works with other media players, then the problem lies within the VLC media player.
- If the MP4 file doesn’t work on other media players as well, then the MP4 video is corrupt.
1. Fix MP4 codec problem
MP4 files might fail to play in VLC Media Player if the codecs of these files aren’t supported by VLC. VLC Media Player doesn’t support the HEVC/H.265 or AVI codecs, and these are among the most common reasons for video not playing issues. You must download the correct codec pack that corresponds to your MP4 video file to play it in VLC without any issues.
2. Disable hardware video decoding in VLC
The Hardware decoding of VLC is often not capable of handling the rendering effects of video files. It generally happens when the video file has many subtitle tracks. So, what you can do is to disable the hardware video decoding option on VLC with the following steps:
- Open the VLC media player and go to the Tools and select Preferences.
- In the opened tab, click Show Settings from the lower left on the window and then select the All button.
- The options will display on your window, go to Input/Codec >>Video Codecs>>FFmpeg, and then disable the Hardware decoding option.
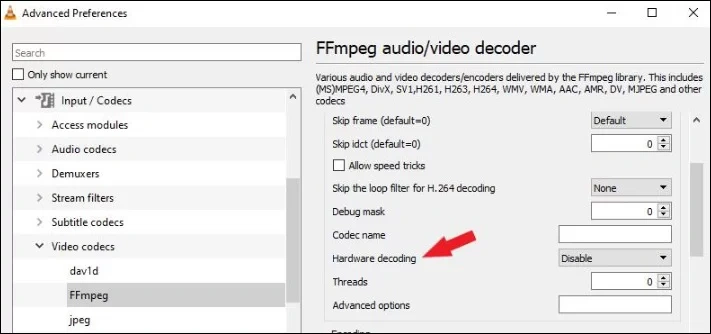
After that, close the VLC media player and restart it, and then play the MP4 video file with it.
3. Change Audio/Video settings of MP4 files in VLC
Changing audio/video settings in VLC might fix the MP4 not playing on VLC error. Follow the steps below for this:
- Open VLC Media Player and click on Tools > Preferences.
- Go to the Input/Codecs section in the Simple Preferences.
- Select All in the Show Settings.
- In the Advanced section, choose Input/Codecs from the list.
- Set the Preferred Video Resolution to your required settings. You can also choose the Best available setting for a unified viewing experience. Then click on Save.
4. Convert MP4 to another format using VLC player
If your VLC is not playing MP4 video file, then maybe converting it to another format can help with video playback. Follow the steps below to convert MP4 to another format using VLC player:
- Open VLC Media Player and click on Media > Convert/Save.
- Click on Add and upload the problematic MP4 file to VLC, and then click on Convert/Save.
- Choose the preferred format from the Profile drop-down list.
- Then, click on Browse to choose the saving location.
5. Use some other video output module
With this solution, you may also resolve the VLC player not playing MP4 videos issue. Here is what you need to do.
- Access VLC and go to Tools > Preferences.
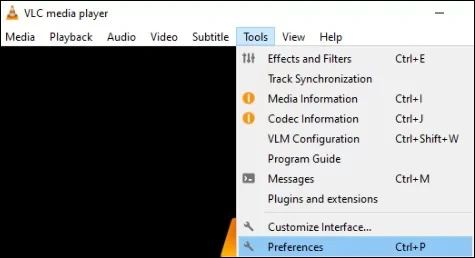
- Tap on Video and checkmark the options Enable video and Window decorations.
- From the Output drop-down menu, select X11 Video Output (XCB).
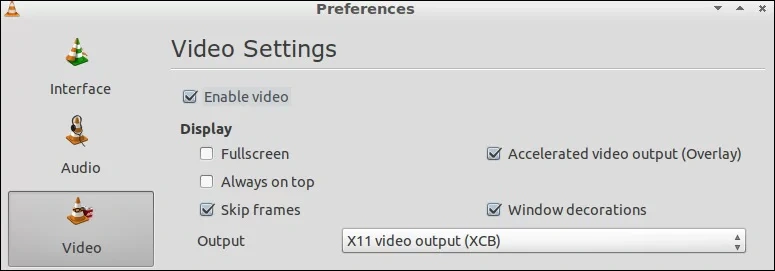
- Save the settings and restart the player.
Repair MP4 file with the utility
When VLC fails to play MP4 videos, it’s mainly because of unsupported codecs or an issue with hardware acceleration settings. In more severe cases, the MP4 not playing on VLC error can also happen because of corruption in MP4 files. To repair the file, you can use Kernel Video Repair. This tool easily repairs video files of major camera brands like Nikon, Canon, GoPro, etc.
Also, it comes with a friendly and easy-to-use interface, which makes it easier for users to use the tool and repair the video files. Let’s go through the working process of this tool to understand it better.
- Download and configure the software on your system.
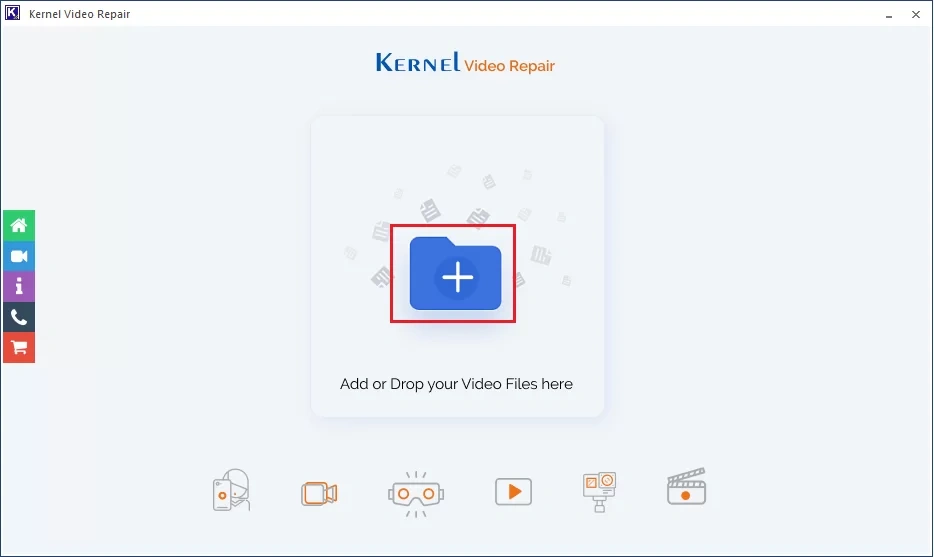
- On launching the tool, click the + folder icon to select the corrupt MP4 videos.
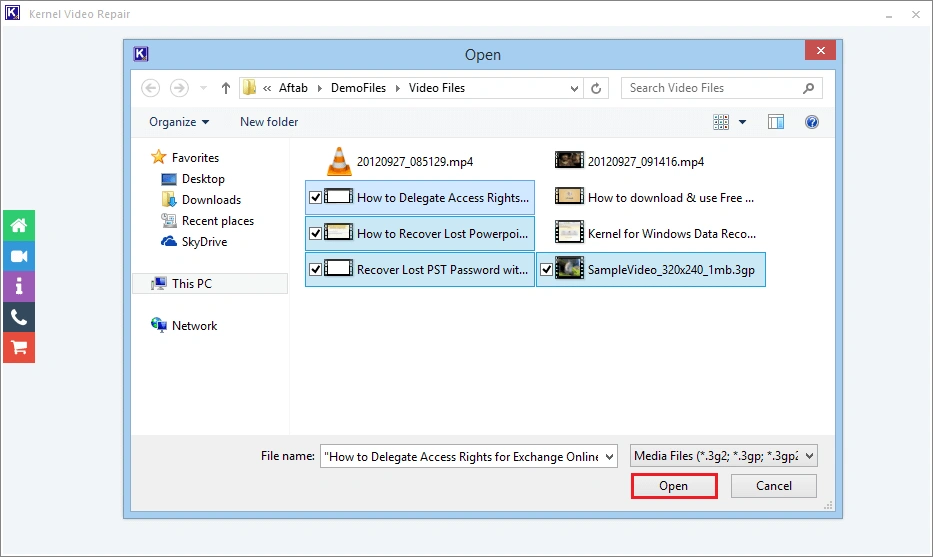
- Select the MP4 files or other videos that you want to repair and click Open.
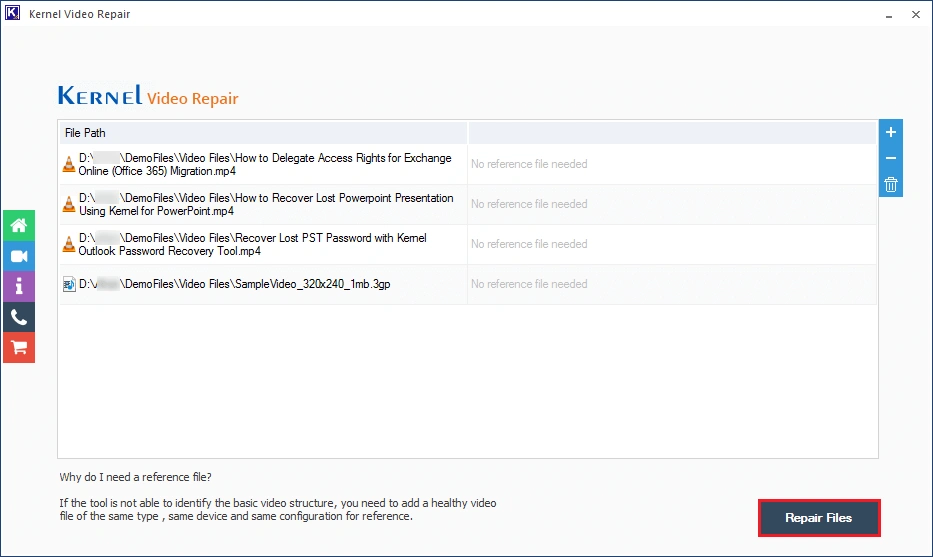
- Once the files are uploaded, click Repair Files at the bottom.
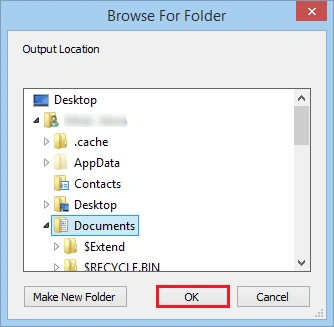
- A pop-up window will appear on the screen to select a location for saving the videos after repairing. Click OK after choosing the location.
- The tool will start repairing the corrupt videos. You can stop the process in-between by clicking the Stop button.
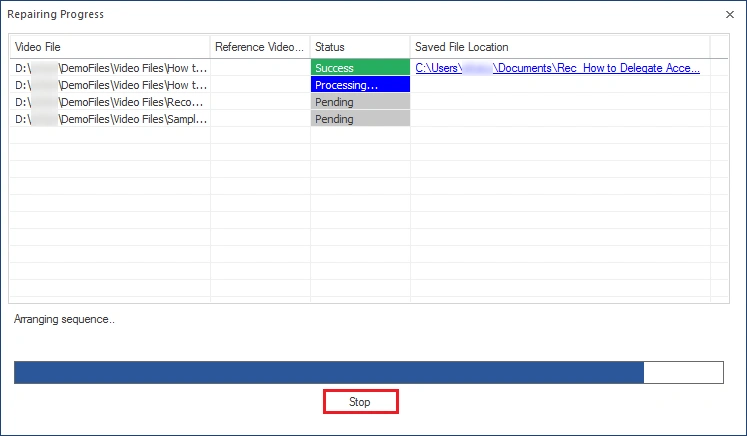
- Once the files are repaired, click OK to end the process. And if you want to save the repair report to CSV, click Save report to CSV.
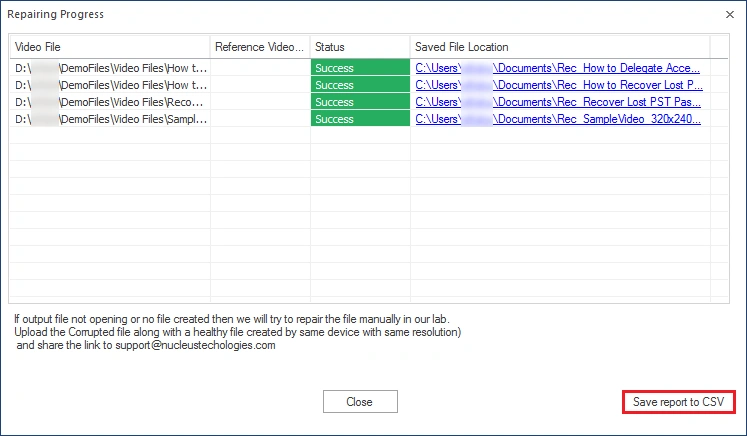
That’s how you can quickly repair corrupt video files with this practical utility.
Wrap up
When VLC fails to play MP4 videos, it can be really frustrating. However, our article has provided several solutions to fix the problem, including upgrading VLC, checking for corrupted files, and using a professional tool. By following the steps outlined, users can easily resolve any issues with VLC and MP4 compatibility.


![Android Videos Not Playing on Windows System [FIXED]](https://www.nucleustechnologies.com/blog/wp-content/uploads/2022/04/900x416-22.jpg)