Read time: 14 minutes
Suppose you are revisiting memories you recorded 10 years ago on your wedding day. All of a sudden, you see the video file blurring out sections of the recording. Don’t you think it’s quite frustrating and overwhelming at the same time? You’ll surely try different media players to see if the error is within the video or the video player. However, the issue is still there. What to do now?
Blurry or fuzzy videos can be due to several reasons and degrade the quality of the video. Fortunately, you do not need to worry about the blurry videos as this article will surely be your perfect guide to fix blurred videos.
What are the causes for blurred video files?
The causes behind the occurrence of blurriness can be categorized into two distinct use case scenarios, depending on how the individual interacts with the multimedia file.
Creators often encounter blurriness in their videos, which can be ascribed to either errors during the video creation process or potential hardware malfunctions.
However, the problem commonly faced by viewers differs from the situation described above, typically occurring during online content streaming. In such instances, issues often arise either with the application being utilized or with the data network.
Download Kernel Video Repair tool and follow our simple step-by-step guide to repair your blurry videos without any hassle. Start with the free version and see the difference yourself.
Video blurs while watching offline
When you’re enjoying offline video playback, several factors can lead to blurriness and interruptions in your entertainment experience.
- File Integrity: Numerous individuals frequently download video files from websites, particularly movies. However, they may encounter blurriness in the videos due to inadequate encoding. To prevent this problem, it is essential to ensure proper digitization of the video content. To resolve the issue, you can attempt the following steps: adjust your media player settings, make necessary modifications, and then verify the video file again. Alternatively, consider downloading a video that conforms to the latest encoding standards.
- Codec Support: The presence of a robust and smart media player application can significantly impact your media playback experience. Even if you’ve obtained a video file in the correct format that matches your system’s media player, the lack of necessary codecs can hinder proper processing, resulting in on-screen problems such as video blurriness, synchronization issues, and more.
- Hard Drive Space: Because of an excessive workload on the hard drive, the video may appear blurry, despite the fact that the media player application is sophisticated and equipped with the necessary codecs. Adjusting system settings and terminating background tasks can prove beneficial. Additionally, removing any unused system applications will be advantageous.
- File Compatibility: File compatibility is a significant consideration in this context. For instance, Windows Media Player serves as the pre-installed default media player within the operating system and enjoys widespread usage worldwide. However, it lacks support for numerous popular multimedia file formats that are readily supported by alternative media player applications such as VLC.
If you find yourself in this situation, attempt playing the video file using a different multimedia application. If this approach doesn’t resolve the issue, consider converting the file format and attempting to open it again.
Video blurs while streaming online
The problem of video blurriness persists regardless of whether you view the content offline or stream it online, though the underlying causes may differ.
Streaming content online can lead to video blurriness due to the following reasons:
- Unstable Internet Connection: An unreliable internet connection poses a persistent issue, impacting various online activities, from basic web browsing to streaming videos.
- Video Quality Set Low: YouTube and other prominent online video platforms provide content in various resolutions. When the internet connection speed drops, rather than halting the stream, the web media player automatically adjusts the video resolution to maintain uninterrupted playback. If you’re facing a similar situation, simply tap the three dots located at the top left corner, select “Quality,” and increase the resolution.
- Video Content had not been processed: When a video is uploaded to YouTube, it typically takes approximately 30 minutes for the upload process to complete. It’s interesting to note that on YouTube, a staggering 300 hours of multimedia content is uploaded every second.
- Something went wrong: This scenario can occur across various situations, such as when there is an unstable internet connection, a video upload completes but post-processing encounters an error, or if something went amiss. In such cases, an error message will be displayed on the screen, prompting a retry at a later time.
To enjoy uninterrupted streaming of online video content, a reliable and high-speed Internet connection is essential. Furthermore, we recommend using the most up-to-date web browser application.
Video blurs after the render is complete
In the preceding section, we explored the issue of video blurring, a common concern not only for users but also for content creators who encounter similar challenges after the rendering process.
The blurriness of a video can be attributed to several factors, including the configuration of focus, camera stability, lighting conditions, and more. Consequently, paying attention to these elements can streamline the process of creating high-quality multimedia content.
Preprocessing video concerns are partially tied to the hardware and equipment employed. Following this, the next phase involves editing and seamlessly merging video clips to create a cohesive video. It is crucial to take into account various factors throughout this process.
How to prevent video blur while recording: Easy steps
Here are the major steps that you must follow to avoid videos from getting blurry from the initial stage:
- Prepare before recording: Prior to commencing the video recording process, it is imperative to assess two critical factors: the intended platform for upload and the resolution settings of both your computer screen and the camera being used for recording. A thorough understanding of shooting and post-recording resolutions is essential.
- Realize the file formats: There is a multitude of media containers, which are essentially file formats or extensions for video content, to choose from. However, it’s crucial to opt for one that provides extensive accessibility and versatility.
- Use Vector art: Raster art is composed of pixels aligned in both vertical and horizontal directions, whereas Vector art employs a distinct methodology, relying on mathematical calculations that offer flexibility in manipulating the artwork’s resolution.
- Better spec hardware: A system equipped with a sluggish processor and limited RAM will not deliver satisfactory performance when attempting to apply edits and review previews concurrently. When engaging in video editing tasks, it is advisable to have a minimum of 8 gigabytes of RAM and a speedy processor. For more advanced editing and effects, such as those found in applications like Adobe Premiere Pro and Apple Final Cut Pro X, it is highly recommended to include a dedicated graphics card to expedite the preview and rendering processes.
How to Fix Blurred Video: Best Methods Explained
Let’s go through some effective methods and tips to fix a blurry video and retain it in the best quality:
Fix 1: Update graphic drivers
Graphic drivers on your PC display the video that you watch on the screen. Make sure your drivers are regularly updated, as if they become outdated, the videos might appear blurry. Follow the process below to fix your videos:
- Open Device Manager and go to Display Adapters.
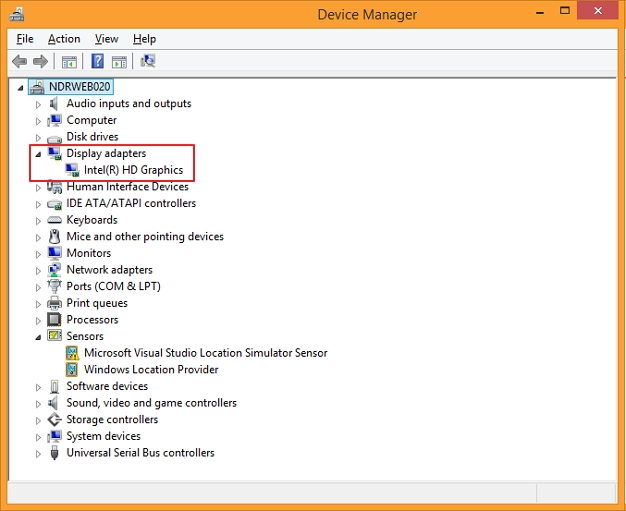
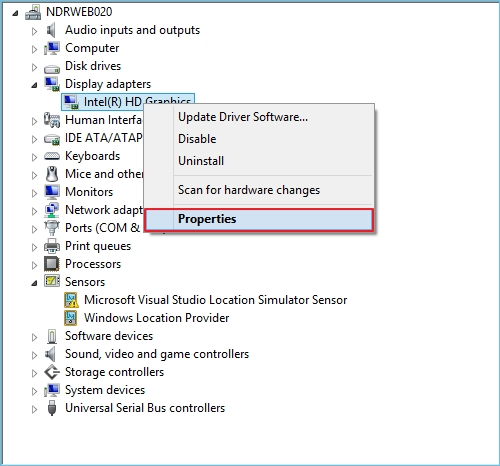
- Check the Graphics Driver on your device and right-click on it.
- Select Properties from the menu shown.
- Go to the Driver tab and click on Update Driver.
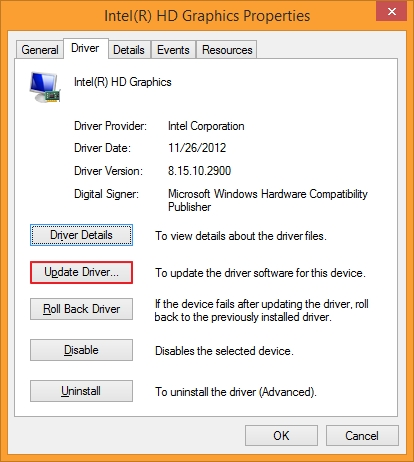
- Tap on the Search automatically for updated driver software to see if there’re any pending updates.
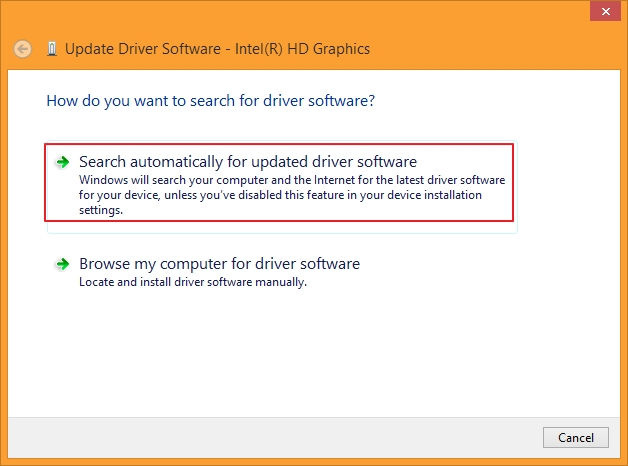
If the drivers aren’t updated, update them. However, if they’re already updated, try clearing the disk space to unblur the video as explained ahead.
Fix 2: Clean disk space
When you run out of storage, the blurred video issue can arise on your device. This can lead to flickering, fuzzy, broken, and unplayable videos, especially those with high resolution.
To avoid the issue, try clearing the disk space by removing unnecessary files, documents, folders, etc., to improve the system performance. If you do not want to delete the files, you can move them to a safe external storage, from where you can access them whenever required.
Fix 3: Use VLC media to fix the video file
VLC media player can help you adjust the streaming value to fix blurred video, if performed using the following steps:
- Launch VLC media player, click on Tools and open Preferences.

- On the bottom of the window, select All under Show Settings.
- This will open a new pane on the right with Stream output.
- Adjust the stream output mixer caching (ms) value to 1500. Select Save.
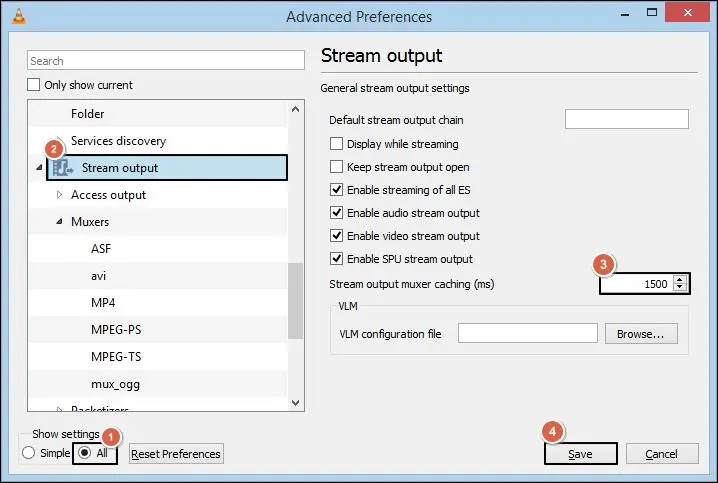
After this, try playing the video again to see if the issue is resolved.
Fix 4: Fix Video codecs
Video codecs, when become outdated, can damage the video quality. Follow the steps below:
- Open Windows Media Player and go to the Options.
- Click on Player and select Once a day to set Automatic updates. Click Ok.
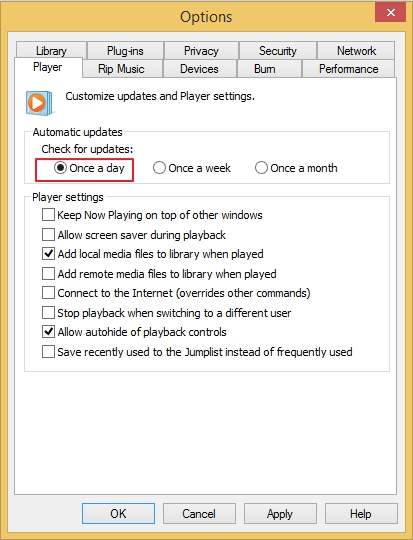
This will make sure that your video codecs are updated at least once a day without skipping.
What to do when the video is corrupt & damaged?
In the preceding discussion, we explored the common concern of video blurriness, which has been a source of frustration for both video consumers and content creators. Our aim was to provide a viable solution to address this issue.
However, when it comes to video files that have become corrupt or damaged, none of the previously mentioned methods are effective. Various factors such as attempting to convert video file formats without proper expertise, incorrect editing, virus attacks, interrupted transfers between computers, and failed uploads can all contribute to the corruption and damage of video files.
Dealing with fundamental problems related to file corruption can be effectively managed using the VLC media player, given its robust capabilities as a media player application. However, when it comes to the challenging task of repairing severely corrupted and damaged video files, we recommend utilizing a dedicated and specialized software.
Professional video repair solution to repair damaged video files
Kernel Video Repair Tool provides effortless repair and recovery solutions for corrupted and damaged multimedia files, encompassing a wide array of popular video formats. This tool seamlessly operates within the Microsoft Windows ecosystem, ensuring compatibility across all versions.
Quick steps to repair blurry video files using the tool:
Step 1: Download Kernel Video Repair tool. Open it and click on + icon to add video files.
Step 2: Select the blurry video files from your system and click Repair Files to proceed.
Step 3: Browse the output location to save the repaired videos.
Step 4: The software will start repairing files. Once completed, directly access them.
Tips to secure your video from getting blurred
Here are some crucial tips that you can follow so that your videos are not blurry:
- Make sure the videos are recorded under proper lighting to minimize unnecessary noise and graininess that might otherwise make the video blur.
- Record videos in formats that are widely acceptable and compatible with a variety of devices.
- Adjust your recording device to the highest resolution (1080 pixels or 4K) to get high-quality videos.
- Regularly clean dirt, dust, or smudges from the lens to record clear and quality videos.
- Take regular backups of the original video file and store them in a safe location for easy restoration of the quality if it is lost or damaged due to any situation.
Conclusion
When enjoying our preferred multimedia content, whether offline or online, nobody appreciates blurriness, as it can disrupt the experience. The aforementioned steps can assist you in resolving various video problems effortlessly. However, if the issue is still persisting in the video, use Kernel Video Repair tool that helps you repair damaged, blurry, flickering, or unplayable videos without quality loss.
Frequently Asked Questions
A. Yes, you can repair blurred video using the built-in features of VLC media player and by clearing the disk space on your system.
A. You can ask the sender to share the videos as an attachment within the email or via the cloud storage to avoid video compression. Another way to avoid the blurriness in the video is to download the video again using a high-speed and bandwidth network.