Read time: 7 minutes
Imagine the situation: “You are the head IT admin in your organization, where you are planning migration from Outlook mailboxes to upgraded Office 365. There are 300 users with more than 500 mailboxes (primary, shared, archive, etc.). You’ve implemented migration batches as the first thing in the morning using the PST Capture Tool and now by the end of the day, you’re checking the progress, expecting the status of entire mailboxes to change to ‘success.’ But there’s a plot twist: you see the error, ‘Some PSTs have not been uploaded.’ What to do now? How’re you planning to troubleshoot the situation?”
Errors like this are quite common for administrators. However, what’s uncommon is the way they handle the situation. Learn how to troubleshoot some PSTs have not been uploaded issue and perform smooth PST to Office 365 migration.
Common causes for PST to Office 365 upload failures
- Oversized PST files: Recommended PST file size for move or upload is 20 GB, and files that go beyond this size limit often undergo process failure.
- Using old file formats: Legacy files like ANSI file format can show compatibility issues with the recent Exchange environments and restrict the PST file upload.
- Not assigned admin permissions: The account used for PST upload is not assigned the required permissions, which will cause discrepancy in the process.
- Inefficient network: Working over an inefficient network, improper network bandwidth is one of the prime reasons for “Outlook import PST some items cannot be copied” error.
- Corrupted PST files: Damaged or corrupted PST files that are impacted by issues like dirty shutdowns will result in upload process crashing.
How to resolve Outlook import PST some items cannot be copied?
Follow the given troubleshooting steps to get rid of the “PST Capture Tool Not Uploading Complete Email Data from PST” error:
- Go through the migration logs: Access the migration logs to identify what’s been causing the error in the process to import PST.
- Check the Azure Blob Storage: The PST files you’re uploading may have failed the AzCopy upload to Azure storage. To confirm, use the steps below:
Step 1: Use your credentials to login to Microsoft Azure Storage Explorer
Step 2: Check that the files you placed in queue are uploaded and displayed in the ingestiondata container.
Step 3: Perform a manual upload of all the files that are missing in the destination.
- Confirm from the mapping file: The error made in the CSV mapping file is one of the major reasons responsible for the issue. Here’s what you can do:
Step 1: Verify that all the PST file names mentioned in the mapping file are correct and free from any typos.
Step 2: There should be no spaces in the email addresses. Use ExchangeGuid in the CSV file rather than the email address to avoid errors.
Step 3: Upload the updated CSV file to the Purview Portal and click Validate. This will ensure that there are no formatting errors.
- Handle corrupted PST files: Corrupted, damaged, or inaccessible PST file is another significant concern that needs attention. Use Inbox Repair Tool by Microsoft Outlook to repair the PST file and handle the corruption. However, the utility won’t effectively work if there’s severe corruption or damage in the PSTs you’re uploading.
How to automate PST uploads for better performance?
You did PST capture tool download to upload your PST files, but the tool showed error and performed incomplete transfers. If you’re receiving the error again and again, and none of the manual solutions seem to help, you must try a professional software to upload PST to Office 365. The tool is known for its simple yet user-friendly interface that simplifies uploading PST files to Office 365. Now, let’s understand why you need an automated solution for this.
- Large-scale data migration: When it comes to migrating bulk data, manual workarounds often fail. It creates the need to move your PST mailboxes with an automated solution.
- Data import speed: Usually, it takes very long time to complete upload of PST files using the manual solution, which results in errors like some PSTs have not been uploaded. It can be avoided when you choose import PST tool.
- Data loss: Uploading corrupt PST files can often result in data loss, if there’s no robust method to do so. Therefore, using a professional tool will help to minimize the chances of data loss.
Using Kernel Import PST to Office 365 is a great alternative to the PST Capture Tool. Moreover, it will provide a secured environment guided by encryption techniques like multi-factor authentication, to eliminate compromising the data integrity.
Follow the given procedure to upload PST files to Office 365:
Step 1: Run the software on your computer.
Step 2: Click on Add in the Add Source pane to provide path to the PST file.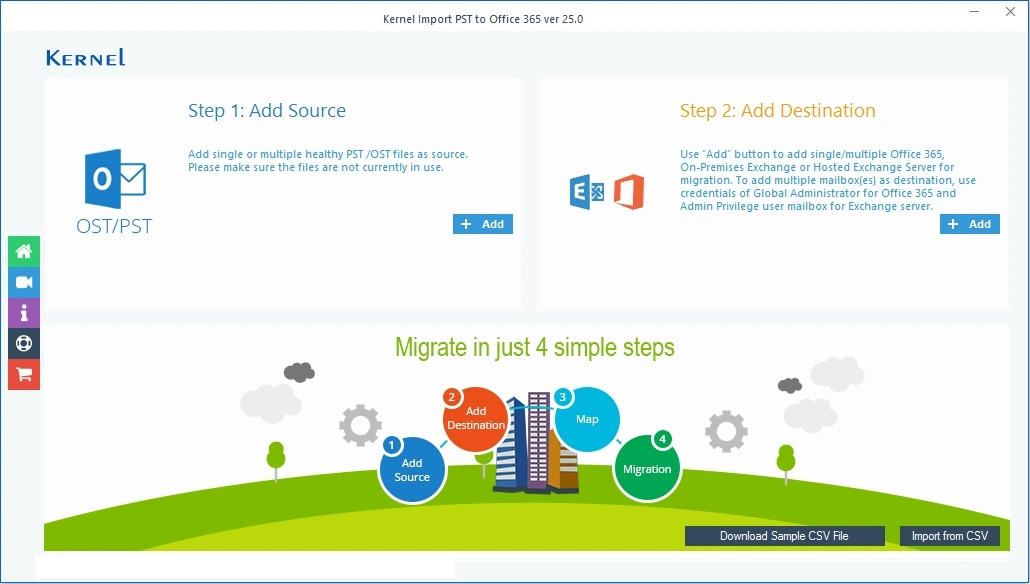
Step 3: Select the desired source PST file and click Open to load them.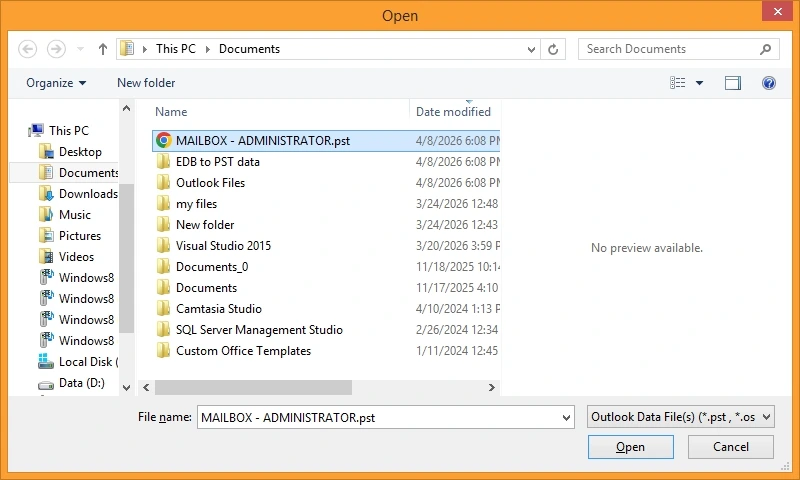
Step 4: Go to the Add Destination pane and click Add to connect Office 365.
Step 5: Enter the credentials: Tenant ID, Client ID, and Client Secret Value to connect.
Step 6: Select from migrate single mailbox or list all mailboxes and then tap on Get User Mailbox (es). Select the desired ones. Click Add.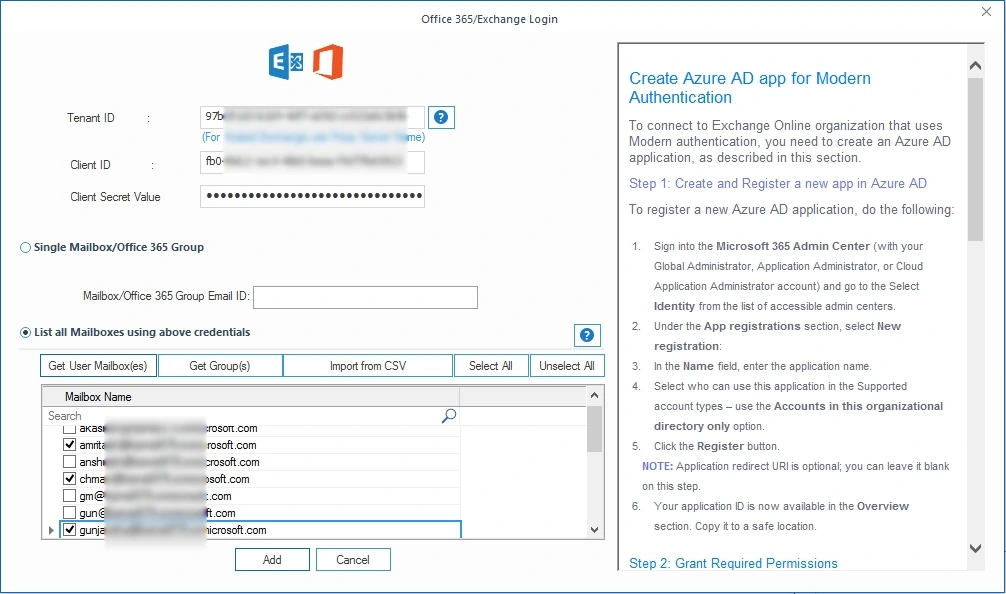
Step 7: Use the dropdown and map the source PST file to the destination mailbox. Click Set Filter and Migrate.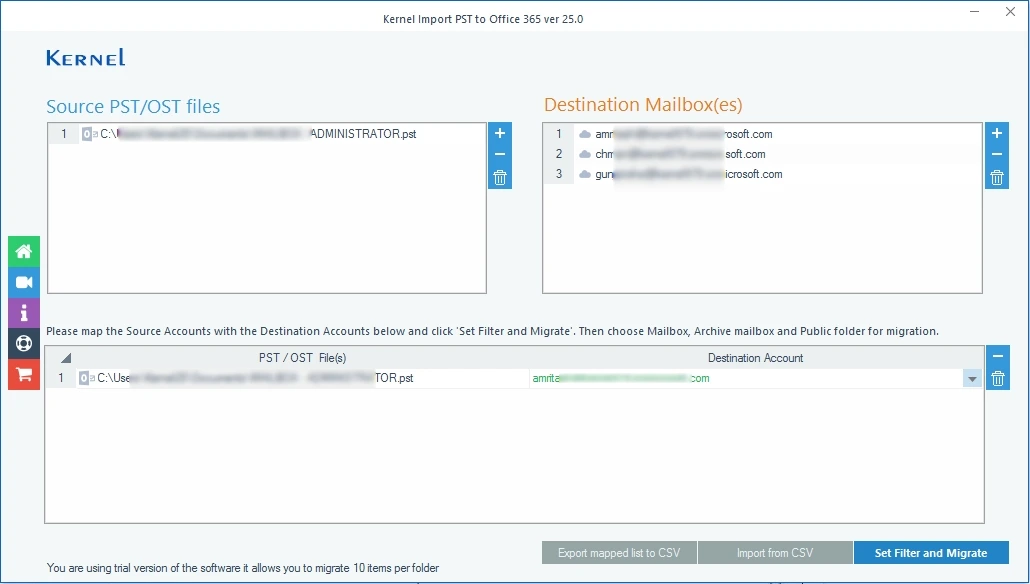
Step 8: Review the folder selection and select or deselect the folders, apply the suitable filters. Tap on I am OK, Start Migration.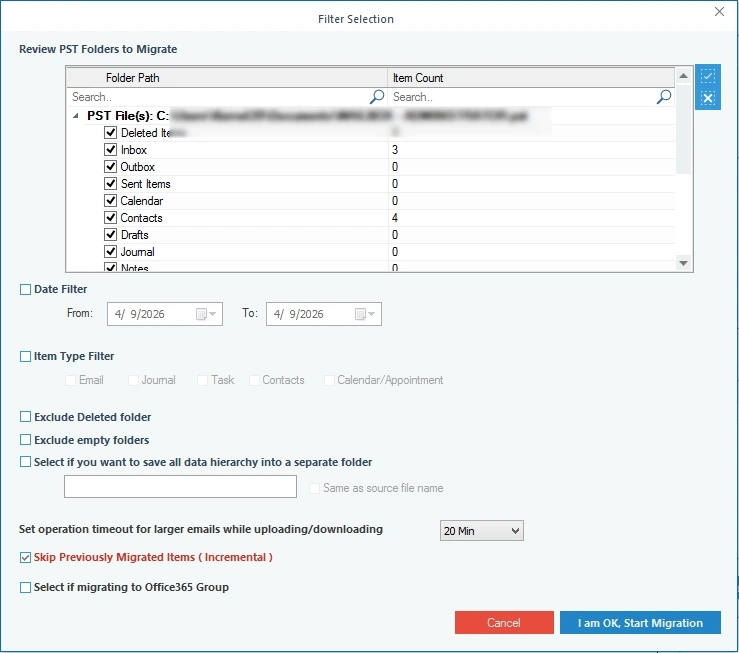
Step 9: Once the tool begins processing, it will show real-time status on the screen.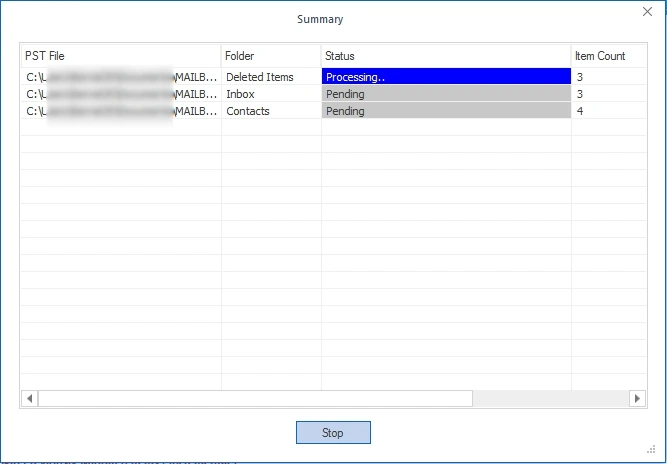
Tips to avoid PST import failures
Here are some tips that you can follow to avoid PST Capture Tool Not Uploading Complete Email Data from PST errors:
- Split PST file size into smaller mailboxes to make it more manageable and move efficiently.
- Make sure your PST files are converted to the Unicode or other newer PST version.
- Assign all the necessary permissions, like Mailbox Import Export, beforehand to avoid issues.
- Make sure the network you are using to upload your outlook PST files to cloud is stable and steady.
Conclusion
With the solutions provided, you can resolve the Outlook import PST some items cannot be copied error. However, try to avoid this error in future with the automated solution that allows you to upload files with minimum hassles. It supports selective import of data and retains emails, attachments, contacts, etc., along with their metadata.
Common user queries
A: Some other common errors that you might face during the process, include missing mailboxes, incomplete transfers, or access denied. Use a professional solution to resolve the error and upload your PST files safely.
A: PST Capture tool is a native utility provided by Microsoft Exchange that searches stored PST files on the network client systems and moves their data to Office 365.