Read time: 8 minutes
User Query: I have a client requirement where project data is saved in a PST file. I need a reliable way to import PST to an Office 365 shared mailbox so my entire team can access the data easily and meet project requirements. What is the best method to import PST to shared mailbox?
I personally got multiple scenarios where users are searching for manual ways to access their PST data in the Shared Mailbox of an Office 365 account. To make things clear for you, let’s first understand why there is a need to import PST files to Office 365 shared mailbox, and then move towards the solution for it.
Why import PST files to shared mailbox Office 365?
Go through the image below to know the key reasons before importing PST files to Office 365 Shared Mailbox: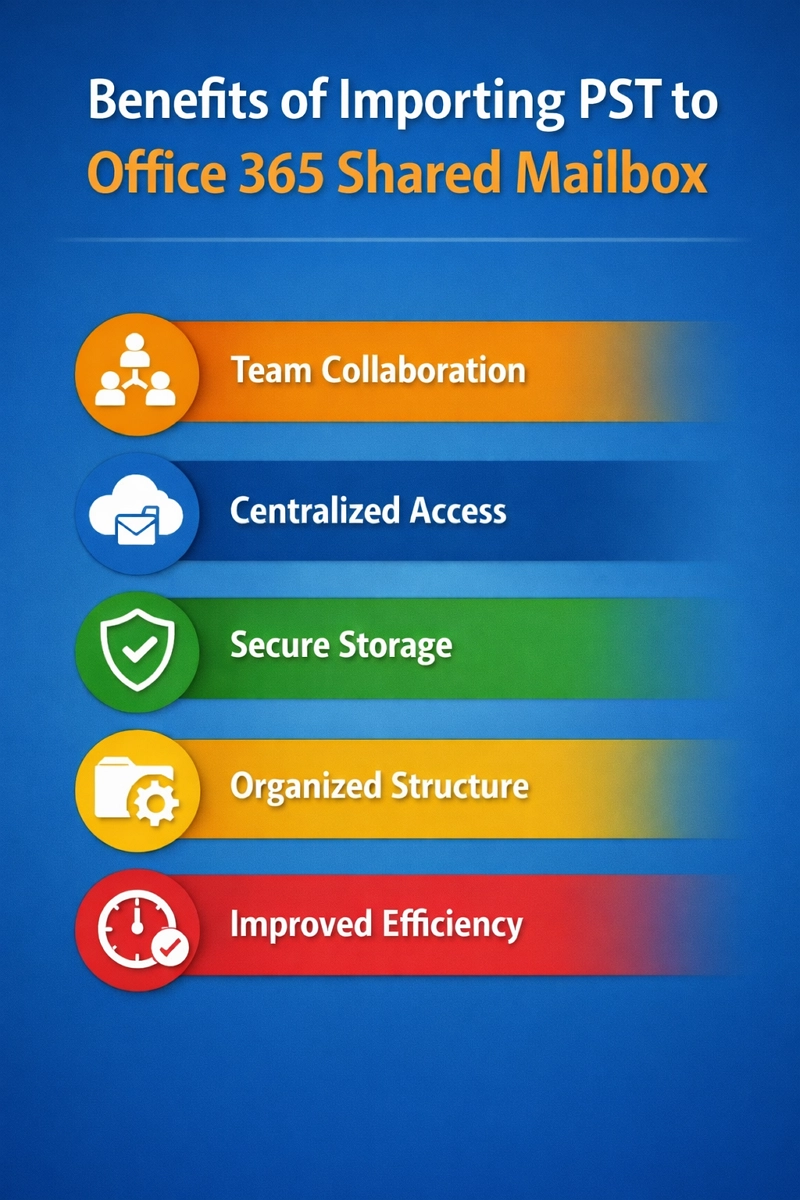
How to import PST to Shared Mailbox Office 365 manually?
There are a few manual methods available that can help you import PST to Shared Mailbox Office 365. Let’s know each method in detail one by one:
Method 1: Outlook’s Import/Export tool
Outlook provides a built-in Import export tool to export all your mailbox data in PST file and import it into any Office 365 account. With this feature, you can easily import PST file to shared mailbox Office 365.
Step 1: Open Outlook and click on File.
Step 2: Go to Open & Export and click on Import/Export.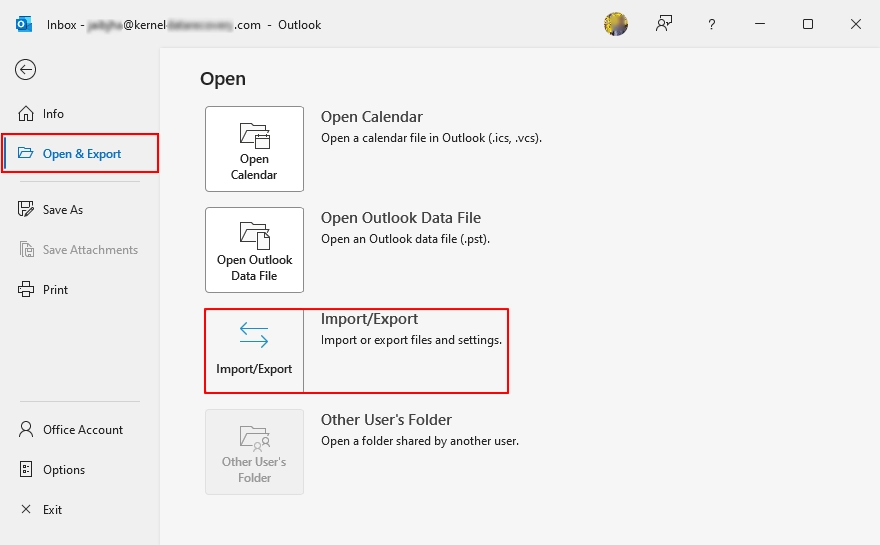
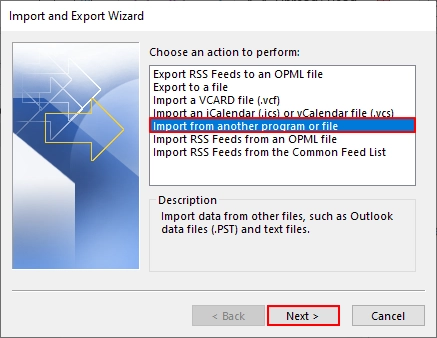
Step 3: Select Import from another program or file and click Next.
Step 4: Now choose Outlook Data File (.pst) and click Next.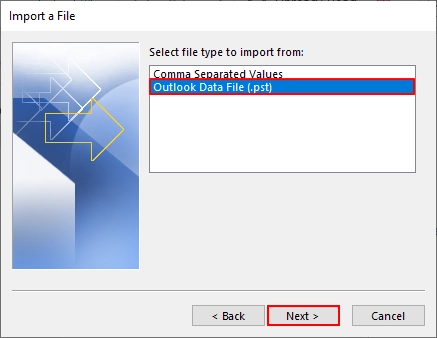
Step 5: Browse and select PST file from your system and click Next.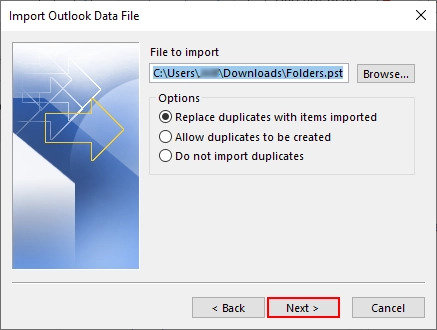
Step 6: Select the mailbox or folder and Office 365 account and click Finish.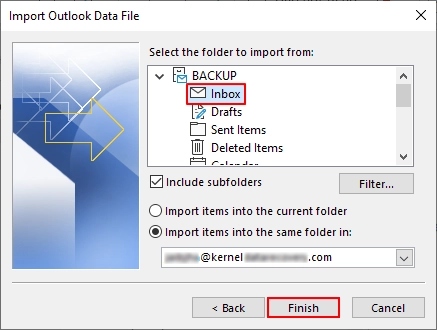
Limitations of the Import/Export tool
- No direct option for shared mailbox imports via Import/Export tool.
- Risk of data mismatch or folder structure loss after import.
- No support for selective import based on date or filters.
- Requires technical knowledge and an admin role for proper execution.
Method 2: Network Upload
The Network Upload method helps you import PST files to shared mailbox Office 365 through Azure storage. It suits large data transfer needs and offers better control, but requires setup steps, proper permissions, and careful mapping for accurate results. Here’s how to import your PST to Shared Mailbox in Office 365 via Network upload.
Step 1: Download AzCopy tool from Microsoft official site.
Step 2: In the Microsoft Purview portal, start creating a new import job to get a Secure Access Signature (SAS) URL.
Note: This URL is a temporary secure link to upload PST files.
Step 3: Start Command prompt and use AzCopy to import files to Microsoft cloud storage via SAS URL.
Step 4: Create a simple CSV file that specifies shared mailbox as destination for the import job.
Step 5: Go to the Purview panel, upload the CSV file and start your import job.
Step 6: Microsoft will import your PST data into the shared mailbox Office 365.
Drawbacks of Network Upload Method
- Complex setup steps with Azure storage account and permission requirements.
- Requires PowerShell use which may be hard for non-technical users.
- You cannot import PST file more than 20 GB to Office 365.
- Risk of data mapping errors due to CSV file misconfiguration.
Method 3: Drive Shipping
Use Drive Shipping method to import PST files to an Office 365 shared mailbox by sending a physical drive to Microsoft. It suits large data transfer needs and avoids internet limits, but needs proper setup, encryption, and admin access. Follow these steps to import PST to Office 365 shared mailbox via Drive Shipping:
Step 1: Download the PST Import tool into your system.
Step 2: Copy the PST files to any hard drive.
Step 3: Create a specific PST Import mapping file.
Step 4: Create a PST Import job for a smooth process.
Step 5: Ship the hard drive to Microsoft’s headquarter address.
Step 6: Filter data and start your PST Import job.
Drawbacks of Drive Shipping method
- High cost due to shipping charges and Microsoft service fees.
- No quick process as physical drive transit takes several days.
- Requires strict encryption and compliance with Microsoft submission guidelines.
- Limited tracking control once the drive reaches Microsoft data center.
As I told you previously that all the manual methods have their own limitations, which makes it difficult to import PST to shared mailbox Office 365. That’s why a professional Import PST files to Office 365 tool is necessary for this import job.
Import PST files to shared mailbox Office 365 | Automated tool
Kernel Import PST to Office 365 tool offers a simple way to import PST to shared mailbox in Office 365 without complex steps like the manual methods. It supports direct import with accurate folder structure, secure transfer, and quick setup, which helps teams access data without delay.
Some of its advanced features are:
- Import PST files to Office 365 Shared, Primary, and Archive Mailboxes.
- Import bulk PST Contacts to Exchange Online and Office 365.
- Migrate PST data to Office 365 Groups with complete data integrity.
- Supports Delta migration to import only new data to Office 365.
- Maintain email attachments, metadata, and folder structure in Office 365.
- Advanced filters to import selective data from PST to Office 365.
Easy steps to import PST to Shared Mailbox in Office 365
Here is a step-by-step guide to import PST to shared Mailbox Office 365 using the tool:
Step 1: Download, install, and launch the Kernel software.
Step 2: On the software home screen, click on Add to sync PST files.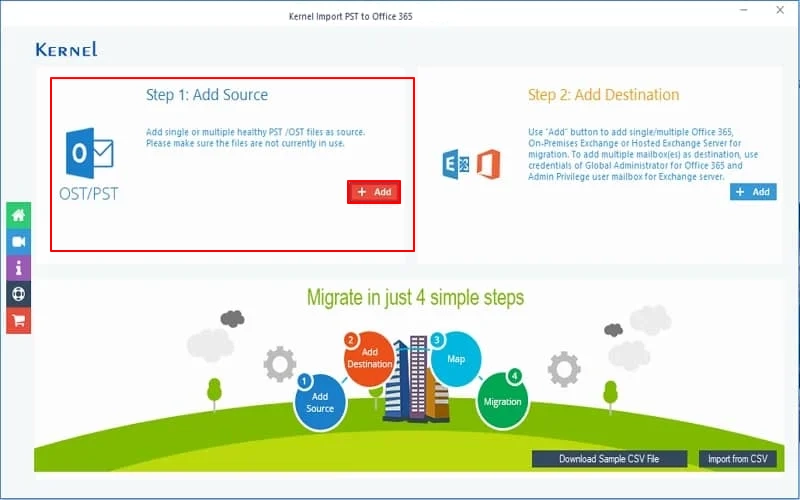
Step 3: Click on Add to connect your Office 365 account containing shared mailbox.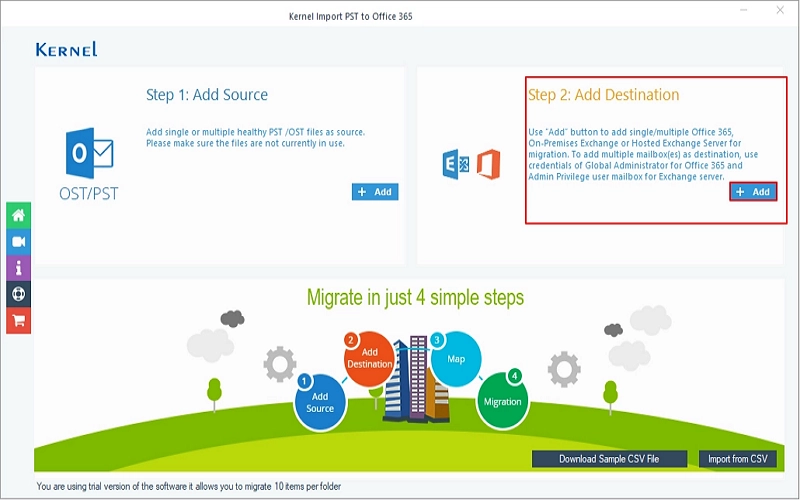
Step 4: Enter required Office 365 credentials, select all the necessary mailboxes, and click Add.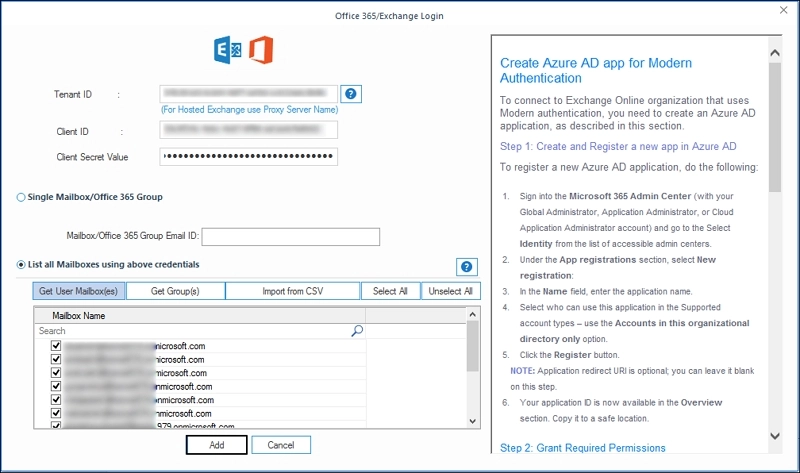
Step 5: Map your PST file with a specific Office 365 account and click Set Filter and Migrate.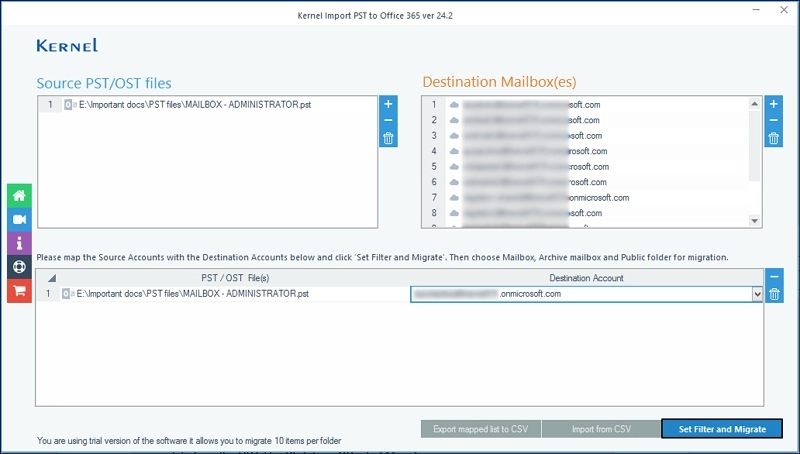
Step 6: Select your mailbox type and click Migrate.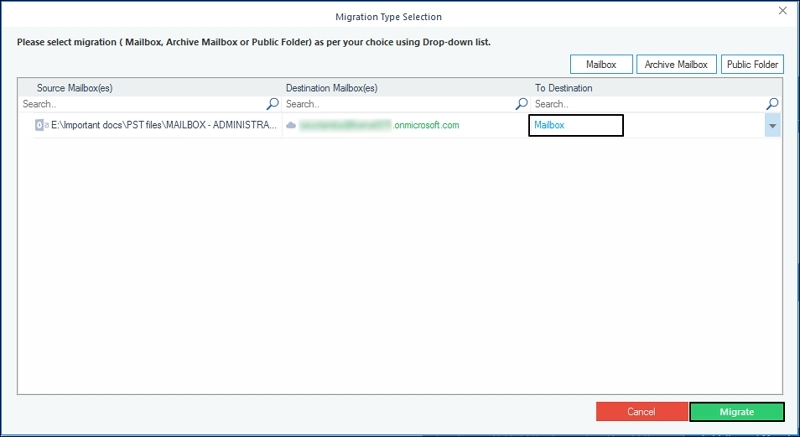
Step 7: Select all the necessary files or folders and apply the necessary filters for selective data import. Click I am OK, Start Migration.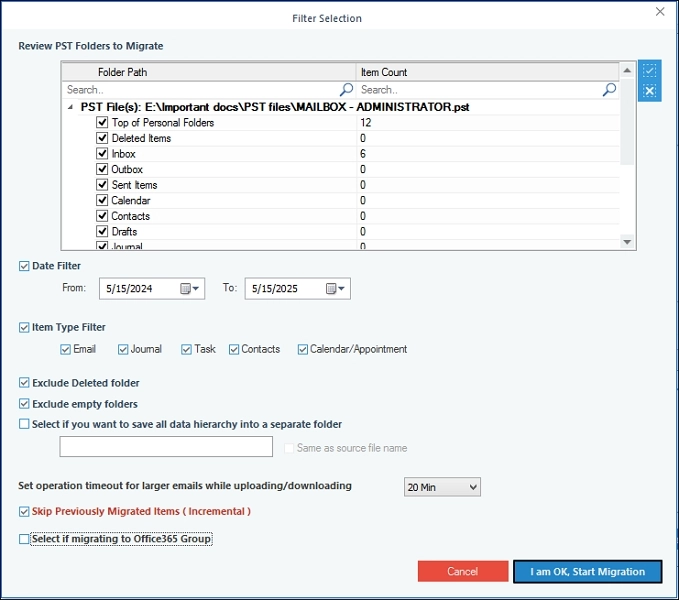
Step 8: The software will import PST to shared mailbox Office 365 and show a Process completed message. Click OK.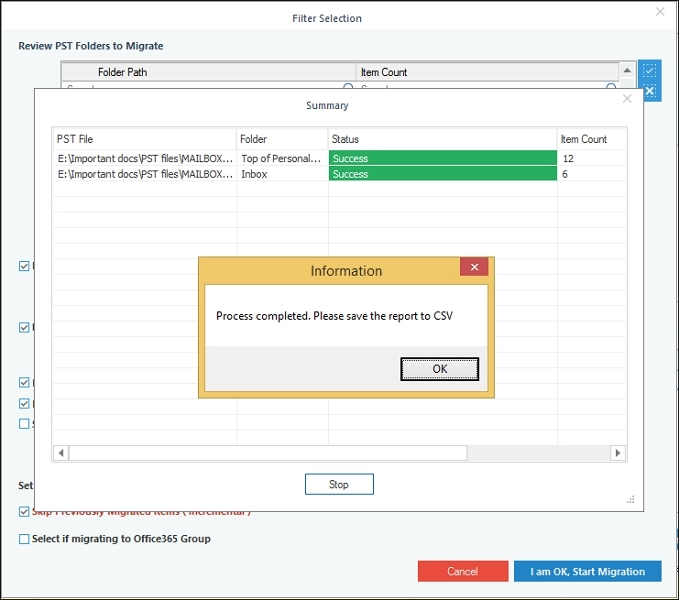
Final Note on import PST to shared mailbox in Office 365
This article has covered all the possible manual methods to import PST to shared mailbox Office 365. However, manual methods do not offer 100% import results because of their restrictions. So, we recommend you opt for the Kernel import PST to Office 365 tool to easily move your PST data to Office 365 shared mailboxes.
Frequently Asked Questions
A: You can create a shared mailbox from the Microsoft 365 admin center. Go to the Teams & groups > shared mailboxes, click “Add a shared mailbox“, enter details, and assign members with required permissions.
A: The easiest manual method depends on your scenario. Outlook Import/Export works well for small PST files, while Network Upload and drive shipping are better for large scale imports. Each method has its own steps and limitations.
A: Yes, manual methods need PowerShell and setup knowledge. However, the recommended tool offers user-friendly interface to upload PST to Office 365.
A: You need admin-level roles like Global Admin or Compliance Admin. Also, proper mailbox access (Full Access Permission) is required to complete the import.