Read time: 5 minutes
In today’s world of remote work, video conferencing has become the norm for businesses to connect with their teams & clients. However, not everyone is comfortable, or able, to turn on their camera. Enter Avatars for Microsoft Teams, a feature that allows users to connect with their presence without the need to turn on their camera.
With the flexibility to represent themselves through unique avatars that reflect their personal style, users can feel more comfortable & confident during virtual meetings. Today, we will dive into the world of avatars & easily set up avatars for Microsoft Teams & how it can revolutionize remote collaboration within your organization.
In the upcoming section, we will show you a comprehensive method to set up Microsoft Teams avatar in no time with all the required permissions & configurations.
How to configure your Microsoft Teams avatar
Setting up MS Teams avatar is a simple process that requires 2 necessary steps. Get ready to take the best decisions in Microsoft teams with your avatar.
By enabling organizations with these features, Teams ensures that everyone can enjoy the benefits of avatars for Microsoft Teams & engaging with one another effectively.
Follow the steps below that are broken down in easy-to-read sections so that the avatars for Teams app are available to all users in your organization.
Step 1: Allowing the Microsoft Teams avatar
To activate Microsoft Teams Avatar for a specific group of users, it is necessary to add the feature to the app setup policy assigned to those users. To do so, follow the steps below.
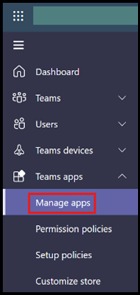
- Access the Teams admin center & navigate to Teams apps > Manage apps from the left-navigation bar.
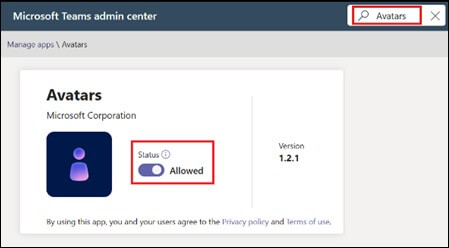
- Search for Avatars under the Search by name text box, & hit Enter.
- Choose to Allow the feature.
Setup policy for pre-installation of Microsoft Teams avatar
At this point, the Microsoft Teams Avatar feature is available to use. However, if you want to pre-install the feature for users, an additional set of steps are required.
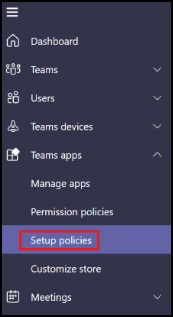
- Return to the Teams admin center & navigate to Teams apps. Click on Setup policies.
- Choose the desired policy to edit or create a new one with a new name.
- From Installed apps, choose the option Add apps.
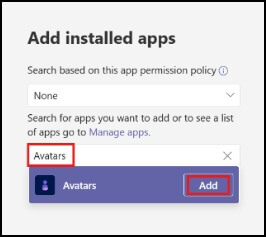
- Search for Global with Search based on the app permission policy & select it.
- Search for Avatars & add it to the policy.
- Tap on the Save button to save changes to the app setup policy.
Enable Pinning for Users
Pinning the app for users in Microsoft Teams is a simple process that can be done through the Teams admin center. This feature gives users a more personalized experience with Teams by allowing them to pin the apps that they use frequently for easy access. Follow these steps to pin app for users:
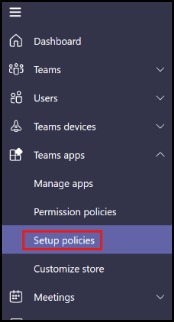
- Open the Teams admin center & navigate to Teams apps > Setup policies. This will lead you to the app setup policies page.
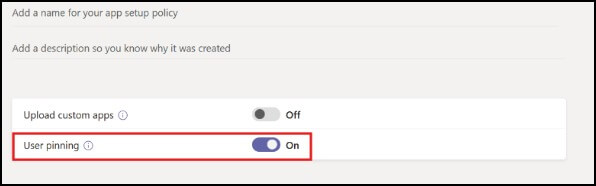
- Select the policy under which you want to enable the user pinning feature. This could be the Global policy, representing the org-wide default policy, or a custom policy if one has been created.
- Locate the User pinning option. This option is default to “Off”, so click on “On” to enable it.
Once you have completed these steps, users will be able to see the app’s avatars when they search through their apps & can pin it for easy access. They can also add the app’s avatar to their Pinned apps list to automatically pin the app.
Step 2: Whitelisting essential URLs
To create an avatar for Microsoft Teams & ensure its smooth functioning, it is vital to allow TCP ports 443 & 80 through your firewall or proxy server. The following URLs need to be permitted for the same purpose:
a. *.microsoft.com
b. *.office.com
c. *office.net
Allowing these endpoints will facilitate an interruption free execution of Avatars app on your Teams. However, if you still encounter any endpoint related issue then consider adding the below mentioned endpoints too.
- clients.config.office.net: Enables the app to access client configurations from Microsoft Office.
- global.profile.prod.collab.mixedreality.microsoft.com: Facilitates collaboration with mixed reality solutions.
- js.monitor.azure.com: Accountable for monitoring JavaScript performance.
- catalog.meshxp.net: Helps in catalog management, particularly for Microsoft cloud offerings.
- browser.events.data.microsoft.com: Enables the app to capture browser events data for analysis & insights.
- avatars.meshxp.net: Supports the functioning of avatars with Microsoft cloud services.
- static2.sharepointonline.com: Responsible for providing static content from SharePoint Online.
- statics.teams.cdn.office.net: Contains essential static data from Microsoft Teams.
- substrate.office.com: Provides the app with insights into Microsoft’s substrate service.
- csp.microsoft.com: Supports Microsoft Teams Security Practices & Policy.
- avatars.mesh.microsoft.com: Ensures the app’s ability to interact with Microsoft’s avatar service.
- noam.events.data.microsoft.com: Helps capture events data from North American regions.
- eu-mobile.events.data.microsoft.com: Stores events data from the European Union regions.
Moreover, it is imperative to allow TCP port 80 to allow requests to automatically redirect to TCP port 443. Thus, enabling these URLs & ports will guarantee the seamless performance of the MS Teams avatar.
Wrapping up
Utilize the process discussed above to set up a Microsoft Teams avatar and be more comfortable and productive in Teams meetings. Be cautious when configuring permissions & setting up endpoints for the Avatars app.
If you need any extra help during your migration into Teams or any kind of advanced capability, then consider using Kernel Microsoft Teams Migration Tool for support. It ensures fast, reliable & secure migrations with minimal effort & maximum performance. The tool allows for specific 1:1 chat migration while preserving original Teams account configuration & permissions. So, give it a try today.
FAQs
A. Avatar in MS Teams is a feature that allows you to participate in video conferences without turning on your camera. This is especially helpful for those who need a break from video fatigue, are joining from a different time zone, or prefer not to show their video. With Avatars, you can still effectively collaborate with your team without worrying about being on camera all the time.
A. The default avatar in MS Teams is your initials. If you want to personalize it, you can change it to another picture such as your staff ID photo or LinkedIn profile picture. This will make it easier for people to recognize & connect with you.