Read time: 6 minutes
The collaboration application Teams from Microsoft is the preferred choice for professionals to conduct meetings or conferences. However, often, the users find themselves in need to remove Microsoft Teams audio device. But with no understanding of the system sound configuration users find the audio device removal process challenging.
This blog will provide a step-by-step tutorial on removing an audio device from Microsoft Teams. We will cover Windows and Mac system instructions that should help when dealing with audio devices. We will also provide some safety tips to protect your data during removal. So, if you’re looking for a comprehensive guide focused on removing your audio devices from your computer’s settings, let’s dive in.
Disable Teams audio device from system
Removing the audio device of Microsoft Teams from your computer in both Windows and Mac is no longer a cumbersome, tricky process. With just a few steps, you can quickly and easily have Microsoft Teams disable its audio as it connects to any web conference, voice, or video call.
Note: Even if you accidentally leave the audio device setting on after participating in a conference, Teams will remember your preference and turn off the device automatically.
For Windows OS:
Here, we will guide you through removing Microsoft Teams audio devices on Windows.
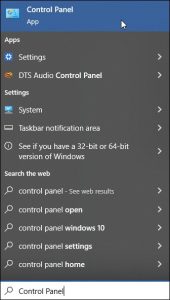
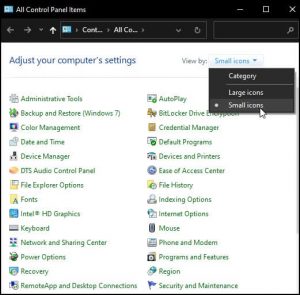
- Step 1. Open Control Panel and set the View by category on top-right to Small icons.
- Step 2. Set the View by option to Small icons.
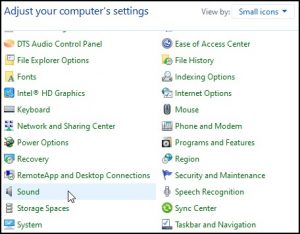
- Step 3. Find and select Sound option and click on Playback tab.
- Step 4. Select the sound device associated with Teams. Right-click on it and select Disable.
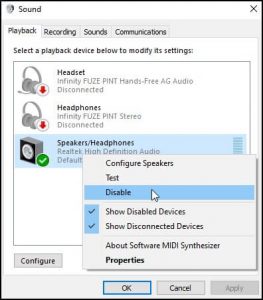
- Step 5. Select the sound device from the list and right-click it. Choose the option Set as Default Device. This will make the selected device your default system sound device.
Note: Disabling the sound device will render it unusable with any other application on Windows and not just Teams.
For Mac OS:
Whether you’re a beginner or an expert, it can be difficult to troubleshoot audio devices on your Mac. Here, we’ll go over how to remove a Microsoft Teams audio device from Mac.
Follow the step-by-step process below:
- Step 1. Click the Apple icon at the top of screen and select System Preferences.
- Step 2. Select Sound option to list all sound setting
- Step 3. Select Output/Input to list all the available sound devices.
- Step 4. Right-click any device and select Use This Device For Sound Output. This will enable the selected device as default system sound device.
- Step 5. Restart Microsoft Teams application.
Now when you try to use Teams for audio output or input, it should no longer be using an unwanted device as its default option. Instead, it should be using whichever device you selected in System Preferences.
Safety tips to protect your data when removing Microsoft Teams audio device
Did you know that when you remove a Microsoft Teams audio device, your data could be at risk? It’s true! That’s why it’s crucial to take the necessary steps to protect yourself. Now, we’ll discuss some of the best safety tips for protecting your data when removing a Microsoft Teams audio device & improving your MS Teams performance.
1.Unplug devices
Unplug your headset or other audio devices from your computer while your system is still running. This will ensure that all settings are saved correctly before disconnecting the device. After unplugging it, wait a few seconds before reconnecting it again if necessary.
2.Uninstall any associated software
If any associated software programs are installed with your audio device, make sure to uninstall them before removing them from your system. This will help ensure that all of the relevant files are deleted and that no trace of them remains on your computer.
To do this, launch the Control Panel and select “Programs and Features.” Then look for any software programs related to your audio device and uninstall them as needed.
Migrate Teams data before removal
Finally, it’s important to migrate any Team data before attempting the removal of an audio device. By using dedicated migration tools like Kernel Microsoft Teams Migration, users can easily move their Teams data from one location to another without having to worry about losing any of their valuable data during the uninstallation of an audio device.
With its easy-to-use interface, users can quickly migrate their teams’ chats and files in just a few clicks – proving that migration isn’t as difficult as it seems. Not only does it allow users to save threaded conversations and files, but it automatically migrates the permissions associated with these conversations as well.
Furthermore, this powerful tool lets you run multiple migrations simultaneously as well as schedule migrations effectively. With a host of automated features, each migration detailed report of completion that can be utilized for future reference. To top it all off, this robust solution supports all Office 365 accounts having MS Teams.
Final thoughts
As we have seen, the procedure to remove Microsoft Teams audio device from your Windows or Mac computer is not too difficult. The process is slightly different for each operating system, but the steps are generally the same. With the procedure mentioned above, you will be able to remove any audio devices from your computer successfully. However, before removing the audio device, it is recommended that you migrate all your important data to another tenant. This will ensure that there is no data loss during audio device removal. Our migration tool is the best solution for all such needs. It is fast and easy to use. So, go ahead and Download it now!
If you have any further questions, please feel free to speak to our team of experts for assistance.