Read time: 8 minutes
Playing a video with missing frames is frustrating. But it doesn’t have to be. You can fix any video file using the FFmpeg method. We will break your broken video into healthy counterparts and then reassemble them into a single playable video file that plays without any issue.
The method might sound technical to some users because it makes use of multiple commands. I have kept things as simple and straightforward as possible. Just keep up with the steps, and you will get your video running again. But before that, let me give you a quick introduction to the FFmpeg method we will be using.
Before we jump on the video repair part, it is imperative to understand FFmpeg, what it is and what we can use it for?
What is FFmpeg?
FFmpeg is a software project that has libraries and programs for handling video, audio, and rest of the multimedia including streams, published under the GNU Lesser General Public License 2.1+ or GNU General Public License 2+ depending on which options are enabled. The name “FFmpeg” is inspired by the standard video group MPEG in which FF stands for ”Fast-Forward.”
What is FFmpeg used for?
Natively, FFmpeg is designed to be used with command-line avoiding a dedicated GUI, and it can be used for processing videos, audio files, format transcoding, basic editing, video scaling, video post-production effects, and standards compliance – SMPTE, ITU.
FFmpeg includes libavcodec, Lavf – libavformat an audio or video container mux and demux library, and FFmpeg command-line program for transcoding of multimedia files, libavcodec an audio or video codec library which is commonly used by many commercial and free software products.
Things possible with FFmpeg
- Read text with selected voice.
- Add, edit, or delete file metadata.
- Add the logo or configure PiP – Picture in Picture.
- Create digital sound with mathematical expressions.
- Use one or more webcams and stream direct input in a single window.
- Filter multimedia files, encode, decode, transcode, mux, demux, and stream.
- Convert video to stills (images) and then, stills to video.
- Edit or modify frame rate, bitrate, max file size, etc.
How to repair corrupt video file using FFmpeg
Now that you’ve got the basic about FFmpeg, let’s move on to the steps that, upon implementation, can help you repair & recover corrupt or damaged video file. The only thing necessary before we begin is that FFmpeg is installed on the system.
The procedure given below is specific and includes three different stages. First, we’ll be converting the video to still images, then we extract audio from it, and finally, create a new video using the extracted images and audio.
Note: Sometimes, only headers are damaged in the video file and not the real frames. To fix header, use this command: ffmpeg -i corrupt-file.mp4 -c copy output-file-name.mp4
Step 1: Convert Video to Still Images
Assuming you’ve downloaded the FFmpeg zip package and extracted it somewhere, now place the corrupt or damaged video file in the bin folder.
- Hold the Shift button and select Open command from right-click menu.
- Type the following command in command prompt:
.\ffmpeg.exe -i .\videoname.wmv -an -f image2 filename%03d.jpg
The video is now converted into multiple images – stills, 99,739 stills were created, before moving to the next stage:
Step 2: Extract Audio
Below command will initiate the audio extraction:
Figure out the exact audio duration:
The output will be something like below though; the numbers would be different depending on the duration of your video file:
“format”: {
“duration”: “3323.603000”
}
}
Now, before we start converting the stills back as the video, we need to calculate the frame rate of output video, so that both the audio & video can match.
For doing so, divide the number of stills by the audio duration number:
In this case, it is 99739 divided by 3323.603 which will be 30.0093, type the command as below:
Step 3: Convert the Stills Back to a Video
In the final stage, mix the audio & video to construct the repaired video file, type the command below:
You’ve successfully repaired a corrupt video using FFmpeg through the command-line.
What are the limitations of using FFmpeg to repair a corrupt video file?
FFmpeg method works, but comes with restrictions:
- Converting a video to images may cause quality loss. And rebuilding the video with these images will result in low quality video.
- Also, if you make a calculation mistake in Frames Per Second (FPS), then the audio & video will not be in sync. And you will end up with a weird video that no one wants to watch.
- Depending on the video length, FPS, and video quality, the number of images can range from 1000 to 1000000 or even more. This can take hours and fill up hard disk to 100%.
Advanced tool to repair and restore any video to its original state
When you don’t want to lose the video quality and want the original video with accurate audio sync and FPS, you must use a professional video repair tool. Kernel Video Repair is one such tool that supports every major video format, like MP4, MOV, MPEG, MKV, AVI, WMV, FLV, WEBM, etc. The embedded multiple smart algorithms in the tool carefully scan and repair each frame of the video one by one. No matter the video size or the level of damage, the tool will help you fix your video.
The best part, unlike the manual method, is that you can repair as many videos as you want in a single operation. Moreover, it boasts minimal yet intuitive UI with meaningful options. It is designed to be easily accessible and compatible with Microsoft Windows ecosystem. And there is no restriction on how big the corrupt video file is in size or how many video files you wish to load & repair at once.
Steps to use the tool to repair corrupt video files in bulk:
- First, download and install the tool on your system. Do it from the website of the tool.
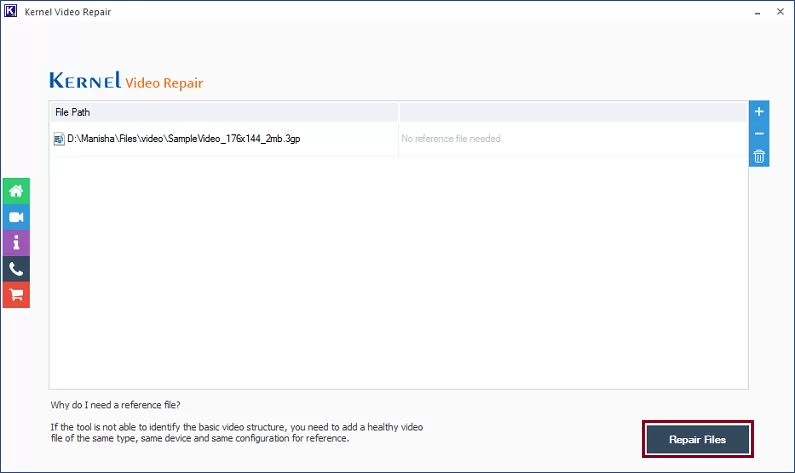
- Run the tool on your system, and look for the Add (+)icon present on the home screen of the tool. Add the corrupt video file(s) you want to repair.

- Once the file(s) are added, check them. You can add or remove video files as per your requirement by clicking on the add (+) or remove (-) icon available on the right upper corner of the tool. Once satisfied, click on the Repair Files option.
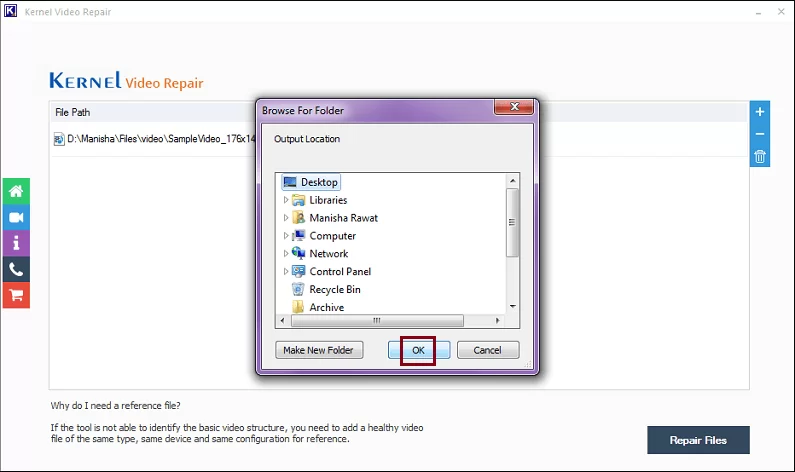
- Provide a destination to save the newly recovered video files. Once done, click on the OK button.
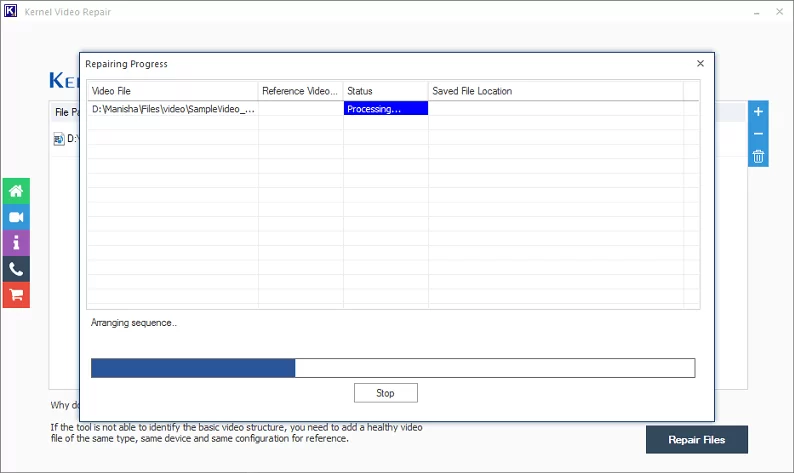
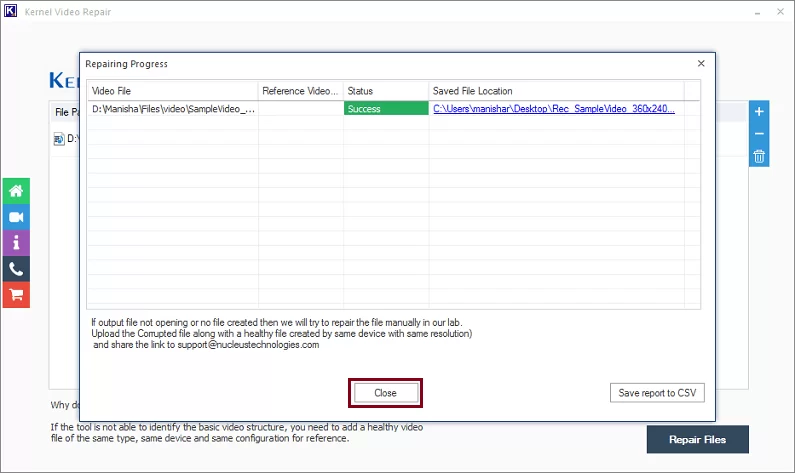
- As you provide the location, the repair process starts. The tool will show you the live progress of repairing.
- Once the repair process is over, you can now click on the Close button to finish the process. You can also get the CSV report of the process by clicking on the Save report to CSV option.
Note: You can either add a single or multiple corrupt files to repair with this tool.
Once you finish all of the above-mentioned steps successfully with the tool, you will get healthy video files on your system at your specified location.
How would you know if a software product is worth the cost and is priced properly as per the standards? Well, there’s no way other than using the product itself. The tool comes with a trial version that you can download for free, and once you feel satisfied, you can buy it.
Conclusion
Use the steps given above to repair video files using FFmpeg. The manual method works great for minor damage, but will fail to repair the file if the corruption is major. Moreover, the process of extracting images and audio separately and then combining them is time-consuming. For fast and guaranteed results, we recommend using specialized tools like Kernel for Video Repair.
Frequently Asked Questions
A. You must divide the total number of images by the total duration of the audio file you extracted to make sure the audio and video match.
For example, 100,000 images divided by 3000 seconds results in a framerate of approximately 33.333.
A. FFmpeg may fail to fix severely damaged files. In such cases, you must use professional video repair tools that guarantee total video repair without compromising your video quality.
A. By converting the video to images and extracting the audio separately, the FFmpeg bypasses the corrupt container of the video file. Then FFmpeg combines the healthy parts together into a functional video.