Read time 7 minutes
There are many video versions available according to resolutions like 720p, 1080p, and 4k. With the introduction of ultra-HD resolution, 4K videos are much in use nowadays. A large number of professional as well as personal videos are recorded and saved in 4K. Such high-definition videos demand certain system requirements. So, many times users trying to run these trending 4K videos (lately the popular Netflix, Amazon Prime videos), get issues like choppiness, stuttering, crashing, lagging, freezing, etc. These issues can be harmful for your video files and may cause damages as well. This blog provides a detailed guide to fix 4k videos not playing issues.
Methods to fix 4K videos not playing issue
Facing issues while playing 4k videos is a mess as it hampers your work and video watching experience. Fix this 4k videos issue with the methods listed below:
Method 1. Check & update system specifications
For ultra-high-definition 4K videos, certain system requirements are mandatory (software and hardware). Let us have a look at the common specifications to run a 4K resolution video smoothly on your PC.
- Enough hard disk space – For example, 150GB for a 3 hour movie.
- Video memory & GPU frequencies – 6000MHz and approx. 1100MHz respectively.v
- RAM – Minimum 4GB
- Monitor or Projector – 4K supported
- Processor decoding ability should be more than or equal to 15.
Method 2. Perform Necessary Updates
If you want a flawless view of high-resolution videos, just confirm that you are working with the latest updates, whether it’s Windows, video media player, or graphics drivers.
- Enable automatic updates for your Windows through the Control Panel.
- Get the updated version for the Graphics Driver.
- Update the current Power Options Plan to High-Performance plan.
- Use compatible Video Media players for 4K Videos and update them regularly.
Other Solutions
Clear Web Browser cached files, e.g. for Chrome, visit – chrome://settings/clearBrowserData
- Disable browser plug-ins, extensions, and add-ons.
- Use HDMI cable supporting higher bandwidth for 4K Video files.
Method 3. Solutions for Videos not working with VLC Media Player
If you are trying to open 4K videos with VLC Media player and getting the aforesaid issues, just try the below mentioned solutions to get the issue resolved.
- Enable Hardware Acceleration
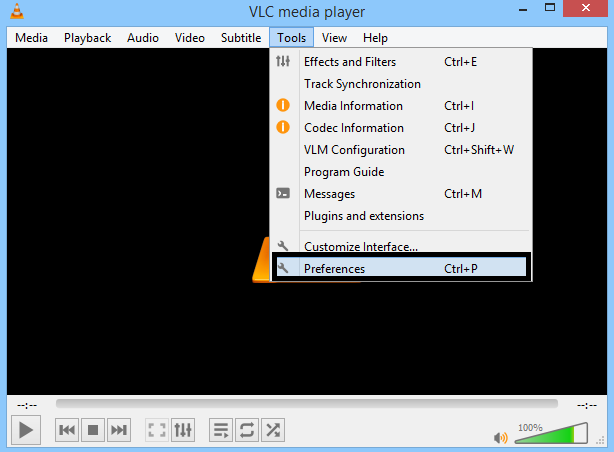
Doing this could resolve the lagging, freezing issues with the video file by increasing streaming, filtering, and decoding speeds. Before trying this solution, it should be confirmed that the system is installed with the latest drivers.- Open the installed VLC Media player on your system. Go to Tools> Preferences.
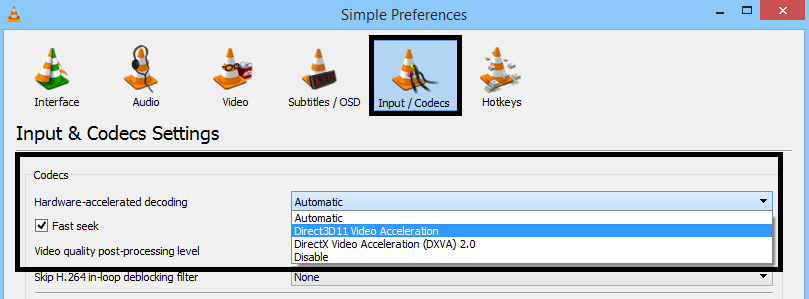
- On the Simple Preferences page, click Input/Codecs icon and then choose the desired option from the displayed dropdown list under the Hardware-accelerated decoding option.
- Open the installed VLC Media player on your system. Go to Tools> Preferences.
- Modify video output settings
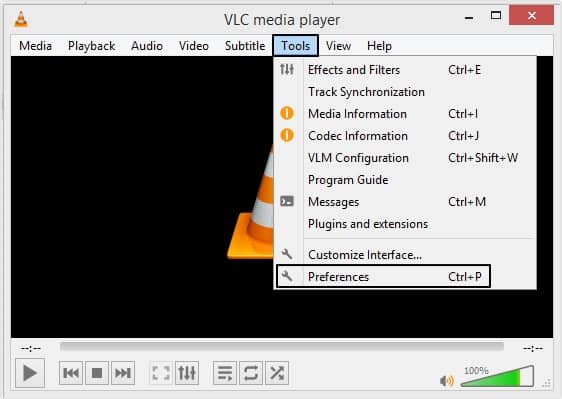
In some cases, changing the video output settings to Direct or OpenGL can resolve the 4k video not playing issues. Follow the steps mentioned below to do so:- Open VLC Media player, go to Tools option and select Preferences.
- Now, click on the Video option, then under the Output section select any option according to your preferences and click Save.
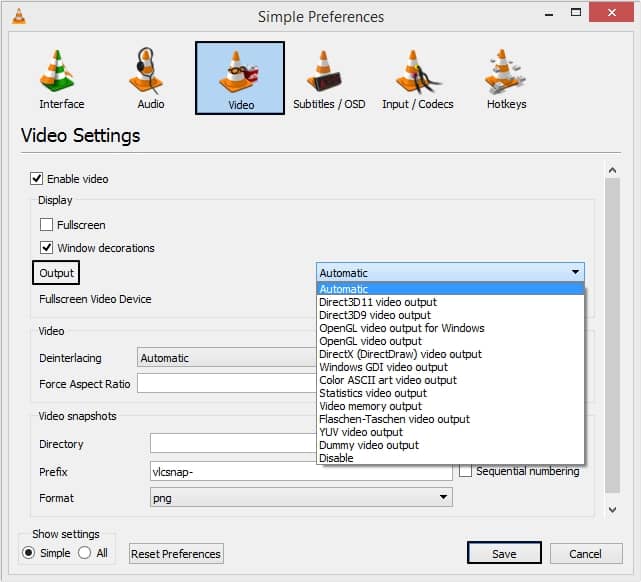
- Open VLC Media player, go to Tools option and select Preferences.
- Increase the cached value in VLC Media Player
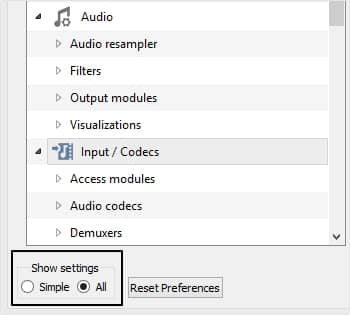
By increasing cached value in the software settings, stutter or lag issues in 4K Videos can be controlled. Follow the instructions given below carefully to increase the cached value in VLC media player:- Open VLC media player and click on Tools >Preferences.
- Under the Show Settings section, select All option.
- Now, from the Advanced settings, click the Input/Codecs option.
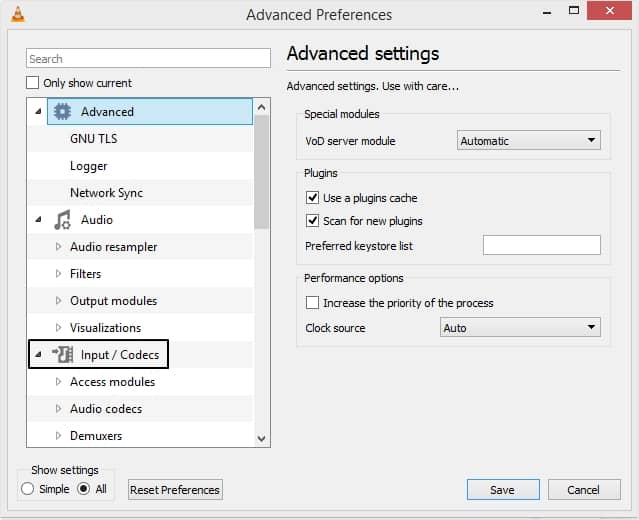
- Move to the Advanced section, modify the File caching (ms), Network caching (ms), and Disc caching (ms) values to about 10000 or more.
- Update Graphics driver
Updating Graphics driver software with Windows update feature may help in resolving this issue. Follow the steps given below to update Graphics card driver:- Press Windows + R keys on your keyboard and type devmgmt.msc and press Enter.
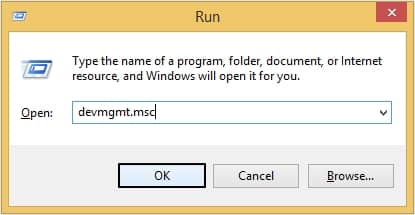
- Now, click on Display adapters >right click on the Graphics card >Update Driver Software.
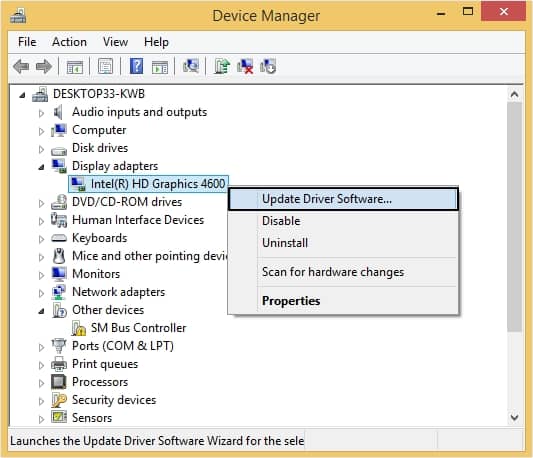
- Press Windows + R keys on your keyboard and type devmgmt.msc and press Enter.
Repair corrupt 4K videos using professional software
Not only the file size or big resolution, but the corruption in the video due to any random reason could lead to 4K video issues. In that case, you need to repair corrupt video files. For this, we suggest you a one-stop – Kernel Video Repair software which supports almost all video file formats – MP4, MOV, MPEG, MJPEG, MTS, M4V, MKV, AVI, AVCHD, WEBM, ASF, WMV, FLV, DIVX, 3G2, TS, 3GP, F4V file formats of any size and resolution from any device. The repair process is quick and is accomplished without loss of original quality. This tool is highly recommended for its compatibility, repairing ability, simple interface, and advanced features.
Conclusion
4k videos are in high demand by individuals either for personal use or for professional use. They need special advanced settings and system requirements to play smoothly without any problems. However, due to some reasons, these videos may not play or open. We have provided some methods to resolve 4k videos not playing issues. Moreover, we have also recommended a professional tool to fix corrupted video files, i.e., Kernal Video Repair tool.