Read time: 9 minutes
Many organizations are in the process of migrating their Exchange Server data to Office 365 to avoid maintenance expenses of the on-premises server. However, there are other reasons too to migrate to Office 365, such as the extensive features and security offered by Office 365.
Once you have decided to migrate your data, the next step is choosing the type of Exchange to Office 365 migration. You can perform migration of Exchange Server 2016 to Office 365 using Staged, Cutover, and Hybrid migrations.
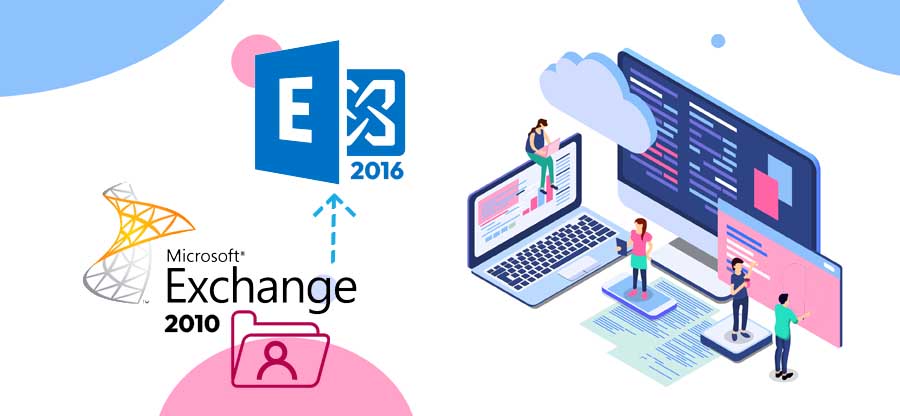
This article explains the step-by-step process of the hybrid migration method for migrating Exchange Server 2016 data to Office 365 or Microsoft 365.
What is Hybrid Migration?
Hybrid migration is used for migrating hybrid environment data. In hybrid migration, it is presumed some data is stored in the server and the rest in the cloud. Besides, performing hybrid migration is a bit challenging as compared to other migration methods. It involves shifting mailboxes, tasks, contacts, calendars, and emails to Office 365 with a connected Active Directory.
There are two types of hybrid migration you can perform to migrate your Exchange Server 2016 data – Minimal and Full Hybrid migration.
As cutover migration is quite popular among all Exchange users, it often leads to a discussion on office 365 cutover vs minimal hybrid migration. If you’re planning to migrate mailboxes from on-premises Exchange 2016 to Office 365, using the minimal hybrid migration approach is recommended, as it is easy to set up. On the other hand, the full hybrid migration method does provide additional features but is hard to execute. Also, full hybrid migration takes longer to migrate the data.
The hybrid migration approach ensures smooth migration of data with minimal interruption for your business.
Pre-requisites for Exchange to Office 365 migration
The minimal hybrid migration is useful in the following scenarios:
- Migrate the Exchange data patiently within a few weeks or less.
- Migrate several mailboxes and improve the user’s productivity.
- Using Exchange 2010, 2013, or 2016 server on-premises (it is not ideal for Exchange servers older than 2010).
- Planning to quit running directory synchronization to manage your users.
- Need to maintain a hybrid Exchange environment due to legal compliance.
- You have a server to install the Azure Active Directory Synchronization tool.
Steps to migrate Exchange 2016 to Office 365
We have created a step-by-step process to help you migrate your Exchange 2016 data to Office 365. Each of these steps must be followed in the same manner to migrate your data without any errors.
- Authenticate the domain name
While migrating the data from Exchange Server to Office 365, the Simple Mail Transfer Protocol (SMTP) address is used to create email addresses for the new Office 365 mailbox. Verifying the on-premises domain in Office 365 is vital for hybrid migration and it can be done through the following steps:- Sign into the Office 365 account with admin credentials and click Setup.
- Now, select Domains to open the domain page.
- From the Domain page, click Add domain to start the domain wizard.
- In the Add a domain section, enter the domain name you use for the on-premises Exchange server and click Next.
- The Verify Domain page appears on the screen, select from Sign in to GoDaddy or Add a TXT record, and click Next.
- Now, follow the instructions provided by the DNS hosting provider to verify your ownership.
- Add your TXT or MX record and wait for up to 15 minutes to move to the next step.
- Click Done in the domain wizard and the verification page appears on the screen; click Finish.
However, if the verification fails, wait for a few minutes, and try again. Move to the next step once the domain is verified.
- Begin the hybrid migration
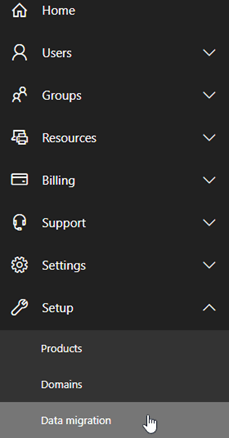
Now, sign into your Office 365 account with global admin credentials from the system where the domain is joined to your on-premises Exchange Server. Open the Exchange Hybrid Configuration Wizard on the Data Migration page of the Office 365 admin center and follow the below steps:- From the Office 365 admin center, click Setup >> Data migration
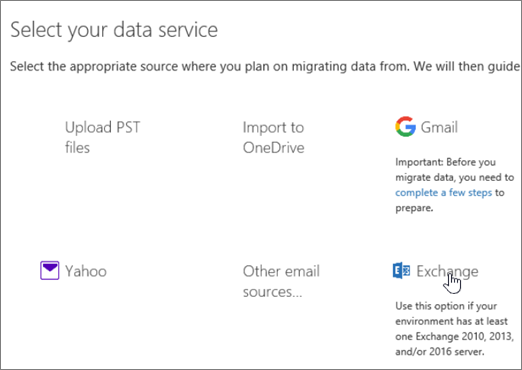
- The migration page appears on the screen, select Migration, and click Exchange under the Select your data service section.
- Click Next on the Hybrid Configuration Wizard page while accepting the default values. The wizard will connect to the Exchange Server by default.
- From the Credential page, select Use current Windows credentials for on-premises Exchange Server and enter the admin credentials to it and click Next.
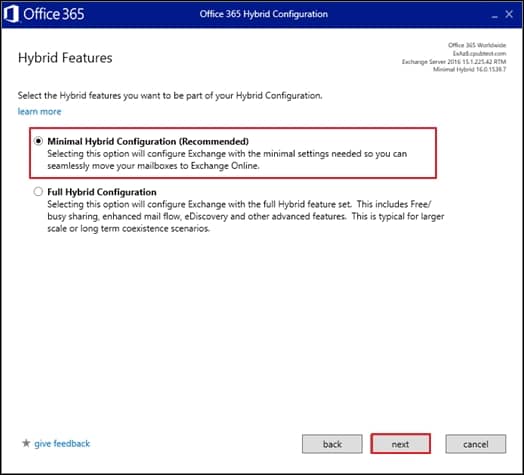
- The Hybrid Features page appears on the screen, select Minimal Hybrid Configuration >> Next.
- Now, click Update on the Ready for Update page to prepare the on-premises mailboxes for migration.
- Create users in Office 365 with directory synchronization
- From the User Provisioning page, select ‘Synchronize my users and passwords one time’. Then, you’ll be prompted to download and install the Azure AD Connect Wizard, which is used to synchronize users from the on-premises to Office 365
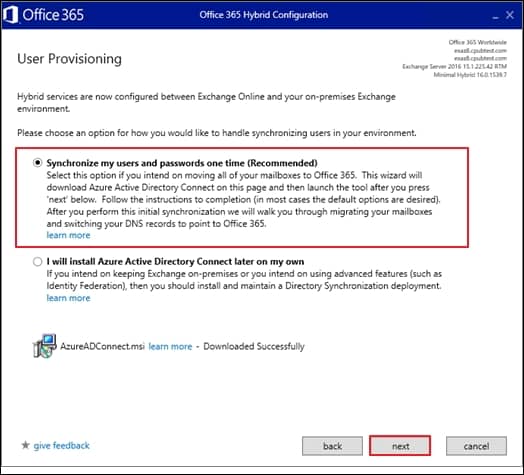
- After downloading the Azure AD Connect, run it on your system and select the default options for Express settings.
- Assign Office 365 licenses to users
- Migrate the user mailboxes
- Go to the Data Migration page and click Setup >> Data Migration and select Exchange.
- Select the user mailboxes you want to migrate to Office 365 and click Start migration.
- Updating the DNS record
Every email system uses a DNS record known as MX record, which is used to identify the delivery address of the emails. During the migration, the MX records point towards the on-premises Exchange email system. But, as you’re migrating to Office 365, you need to point out the MX records at Office 365.
Besides, you also need to set up your DNS records. To do so, follow the below steps:- Go to your Office 365 admin center and click Settings >> Domains.
- Pick the domain name you want to update.
- You’ll get the step-by-step process for updating DNS records on the domain wizard.
Before migrating the mailboxes, you need to create users in Office 365 and to attain this run directory synchronization.
Once the synchronization is finished, you’ll be redirected to the Data Migration page, where all the synchronized users are listed.
Note: After the one-time synchronization of users, the directory synchronization turns off automatically in Office 365.
After synchronizing the users with your Office 365, assign licenses to each user to allow access to their cloud mailboxes after migration. On the data migration page, you’ll notice the ‘license required’ status in front of each mailbox, as shown below: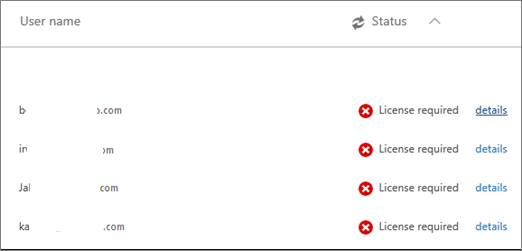
To give license to users, go to the admin center >> user. Click Active users to add users individually or in bulk.
Once the licenses are assigned to the users, you can begin the migration process with the below steps:
Note: Before migrating the entire mailboxes, it is recommended to migrate two or three mailboxes as a test migration to check the migration process flow.
When you start migrating the mailboxes, the Data Migration page will display the migration status as it progresses, as shown below: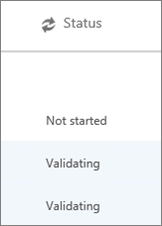
Alternative method to migrate to Office 365 smoothly
The minimal hybrid migration works perfectly when the on-premises Exchange server has everything in place, which means there shouldn’t be any corrupted databases. However, you cannot migrate public folders along with using the above process. It requires you to perform a separate migration process for it. Besides, if the migration fails for any reason, you’ll have to create new migration jobs every time to migrate the data, which would be time-consuming and costly. So, what is the best way to quickly migrate on-premises Exchange mailboxes to Office 365 without any hassle or data loss?
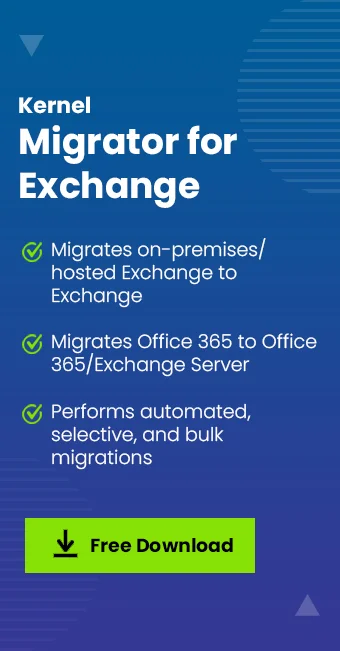
Third-party tools like Kernel Migration for Exchange allows you to perform On-premises Exchange to Office 365 Migration quickly without going through a complicated process. This Exchange Migration tool is specially designed to migrate single/multiple mailboxes from Exchange environments. It is integrated with smart features like selective data migration, migration scheduling, offer zero downtime, data synchronization, and more.
It even allows you to migrate public folders within the same migration job. At the end, it also provides you with real-time migration reports
Conclusion
Exchange Server 2016 to Office 365 migration has become very common for organizations due to the extensive features of the cloud and cost-efficiency. Even though Office 365 seems to be a tempting choice, migrating from on-premises using manual methods is not an easy job. This is one of the prime reasons why administrators suggest organizations to rely on third-party tools like Kernel Migration for Exchange to migrate Exchange Server 2016 to Office 365.