Read time: 6 minutes
Microsoft Outlook allows you to add custom email signatures with hyperlinked images, text, e-business card, company logo, or even an image of your handwritten Signature. However, the process to create and add email signatures in Outlook is easy but requires the right approach. If you’re a Microsoft Outlook user and are looking to make your email messages impressive with signatures, but don’t know how to create an email signature in Outlook, we’ll help you out.
In this article, we’ll tell you how to create an email signature in Outlook. But before that, let’s know the reasons to create and add an email signature in Outlook.
Why Create and Add Email Signature in Outlook?
When you create an Outlook email signature, it showcases your professionalism and even strengthens the brand’s credibility. Here are some top benefits of creating and adding an email signature in Outlook:
- Professional Look: With signatures, your email looks more professional and clean and moreover, improves credibility.
- Easy to Contact: It has your name, job, company, contact details, and a handwritten signature, and thus, people can reach out to you easily.
- Build Your Brand: When you add your company’s logo or colors, it helps receivers recognize your brand instantly and build trust.
- Marketing Boost: In signature, you can add links to your website/social media, or even share special products offers, to get people interested in what you do.
After analyzing the core benefits of adding a signature in emails, let’s look at the process to create and add them to Outlook emails.
How to Create and Add Email Signature in Outlook for Windows?
Due to the higher dominance of Windows OS globally, Outlook for Windows has the largest user base among all Outlook platforms. If you’re an Outlook for Windows user, follow the steps below to create and add an email signature in Outlook effectively:
Step 1. Open your Outlook, go to the File tab, and tap on Options.
Step 2. Select Mail tab and tap in Signature button under Compose Messages.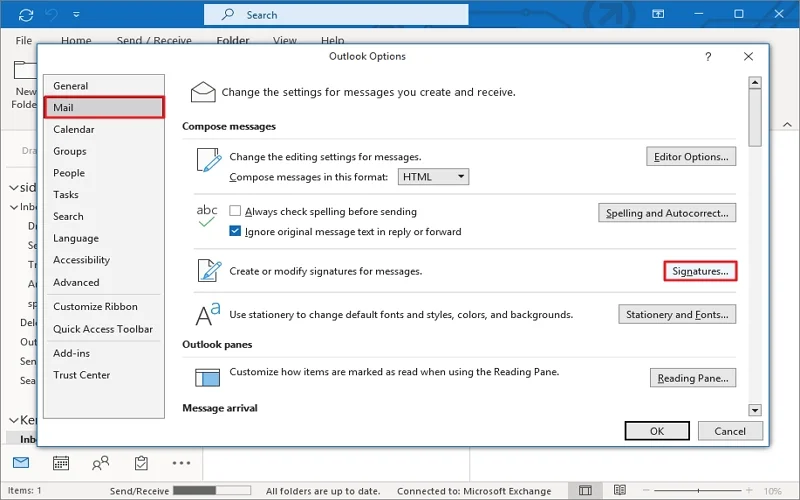
Step 3. In the Email Structure tab, click on the New button, name your Signature, and hit OK.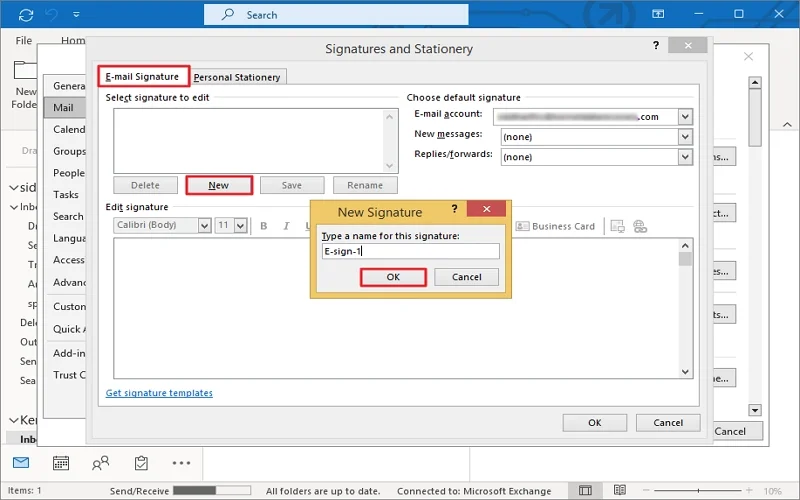
Step 4. Go to the Edit Signature section, make the signature that you want to use for your emails. After making the signature, go to Choose the Default Signature, and choose the newly created signature in the New Message dropdown. Click OK.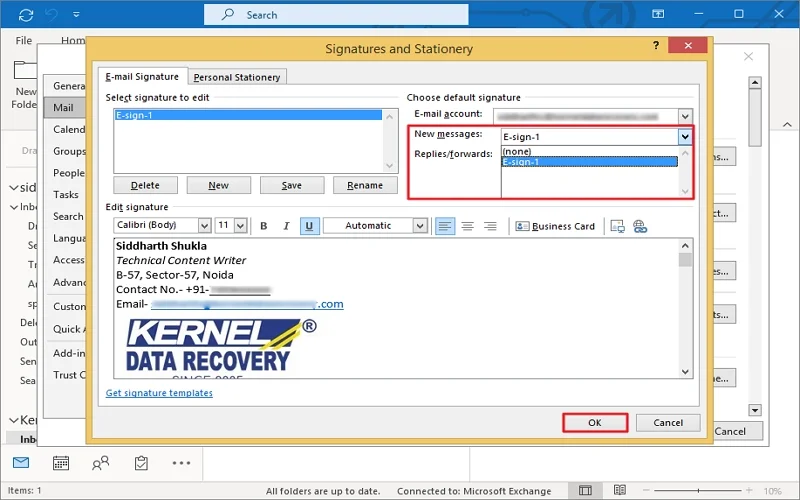
Note: You can also add images, a company logo, a business card, or a hyperlink in the email signature. Also, you can use any font, any color, or any style to make your signature more professional and attractive. Moreover, you can create and add as many signatures as you want.
Step 5. Now, try to compose a new email in Outlook. You’ll see that the signatures have been added to the email body automatically.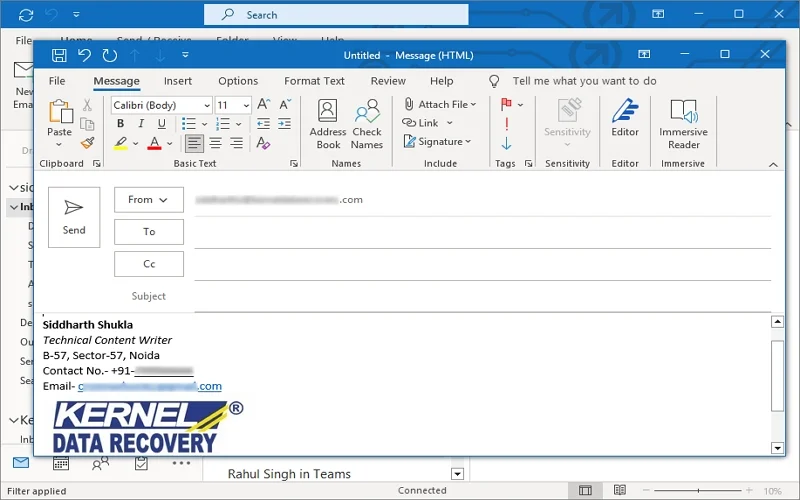
The above steps completely determine how to add an email signature in Outlook effectively.
Having Issues with Outlook? Here’s How to Fix It!
Usually, Outlook works fine, but some users reported that Outlook freezes and displays some error messages while creating signatures in email. You might also see error messages, or it could even crash and freeze unexpectedly. These issues happen when your Outlook PST file gets damaged/corrupted.
But you don’t need to worry! Microsoft Outlook also provides a free and native solution: the Inbox Repair Tool (ScanPST.exe). It can fix minor issues in the PST file in a few easy steps. However, it is useful but comes with certain limitations:
- Unable to repair severely corrupted PST file.
- Fails to fix oversized (over 2GB) PST files.
- May delete the corrupt item without recovery.
- Doesn’t recover permanently deleted items from PST files.
To counter such limitations for PST file repair, use a third-party Outlook PST repair tool. The Kernel for Outlook PST Repair is such a professional and automated tool that helps you repair those damaged PST files and get back your emails effortlessly.
Benefits of Professional PST Repair Tool:
- Scans and fixes severely corrupted PST in no time.
- Repairs multiple large PST files to save time and manual effort.
- Saves a PST file in multiple formats and cloud platforms effectively.
- It is easy to follow; you don’t need to be an expert to fix your Outlook issues.
- Repairs and recovers permanently deleted items along with attachments.
- You won’t lose any of your important mailbox components: emails, attachments, etc.
How to add an Email Signature in Outlook | Final Words
Now that you know the complete step-by-step process to create and add an email signature in Outlook 2016. However, the process is easy but may bother new Outlook users as well. The above steps will make them experts, if followed carefully.
Sometimes, Outlook becomes inconsistent and displays errors, which may restrict you to create and add email signatures. In such cases, use Kernel for Outlook PST Repair and fix the issues. It is easy to use a reliable and most recommended solution to fix PST file issues. Download the free trial version today and check out its features and efficiency!
Frequently Asked Questions (FAQs)
A. To create and add an email signature in Outlook, open Outlook and go to File> Options. Tap on Mail>Signature>. Click New, input the signature name, and design your signatures with the given option. Add text, images, font style, etc.
A. Outlook adds a signature automatically in emails if you’ve created signatures in Outlook before. But if you want to use a specific one when composing a new email, go to the Message tab, tap on Signatures, and choose the desired one. The signature will be added successfully.