Related Posts
Bounce Back Error in Office 365? Take These Steps

Written By
Anisha Rawat
Published On
June 17, 2022
Read time: 6 minutes
You have recently migrated to Office 365 with the idea of better and improved communication and organization of work. You have recently migrated to Office 365 and even have to configure Office 365 account in Outlook with the idea of better and improved communication and organization of work. But the moment you send an important email, it bounces back, and you receive an NDR (Non-Delivery Report) informing you that the email could not be delivered to the email address.
This can be an annoying experience, especially during busy working hours. Just to be clear, this is not a hypothetical situation and can be a reality for many Microsoft Office 365 users as they face the delivery error code 550 5.1.10. This can put a halt to your email delivery but can also be resolved with the right approach. It does involve certain minor details which require attention. Hence, here we will be discussing at length how to resolve a bounce-back error following a Microsoft 365/Office 365 migration.
When you strongly hit a ball on the ground, it bounces back to you. Similarly, a bounce-back email message is the one that gets rejected by the server and bounces back to the sender. This message does not get delivered to its intended destination, and the user gets a Non-Delivery Report on their system screens to confirm the same. These emails don’t get collected anywhere in which you can find old emails in Office 365.
Understanding the causes is essential so that the users can avoid them in the future. This delivery error is a result of any of these factors-
These are a few methods with which you will be able to resolve the bouncing back of emails-
There is a possibility that you sent the email in a hurry, typed the incorrect email address, and hence, it didn’t get delivered where it was supposed to. Make sure to double-check for any spelling and spacing errors. Once everything is accurate, only then send the message again.
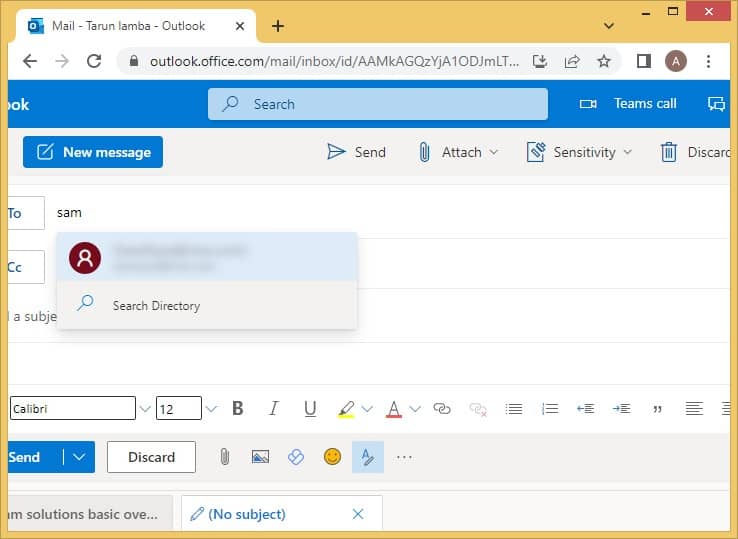
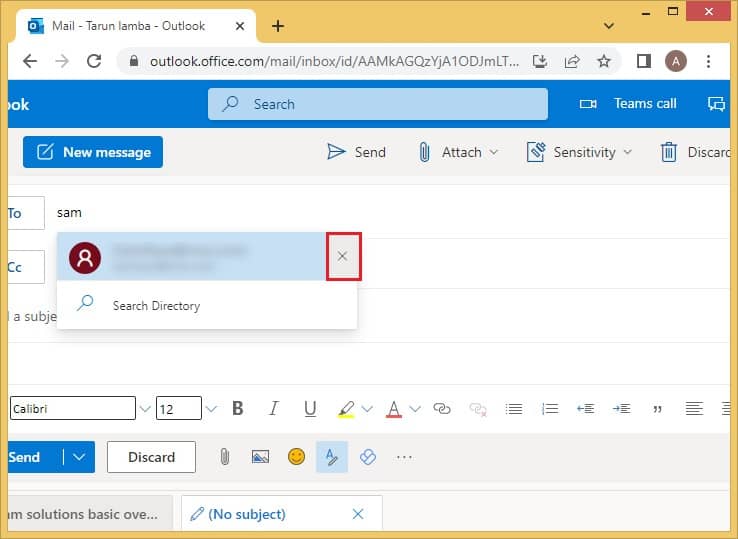
Before going ahead with the solution, first, you need to double-check and ensure that the problem lies with the AutoComplete list. To do the same, manually type the entire email address. If it gets delivered, then it is clear that the error is being caused by the list itself.
You can remove the email ID on it by following these steps:

The receiver of that message might have applied some Inbox rules which are restricting the receiving of your message. They need to remove all these rules for the smooth delivery of emails.
This can be done using these steps:
Forwarding allows users to forward all their messages to some other destination. If that happens to be a bad email address, then the reason behind bouncing back emails is crystal clear.
The recipient should follow this process to disable message forwarding:
Often even a tiny mistake can cause big damage. This could be a case with Office 365 as well. Experts have always suggested that every user must take a backup of their Office 365 data. This is done to ensure that even in data loss, you already have a backup, and none of the data is lost permanently.
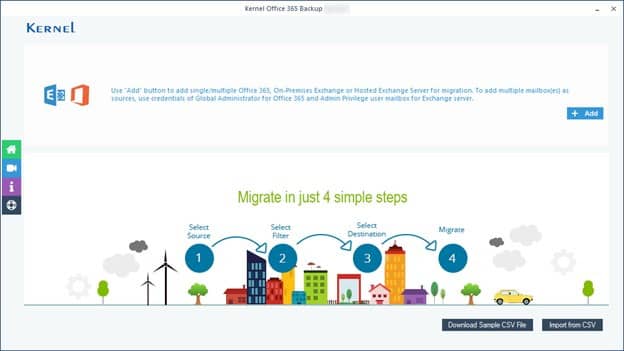
A secure tool for taking backup of the entire data of Microsoft 365 is the Kernel Office 365 Backup. Users can backup any type of mailbox- private, archive, group, or shared and save them into the output format of their choice- PST, HTML, DOC, MSG, PDF, EML, and DOCX. All this is performed in 4 simple steps, and the security of the data takes top priority.
Bounce-back emails can cause a lot of trouble for the users as they restrict a smooth email communication process. This issue can be due to many factors like invalid email addresses, typing errors, Inbox rules, forwarding messages, large-size attachments, an unresponsive server, and a problem with the AutoComplete list. Despite any of these causes, one can easily resolve this error provided you take the help of the right solutions. To begin with, ensure there are no typing, validity or spacing errors in the email address mentioned. In addition, remove the recipient’s email from the AutoComplete list and then add the correct one. Finally, you must ask the receiver of the message to remove Inbox rules and to forward messages which can be affecting this email delivery. As a precaution against loss of data and other errors like Exchange online archive mailbox is not displaying in Outlook issue, you can always use a professional tool for backup.


![How to Increase Gmail Account Storage for Free? [Quick Guide]](https://www.nucleustechnologies.com/blog/wp-content/uploads/2026/07/increase-gmail-account-storage.webp)