
Read time: 5 min
As of now, over 4.48 billion people use email, and the number is expected to grow to approximately 4.89 billion by 2027. Though many people already have years of emails saved as MSG files on their computer, exported from Outlook. Searching across local folders feels slow, and when you open MSG files one by one, it can eat up your time. Therefore, to manage these old email issues, many users look to import/archive MSG in Gmail.
Since Gmail doesn’t support MSG files directly, it creates confusion for first-time users. This confusion can be small but stressful! This article explains the reasons along with the simple ways to archive MSG files in Gmail with zero data loss. It will take just a few minutes! Stay with us and learn how to archive MSG in Gmail in no time.
Top Reasons Why Archive MSG in Gmail?
Archived emails are just hidden from the inbox; they still exist in your account. They are easily searchable in Gmail. You know the emails matter, but you may feel hassled when viewing or managing them locally. Here are a few reasons that compel users to archive MSG to Gmail:
- Centralized email access.
- Access from anywhere, anytime.
- Reduced dependency on Outlook.
- Easy searching instead of manual efforts.
- Long-term Archive and record keeping.
Method to Archive MSG in Gmail | 100% Working
You can import MSG files in Gmail directly, so you need the following prerequisites to accomplish your task:
- Outlook desktop application installed.
- Gmail account configured in Outlook using IMAP.
Part 1. Steps to Configure Gmail Account in Outlook
Here is a complete step-by-step guide to configure a Gmail account in Outlook. Once configured, import the MSG file into the Gmail folder. Here are the steps to follow:
Note: IMAP is enabled by default for a standard Gmail account. You only must enable it for Google Workspace accounts.
Step 1: Open Outlook, go to the File menu, and click on Add Account.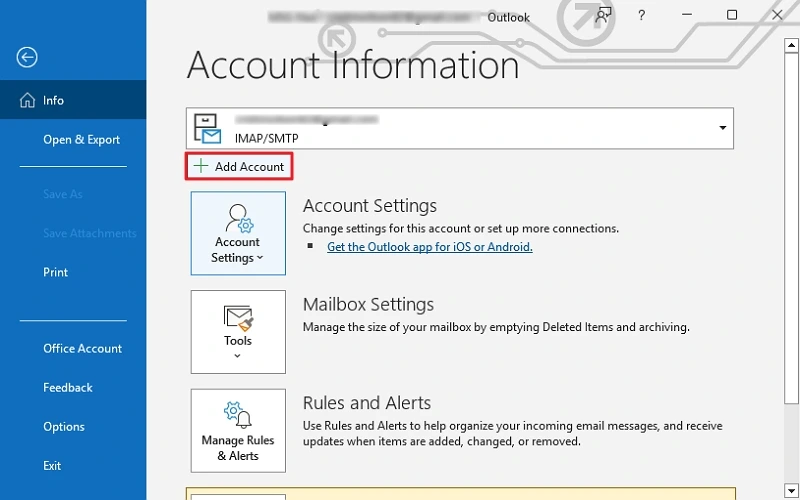
Step 2: Enter your Google email and click on Advanced options. Check mark Let me set up my account manually and click Connect.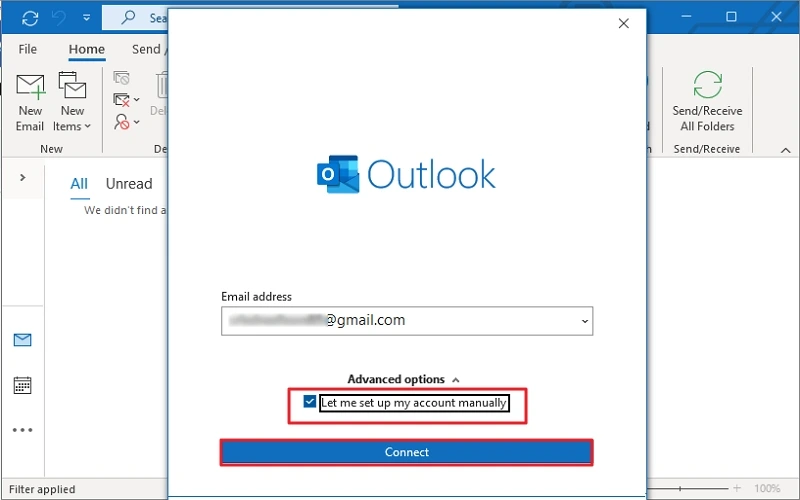
Step 3: Click on the Google option. A new Chrome window will open. Enter your Google email account and click Next. 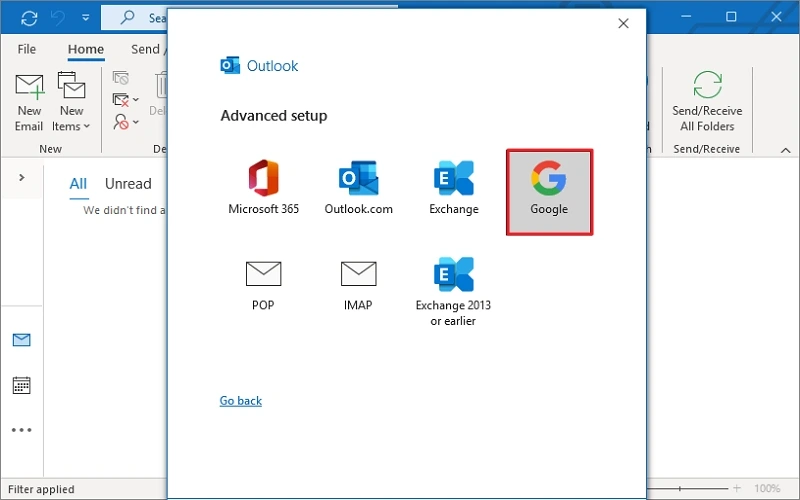
Step 4. Enter the password for your account and click Next.
Step 5. Click Allow to let Outlook access the emails.
Step 6. The Google account will be added successfully. Click Done to finish.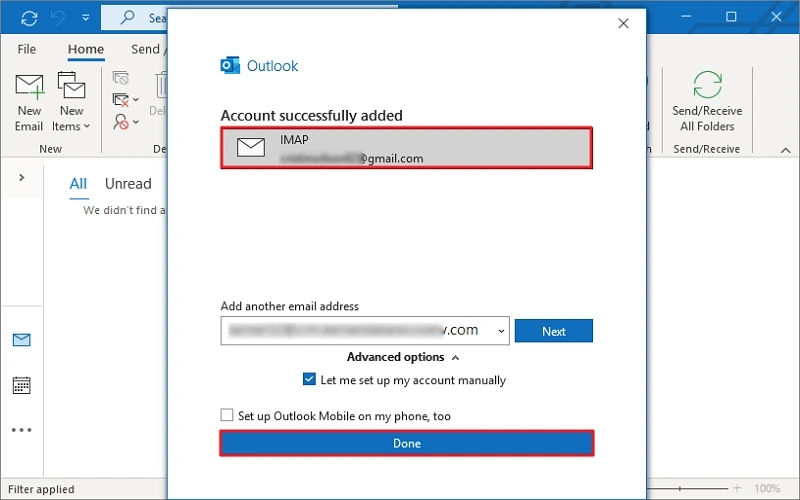
(A new folder of your Google email account will be created in Outlook.)
Step 7. Now, locate your MSG file in the system and drag and drop it into the configure Gmail account folder.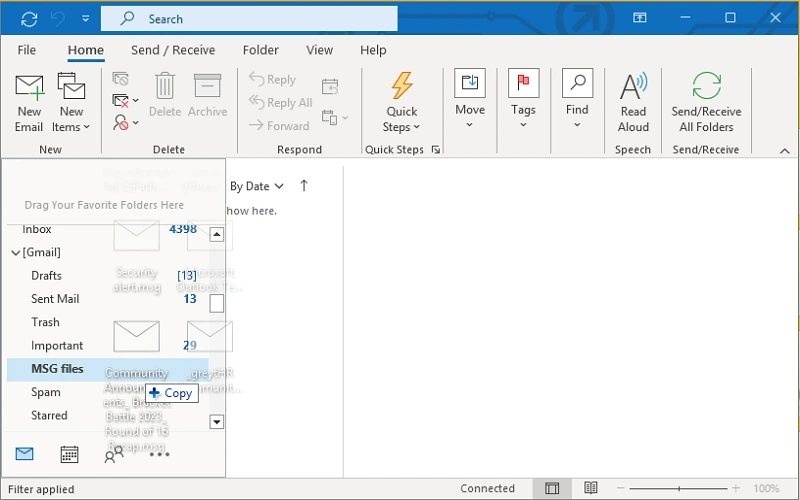
Outlook will upload those MSG files to the Gmail servers. Once the MSG files have been synced, they will appear in your Gmail.
Part 2. Steps to Archive MSG in Gmail
Follow the steps below to archive MSG in Gmail effectively:
Step 1. Open Gmail in a web browser and log in with the account.
Step 2. Navigate to the folder where you save the MSG files.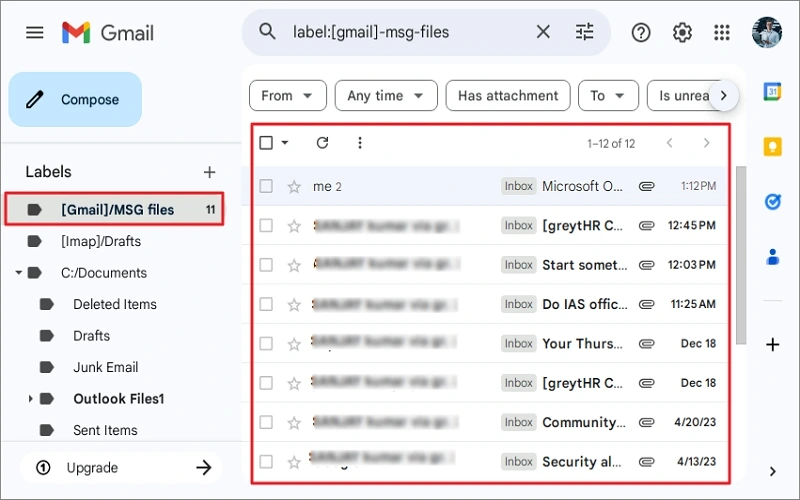
Step 3. Select all MSG files and tap on the Archive button.
You can also archive multiple MSG files in Gmail with ease.
Note: For an easier approach, compose a new email in Gmail and send all your MSG files to your alternate Gmail account. But this method will bother you when searching for a specific MSG file.
Conclusion
We hope you know the topmost reasons/benefits and the effective way to archive MSG email in Gmail. There are many other ways, like composing emails or sending a MSG file to Gmail after conversion, but they are unreliable and create ambiguity problems later. With the above effective method, you can archive MSG in Gmail with ease. Furthermore, you can also use the MSG to Gmail converter solution to export the MSG file to Gmail directly.
Frequently Asked Questions
A. The email gets removed from the inbox, but it does not get deleted. It remains in the ‘All Mail’ section of Gmail. However, you can assign any label to keep the archived emails separated.
A. Archiving and deleting emails are not the same in Gmail. You can still search and locate your archived mail in Gmail with ease.
A. Open the Gmail app on your phone, tap & hold emails you want to archive, then tap on the Archive option.