Read time: 9 minutes
MBOX is a versatile file extension used by several major email clients, such as Apple Mail, Entourage, WebMail, Thunderbird, etc. It is used for storing emails and other mailbox data. However, most .mbox email clients are either outdated, offer limited functionality, or do not fulfill evolving user demands. This is why businesses often lookout for methods to switch from MBOX file format to Outlook PST.
Outlook, being one of the most popular email clients over the world, utilizes PST file format to store email data. This is majorly because of the simple interface and the range of features it provides.
This article provides the best methods to convert MBOX file to PST efficiently without causing data loss.
Struggling to convert MBOX files to PST? Download the free trial version of Kernel MBOX to PST converter to convert 25 items per folder for free!
How to convert MBOX file to PST in simple way?
When you look to export MBOX to PST manually, you need high-level tech expertise. So, how do we go about it now if we want to get away from the manual approaches? This is where the professional MBOX to PST converter fits in. But which is the best tool to convert these files?
To avoid this confusion, we suggest you use Kernel MBOX to PST Converter. This tool supports conversion of unlimited MBOX files from 20+ email clients, including Thunderbird, Zoho Mail, Eudora, Entourage, etc. to PST. It also allows transfer of data to several other file formats such as DBX, PDF, and HTML.
- Get a clear preview of data before saving.
- Maintain integrity and hierarchy of data.
- Convert data with 100% accuracy.
- Involves a simple MBOX file to PST file conversion process.
- Convert selective data from MBOX files using smart filters.
- Simple and intuitive user-interface provides a clear preview of the emails.
- Import data from MBOX to Gmail, Outlook, Office 365, etc. with the original hierarchy.
Simple process to convert MBOX files to PST
Here’s the step-by-step guide to convert MBOX file to PST using the software.
Step 1: Download and Install the software.
Step 2: Select the MBOX file(s) or add the folder with MBOX files.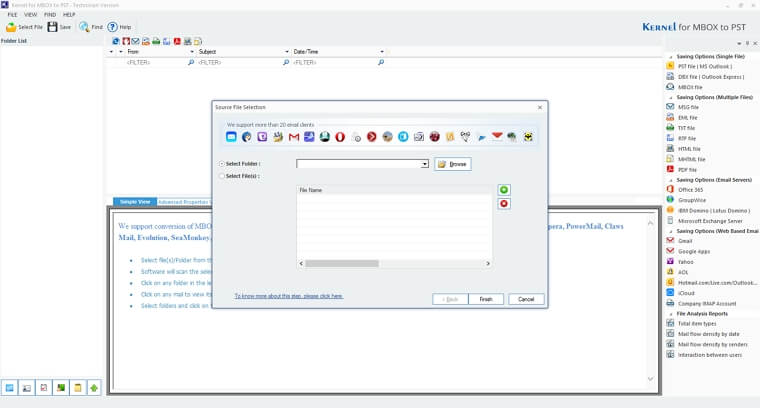
Step 3: Select a mailbox folder and then select the item to get a preview of the emails.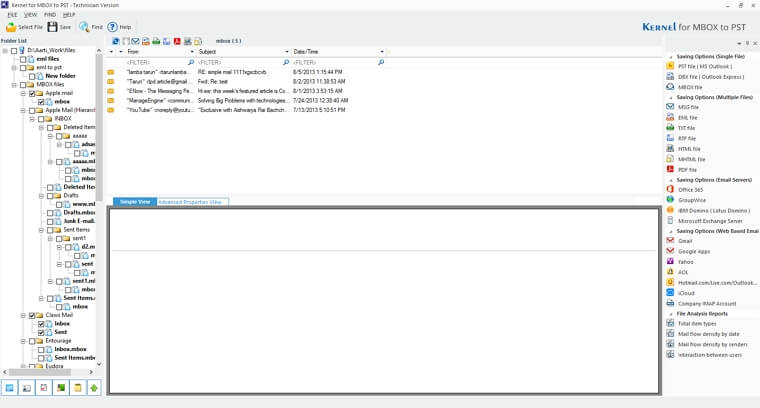
Step 4: Click Save and select from the given output types, where you want the data to be migrated.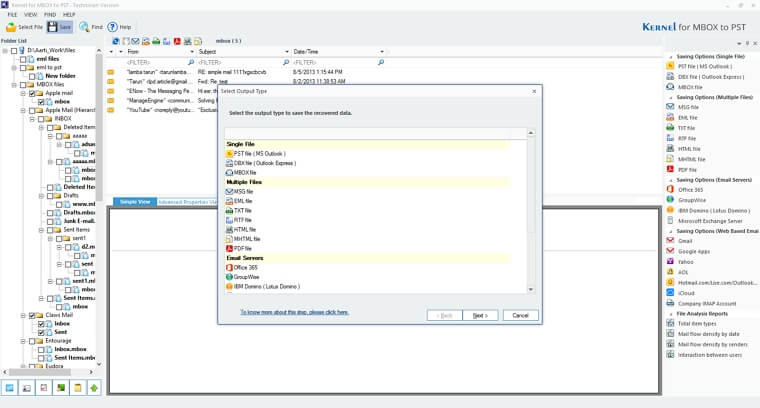
Step 5: Check out the filters and apply them from the given ones to migrate selective data.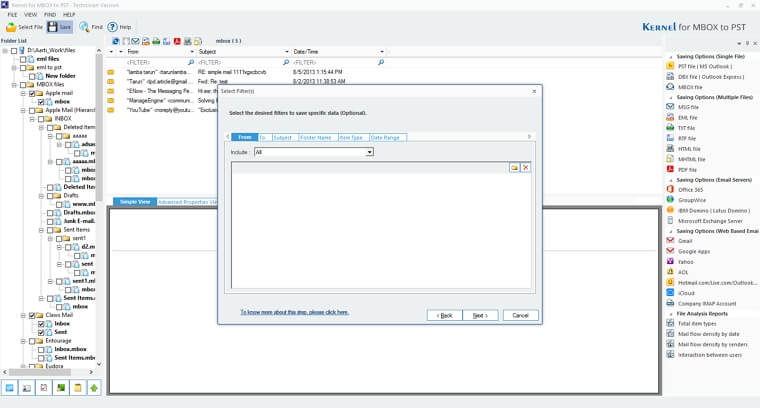
Step 6: Use the Split PST option to fragment a large mailbox into multiple small-sized PST.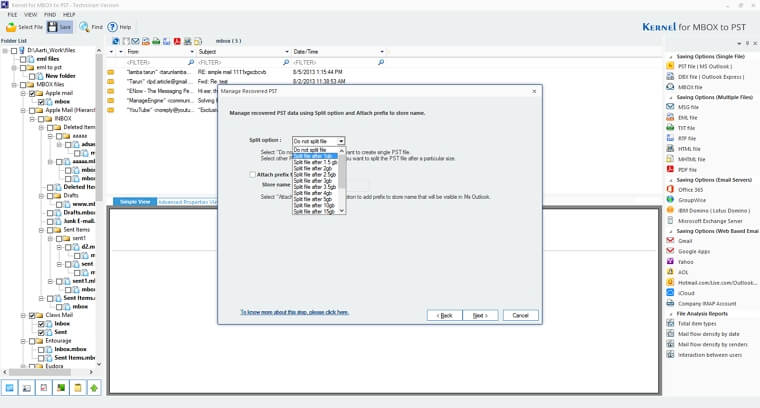
This will begin the process to convert MBOX files. Once completed, you can access the data in your Outlook mailbox.
Best Free Methods to Convert MBOX File to PST
This section provides you with the best proven methods to learn how to transfer MBOX to PST manually based on the email client used. Let’s discuss them one-by-one in depth.
Method 1. Convert MBOX file to PST using multiple email clients
This process requires you to have Apple Mail, Eudora, Outlook Express and Microsoft Outlook installed on your PC. Let’s see how to perform the file conversion process:
Step 1: Add mailbox to Apple Mail
Start the process by importing MBOX files into Apple Mail on your system. Here is how can you do that:
- Launch Apple Mail on your PC and then go to File.
- Click on the Import Mailbox option.
- Select files in MBOX format as the source, click Continue.
- Choose the location of MBOX file, click Continue, and Done.
Step 2: Create mailbox in Eudora
Once the mailboxes are imported to an MBOX file, the next step involves creating a mailbox in Eudora.
- Rename the above .mbox file to .mbx file extension. For example, if the file above was named Mailbox.mbox, change it to Mailbox.mbx.
- Change the file location to C:\Documents and Settings\user\Application Data\Qualcomm\Eudora.
- Launch Eudora and then double click the .mbx file to configure in Eudora.
Step 3: Import mailbox to Outlook Express
Mailboxes are now configured in Eudora. Let’s bring them to Outlook Express.
- Open Outlook Express, go to File>>Import>>Messages.
- From the list of email clients, select Eudora and then click Next.
- Browse the directory where the files were stored in the previous step and click OK.
The data is exported to Outlook Express.
Step 4: Import to Microsoft Outlook
Launch Microsoft Outlook on your system and follow the process given below:
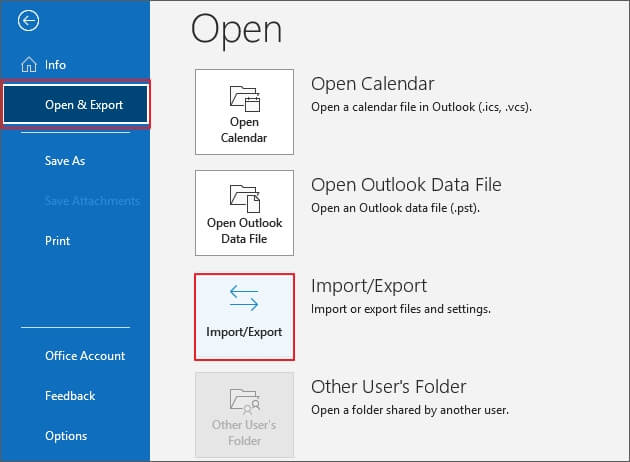
- Go to File, then click Open & Export.
- Select Import/Export. Click on Import Internet Mail and Address and then Next.
- Select Outlook Express 4.x, 5.x, 6.x, or Windows Mail from Select the Internet Mail application to import from and then Next.
- Your MBOX file data is in Outlook. You can export it to a PST file for your use.
Step 5: Export mailbox to PST
The last step in the process is to export the mailboxes to a PST file. Follow the given approach:
- In Outlook, go to File
- Click Open & Export and then Import/Export.
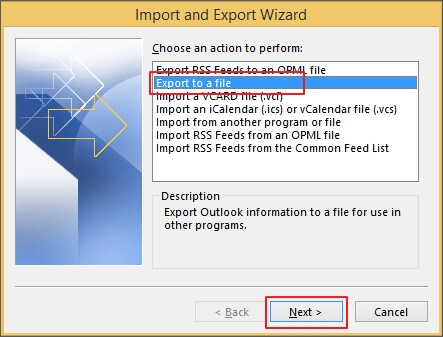
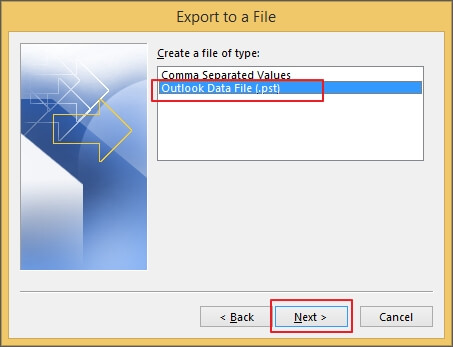
- Select Export to a file from the options.
- Proceed with the Outlook Data file (.pst) from Create a file of type options.
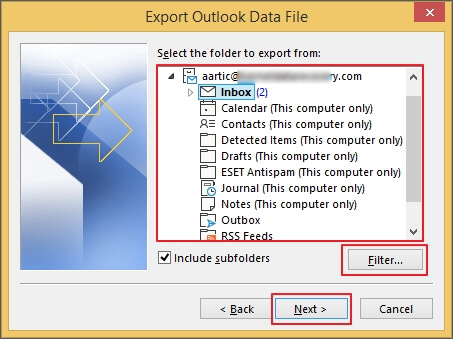
- In the Select the folders to export from window, select the folder you want to convert. Apply filters if needed and click OK.
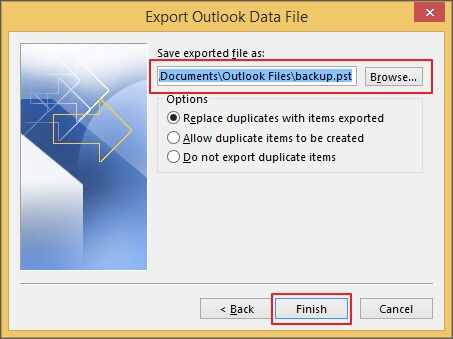
- Click Browse to define the saving location and select options if needed. Click Finish.
Method 2. Save MBOX file to PST file (using Thunderbird to Outlook)
You can migrate emails from Thunderbird to Outlook if the MBOX files you’re trying to convert belong to Thunderbird client. The process to do this includes three steps.
Step 1: Extract the emails from Thunderbird and save them to EML file.
Step 2: Import the EML file containing emails extracted from Thunderbird mailbox.
Step 3: Export the mailbox stored within the EML folder in Outlook to PST file and store it offline.
Once the emails are in a PST file, you can save them in your local storage for as long as you need.
What are the drawbacks of manual methods?
With the manual methods, you can easily execute the MBOX file to PST file conversion. However, there are certain shortcomings of these manual methods, as explained below.
- Manual methods to export MBOX to PST involve multiple steps, which often become lengthy.
- There is a high risk of losing data to manual methods of MBOX file to PST file conversion because of the complexity involved.
- Due to the unavailability of direct approaches, it’s impossible to convert Thunderbird to Outlook, Entourage to Outlook, etc. Directly.
- Require technical expertise, so you may need to hire technically skilled resources.
Conclusion
Conversion of MBOX files to PST with manual methods is not as reliable as professional tools because of the lengthy process and complications involved. For an accurate and quick MBOX file conversion, we recommend you get a professional MBOX converter tool. The software lets you save MBOX file data in multiple formats, including PST, EML, PDF, MSG, and others. You can use the MBOX to PST Converter Free trial version to get a brief understanding of how it functions.
FAQs
Every individual or organization converting .mbox files to .pst has their own specific reasons behind the switch. In the following section, you’ll find out some common situations that may lead you to perform this conversion.
1. Cost-efficient email client for businesses as compared to Thunderbird, Eudora, or other MBOX supporting email clients.
2. Easy to use email application and provides better email management. Backing up PST data is easier than the process you’ll need to follow to backup MBOX files.
3. You can apply password protection on your PST file to save the data from unauthorized access.
Converting MBOX file to PST provides benefits like email encryption and multi-factor authentication.
There are multiple methods to transfer mailbox data from one file format to other, such as using different email clients or by exporting MBOX to EML first and then saving it to a PST format.
The easiest method to perform the file conversion involves the following steps:
1. Launch the Kernel MBOX to PST Conversion tool.
2. Add the MBOX file or the folder containing multiple MBOX files.
3. Select the required mailbox folder, apply filters, and select the desired output type.
4. This will begin the process of converting the files.
Once done, you can store the PST in your local storage.
If you perform the MBOX file conversion using manual methods, there can be changes in the data integrity and structure. To avoid this, you can use a MBOX file to PST converter.
Yes, with the free trial version of recommended software, you can effortlessly migrate emails from MBOX to PST.
Yes, Thunderbird email application allows conversion of MBOX mailbox data to Outlook PST. To perform this, you need to first convert MBOX emails to EML and then import the EML file to Outlook.
Once imported, you can use the Outlook’s in-built feature to export the emails to Outlook PST file.