OST/PST to Office 365 Migration
Follow the steps given below to migrate your offline OST or PST files to Office 365 account.
Note: For illustration purposes, this guide will cover PST to Office 365 migration. You can choose the OST or PST file as per your needs. The steps to migrate both (OST and PST) are the same.
Step 1: Open the Kernel Email Migrator software and click on the Add Project button. Then, provide a suitable Project Name and click OK.

Step 2: Select the newly created project. Click on the Add Job button.

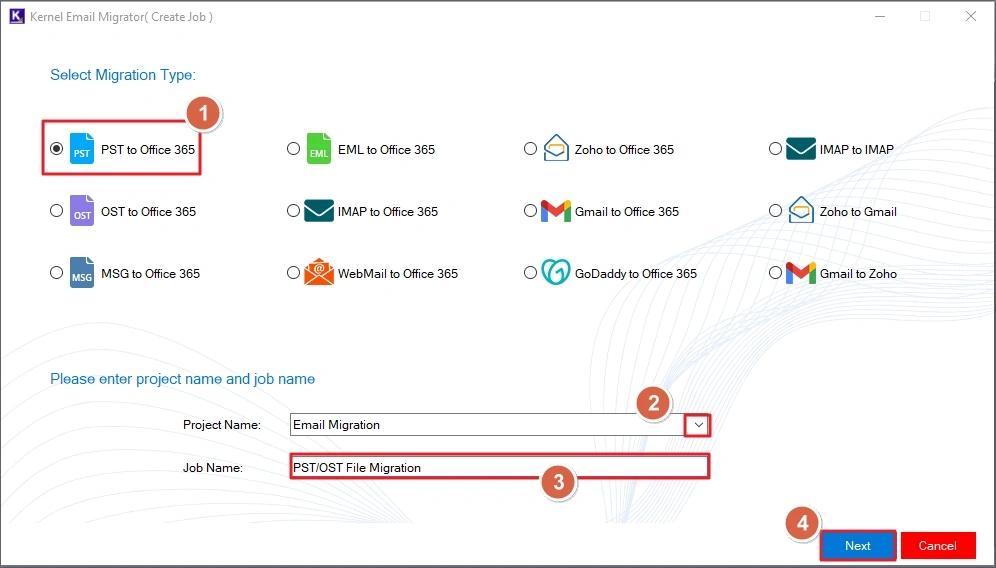
Step 3: Choose the option PST to Office 365, choose the project name with the dropdown and provide a Job Name. Then, click Next to setup the source & destination account.
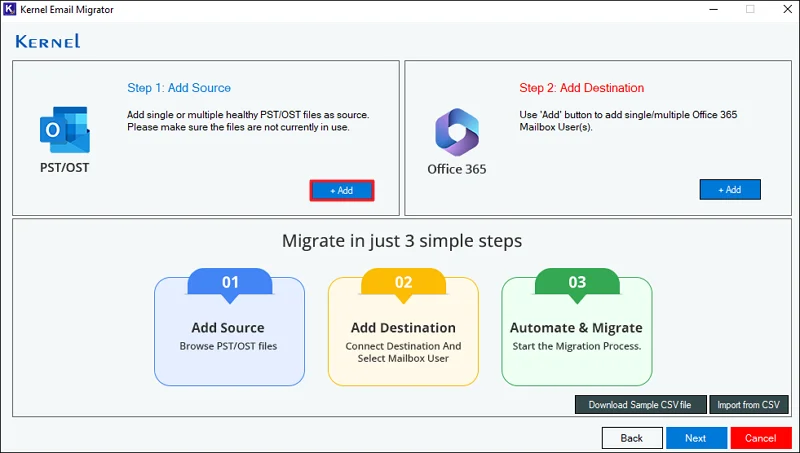
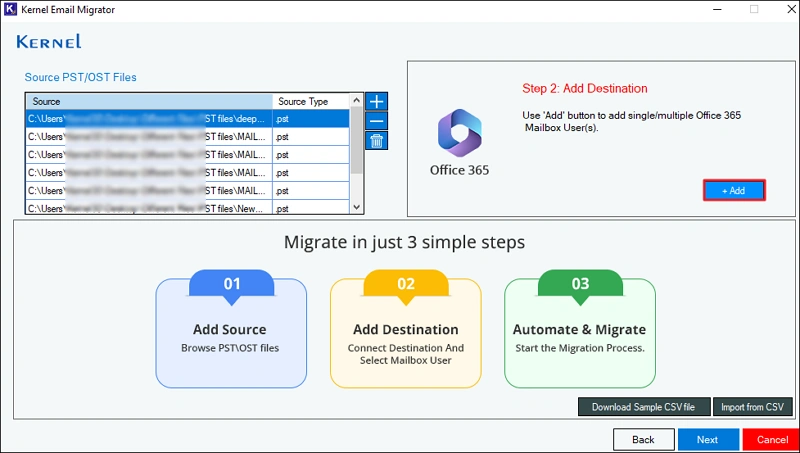
Step 4: Now, we will select the PST file(s) that you want to migrate to Office 365. Click on the Add button under the Step 1: Add Source section.
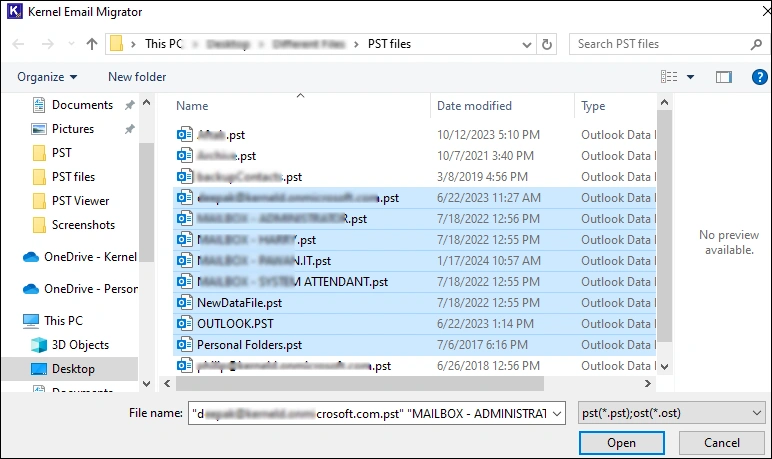
Step 5: Go to the location where the PST file(s) are stored. Select single or multiple files and click Open to add these files as the source.
Step 6: After adding the source PST files, let's configure the destination Office 365 account. Click Add button in the Step 2: Add Destination section.
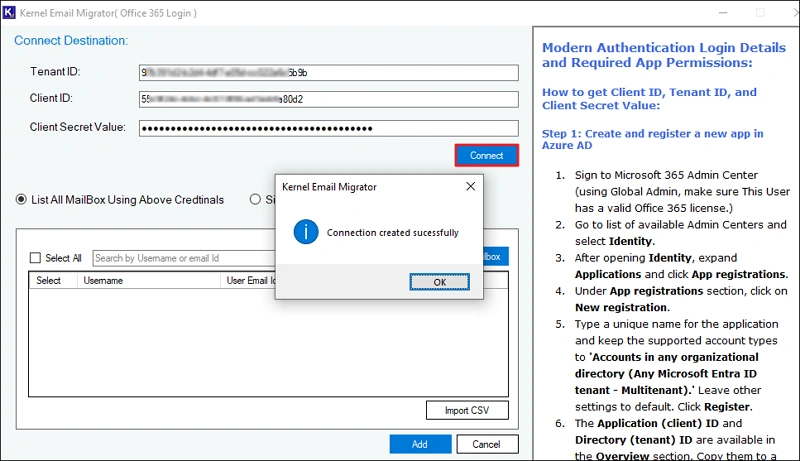
Step 7: Under the Connect Destination, provide Tenant ID, Client ID, and Client Secret Value for the Microsoft 365 account you wish to add as the destination. After entering the credentials, click Connect to authenticate the values and establish a secure connection between the email migrator and the Office 365 account.
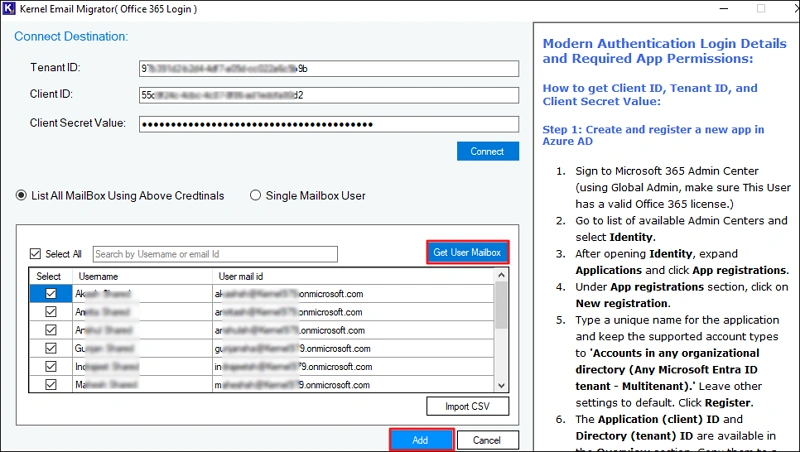
Step 8: To migrate the PST files to a single mailbox, select Single Mailbox User. However, to transfer different PST files to different mailboxes, select the List All Mailbox Using Above Credentials option and click on the Get User Mailbox button. Then, select the mailboxes from the list and click Add.
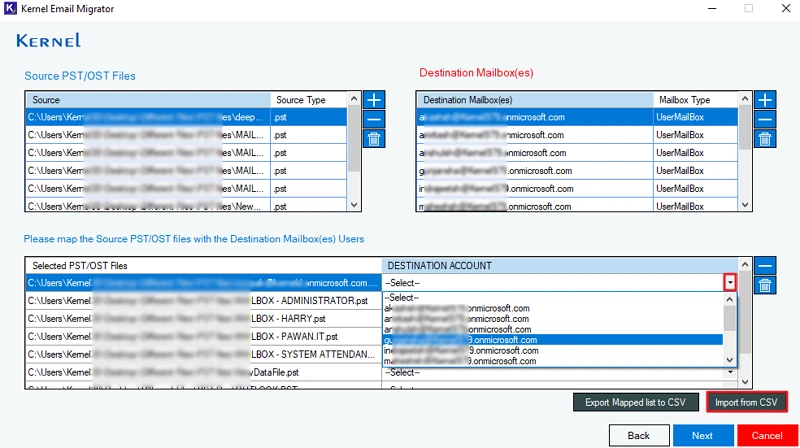
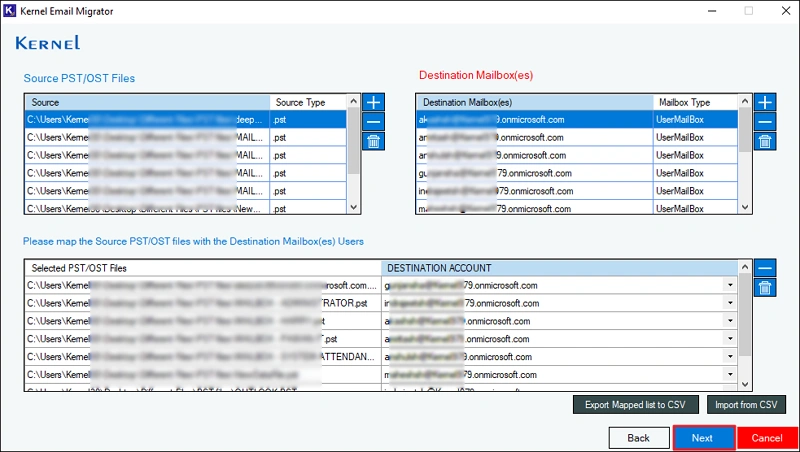
Step 9: For accurate email migration, you must map the source PST file to a destination user mailbox. In the mapping section, you will find a dropdown against every selected PST file. Use the dropdown to select the mailbox for that PST file. Alternatively, for quick mapping, click on the Import from CSV button and upload a CSV file with correct mapping information. The tool will analyze the CSV file and map mailboxes automatically.
Step 10: After mapping, click Next to continue with the email migration.
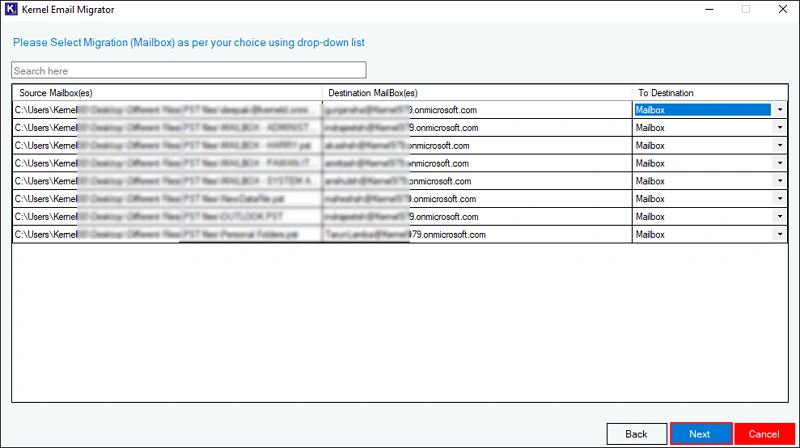
Step 11: The tool will show you all the PST files mapped with your selected mailboxes and the destination of the migration. Click Next to continue.
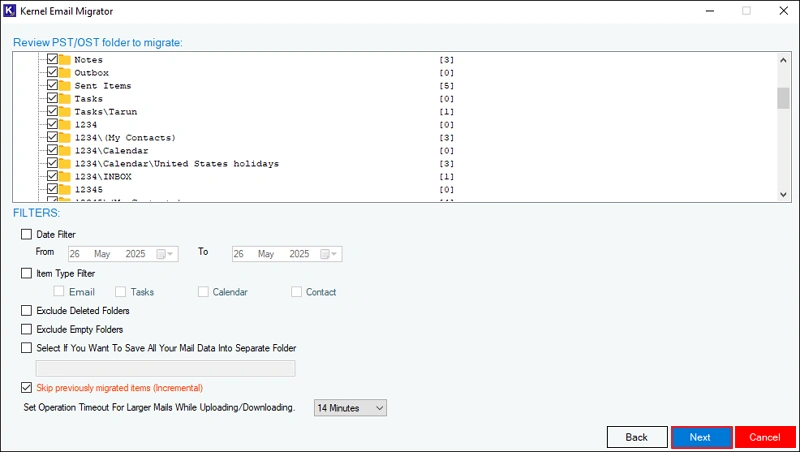
Step 12: You can exclude specific folders from the PST file for migration in the Review the PST/OST folders to migrate section. Additionally, you can apply various filters like Date Filter and Item Type Filter for selective email migration. To speed up the migration, you can also exclude deleted and empty folders. Click Next to proceed.
Note: To migrate only new data or in case you are retrying a failed migration, make sure to select the Incremental feature.
Step 13: To begin the migration instantly, select the Execute Immediate option and click Finish.
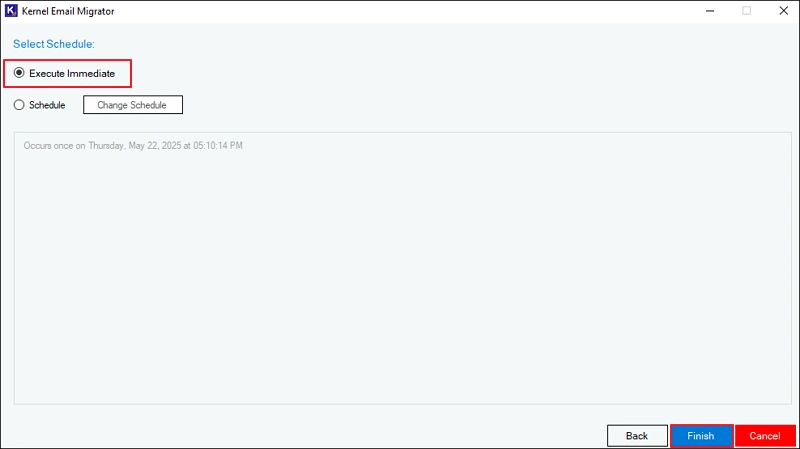
Note: To run the migration automatically later, select Schedule and click on Change Schedule. Then, set occurrence, date, time, frequency, and duration of migration.. Click Finish after setting up the time.

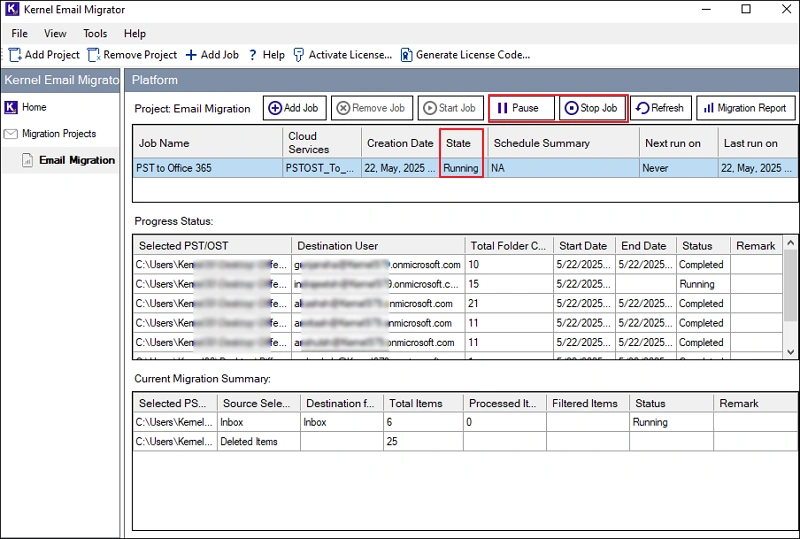
Step 14: The job will be created and PST to Office 365 migration will start. Notice the State of the job, it will be in the Running state. You can also Pause or Stop the current job in case of any emergency.
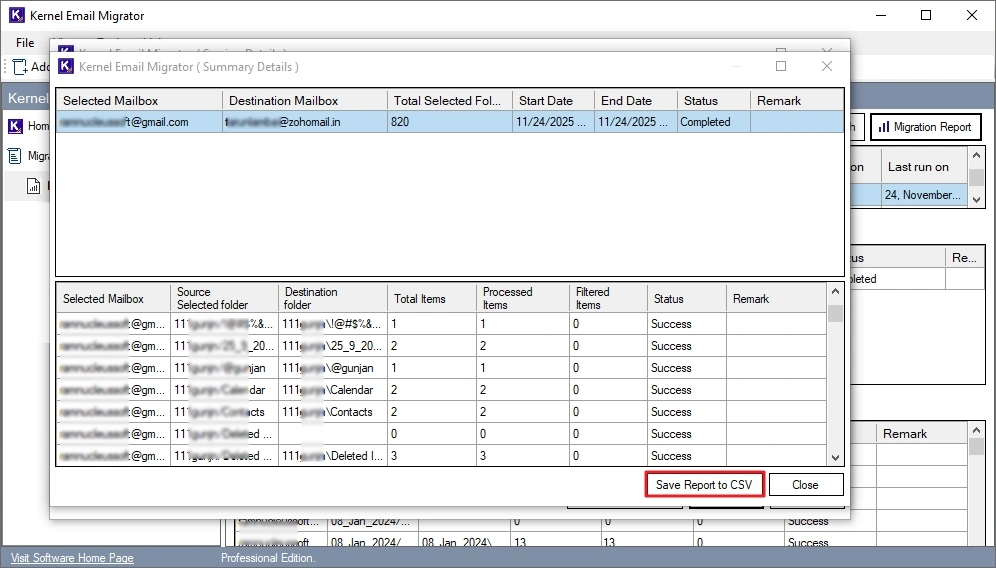
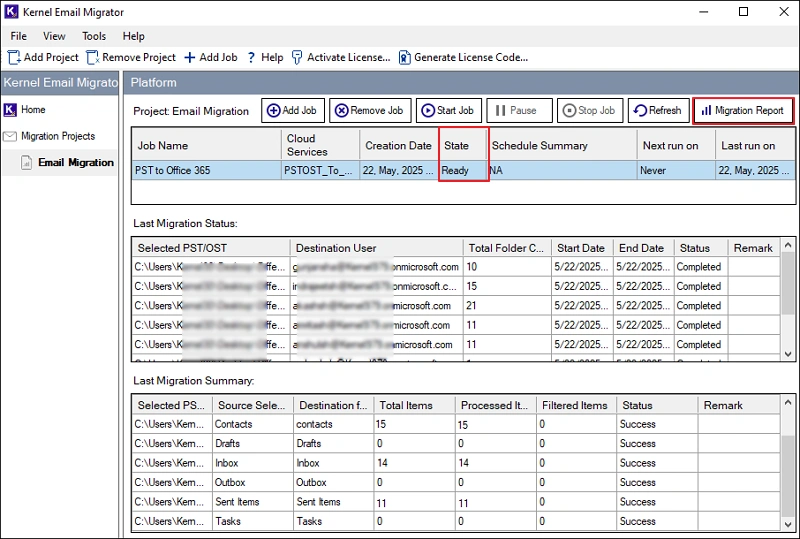
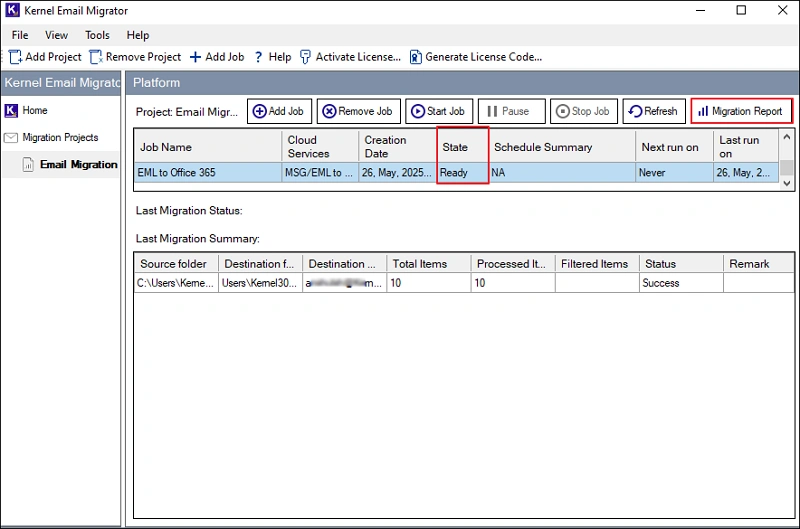
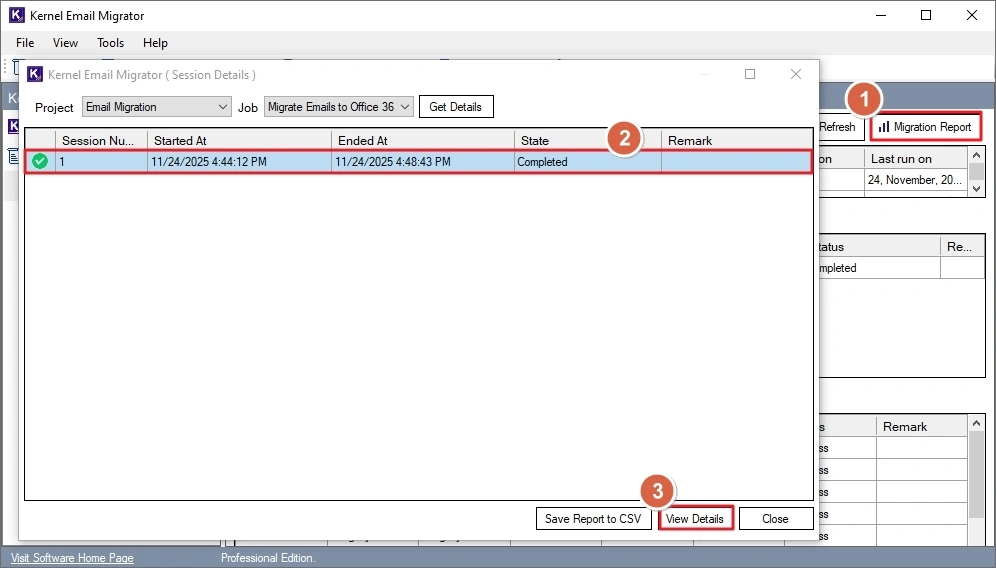
Step 15: After the migration is completed, the job state changes to Ready. To view the migration report, click on the Migration Report button.
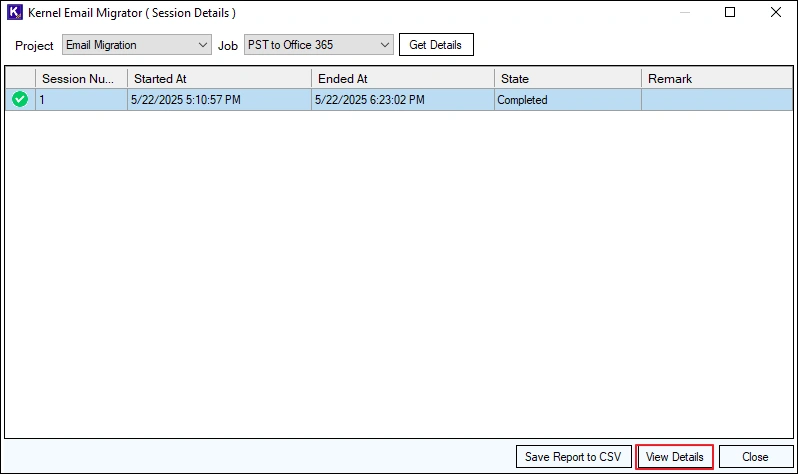
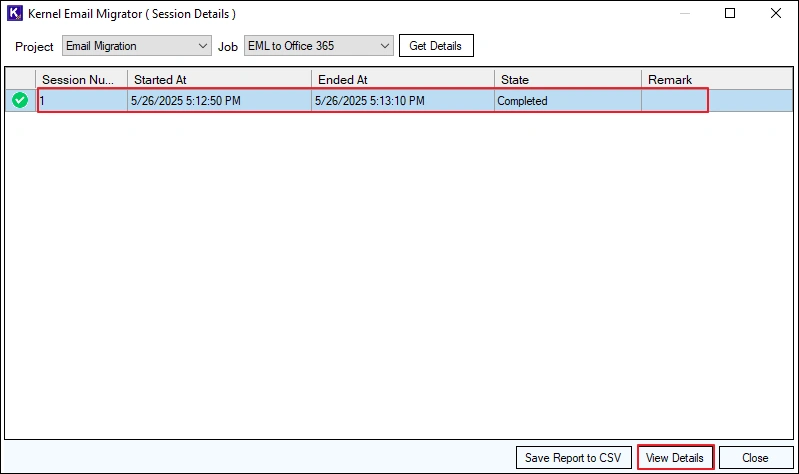
Step 16: Select the report you want to view and click View Details.
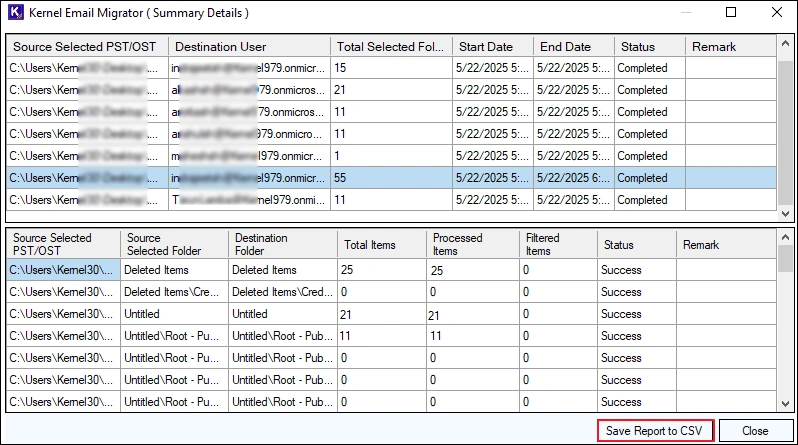
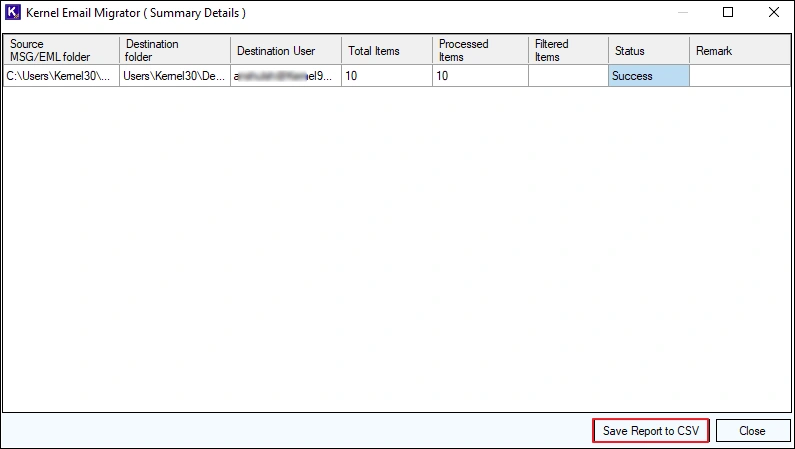
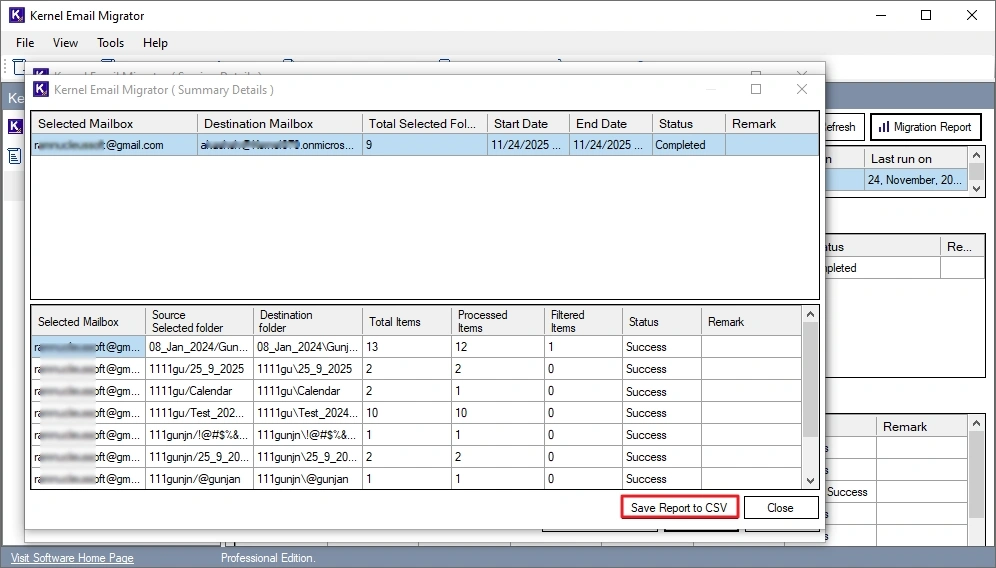
Step 17: The tool creates a detailed report for every migration job you run. You can also download this report to your local system by clicking on the button Save Report to CSV.
EML/MSG to Office 365 Migration
Follow the steps given below to migrate your EML or MSG files to Office 365 account.
Note: For illustration purposes, this guide will cover EML to Office 365 migration. You can choose the EML or MSG file as per your needs. The steps to migrate both (EML and MSG) are the same.
Step 1. Open the Kernel Email Migrator software and click on the Add Project button. Then, provide a suitable Project Name and click OK.

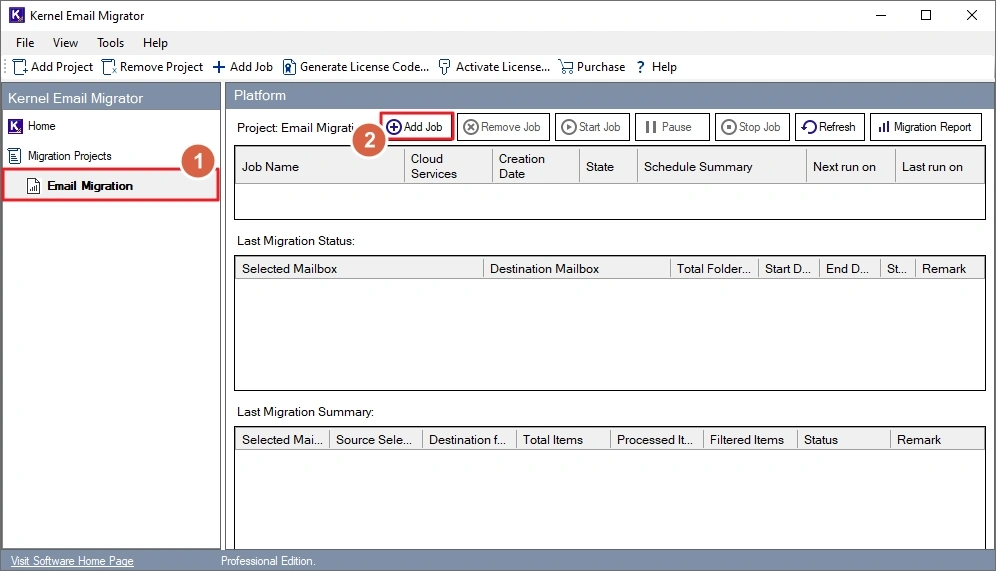
Step 2. Select the newly created project. Click on the Add Job button.
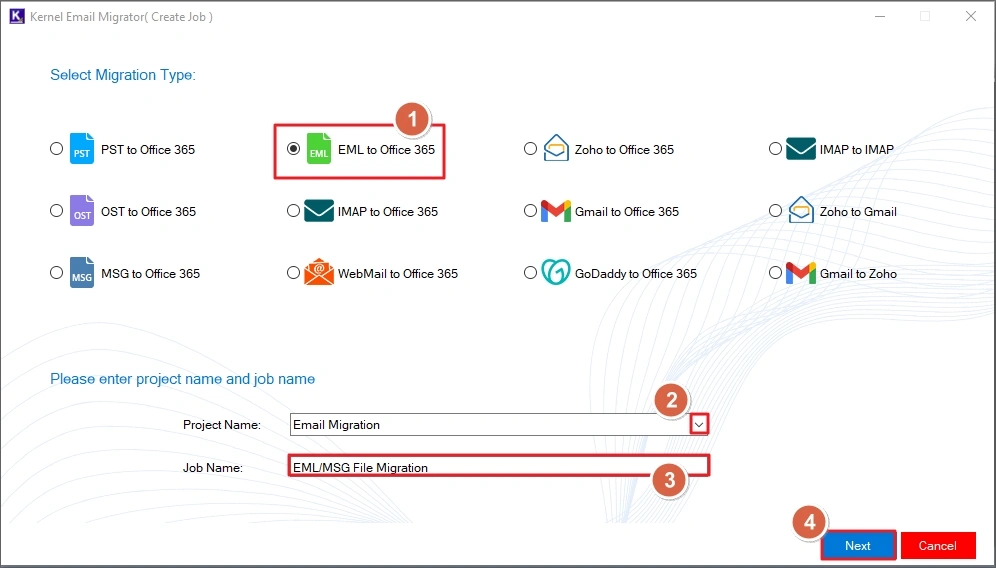
Step 3. Choose the option EML to Office 365, select the project name with the dropdown and provide a Job Name. Then, click Next to setup the source & destination account.
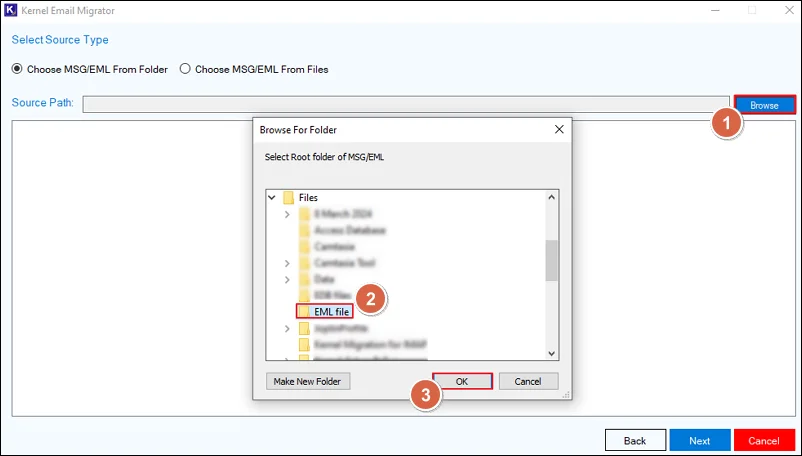
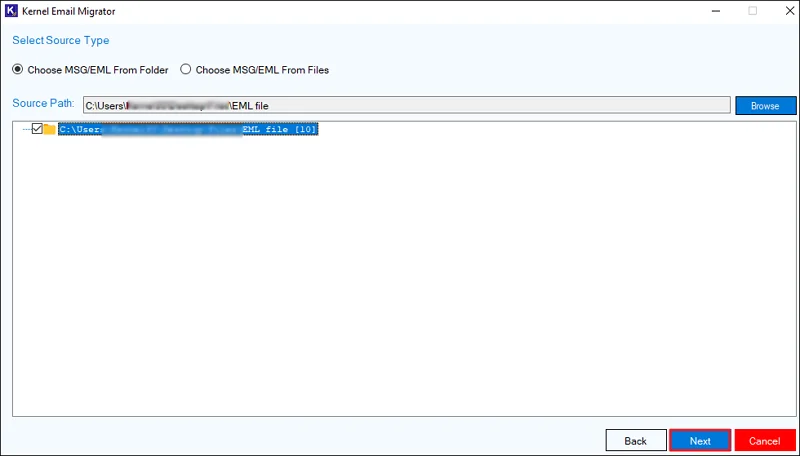
Step 4. To select the folder containing the EML files, select the option Choose MSG/EML Folder. Then, click Browse and go to the folder location. Select the folder and click OK. Alternatively, you can select the option Choose MSG/EML From Files and select individual EML files for migration.
Step 5. Click Next after folder/file selection.
Step 6. Enter Tenant ID, Client ID, and Client Secret Value to add the destination. Click Next to verify the credentials and connect to the Office 365 account.

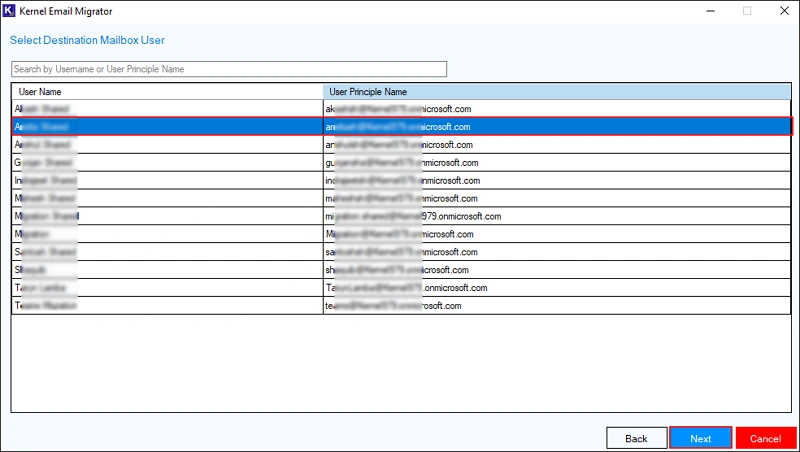
Step 7. Select the destination mailbox in which the entire EML files will be migrated and click Next. You can also search for a particular mailbox using User Name and User Principal Name.
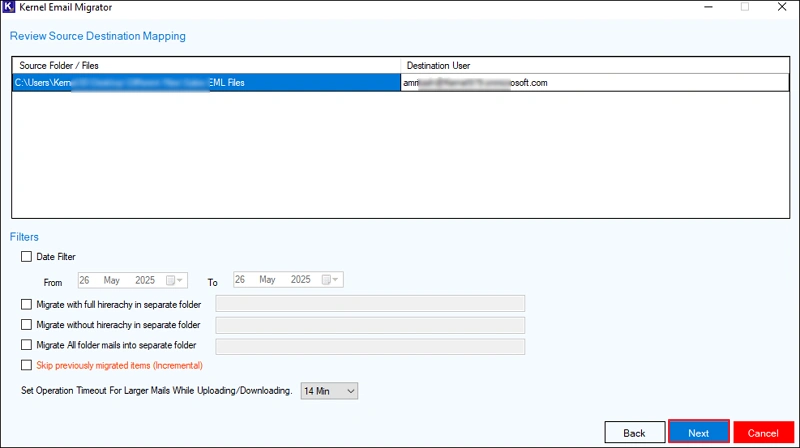
Step 8. For selective email migration, users can specify a particular date range. The tool also allows migrating the emails in a separate folder with or without original folder hierarchy. To migrate only new data and skip any previously migrated data, select the option Skip previously migrated items (Incremental). Click Next to move forward.
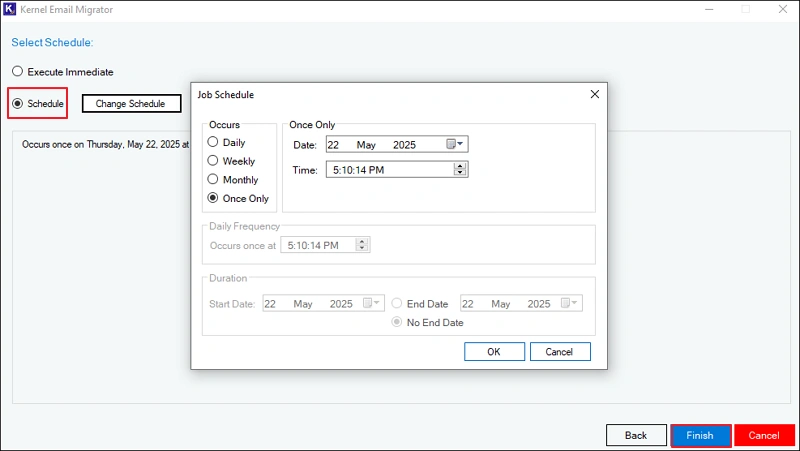
Step 9. To start email migration immediately, select the Execute Immediate option and click Finish.

Note: To run the migration automatically later, select Schedule and click on Change Schedule. Set the occurrence, date, time, frequency and duration of the migration. Click Finish after setting up the time.
Step 10. The job will be created and EML to Office 365 migration will start. Notice the State of the job, it will be in the Running state. You can also Pause or Stop the current job in case of any emergency.
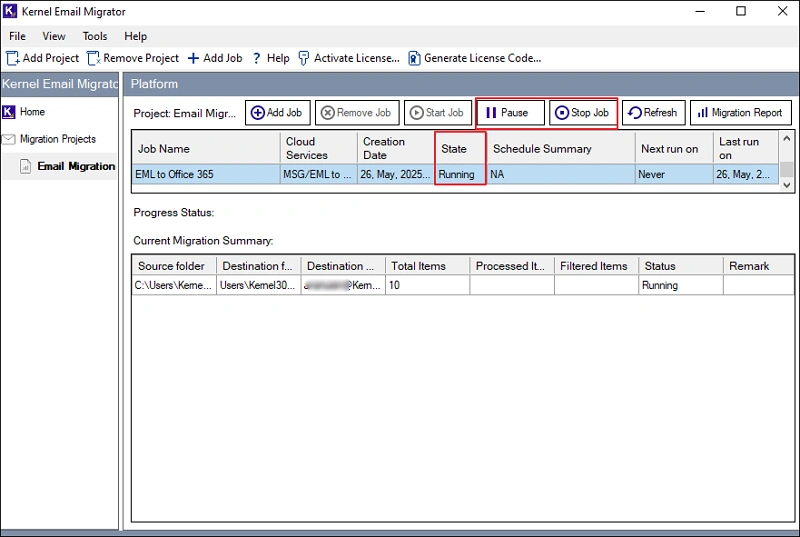
Step 11. After a successful migration, the job state changes to Ready. To view the migration report, click on the button Migration Report.
Step 12. Select the report you want to view and click View Details.
Step 13. The tool creates a detailed report for every migration job you run. You can also download this report to your local system by clicking on the button Save Report to CSV.
IMAP to Office 365 Migration
The Email Migrator tool allows you to migrate emails from IMAP-supported server to your Office 365 account on any tenant. Our tool allows you to migrate:
- Gmail to Office 365
- Zoho to Office 365
- Exchange On-Premises to Office 365 (Exchange Online)
- GoDaddy to Office 365
- WebMail to Office 365, and many more.
For this tutorial, we will perform Gmail to Office 365 migration. You can select any IMAP server in the source. The steps are identical for all IMAP to Office 365 migrations. Steps to migrate emails are:
Step 1. Launch the Kernel Email Migrator tool and click on the Add Project button. Provide a name for your project and click OK.

Step 2. Select the project you created in the previous step and click on the Add Job button.

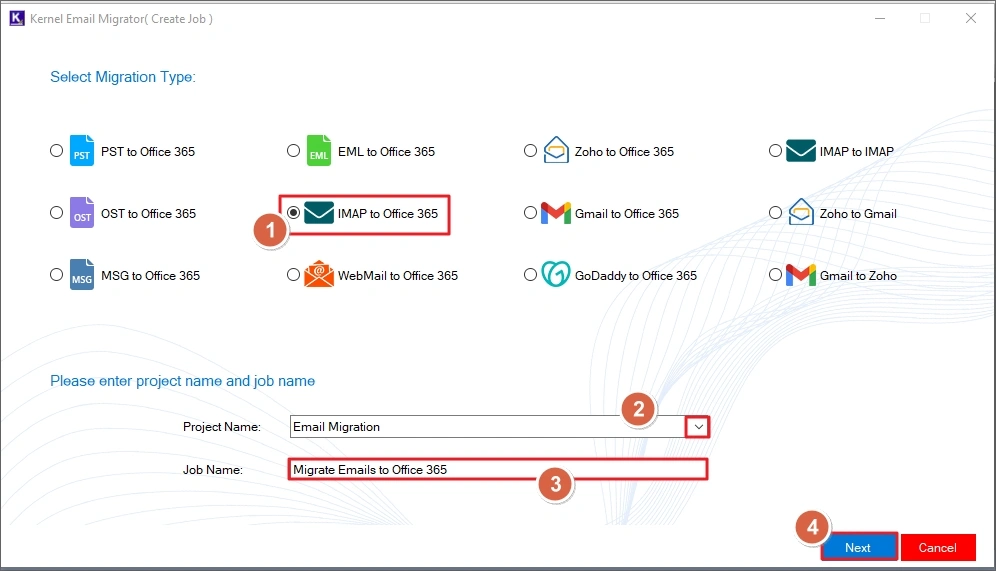
Step 3. Choose IMAP to Office 365 as the migration type, select the project name using the dropdown, and provide a suitable Job Name. Click Next to proceed.
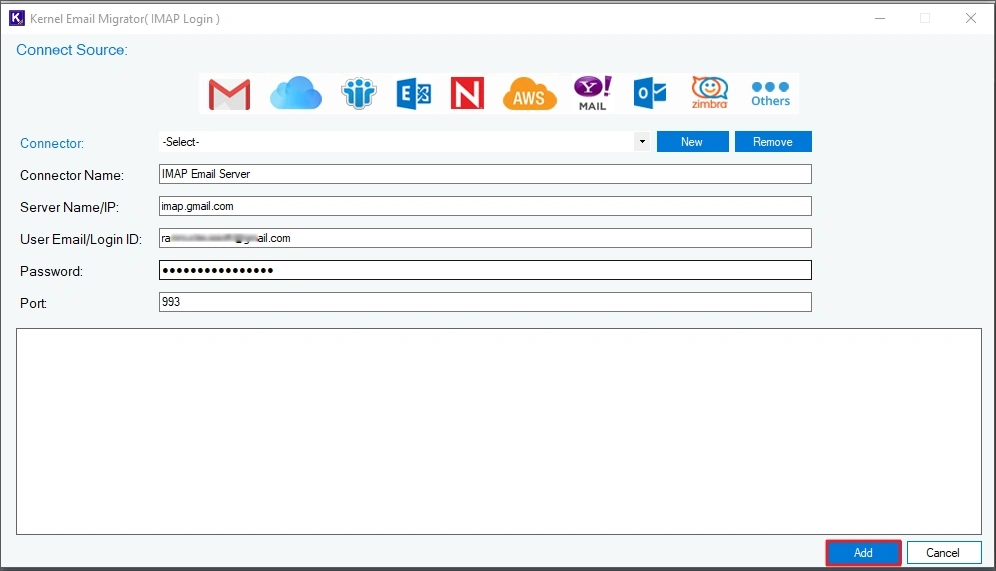
Step 4. Click on the Connect button in the Add Source section to add the source IMAP account.

Step 5. Provide a connector name and enter the Gmail credentials for login. Then, click Add.
Note: The tool will ask to save the login details. Accept or reject it as per your preference.
Step 6. To add destination, click on the Connect button within the Add Destination section.
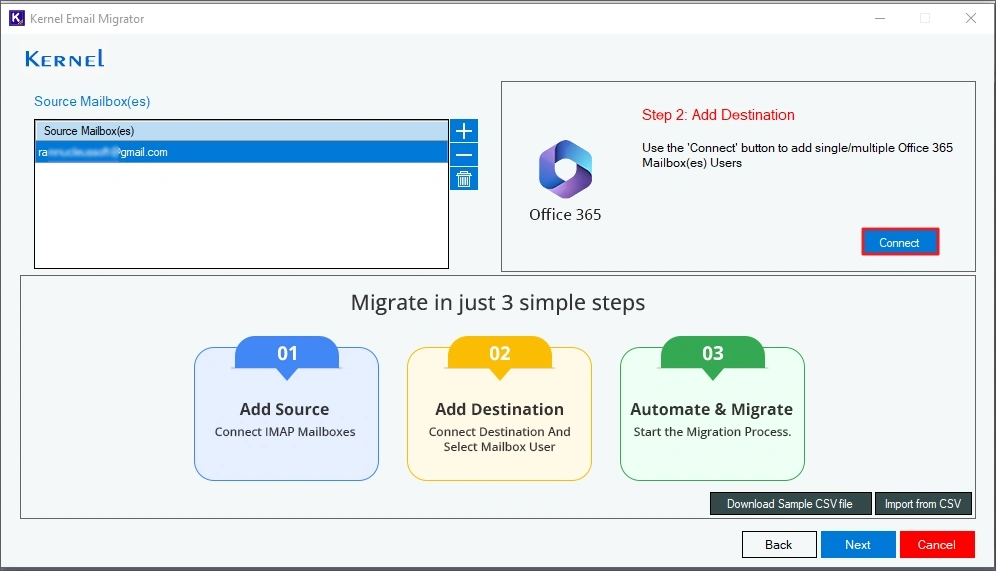
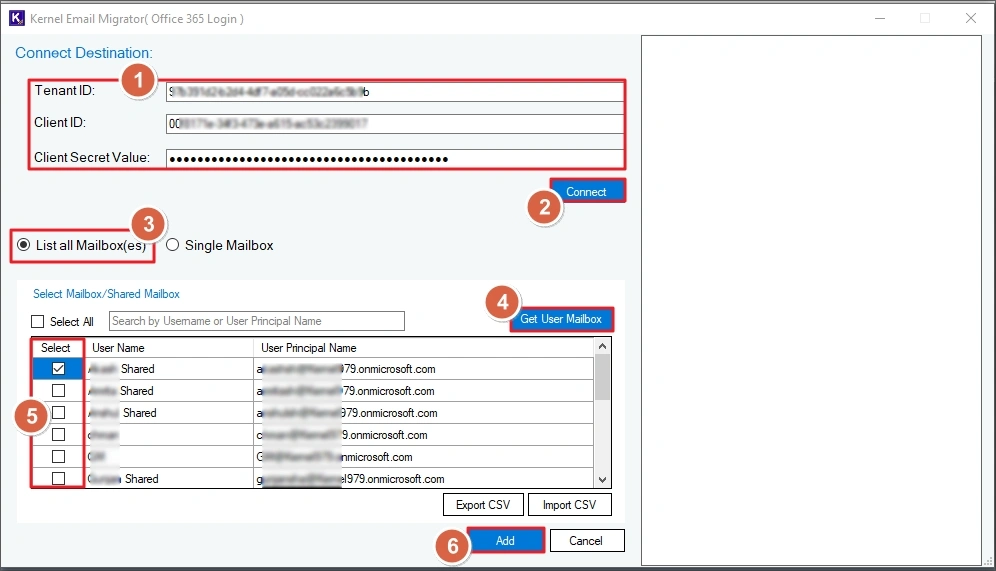
Step 7. Provide the login credentials (Tenant ID, Client ID, and Client Secret Value) of your Office 365 account. Then, click Connect. When the connection is successful, select the List all Mailboxes option and click on the Get User Mailbox button.
Then, from the list of user mailboxes, select the one in which you want to migrate the data and click Add.
Note: To add a single mailbox in the destination, select Single Mailbox option and enter the user email address
Note: The tool will ask to save the login details. Accept or reject it as per your preference.
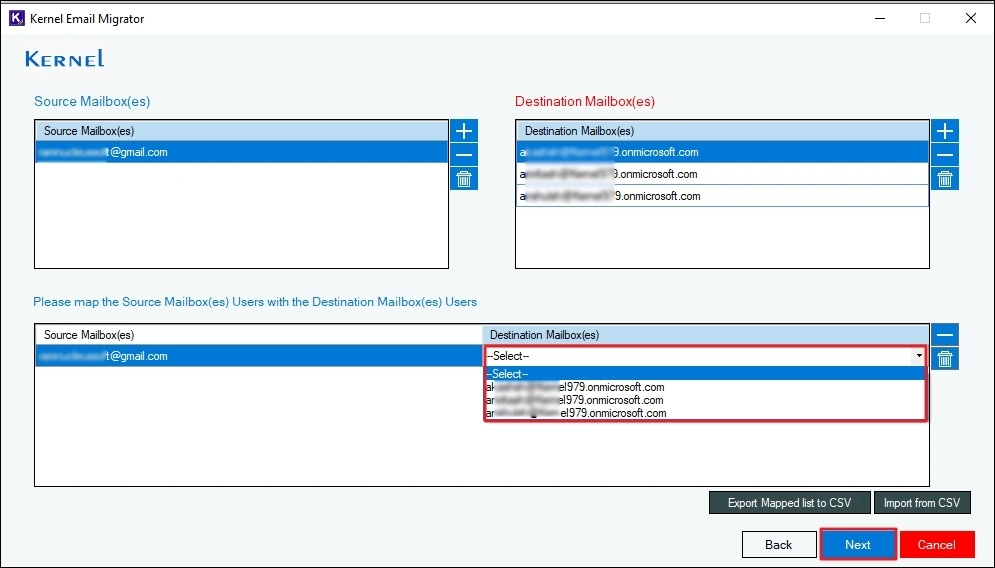
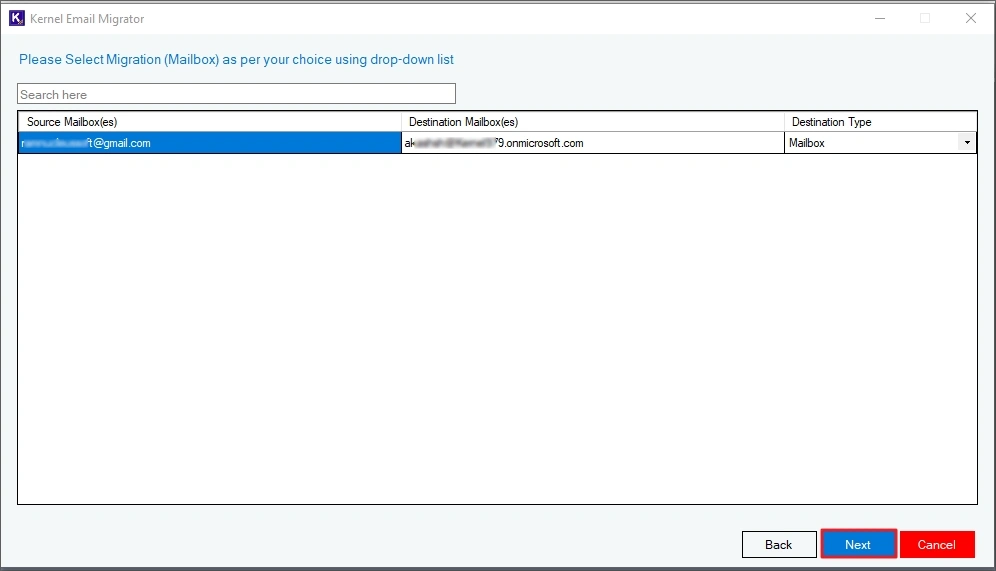
Step 8. The tool will scan and list the mailboxes from the source and destination. Mailboxes with the same name will be auto-mapped. You can map the unmapped mailboxes manually using the dropdown in the Destination Mailbox section or by uploading a CSV file (with mapping details). After mapping, click Next to proceed.
Step 9. Select the destination mailbox for migration and click Next.
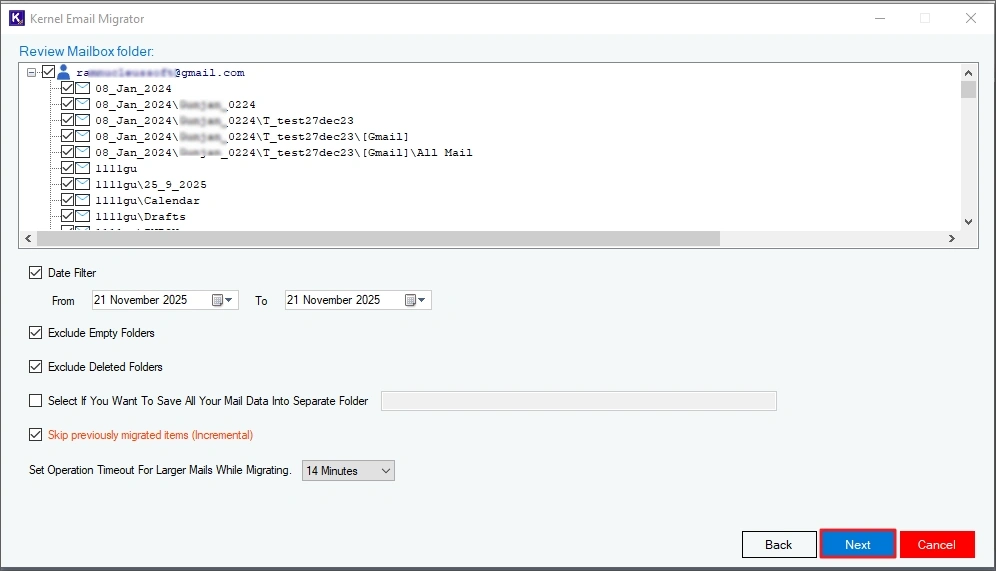
Step 10. Apply the following filters for selective migration.
- Review Mailbox Folder: Include/exclude specific folder from migration.
- Date Filter: Set a start and end date. Only the data sent/received between the specified dates will be migrated.
- Choose to skip Empty and Deleted folders
- Create and save complete mailbox data into a new folder in destination
- Use the Incremental migration option to move only new data, skipping data already present in the destination.
After setting up the filters, click Next.
Step 11. To run the migration instantly, choose Execute Immediate and click Finish.

Note: To schedule the migration to run automatically at a later time, select Schedule and click on the Change Schedule button. Choose the time, date, and frequency of the migration and click OK. Finally, click Finish.

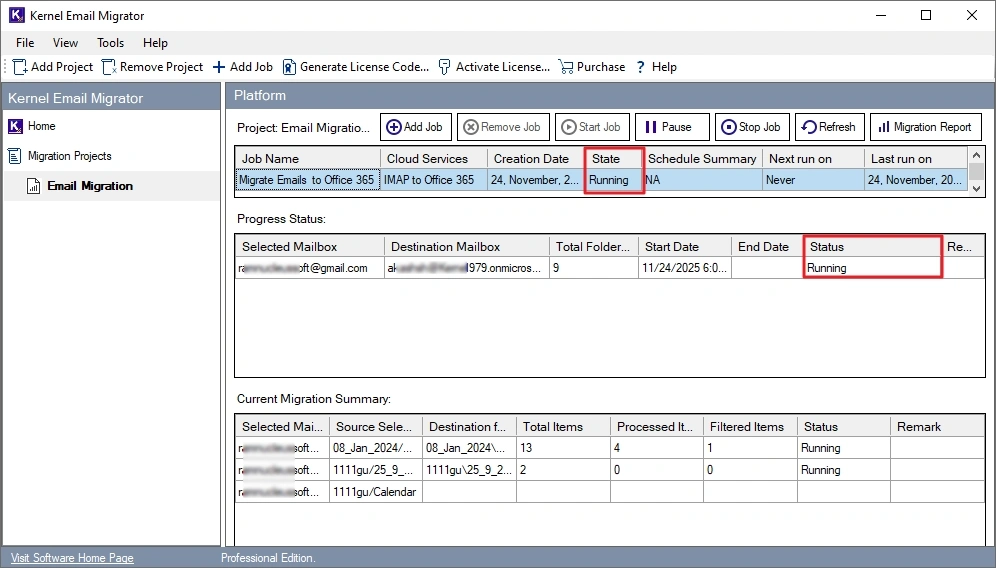
Step 12. Gmail to Office 365 migration is started. For an ongoing migration task, the State of the job will be shown as Running, and the Status of the mailbox will also be Running.
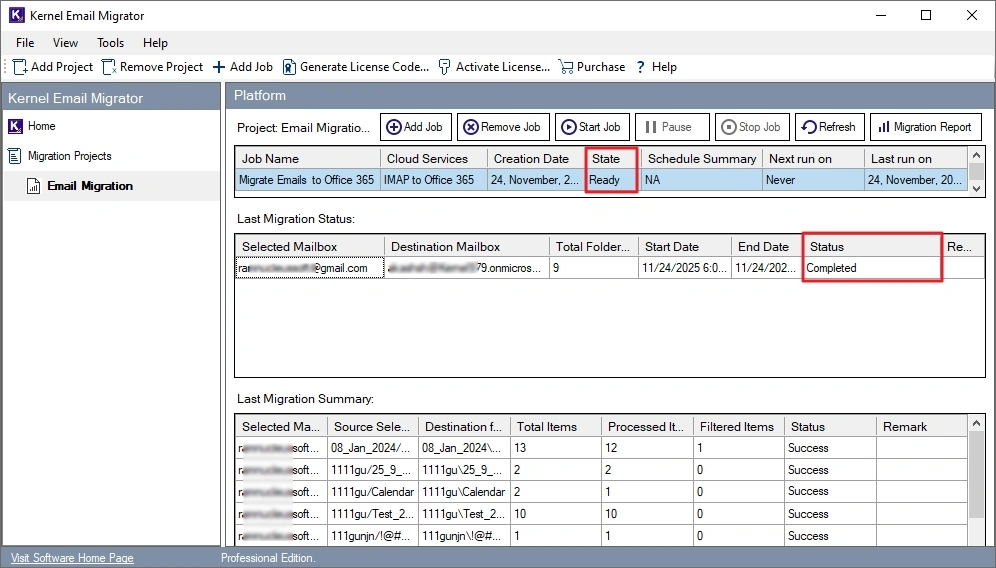
Step 13. When the migration is done, the job State will turn to Ready, and the mailbox Status will turn to Completed.
Step 14. To view a detailed report of the finished migration, click the Migrate Report button at the top right corner. Then, select the job session and click on View Details.
Step 15. To save the report at your desired location, click Save Report to CSV. Choose the location to save the file and click Save.
IMAP to IMAP Migration
The Email Migrator tool allows you to migrate emails between any two IMAP-supported servers. A few major migrations supported by the tool are:
- Gmail to Zoho
- Zoho to Gmail
- Gmail to GoDaddy
- Exchange On-Premises to Gmail
- Exchange On-Premises to Zoho
- WebMail to Gmail and many more.
For this tutorial, we will take source as Gmail and destination as Zoho. You can select any IMAP server in the source & destination according to your requirements. Steps to migrate emails are:
Step 1. Launch the Kernel Email Migrator tool and click on the Add Project button. Provide a name for your project and click OK.

Step 2. Select the project you created in the previous step and click on the Add Job button.

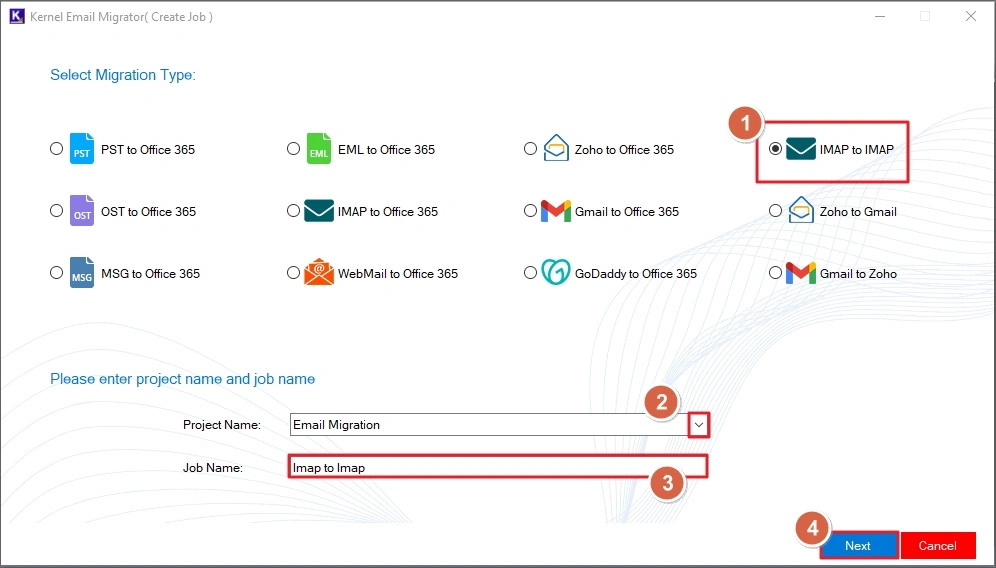
Step 3. Choose IMAP to IMAP as the migration type, select the project name using the dropdown, and provide a suitable Job Name. Click Next to proceed.
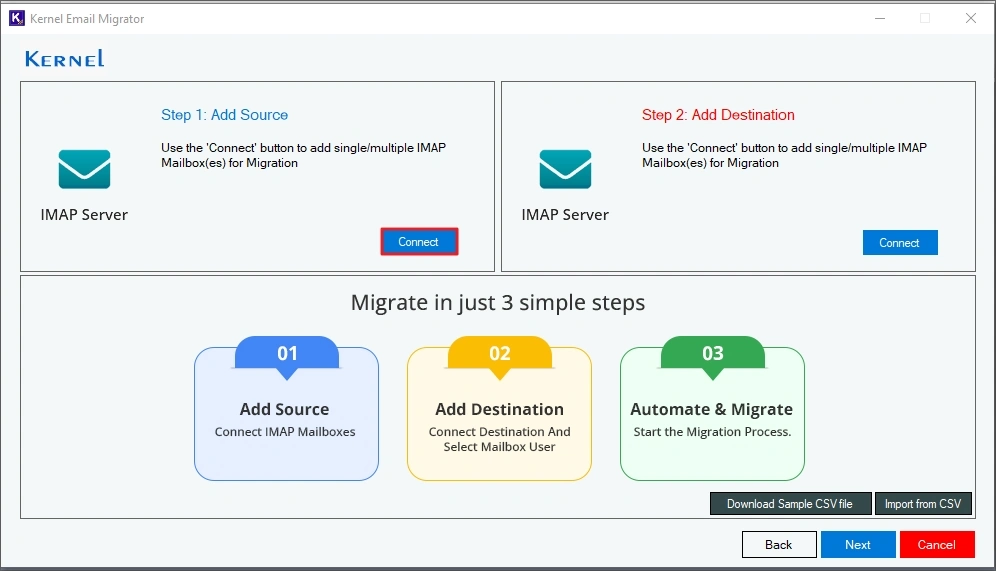
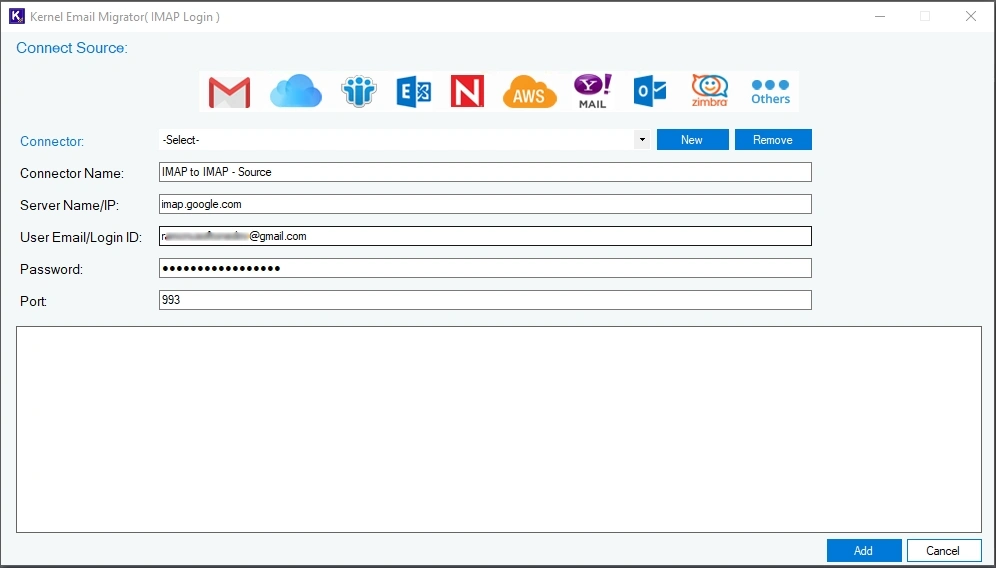
Step 4. Click on the Connect button in the Add Source section to add the source IMAP account.
Step 5. Provide a connector name and enter the Gmail credentials for login. Then, click Add.
Note: The tool will ask to save the login details. Accept or reject it as per your preference.
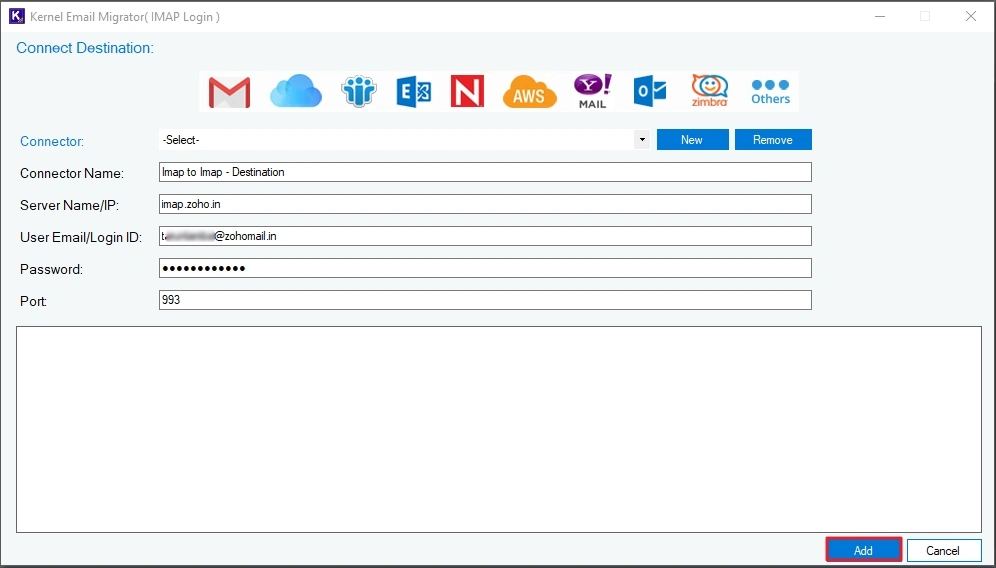
Step 6. To add a destination, click on the Connect button in the Add Destination section.

Step 7. Give a connector name and provide the login credentials of your destination IMAP account. Then, click on Add.
Note: The tool will ask to save the login details. Accept or reject it as per your preference.
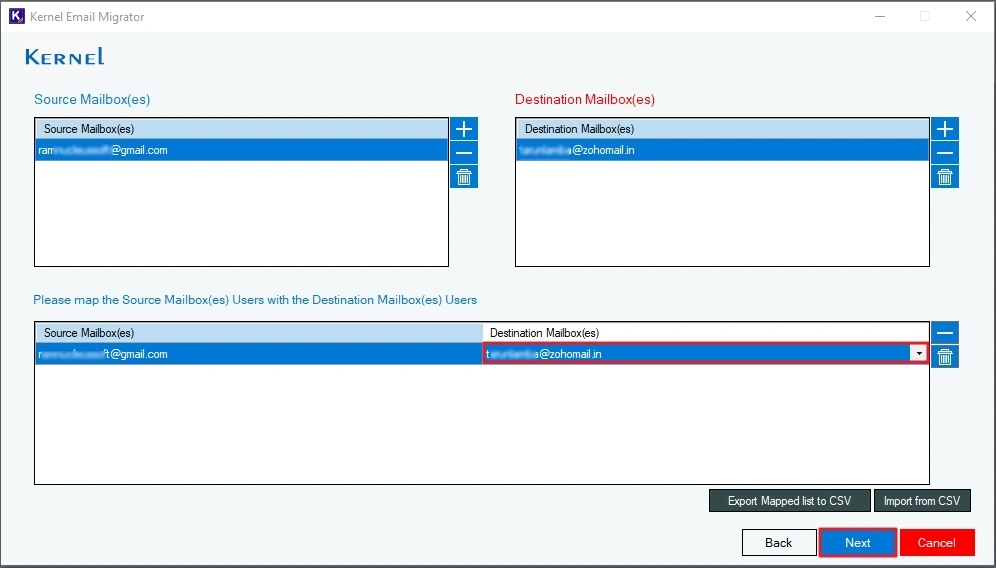
Step 8. The tool will scan and list the mailboxes from the source and destination. Mailboxes with the same name will be auto-mapped. You can map the unmapped mailboxes manually using the dropdown in the Destination Mailbox section or by uploading a CSV file (with mapping details). After mapping, click Next to proceed.
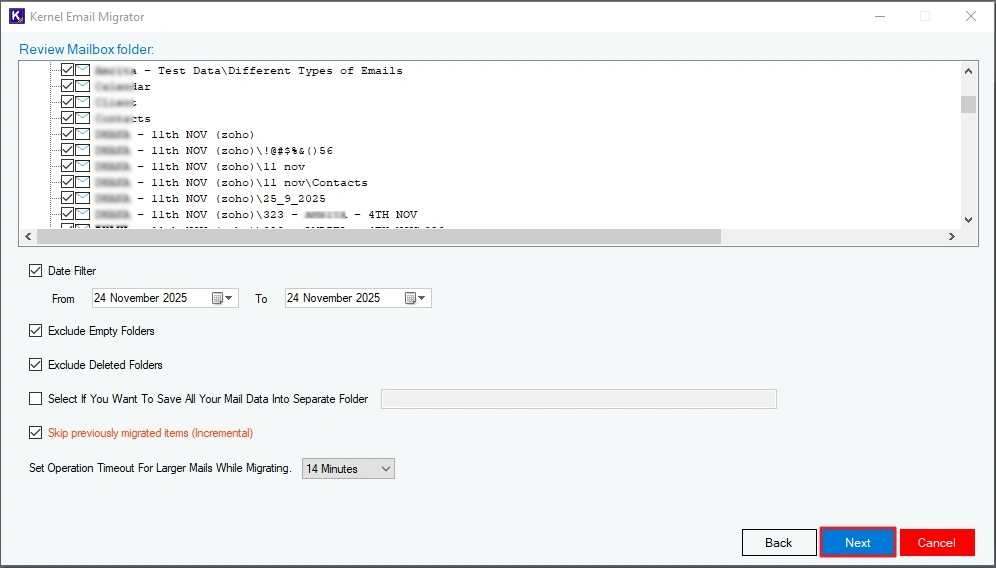
Step 9. Apply the following filters for selective migration.
- Review Mailbox Folder: Include/exclude specific folder from migration.
- Date Filter: Set a start and end date. Only the data sent/received between the specified dates will be migrated.
- Choose to skip Empty and Deleted
- Create and save complete mailbox data into a new folder in destination.
- Use the Incremental migration option to move only new data, skipping data already present in the destination.
After setting up the filters, click Next.
Step 10. To run the migration instantly, choose Execute Immediate and click Finish.

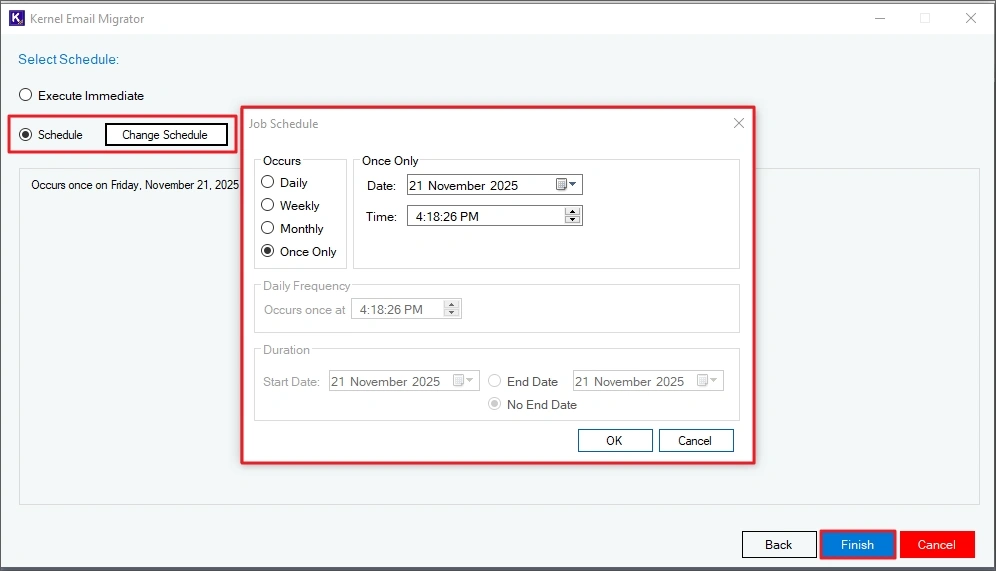
Note: To schedule the migration to run automatically at a later time, select Schedule and click on the Change Schedule button. Choose the time, date, and frequency of the migration and click OK. Finally, click Finish.
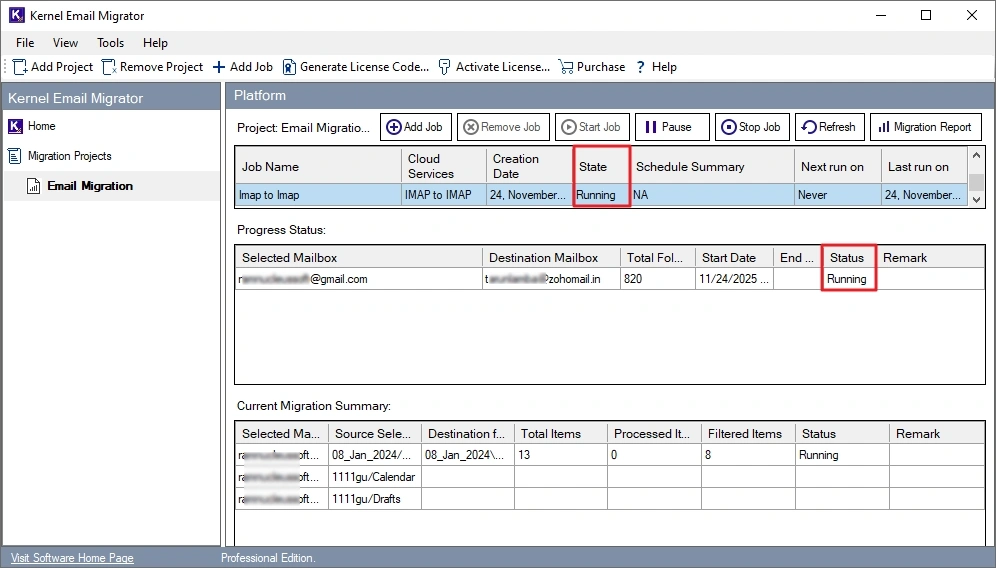
Step 11. Gmail to Zoho migration will begin now. For an ongoing migration task, the State of the job will be shown as Running, and the Status of the mailbox will also be Running.
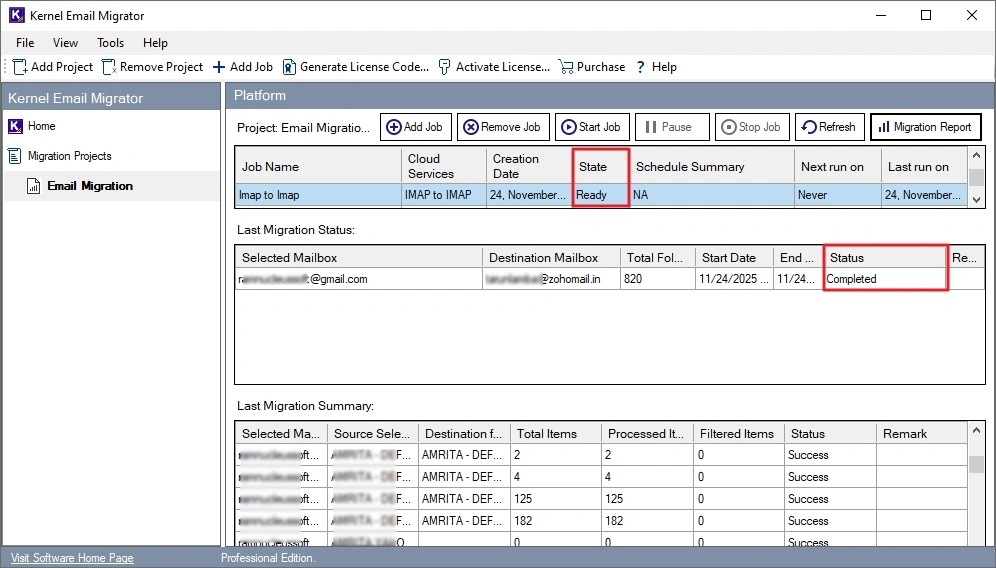
Step 12. When the migration is done, the job State will turn to Ready, and the mailbox Status will turn to Completed.
Step 13. To view a detailed report of the finished migration, click on the Migrate Report button at the top right corner. Then, select the job session and click on View Details.
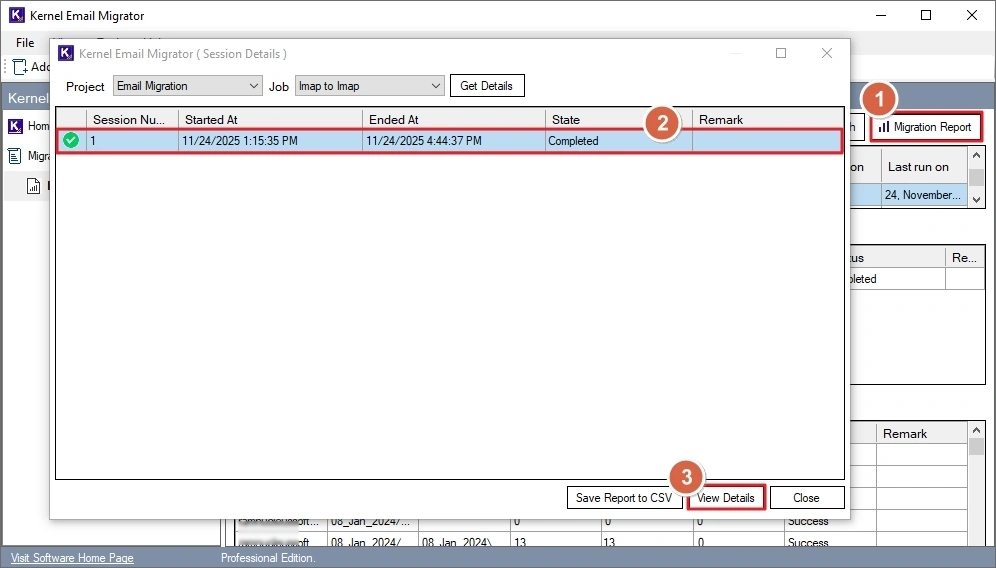
Step 14. To save the report at your desired location, click Save Report to CSV. Choose the location to save the file and click Save.