Read time: 7 minutes
Large and bulky videos are difficult to transfer or send as attachments. It’s also very hard to edit and store them because many platforms have quite strict size restrictions. Users often split long videos into parts, without losing the original quality. This blog will discuss the reasons for splitting, difference between splitting and compressing and outline how to split a long video into parts in detailed steps.
Why Do We Need to Split Large Video Files?
Large video files take up a lot of system space and can sometimes even affect the functionality of your system. Splitting makes it easier to manage the video files while preserving the original video quality. Here are some common reasons why users split MP4 files into parts:
- Faster uploads: Since smaller video files contain less data than larger videos, they upload and download faster to the desired location.
- Easy to manage: Splitting video files into smaller parts makes them easier to handle.
- Easily shareable: Trimming a video file into smaller segments makes it easy to share with others.
- Storage space: Large video files occupy more storage, which may affect your system’s working capability and make it slower than usual.
- Better editing: Video editors often split large video files into multiple parts due to size restrictions on many video editing platforms. Also, small-sized video files are much easier to edit in professional editing tools like Adobe Premiere Pro and Apple Final Cut Pro (primarily for macOS users).
Things to Keep in Mind Before Splitting Long Videos
Before splitting your video files, there are some things that you should do, such as:
- Create a backup of all your video files by following the 3-2-1 backup method to protect your data. If anything goes wrong during the split process, this backup will help in instant recovery and prevent data loss.
- Don’t split large videos on your external drive directly. First, copy them to your system and then start splitting them. Splitting large video files on an external drive can be risky if the drive becomes disconnected from your computer.
- Check once that you have enough storage space to store the smaller sized video files after the split process is completed.
- Do not close VLC Media Player during the splitting process and avoid shutting down your computer.
How to Split Video File with VLC Media Player?
VLC Media Player is a cross-platform open-source, free utility to play videos and audios. It is a versatile utility that is compatible with various video file formats. The VLC media player can perform numerous tasks, one of which is splitting videos. The following is the step-by-step procedure for splitting videos with VLC Media Player.
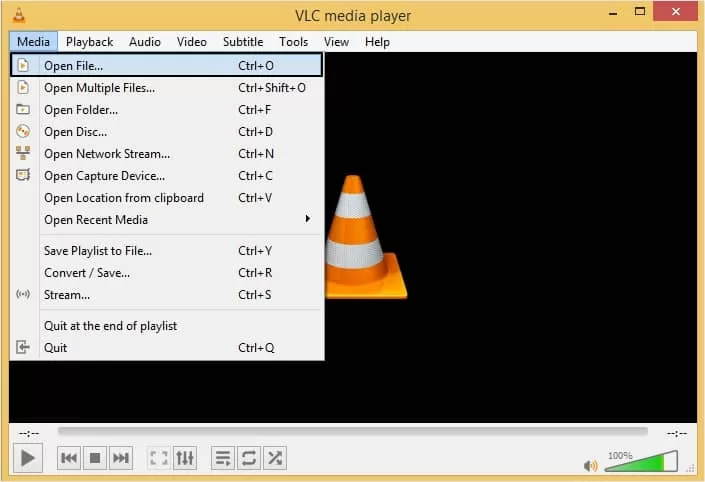
- Run VLC Media Player and click on the Media tab and then Open File option to add video file.
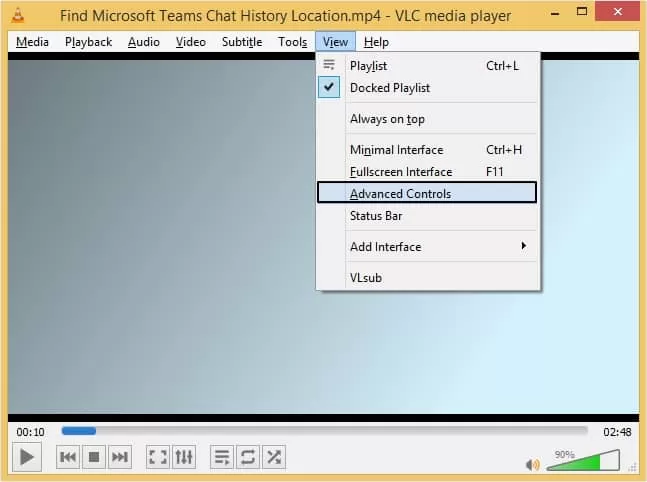
- Now, click on the View option at the top and select Advanced Controls option from the menu.
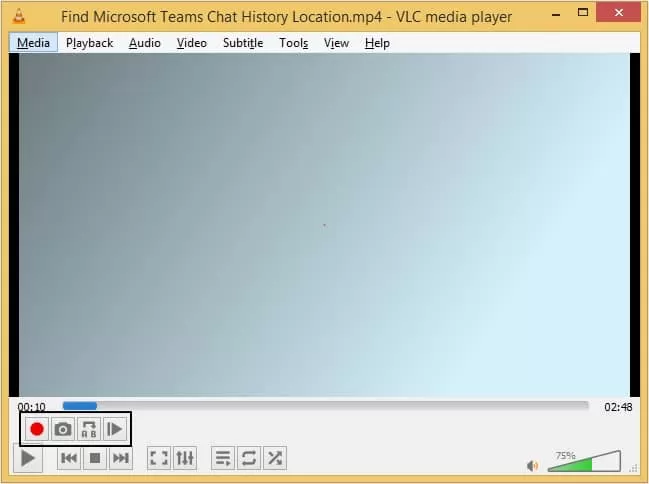
- Once you click on the Advanced Controls option, you will see that a few video control options are added.
- Now click on the Tools option and select Preferences from the tool’s menu.
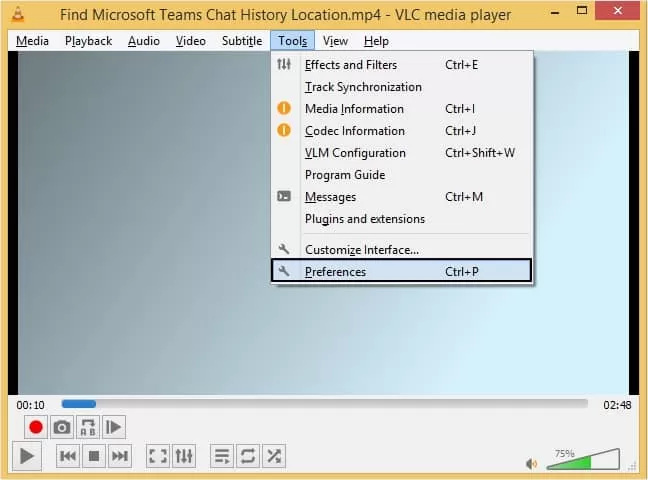
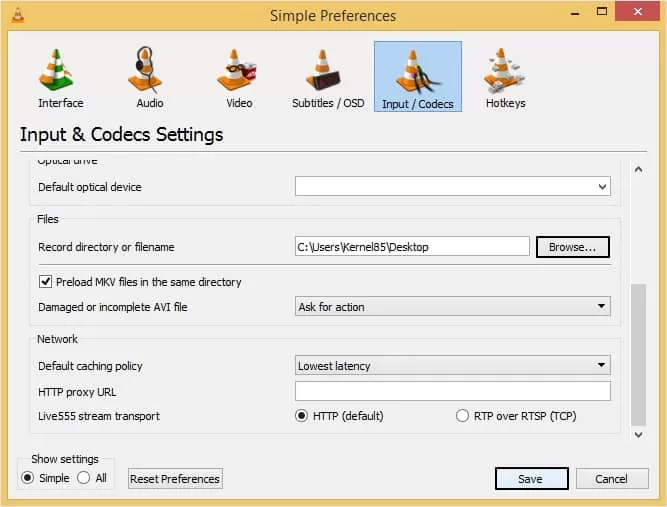
- In the Simple Preferences window, select Input/Codecs category and look for Record directory or filename. Now provide a destination by clicking on the Browse button. Once done, click on the Save button to finish.
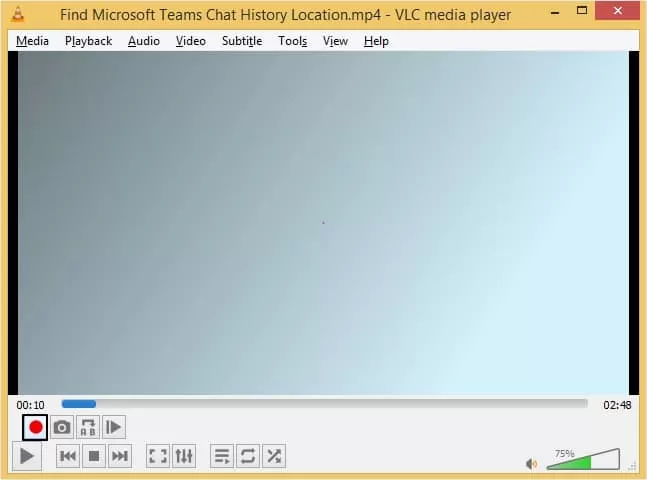
- Now you need to click on the recording icon to start the recording. Record until you want to record, and click on the recording icon again to stop the recording process. (This process can be repeated as required.)
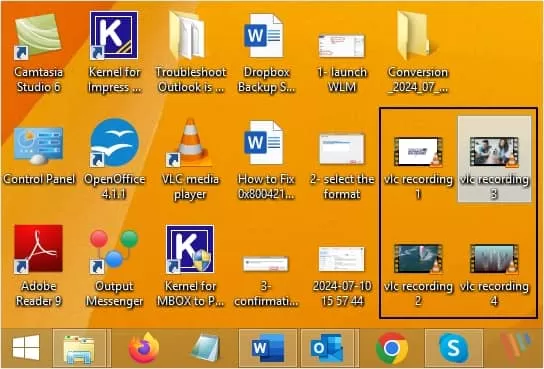
- Now you can find all the recorded videos at the location where you saved them.
Note: Many online third-party tools claim to split video files for free, but they’re not the safest option. They can truncate the video and damage it permanently, leaving little room for recovery. However, if you still want to give them a try, do so at your own risk and take a backup of your videos before using them.
What if the Video Gets Corrupt?
Well, if the split process is interrupted in between or if the video is not split properly, it can get corrupted or damaged. It is also possible that your video file was corrupt from the beginning, hence there was a problem splitting it. In such case, instead of proceeding with splitting the video file, it’s better to fix the damage first.
Repair the corrupt video files with the help of a trusted Video Repair tool and then split it into smaller parts. Kernel Video Repair can help in this case as it repairs highly corrupt and damaged video files without ruining the original video quality.
Conclusion
Splitting videos provides you with various benefits and becomes necessary in many scenarios. In this blog, we have discussed how one can split a bulky video into a few easy steps with VLC media player. We have also discussed what to do in the case of corruption and have suggested the best way to face it. Kernel Video Repair is designed with a strong algorithm to repair your video files without compromising the quality and risk of data loss.
Frequently Asked Questions
A. No, splitting large-sized video file doesn’t affect the video’s quality.
A. The macOS users can directly split a long video into parts for free using the QuickTime Player, without losing the video quality.
A. Yes, split video files can be easily merged back again to form a complete long video with the help of built-in PC tools. Windows users can take the help of Clipchamp whereas Mac users can merge split videos via the iMovie app.
A. Users can split MP4 files into parts for free with the help of either VLC player or Microsoft Clipchamp app.