I once worked on an Exchange Server upgrade where the Microsoft Exchange Cumulative Update [CU] installation seemed perfectly normal for nearly 30 minutes. Then, the setup suddenly rolled back & displayed the error 1603 with no clear explanation & no direct fix suggestion.
Since error 1603 doesn’t point to a single cause, it is one of the challenging situations for an Exchange administrator. The right & systematic approach can fix the error. So, be with the blog & learn all the needed aspects about the causes, practical fixes, and more.
Symptoms of CU Update Error 1603 [Non-Avoidable]
Check out the common symptoms of the CU update error 1603.
- Setup freezing midway.
- Incomplete Exchange upgrades.
- Exchange CU installation rollback.
- Server instability after failed update.
- Exchange services are stopping unexpectedly.
Causes of CU Update Install Failing with Error 1603
Here are common causes of CU update install failing with error 1603.
- A pending Windows reboot.
- Antivirus or security software issues.
- Corrupted Exchange or system files.
- Required Exchange services failing during setup.
- An incompatible .NET framework version.
- Low disk space.
- Verify Exchange Server compatibility.
- Maintain free space on the system drive & Exchange installation drive.
- Disable antivirus temporarily & after installation, re-enable protection and add Exchange exclusions.
- Make sure you are working with the updated version of Windows.
- Check the Exchange Service with the command “services.msc” in the Run wizard.
- You can also run DISM repair to fix corrupted Windows image files.
- Verify Exchange Server Database health / IIS health & ensure that the required features are installed & functioning.
- Run the “sfc/scannow” command because corrupted Windows files can interfere with installations.
- Check the maintenance state using the Exchange Management Shell: Get-ServerComponentState -Identity ServerName
Troubleshoot CU Update Install Failing with Error 1603 [Top Ways]
Check out the following section to implement the right methods to troubleshoot the error 1603.
Way 1. Review Exchange Setup Logs
The setup logs usually reveal the root cause of the error, like 1603. So, we have to check them & look for “Error”, “Failed”, “Access Denied”, or “Prerequisite Analysis Failed”. Check with: C:\ExchangeSetupLogs\
Way 2. Run Setup as Administrator
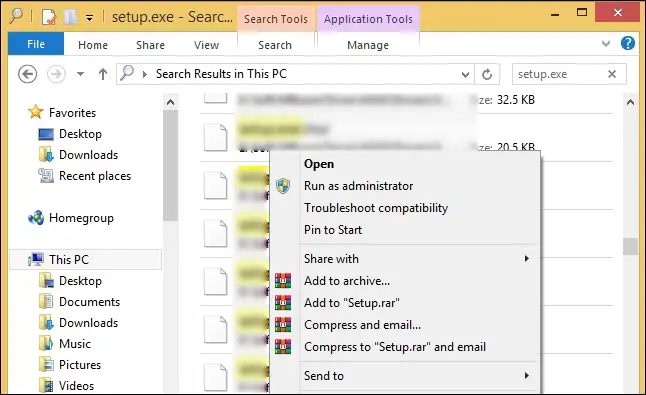
Improper privileges can also trigger the error 1603. So, launch Command Prompt with Administrator privileges to manage system files. In short, modifying your permissions can help users to tackle the error. Here are the steps:
- Go to your Setup.exe file. Right-click and select Run as administrator. Tap on Yes.
Way 3. Checking .NET Framework Compatibility
As Exchange CU versions only support specific .NET versions, you must verify that your .NET framework versions match Exchange CU requirements.
Open CMD or PowerShell & use this command for checking the installed version:
Way 4. Make sure no pending reboots exist
Pending reboot registry entries might be one of the reasons that block Exchange CU installation. So, check its existence. If any present, then restart the server first. Check with the following path:
Way 5. Perform a Clean Boot [Widely Recommended]
It is one of the most recommended troubleshooting methods for resolving failed Cumulative Update [CU] installations. A clean boot starts Windows with a minimum number of drivers & startup programs, and eliminates software conflicts.
Here are the steps to disable only third-party services, as they aggressively monitor or lock system files.
Step 1. Open the Run window, type up msconfig, & click OK.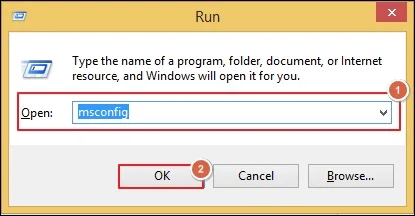
Step 2. Go to the Services tab & check mark the box Hide all Microsoft services. Select Disable all & hit Apply.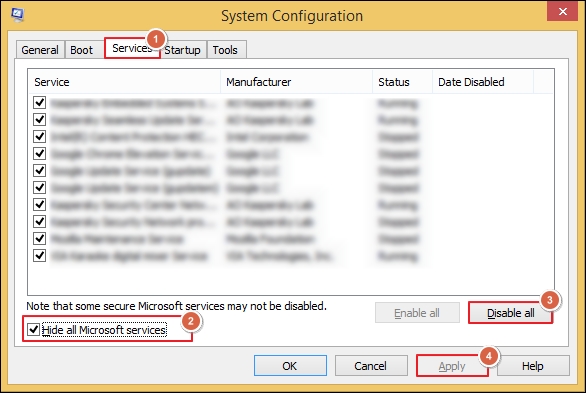
Step 3. Go to the Startup option and access the Open Task Manager.
Step 4. Turn off every startup program listed & close the Task Manager.
Step 5. Hit OK in the System Configuration wizard & then restart the server.
Step 6. Once the process is completed, retry the CU installation.
Best Practices Before Installing Exchange CU Updates
Try to follow the provided practices before installing Exchange CU updates to reduce the chances of error further.
- Disable antivirus temporarily.
- Verify Exchange health beforehand.
- Always take a full Exchange backup.
- Test updates in the staging environment.
- Install updates during maintenance Windows.
Last Thoughts on CU Update Install Failing with error 1603
Log analysis, prerequisites verification to repair system files & checking Exchange services can fix most installation errors, like 1603. We have provided the workable fixes in the guide through which administrators can safely complete Exchange CU installations with minimal risks. Follow the steps carefully and counter this error with ease.