Read time: 9 minutes
Microsoft OneDrive is one of the best go-to platforms to store various types of business as well as personal data, pictures, files, documents, and other items on cloud storage, and access them across multiple devices. However, some users also prefer saving files directly to their computer to manage storage offline, bypass OneDrive errors, or avoid unnecessary uploads.
To stop files from saving to OneDrive, you do not have to uninstall OneDrive every time. Instead, you can change a few individual settings to do so. In this guide, we will learn how to stop files from saving to OneDrive using several methods. Let’s begin!
How Do Files Automatically Save to OneDrive?
For Windows and Microsoft applications, OneDrive can become a default storage location, like
- If enabled, OneDrive backs up folders such as Desktop, Documents, and Pictures automatically.
- Microsoft applications such as Word, Excel, PowerPoint, and others may use OneDrive as the preferred location for saving files.
- Windows may often ask to backup complete data on OneDrive during device setup or account configuration.
- Some files appear in File Explorer (OneDrive Files On-Demand) even though their full contents are stored in the cloud.
How to Stop Files from Saving to OneDrive: 6 Methods
You can effectively stop files from saving to OneDrive in several ways. Choose the method that suits you well.
Method 1: Turn Off OneDrive Folder Backup
This is the first method to try if your Desktop, Documents, Music or Pictures folders automatically save files to OneDrive. Follow these steps to stop files saving to OneDrive:
- Click the OneDrive cloud icon in the Windows taskbar notification area. Select Settings (gear) icon, then tap Settings.
- Go to Sync and backup, and then select Manage backup.
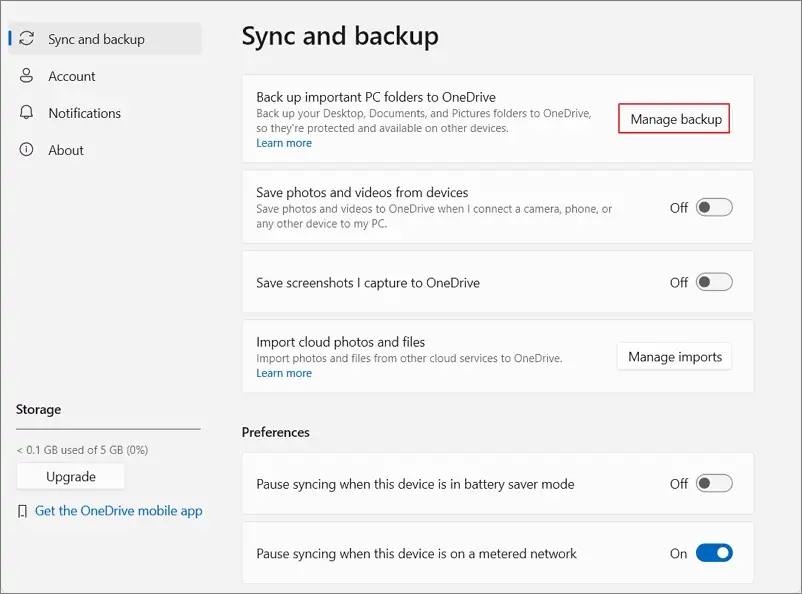
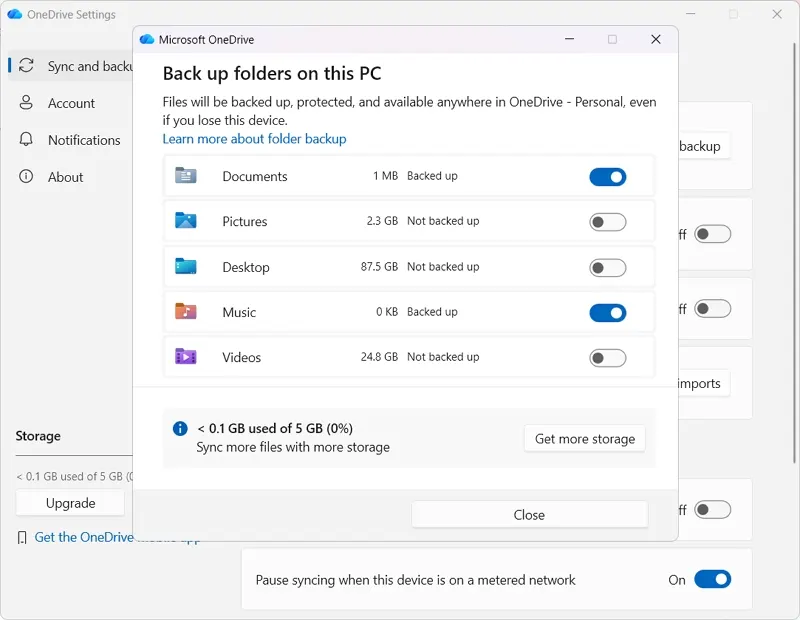
- Select the available folder you want to stop saving to OneDrive, such as Desktop, Documents, Videos, Music, and Pictures. Set the slider to off for the required folder.
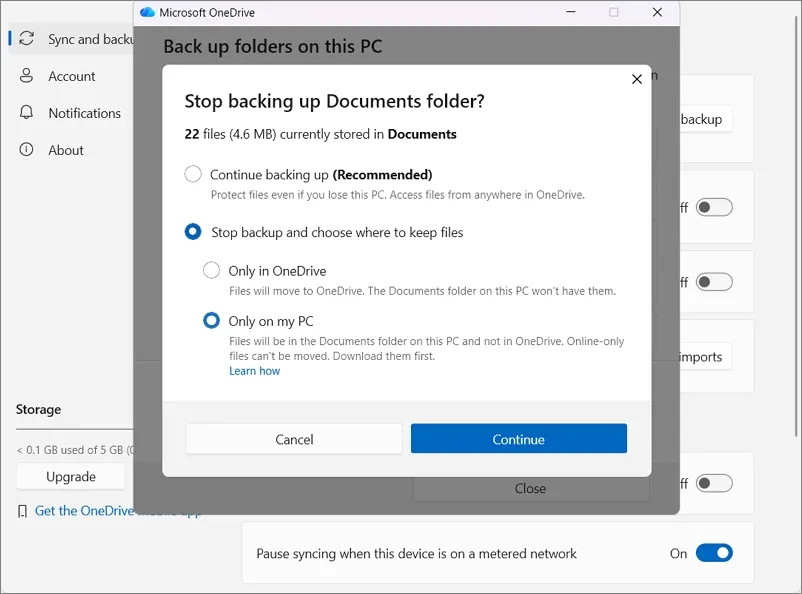
- Select Stop backup and choose where to keep files and choose Only on my PC. Click Continue.
Method 2: Change the Default Save Location in Windows
If you want Windows to use local storage instead of OneDrive, you can opt for the storage preferences. Review the default file saving locations by following these steps:
- Press Windows + I to open Settings, then go to System and tap on Storage.
- Expand Advanced storage settings and tap on Where new content is saved, if available.
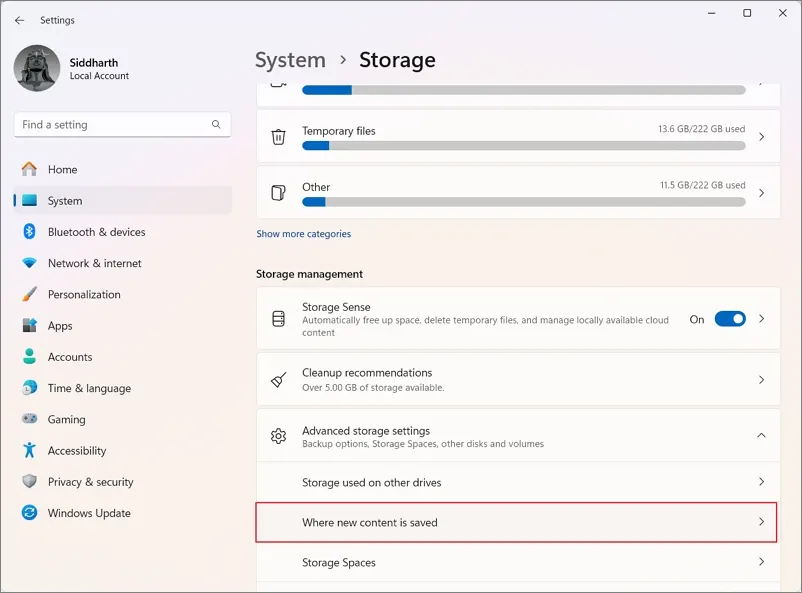
- Review the available storage preferences and select a local drive, such as C: or D, and save the changes.
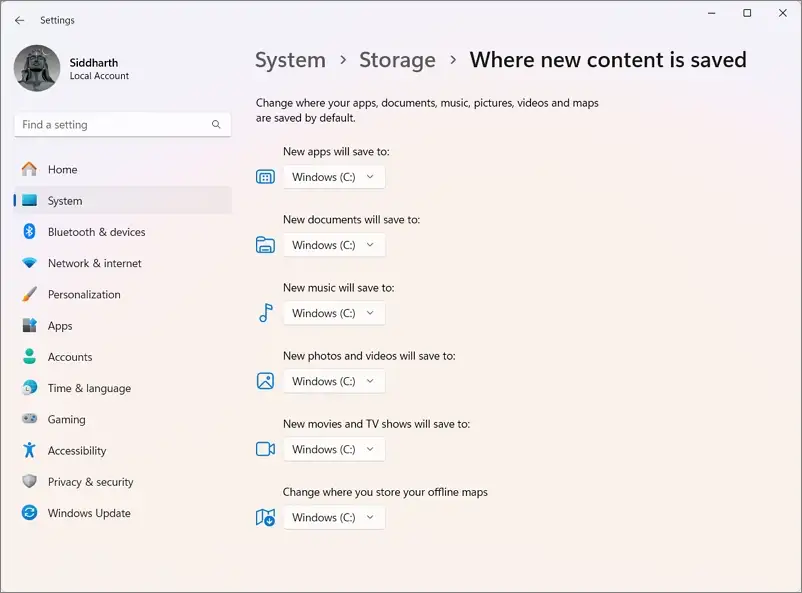
It does not change the saving location of every desktop application. You may still need to change the settings in Word, Excel, your browser, and other programs.
Method 3: Stop Microsoft Word from Saving Files to OneDrive
Microsoft Word may suggest OneDrive as a saving location, particularly when you are signed in with a Microsoft account. You can change its default save behavior by following the steps below:
- Open Microsoft Word, go to File, then select Options, and go to Save.
- Look for the option Save to Computer by default, if available in your version. Enable it.
- Set a local default file location, for eg., C:\Users\YourName\Documents, and click OK.
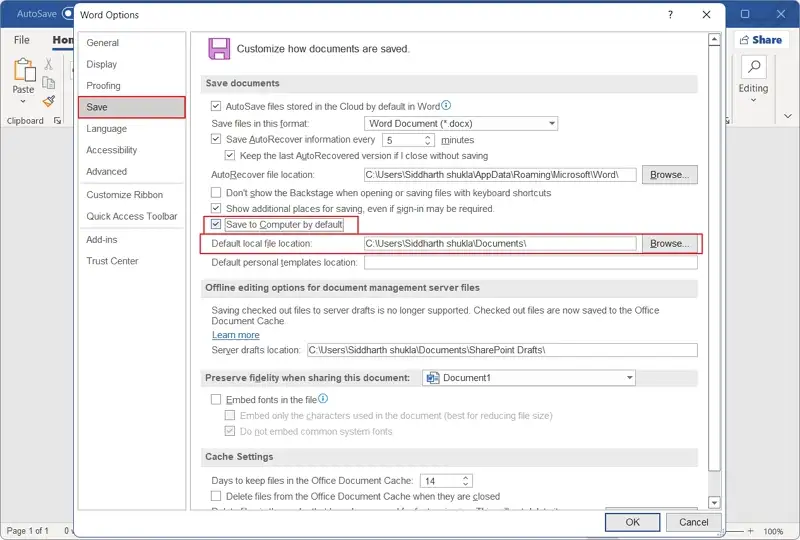
Now, when you save a new document, Word will prefer the local computer location rather than OneDrive. You can still choose OneDrive manually whenever you want to save a document online.
Method 4: Change the Download Location in Google Chrome and Microsoft Edge
If your Downloads folder is inside OneDrive, downloaded files may automatically sync to your cloud account. You can change the download location by following these steps:
In Google Chrome:
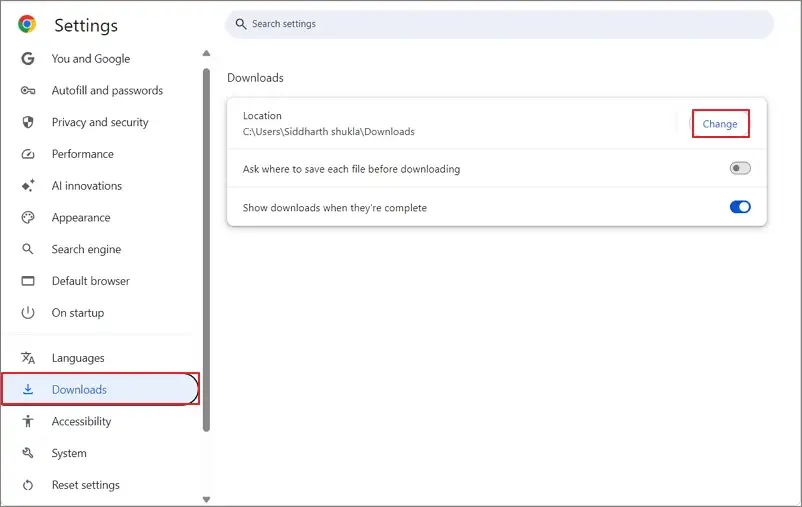
- Open Google Chrome on your system, click on the three dots, and select Settings.
- Select Downloads, then find the Location option, and click Change.
- Choose a local folder, like C:\Users\YourName\Downloads.
In Microsoft Edge:
- Open Microsoft Edge, click the three-dot menu, then select Settings.
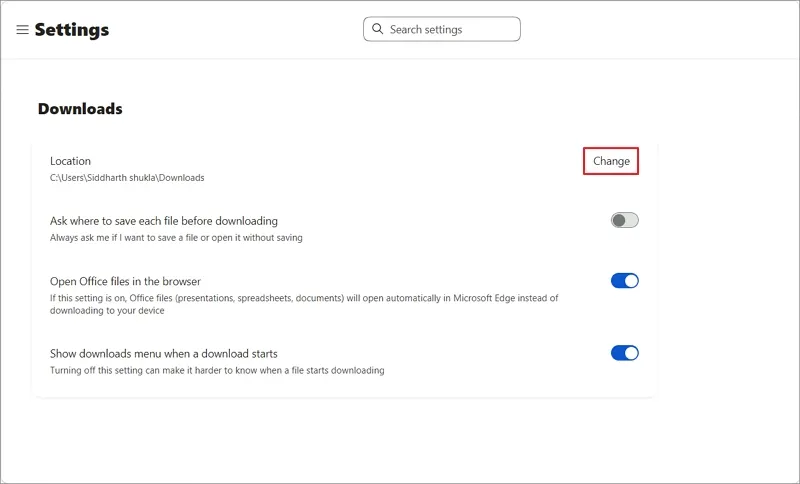
- Open Downloads, find the Location setting, and click Change.
- Select a local folder outside OneDrive. You can also enable the option to ask where to save each file before downloading it.
Method 5: Unlink OneDrive from Your Computer
If you no longer want your OneDrive account connected to your PC, you can unlink it. Follow these steps to unlink OneDrive from PC:
- Click on the OneDrive cloud icon in the taskbar and open Settings.
- Select Account, tap on Unlink this PC, and confirm by clicking on Unlink Account.
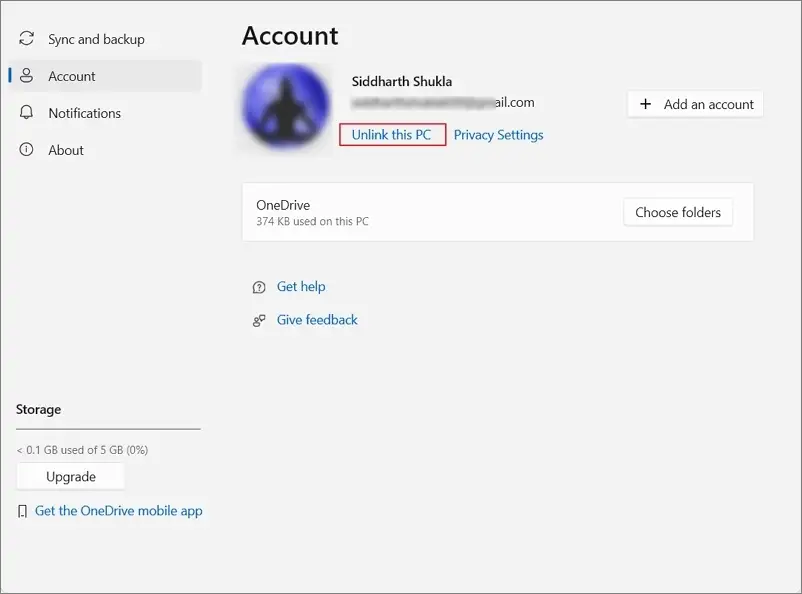
- After unlinking, OneDrive will stop syncing that account with your computer.
However, unlinking does not download cloud-only files or automatically move your existing files to local folders. Files already downloaded to your PC generally remain there, while online-only files remain in your OneDrive account.
Method 6: Uninstall OneDrive from Windows
If you do not want to use OneDrive at all, you can uninstall the application. Here are the steps to follow:
On Windows 11:
- Press Windows + I, select Apps > Installed apps, then tap on Microsoft OneDrive.
- Click the three-dot menu next to it, click Uninstall, and follow the instructions.
On Windows 10:
- Open Settings, go to Apps > Apps & features, and find Microsoft OneDrive.
- Select it and click Uninstall.
Uninstalling OneDrive removes the application from your computer, but it does not delete the files stored in your online OneDrive account. Make sure you have downloaded important files before removing the application.
How to Move Existing Files from OneDrive to Your PC?
Disabling OneDrive backup does not always move existing files back to your computer. If you want to store your existing documents locally, follow these steps.
- Open File Explorer and open your OneDrive folder.
- Find and select the files or folders you want to move.
- Check whether the files are available offline. If they are cloud-only, download them first or select Always keep on this device.
- Copy the required files to a local folder outside OneDrive, such as Documents or Downloads.
Open the copied files to check that they work and double-check that important files are available locally before removing any cloud copies.
Last Say
Now that you know how to stop files from saving to OneDrive. You do not need to remove OneDrive completely to stop files from saving to it. In most cases, turning off automatic folder backup and changing the default save locations in Windows and Microsoft Office will solve the problem.
Before disabling backup, unlinking your account, or uninstalling OneDrive, always keep existing OneDrive data and check that your important files are safely stored on your computer so that they can be easily accessed and protected against ransomware, malware, and other cyber breaches.
Frequently Asked Questions
A: To stop Windows 10 from saving and backing up your files to OneDrive, disable folder backup, unlink your account, or uninstall the OneDrive application completely.
A: Open OneDrive Settings, go to Sync and backup, and select Manage backup. Turn off backup for the folders you no longer want to sync. Also check the default save locations in your Office applications.
A: Choose a local folder outside OneDrive when saving a file. You can also set your local Documents folder as the default save location in applications such as Microsoft Word and Excel.
A: No, stopping folder backup does not automatically delete your files from OneDrive. However, the files may remain in the cloud rather than moving back to your computer.
A: Yes. Windows can save files locally without OneDrive. You can unlink or uninstall OneDrive and continue using your computer’s local storage.
A: Yes. You can sign in to OneDrive again and enable synchronization or folder backup whenever you need it. Check the folder locations carefully to avoid creating duplicate files.
A: Disabling OneDrive synchronization does not uninstall Microsoft applications. However, cloud-based features such as AutoSave and access to files stored only in OneDrive may be affected.