Read time 12 minutes
Over the last few years, Office 365 has become the go-to productivity platform for businesses of all sizes. As organizations continue to embrace Office 365, the need for tenant-to-tenant migrations has increased. Although Office 365 provides a number of built-in tools for migrating users and data, the process can still be complex and time-consuming.
To help simplify the Office 365 tenant to tenant migration process, we’ve put together a step-by-step guide. This guide covers everything from planning and preparation to execution and post-migration tasks. By following these steps, you can ensure a successful migration with minimal disruption to your users.
More about Office 365 tenant to tenant migration
A tenant in Microsoft 365 is a unique environment of Office 365 services. It is a specific location such as Europe or North America to store organization data. It contains organization data including Office 365 Mailboxes, Documents and Sites on SharePoint, files data on OneDrive, Teams etc. A tenant administrator can use all the features given in the subscription. In business-merger scenarios, the mailboxes need to be moved to another tenant. The migration is not a linear process; you need to do some preparation, meet some prerequisites, and own licenses.
So, here we are going to discuss some basics that can help you migrate mailboxes from one Microsoft 365 tenant to another. Also, here we’ll talk about how you can plan the migration.

Migrate mailboxes, public folders, & archive mailboxes from one Microsoft 365 tenant to another using a professional Kernel Office 365 Migration Tool.
A simple approach to Microsoft 365 tenant to tenant migration
A Microsoft 365 tenant to tenant migration may present various challenges depending on your migrations scenario. Usually, tenant to tenant migrations are done during business acquisitions, mergers, or divestitures. Consequently, you have different migration patterns like a one-time migration, a phased migration, or a split flow/tenant move.
The Microsoft 365 tenant to tenant migration is performed using PowerShell scripts or third-party tools. Before that, there is an Office 365 Pre & Post Migration checklist you should keep in mind.
Pre-migration stage
Depending on your migration pattern, you may have various considerations before domain preparation. Usual scenarios are:
- Involves re-branding
- No rebranding
- Just a cloud tenant move
Based on your requirements, prepare the domain with the following steps:
- Ensure that you have enough licenses for the target Microsoft 365.
- Create admin accounts in both the source and target to perform the migration smoothly.
- Create user mailboxes, room/resource mailboxes, and distribution groups in the target.
- If needed, perform AD DS consolidation using AD DS tools and sync the source domain with the target domain manually or using synchronization.
- Train your end users regarding the post-migration use of Microsoft 365.
- Start verification of target tenant domain in Microsoft 365.
- Add a source domain in the target Microsoft 365 admin center and create TXT records in DNS.
Make sure the domain is in use with only one tenant. Otherwise, the verification will fail.
After performing these steps, it will take around 72 hours for the change to be seen.
- Generate a list of user mailboxes that are to be migrated and create a CSV file for mapping.
- Note the lowest value of TTL on the MX record (of the primary email domain).
- Disable directory sync for source tenant (from Microsoft 365 admin center) to avoid sync of any modifications in source tenant account AD DS to Microsoft 365 platform. It can take a minimum of 24 hours to complete the disabling process.
-
Stop inbound mail flow
Stop inbound mail flow to the source tenant by changing the primary MS record to an unreachable value or by using a third-party service. As you have noted the lowest value of TTL on the MX record (of primary email domain) in your preparation step, you can plan the time of this step easily.
-
Source tenant preparation
Before moving the Office 365 mailbox to another tenant, the primary mail domain should be erased from all objects in the source tenant.
- Reset the default email address to the initial email address of Microsoft 365.
- Remove all the Lync licenses from the source tenant with the help of the Lync Admin Portal.
- Reset the default email address of distribution lists, rooms, and resources to the initial domain.
- Remove the secondary email address from all tenant objects.
- In Windows PowerShell, run the command Get-MsolUser -DomainName xyz.com that will retrieve all the objects still using the primary email address or refusing the removal.
-
Preparing the target domain
It involves verifying the source tenant in the target domain (one hour after the previous step).
- Configure the auto-discover CNAME.
- When you use AD FS, you’ll have to configure a new domain in the target tenant for AD FS.
- Activate the new user accounts in the target domain and assign licenses.
- On the new users, set the source domain as the primary email address (done using Windows PowerShell). Also, decide on communicating the passwords to end-users.
- When the user mailboxes are active, change the mail routing and point the MX record to the new Office 365 email address.
- Test the mail flow in and out of the target tenant.
Begin the migration
- When you have 500 users or less, migrate the mail calendar and contacts separately to the destination tenant mailbox. For email migration, limit the migration by any criteria like a date.
- When you have 500 users or more, use the multi-pass method to migrate the contents in multiple batches. You can migrate only contacts, calendars, and a single week of data.
Now it is time to decide on the migration method. You can also decide on the type and amount of data to be migrated. Migration can be accomplished using PowerShell scripts. However, this method is very complex even if you are an Exchange expert. You will have to do a thorough preparation prior to migration so that you won’t mess up with cmdlets or steps. Also, it is time-consuming even if you assign multiple hands to complete the task. So, third-party migration tools are recommended as they offer complete control over the migration along with quick and efficient processes automatically.
What experts think about Kernel Office 365 migration tool?
While during Office 365 tenant to tenant migration, the last thing you would want is to lose your data. Most migration experts recommend using a reliable and secure migration tool for Microsoft 365 tenant to tenant migration because it assures you to move your data without corrupting it. Even after migration, the data will be present in the same structure and format. It automates the migration and completes it with minimum manual tasks. Simply administrators can continue with their other tasks even during the migration.
Kernel Office 365 Migration tool – For a quick and easy O365 tenant to tenant migration
Kernel Office 365 Migration is an advanced tool that is specially designed for the Office 365 tenant to tenant migration. It allows users to easily migrate every Microsoft 365 mailbox from one tenant to another. It has some amazing features that make it the best migration tool for Microsoft 365.
- Migrates from one Microsoft 365 tenant to another without any hassles
- Allow migration of multiple mailboxes from one tenant to another
- Migrate unlimited user mailboxes with a CSV file
- Offer specific filters to migrate selective data
- Save migration report in CSV format after complete migration
Let’s have a look at the working process of this tool:
- After installation, launch software on your system.
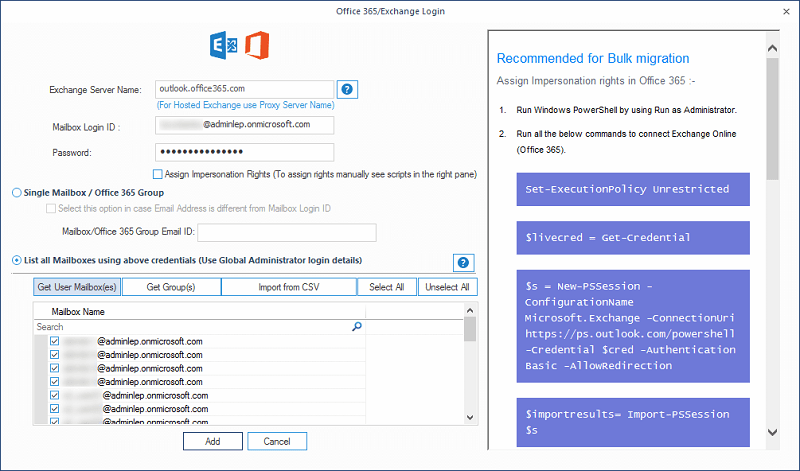
- From the home screen, click Add Source to add the first tenant Microsoft 365 account as the source.

Note: You can use Basic Authentication or Modern Authentication as per your requirements. - The Office 365/Exchange window appears on the screen, enter the Microsoft 365 account details, and select List all mailboxes using above credentials. Now, hit the Get User mailboxes button. All the Microsoft 365 mailboxes will appear in the tab, select the specific mailboxes, and then click Add.
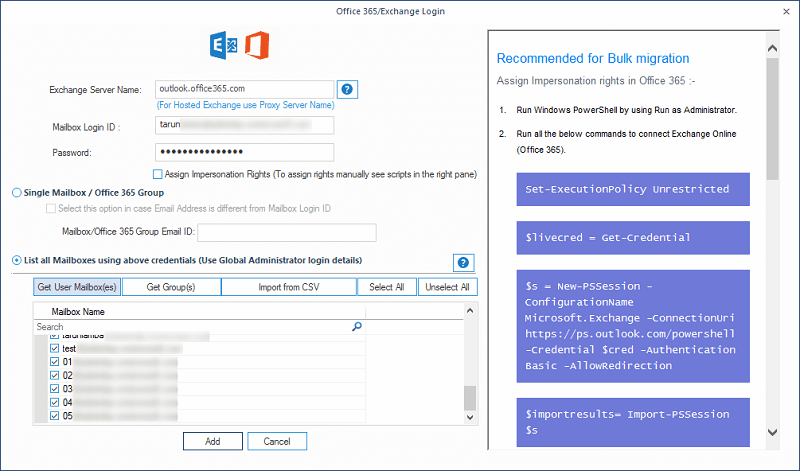
- Once mailboxes are added to the source section, click Add in the Add Destination section to add another Microsoft 365 tenant as the destination.

Note: Here also, you can use Basic Authentication or Modern Authentication as per your requirements. - Just as with the source section, provide credentials in the destination section for your Microsoft 365 account. Make sure you add all the mailboxes for accurate migration.
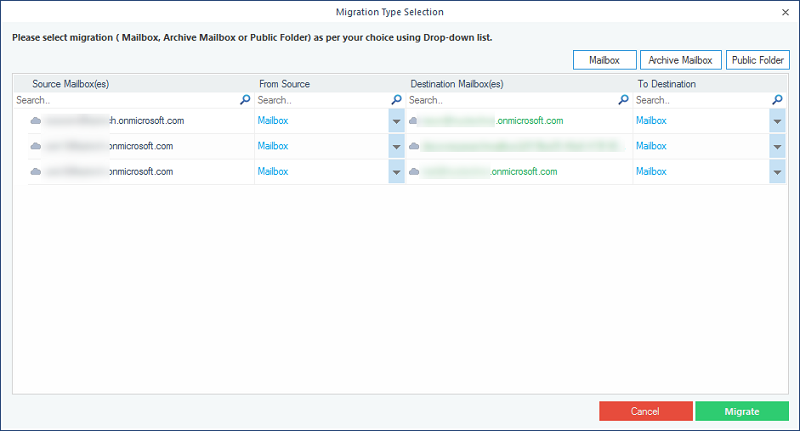
- After adding both the source and destination mailboxes, map mailboxes to each other, and then click Set Filter and Migrate.
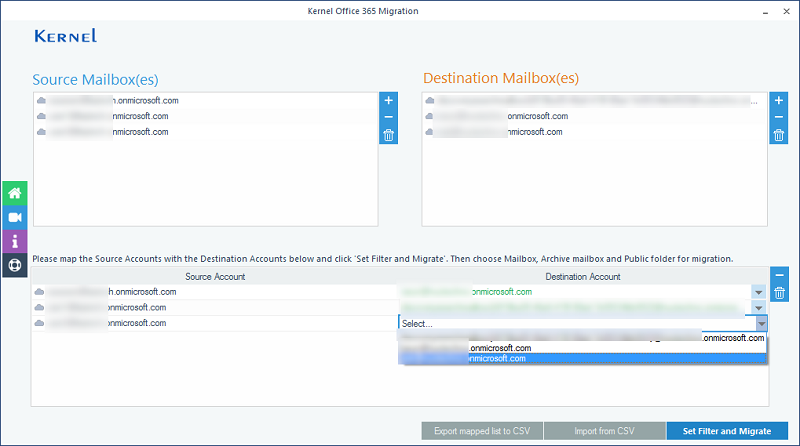
- In the next step, select the type of destination (Mailbox, Public Folder, Archive Mailbox) and click Migrate.
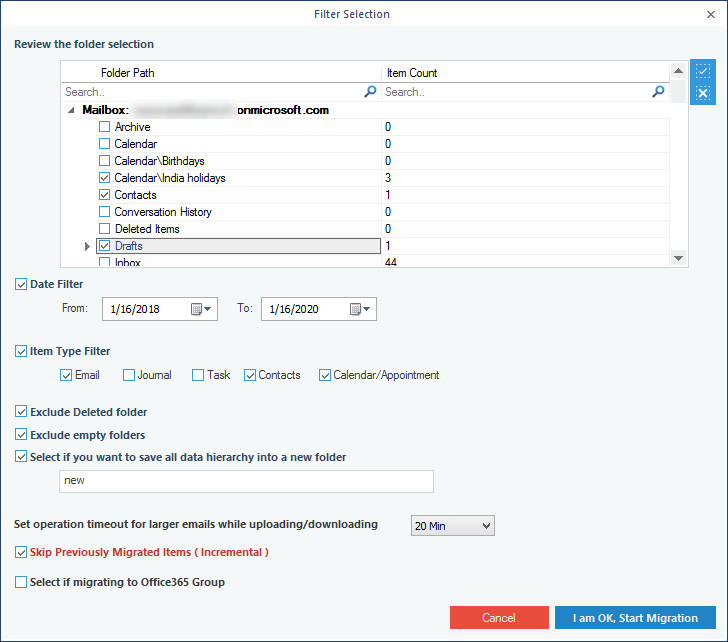
- The Filter Selection window will pop up on the screen; apply filters to the mailboxes if you want to, and click I am OK Start Migration.
- The tool will start migrating mailboxes from one tenant to another. Once the migration is done, a notification will appear on your screen confirming the same, click OK to finish the process.
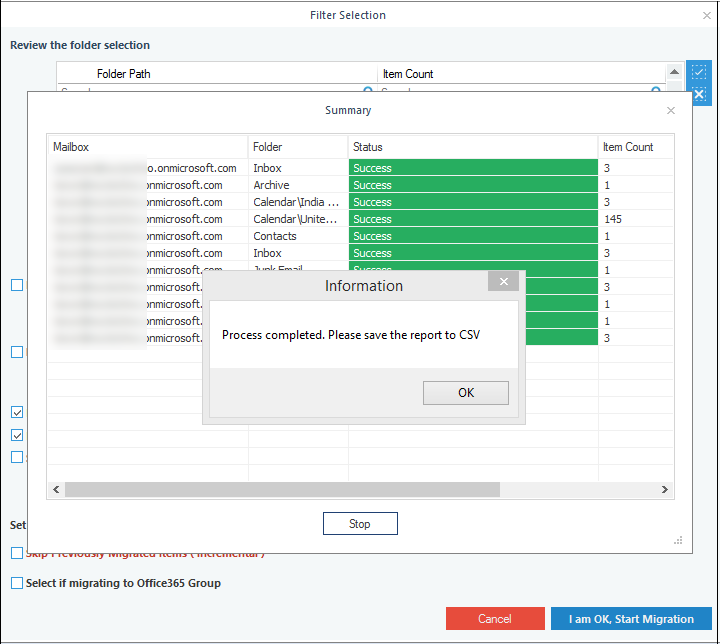
The migration report can be saved in a CSV format. This way, you can quickly perform Microsoft/Office 365 tenant to tenant migration using the third-party migration tool.
Manual methods Vs. Kernel Office 365 migration tool
| Features |
Manual Methods |
Kernel |
| Migrates mailboxes | Yes | Yes |
| Migrates archive mailboxes | Yes | Yes |
| Migrates public folder data | Yes | Yes |
| Supports batch migration | Yes | Yes |
| Migration is possible from any version of Exchange | Yes | Yes |
| Easy to set up the environment | No | Yes |
| Easy migration | No | Yes |
| Can be done by non-technical users | No | Yes |
| Is reliable and secure | No | Yes |
| A similar procedure for all migrations | No | Yes |
| Fast and accurate | No | Yes |
| Offers easy selective migration of data | No | Yes |
Conclusion
In this step-by-step guide, we’ve outlined the process of migrating your Office 365 tenant to a new one. We understand that migrations can be daunting, but with careful planning and execution they don’t have to be. If you follow these steps and reach out for help if needed, you should be able to successfully migrate your organization to a new Office 365 tenant. But if you’re looking for a tool to help make the migration process easier, Kernel has an Office 365 Migration tool that can automate much of the process for you. Plus, this migration tool is available free of charge so there’s no reason not to try it! Get started today. The tool Support for all Office 365 (Microsoft 365) including GCC High, GCC, DOD, and Commercial Microsoft 365 plans.
A- Microsoft 365 tenant to tenant migration depends on multiple business scenarios such as business mergers, acquisitions, business data migration projects, re-branding, etc.
A- For the migration process, it is vital to have a domain attached to a single domain, either source or destination at a time. So, source domain data need to be transferred to the destination account before detaching it from the source account. Then, attach the domain to the destination account and finally detach from the source account. For all these processes. This source domain in the destination account needs to be verified for authentication via TXT records in DNS for authentication purposes.
A- Hardly, there is any manual process to migrate a Microsoft 365 tenant to another which is a complex process of using PowerShell scripts, and limits of 500 mailboxes migration is another challenge that needs to be completed by using a smart and robust Microsoft 365 Migration tool.
A- A reliable professional Microsoft 365 migration tool like Kernel Office 365 Migration tool offers many advantages to its users by facilitating quick migrations, intelligent filters, unlimited data migration, all sorts of content from mailboxes, groups, public folders, tenants migration with support to all plans and Windows OS versions without compromising the original structure and properties.
A- To run cmdlets in Exchange Online PowerShell for performing data migration, you need to connect Windows PowerShell to Exchange Online, i.e. configuring Exchange Online account in the PowerShell application.