Read time: 13 minutes
After a lot of queries from users about Outlook.com to Microsoft 365 migration on our technical forum, we have decided to provide useful information on the same through this blog. This migration is a trend now. We have included the complete explanation of the native way with a recommendation of the smart, professional tool Kernel IMAP to Office 365.
What is Outlook.com?
Outlook.com is a web-based email client from Microsoft and offers Mail, People (Contacts), To Do (Tasks), and Calendar services to users. It facilitates Skype integration for communication and provides Office for the web integration to open, view, and edit attached documents like Word, Excel, PowerPoint, etc.
What is Office 365?
Microsoft 365/Office 365 platform includes Exchange Online, which stores information (emails, contacts, calendars, and more) in its user mailboxes. It also integrates sharing and collaborative tools like SharePoint, Yammer, OneDrive, etc. Microsoft 365 has a lot to offer, including advanced security features. That is why Outlook.com to Microsoft 365 migration is trending now.
Why Migrate Outlook.com to Office 365?
Know all the prime reasons that insist you to export Outlook.com emails to Office 365:
- Enhanced Security: Get advanced malware protection, spam filtering, data encryption, and multi-factor authentication (MFA) to safeguard business data.
- Increased Storage: Access much larger mailbox sizes and substantial OneDrive cloud storage, eliminating space concerns.
- Multiple Apps Integration: Works natively with Microsoft Teams for collaboration, OneDrive for file sharing, and SharePoint, creating a unified workflow.
- Productivity Tools: Access the full suite of Office apps (Word, Excel, PowerPoint, etc.) and AI assistance with Copilot.
- Flexibility & Accessibility: Work from anywhere, on any device, with secure access to your data.
As you know, all the reasons that say Office 365 are much greater than Outlook.com. Now, let’s start migrating Outlook.com emails to Office 365 in the section below.
Points to consider before Outlook.com to Office 365 migration
Have a look at the prerequisites of Outlook.com to Microsoft 365 migration.
- Adding users in Microsoft 365 and assigning licenses to them
- Collecting admin account credentials, username, and passwords of each user’s mailboxes in the source account.
- Source Outlook.com account, preparing and collecting data for migration
- Create an app password for your Outlook.com account to use as the password for migration. Visit this link for reference.
How to migrate Outlook.com to Office 365?
There are only limited manual methods that exist to export Outlook.com emails to Office 365. In the section below, we will cover all the free methods for Outlook.com to Office 365 migration. Follow the steps to get the required outcome.
Method 1: Migrate Outlook.com to Office 365 using Microsoft 365 Admin Center
Here’s the step-by-step process to execute Outlook.com to Microsoft 365 migration with the Admin Center.
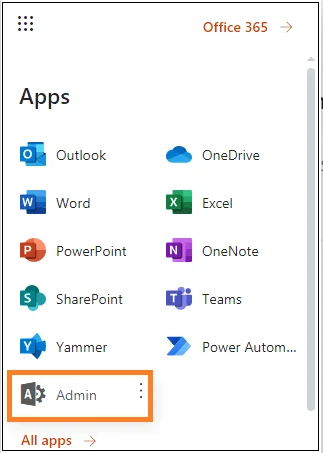
- Log in to your destination Office 365 account with administrator credentials and click on the Admin option.
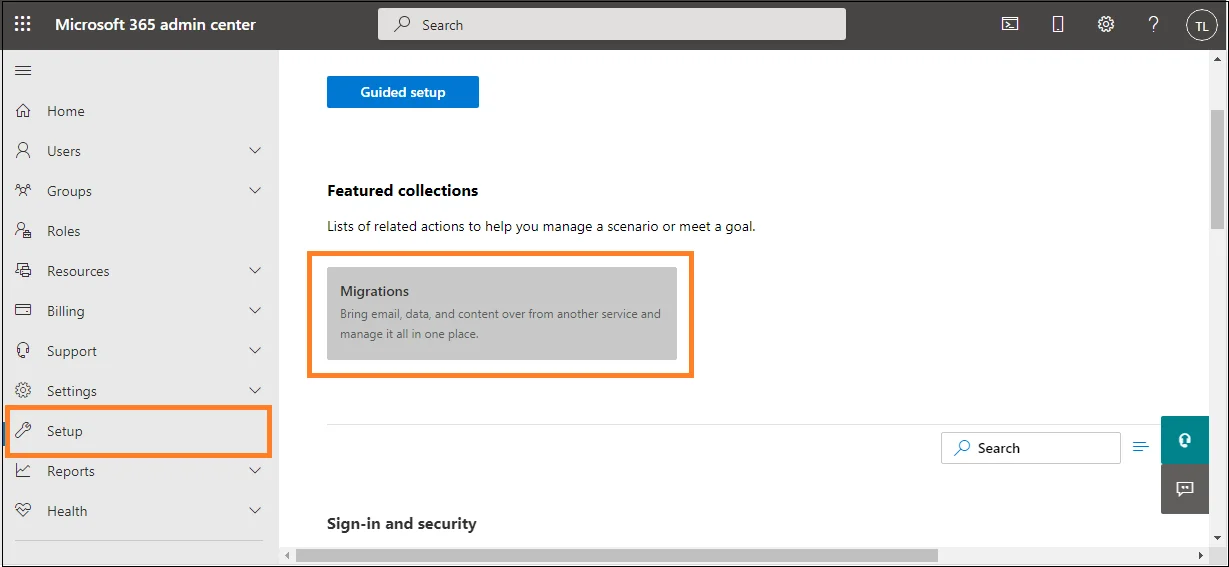
- On the left panel, search for the Setup section to expand it and click the Data migration option under it or follow Setup>Migrations.
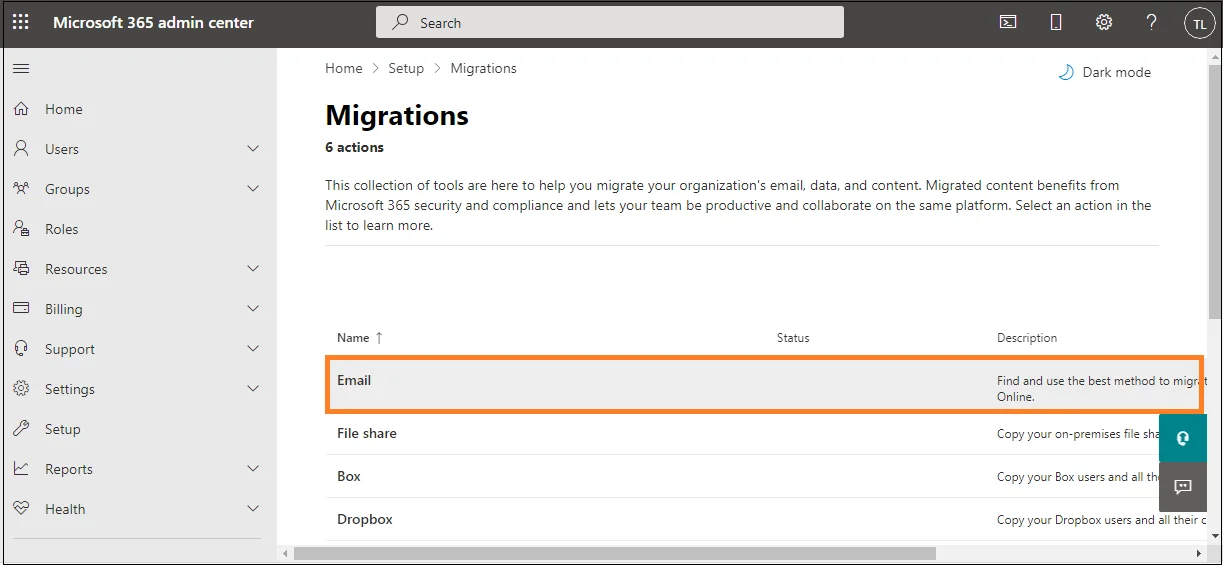
- Select the migration category as Emails to move emails from your IMAP server account to the Microsoft 365 destination.
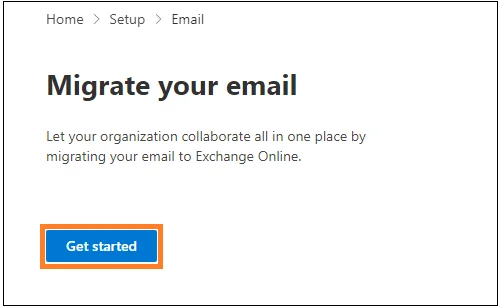
- Click Get Started on the next page to proceed.
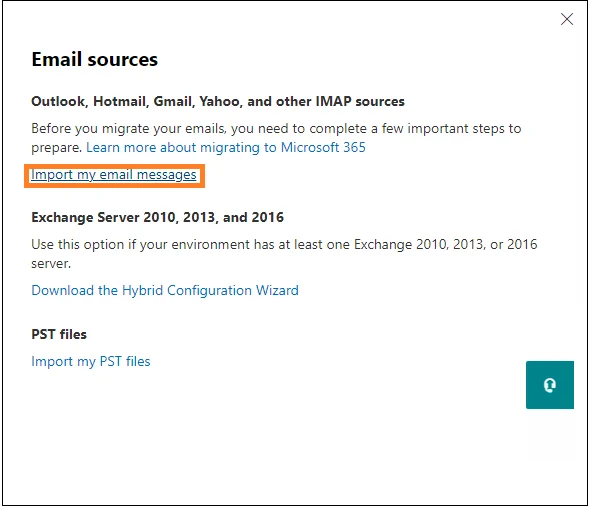
- Click Import my email messages on the Email sources page.
- Select the data service Hotmail/Outlook.com.
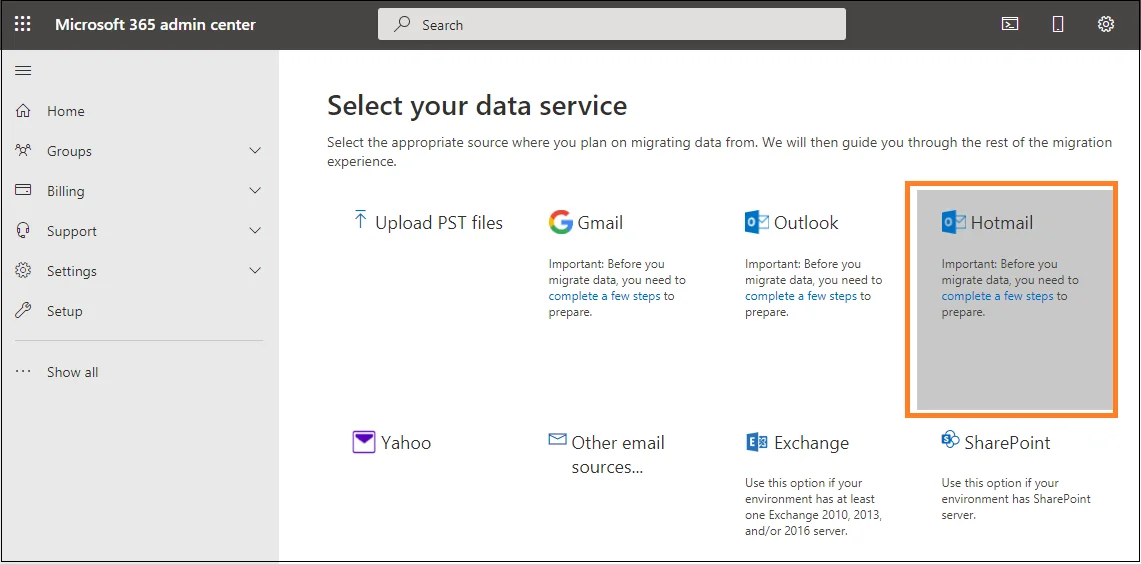
- Choose the email provider if it is listed and select the mailboxes for migration on the next page.
If the email provider is not listed, click on the Other email sources option.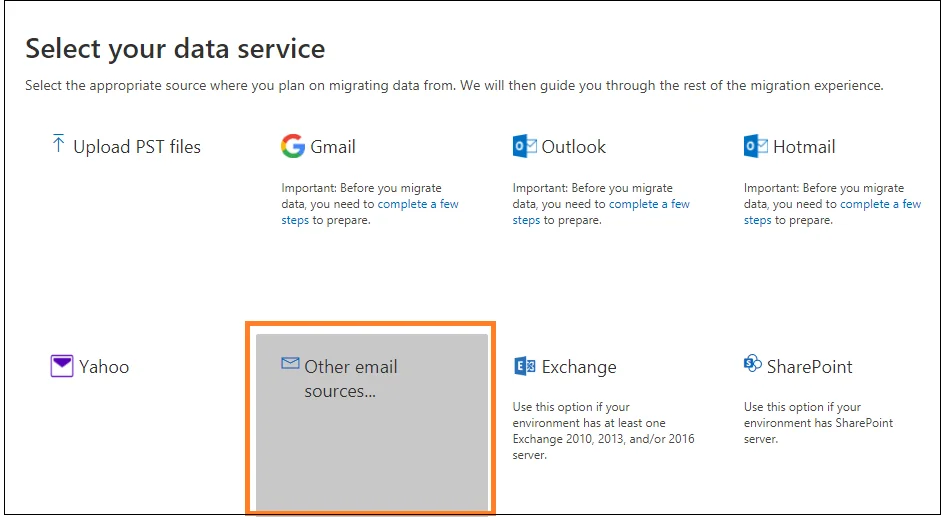
Then on the Select your data service page, provide the information details like – IMAP server name, port number, user name, password, security, etc., and click the Save option.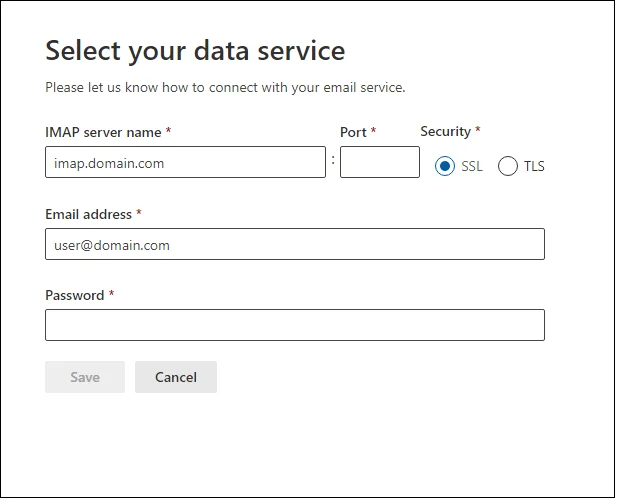
Next, select the user mailboxes you want to migrate, provide the email address and app password created for your Outlook.com account earlier. Then, click on the Start Migration option.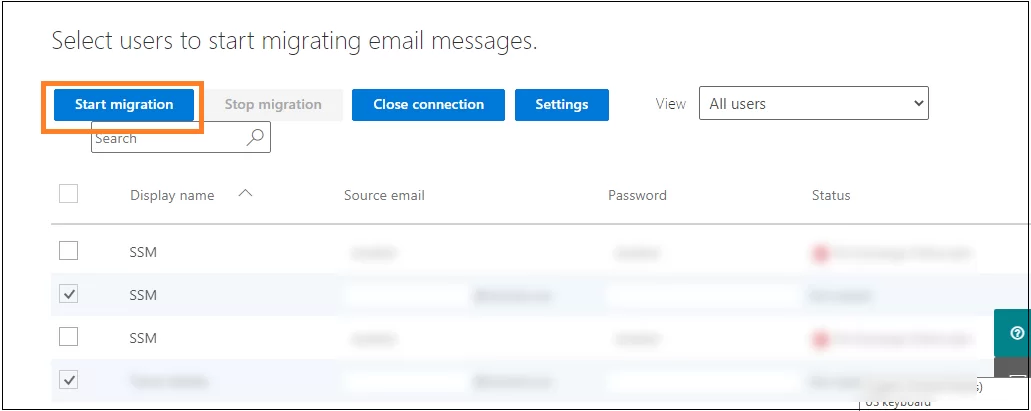
- The migration will start and display different statuses – Starting, Syncing, sometimes Queued when migration is in waiting. When the status is displayed as Syncd, then the migration and synchronization process is completed. Click Close Connection to exit the migration.
Limitations of this manual process
The Admin Center option to migrate Outlook.com to Microsoft 365 includes few limitations that users should know beforehand.
- You need full technical skills to understand Admin Center and run Outlook.com to Office 365 migration.
- This method allows you to migrate emails only. You can’t migrate calendars, contacts, tasks, etc.
- The maximum allowed email size for migration is 35MB.
- Maximum 500,000 items are allowed to migrate from a user’s mailbox.
Method 2: Migrate Email from Outlook.com to Office 365 using Outlook
With the help of Import/Export tool available within Outlook, you can export Outlook.com emails to Office 365. However, you need to execute this process in three parts to get the desired outcome.
Part 1: Add Outlook.com account in Outlook
First of all, you need to synchronize your Outlook.com IMAP connection to Exchange account using Outlook. It will move all your Outlook.com data to Outlook desktop client, and you can easily access it without facing any errors.
Part 2: Export PST using Import/Export tool
After adding the Outlook.com account, export your mailbox to a PST file. Here’s how you can export Outlook.com emails in a PST file using Outlook:
Step 1: Open Outlook and click on File.
Step 2: Click on Open & Export > Import/Export.
Step 3: Select Export to a file and click Next.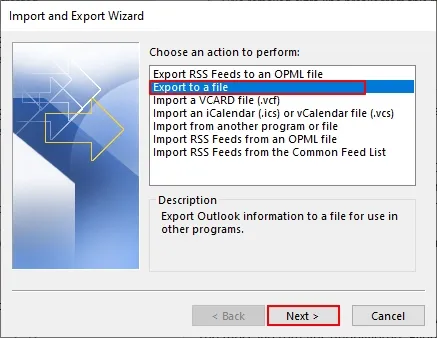
Step 4: Select file type as Outlook data File (.pst) and click Next.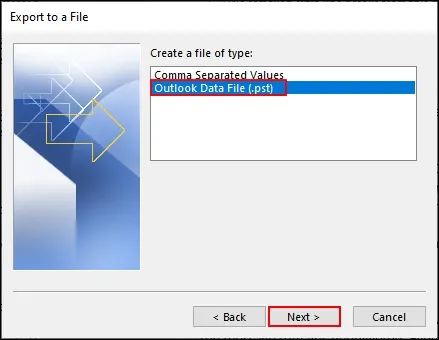
Step 5: Select Outlook.com mailbox and click Next.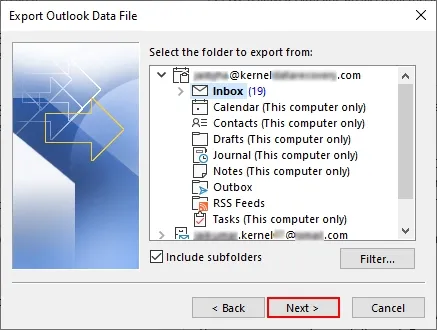
Step 6: Finally, select the saving location and click Finish.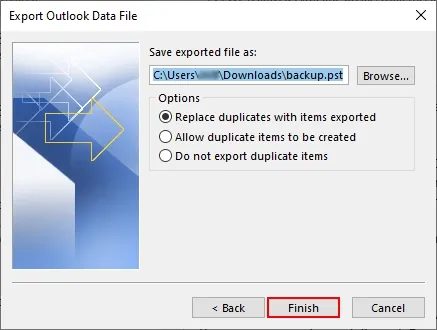
Part 3: Import PST file to Office 365 using Import/Export
As you have exported all your Outlook.com mailbox in a PST file, let’s start importing that PST file to your Office 365 account with all the mailboxes in the original hierarchy.
Step 1: Open Outlook and click on File.
Step 2: Go to the Open & Export > Import/Export tile.
Step 3: Select Import from another program or file and click Next.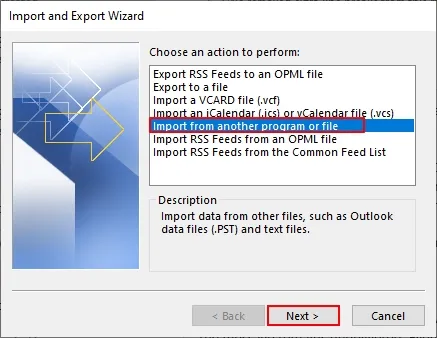
Step 4: Select Outlook Data File (.pst) and click Next.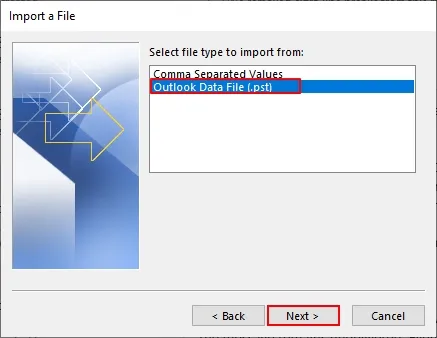
Step 5: Browse and select the PST file containing Outlook.com emails and click Next.
Step 6: Select your Office 365 account and click Finish.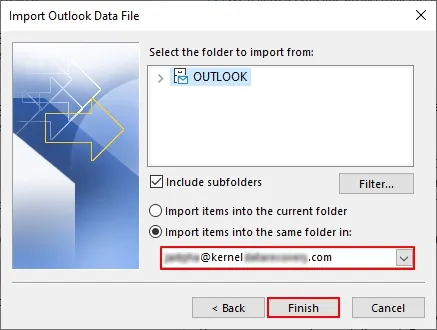
Drawbacks of this method
- This method is too long and will damage your data if a single step is missing.
- It will not guarantee 100% migration results.
- It cannot handle large-sized PST files or show errors while migrating them.
Method 3: Migrate email from Outlook.com to Office 365 via Drive Shipping
Drive-shipping is one of the oldest methods that will help you migrate your entire Outlook.com mailbox to Microsoft Office 365. It is the physical method where a user needs to upload their data to a hard drive and send it physically to Microsoft Office. Where professionals handled it carefully and uploaded them on their cloud platform with precision.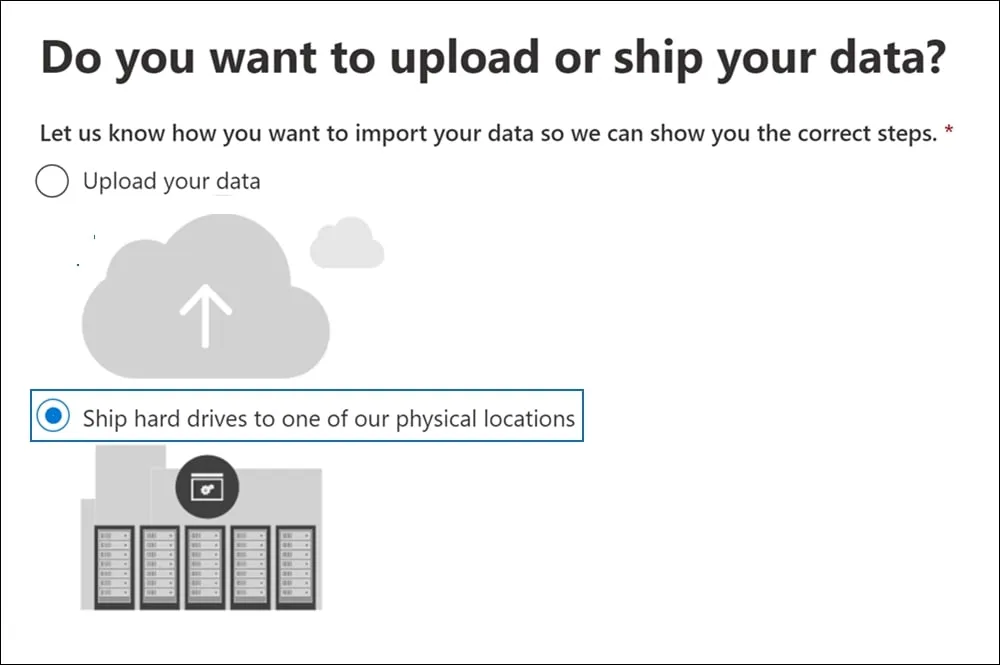
Step 1: Download the PST Import tool.
Step 2: Copy the PST file containing Outlook.com mailbox to the hard drive.
Step 3: Create a file containing a mapping of both source and destination users.
Step 4: Create an import job for the PST file within Microsoft 365.
Step 5: Send this to Microsoft Office and make sure they will get your file.
Step 6: They will filter out all your information and initiate a hassle-free Outlook.com to Office 365 migration.
Limitations of this method
- Manual PST transfer to Microsoft 365 may take one to two weeks.
- Urgent PST uploads to Microsoft 365 face delays and cause operational challenges.
- PST data transfer to Microsoft requires a physical hard disk/drive shipment.
- This approach involves data usage charges that increase costs for small teams or businesses.
Method 4: Migrate Outlook.com to Office 365 through Network Upload
The Network Upload is a free method that can easily migrate email from Outlook.com to Office 365. With this method, only administrators can migrate PST files to Office 365 with Azure AZCopy tool.
Note: Make sure to store the PST file on a file server or shared directory. Allow all the permissions for Import/Export and all Mail Recipients roles.
Step 1: Start your secure SAS URL and install the Azure AzCopy application.
Step 2: Create your job, and transfer Outlook PST file into your Office 365 account.
Step 3: Upload your Outlook .pst files into Office 365 and then click Next.
Step 4: Make sure that your PST files have been successfully uploaded to Azure storage.
Step 5: Create a mapping document to import the PST file to Office 365.
Step 6: Filter the .pst file information and migrate Outlook.com to Microsoft 365.
Limitations of this manual method
- Without technical expertise, a single mistake may cause PST file corruption.
- You can export one PST file at a time; multiple PST migration needs repeated efforts.
- Moving many PST files to Microsoft 365 feels complex, slow, and hard to manage.
Additionally, you can perform IMAP to Office 365 migration using PowerShell commands, although this method is more technical and complex to execute. The above-mentioned methods are free, but all of them have some boundaries that stops you from relying on them.
A quick way to migrate Outlook.com to Microsoft 365
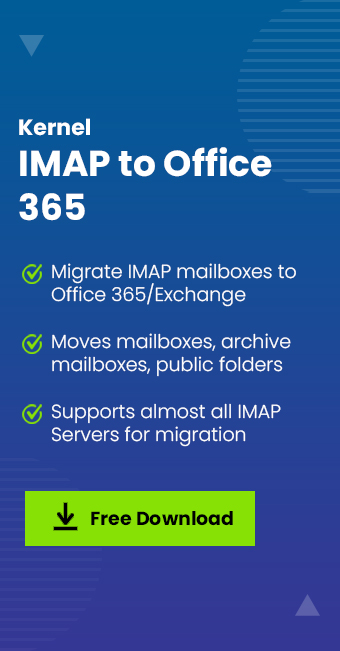
To migrate your IMAP-based email clients like Outlook.com content without any limits, you should use an intelligent, user-friendly, and robust IMAP migration software like Kernel IMAP to Office 365 tool delivers amazing features and functionalities to make the complete migration process smooth and error-free. Some of its top features are:
- Supports almost all IMAP email servers for migration to the cloud
- Provides server name and ports information on the interface itself
- Migrate single as well as multiple IMAP email server mailboxes to Microsoft 365 mailboxes
- Perform a quick, direct, and flexible migration with advanced filter options
- Facilitates free trial version of the tool available to download
- Facility to assign impersonation rights to Microsoft 365 user mailboxes directly
- Easy mapping between source and destination mailboxes
- Migrate IMAP mailboxes data to Archive, Shared, Public Folder, and Groups individually
- Saves migration records into the CSV file format
Conclusion
We have mentioned all the free manual methods to migrate Outlook.com to Office 365. However, all these methods are not result-oriented and require technical skills. Thus, utilize the recommended Kernel IMAP to Office 365 Migration tool to simplify your Outlook.com to Office 365 Migration process with complete mailbox integrity.
FAQs for Outlook.com to Microsoft 365 migration
A- In the manual migration of an IMAP email server to the cloud, you can migrate emails up to a maximum size of 35 MB and a total of 500,000 items only from the source mailbox.
A- Yes, the professional Kernel IMAP to Office 365 tool supports all IMAP-enabled email servers, including Gmail.
A- No, there is no such requirement. However, you need to provide the server name and login details of your source IMAP email server account to the tool for the migration.
A- The manual way of IMAP migration via Microsoft 365 Admin Center is a feasible process only when all prerequisites are met and the process is done under the supervision of an expert. It has high chances of manual errors and data loss.
A- This is not possible through the manual solution, but the Kernel IMAP to Office 365 tool has the option of direct migration of specific IMAP email server data to the Microsoft 365 public folder.