Read time: 9 minutes
Bluehost is one of the most popular web hosting providers, and millions of people use their services. Bluehost offers email hosting services to its users so they can create their own user email addresses as per their business needs using its servers. However, by the time Office 365 has become the prime cloud platform nowadays. Because of its advanced functionalities, features, security, and co-pilot AI feature, it is a game-changer in the field of cloud platforms.
At that time, migrating email from Bluehost to Office 365 can seem difficult, but with the right approach and method, it can be a straightforward process. In this guide, we will discuss the manual steps to migrate your Bluehost email to Office 365. So, whether you are currently using Bluehost email or are looking for a way to switch over to Office 365, get started with us now.
Before starting to migrate email from Bluehost to Office 365, it’s necessary to know the primary reasons for this data transfer.
Why switch from Bluehost to Office 365?
Here are some of the key reasons that make Office 365 a better choice for users than Bluehost.
- Office 365 (Exchange Online) offers significantly larger mailboxes, better attachment handling, and far superior, enterprise-grade spam filtering compared to standard Bluehost webmail.
- Microsoft 365 offers advanced security features, including multi-factor authentication, data encryption, and robust protection against malicious threats.
- Users gain access to the complete Microsoft 365 suite, including web/desktop versions of Word, Excel, PowerPoint, and Teams, facilitating better collaboration than simple hosting packages.
- The platform easily scales, allowing businesses to add users and storage as they grow.
Microsoft ensures 99.9% uptime and allows for seamless access to emails and files from any location or device via cloud storage.
As these reasons show, Office 365 is a more affordable, feature-rich, and secure email solution than Bluehost. Moreover, there are many other benefits of moving from any IMAP to Office 365. Now, let’s start the Bluehost to Office 365 migration process.
How to Migrate Bluehost Emails to Office 365?
Here is the step-by-step guide, mentioning manual solutions and one advanced IMAP migration tool to easily move emails from Bluehost to Office 365.
Method 1: Migrate Bluehost email to Office 365 manually
There is no direct way to migrate emails from Bluehost to Office 365. Thus, you need to follow a three-part process to achieve Bluehost to Office 365 migration. Go through the below-mentioned guide and make your migration easy and secure:
Part 1: Adding bluehost webmail account to Outlook
It is an effortless process to add Bluehost mail to Outlook and can be done in seconds. Here is how to do so:
- Launch Outlook on your PC.
- Tap on the File menu and click on Add Account.
- For the SMTP & IMAP protocols, you need to configure the Bluehost webmail account. For this, enter the email address and tap on the option “Let me manually set up my account” box. Hit Connect.
- Depending on your preference, choose POP or IMAP as your incoming protocol. For this configuration, we are using IMAP.
- Within the Email Client Settings, type the hostname and port number & encryption methods for the Incoming & Outgoing Mail servers. Tap on Next.
- Tap on Connect and type the email account password.
- After your email account is set up, click on Done.
- Sending and receiving emails from Bluehost is now possible using your Outlook email client.
Part 2: Migrating Bluehost mails to a Outlook PST file
Now, you can easily access your Bluehost emails in Outlook. It’s time to export the entire Bluehost mailbox to a PST file using Outlook Import/Export feature. Let’s discuss how to export the Bluehost emails to a PST file:
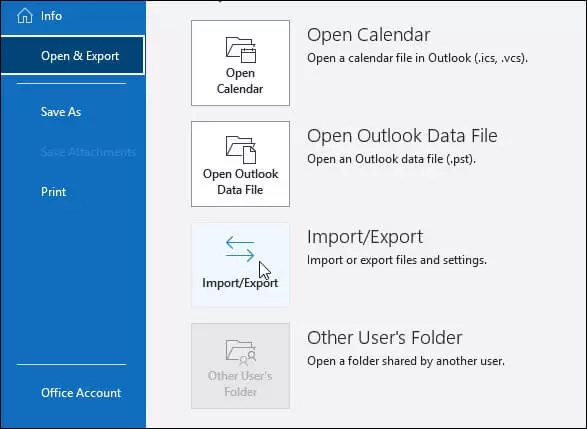
- Open Outlook and tap on the File menu.
- Choose the option Open & Export.
- From the right side, tap on Import/Export.
- In the upcoming window, click on Export to a file. Tap on Next.
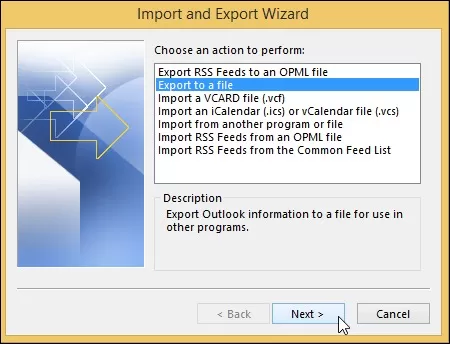
- From the Export to a file wizard, choose Outlook Data File(.pst) and hit Next.

- Next, you need to choose the Bluehost mailbox folders you wish to export.
- Click on Next in the following window and Finish the export process.
Part 3: Import PST file containing Bluehost Emails to Office 365
You can easily configure Office 365 account in Outlook if you know the POP settings for Office 365. Follow these steps to import Bluehost emails to Outlook configured with Office 365 account.
- Launch Outlook and click on File.
- Click on Open & Export > Import/Export.
- Tap on the Import from another program or file option.
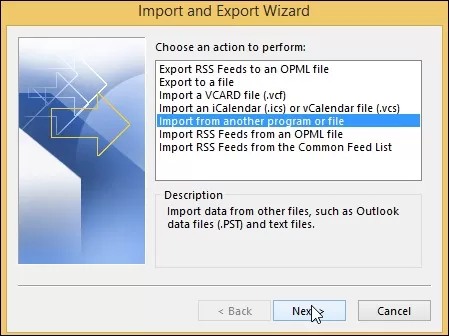
- From the Import a file wizard, choose Outlook Data File(.pst) and choose Next.

- Using the Browse button, select and open PST files from the local drive.
- Check the option “Do not import duplicates” and click on Next.
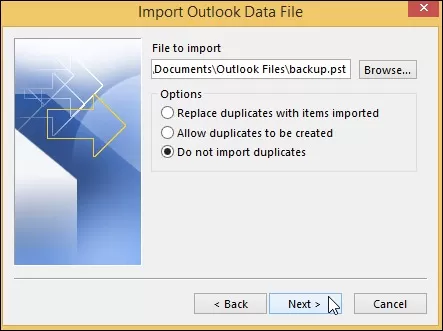
- Finally, select the Office 365 mailbox to import the PST file. Click Finish
Method 2: Migrate Bluehost emails to Office 365 using Exchange Admin Centre
The Exchange Admin Centre (EAC) in Microsoft 365 can migrate Bluehost emails to Office 365 using the built-in IMAP migration method. This process involves configuring a migration endpoint with Bluehost server details (imap.bluehost.com, port 993), creating a CSV file for user mailboxes, and running a migration batch to transfer mailbox data. Here’s how to do so:
Step 1: Access Microsoft 365 Admin Centre, copy the TXT record, and add it to Bluehost.
Step 2: Add Microsoft MX and CNAME records in Bluehost to route emails.
Step 3: Locate Bluehost IMAP server address and port details from webmail settings.
Step 4: Prepare a CSV file with user mailboxes for Office 365 transfer.
Step 5: Create migration endpoint, upload CSV, verify details, then start migration batch.
Step 6: Send test emails, wait three days, and confirm mail delivery in Microsoft 365.
Final Note: End the migration batch after success and disconnect Bluehost email services safely.
As the above-mentioned method looks easy, but is not result-oriented. Let’s know all the challenges of this manual method.
Limitations of this manual method
- Manual IMAP migration only transfers email folders; it does not support migrating calendars, tasks, or contact items.
- The process is tedious, requiring manual configuration, and is prone to errors, particularly for non-technical users.
- Maximum Mailbox Items: A maximum of 500,000 items can be migrated from a single mailbox.
- Emails larger than 35 MB may fail to migrate.
- Unstable internet connections during the transfer can cause data corruption or incomplete migration.
- It is highly inefficient for moving multiple users, making it unsuitable for company-wide transitions.
To avoid these restrictions and easily move emails from Bluehost to Office 365, it is recommended to opt for an automated IMAP to Office 365 migration tool.
Method 3 – Professional tool for Bluehost to Office 365 migration
Migrating email data from one account to another is a complex process because it involves moving not only messages but also contacts, calendar entries, and other items. When migrating from Bluehost to Office 365, the process is further complicated. However, there is a tool that can make the migration process much simpler: Kernel IMAP to Office 365.
Advanced features of this IMAP migration tool
- Support direct IMAP to Office 365 mailbox transfer from Gmail, Yahoo, Zoho, GoDaddy, Amazon and other IMAP servers.
- Migrate IMAP mailbox to Office 365’s Mailbox, Archive Mailbox, Shared Mailbox, Public Folder, and Office 365 Groups.
- Advanced filters for selective migration based on date range, folder type and more.
- Incremental migration to skip items already migrated and avoid duplicates.
- Easily handle large and unlimited IMAP mailboxes without size restrictions.
- Preserve original folder hierarchy, labels, flags, and metadata during transfer
Quick steps to migrate Bluehost emails to Office 365 using the tool
Step 1: Download, install, and launch Kernel IMAP to Office 365 Migration tool.
Step 2: Add Bluehost account in the source and Office 365 account in the destination.
Step 3: Map source and destination user accounts and click Set Filter and Migrate.
Step 4: Select destination mailbox type, as Mailbox, and click Migrate.
Step 5: Apply necessary filters for selective Bluehost to Office 365 data migration.
Step 6: Click I’m OK, Start Migration and the tool will start migrating your mails.
Step 7: After a successful migration, download the detailed migration report in a CSV file.
Winding up
Now you know all the manual methods to migrate emails from Bluehost to Office 365. However, Manual methods have multiple drawbacks and do not offer guaranteed migration results. Thus, utilizing the suggested Kernel IMAP to Office 365 Migration tool simplifies your Bluehost to Office 365 migration. With this tool, you can easily migrate all your emails, contacts, notes, and attachments from Bluehost to Office 365’s mailbox, shared mailbox, and public folder accordingly.
Frequently Asked Questions
Question: Does Bluehost to Office 365 migration include contacts and calendars? Answer: Manual methods migrate only emails and folders. To migrate Contacts, calendars, and tasks from Bluehost use a professional IMAP to Office 365 Migration tool.
Question: Is Outlook required for manual Bluehost email migration? Answer: Yes, Outlook is required to export Bluehost emails into a PST file before importing them into an Office 365 mailbox.
Answer: Manual methods migrate only emails and folders. To migrate Contacts, calendars, and tasks from Bluehost use a professional IMAP to Office 365 Migration tool.
Answer: Yes, Outlook is required to export Bluehost emails into a PST file before importing them into an Office 365 mailbox.