Read time: 7 minutes
Internet Message Access Protocol (IMAP) is a standard email retrieval protocol that stores email messages on the server. It allows recipients to view and work on these messages without downloading them, which enhances their email management process.
Moreover, it provides you the flexibility to manage your workflow effectively, with its multiple-device support at the same time, online accessibility, etc. To utilize all the several advanced features of IMAP, you need to import your PST files into an IMAP server account.
Hence, the blog will discuss various reasons behind it and provide corresponding solutions to make this transition smooth.
Reason to Import PST Files to an IMAP Account
Several reasons led users to import their PST files into an IMAP account. Significant ones of them are listed below:
- IMAP allows its users to view and read folders on the mail server.
- It stores all the emails on the server, which reduces the possibility of data loss during a system crash.
- Users can work on their downloaded emails offline, and it will sync all the changes and show them on the other side as well.
- It helps in freeing up the system’s storage space by storing emails on the server.
- Users can access, read, and work on their emails on multiple devices at the same time.
Manual Method for PST File to IMAP Conversion
Users can seamlessly import their PST file to an IMAP account with the Outlook application. To facilitate this transition, you need to configure your desired account in Outlook via IMAP protocol. After that, import your PST files into that IMAP account via Outlook’s Import/Export feature. To perform this transition, follow the two-parted method meticulously.
Part 1. Configure your Email Account via IMAP in Outlook
Outlook offers several configuration options to its users to configure their email accounts as per their needs. For the configuration of your email account via IMAP, follow the given steps carefully.
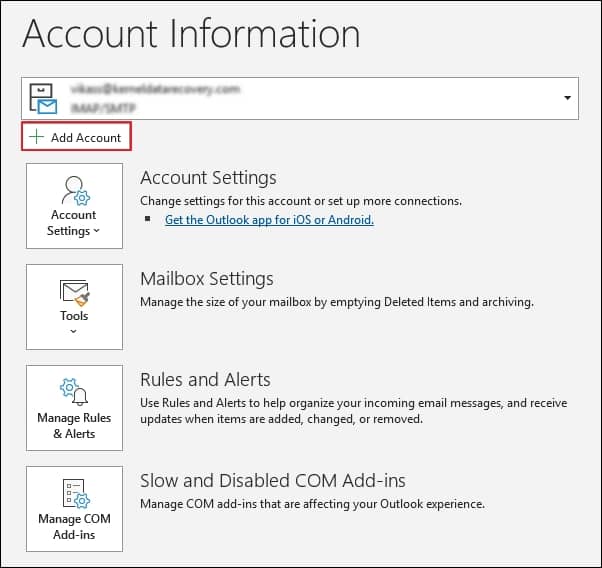
- Open the Outlook application> tap on File tab> click on Add Account option.
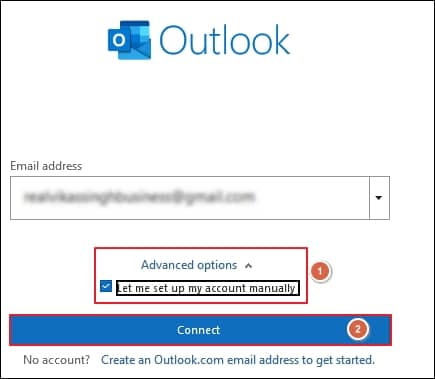
- Insert the email address that you wish to configure through IMAP, then press on Advanced options.
- Under the Advanced options, Mark the Let me set up my account manually option and proceed to Connect.
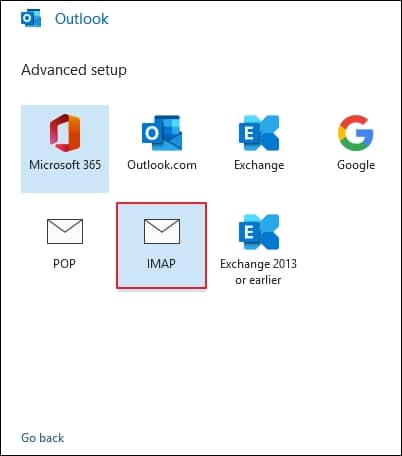
- Choose IMAP under Advanced setup, then enter your account password in the pop-up window and proceed to Next.
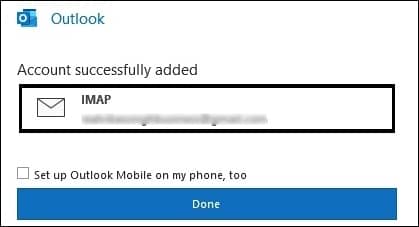
- After showing the “Account successfully added” message, tap on Done option.
Part 2. Import PST Files into the Previously Configured Account via Import/Export Facility
You can easily export or import PST files in Outlook with the help of its built-in Import/Export feature. Once you have successfully configured your account, go through the following steps to import your PST files into your recently configured IMAP account.
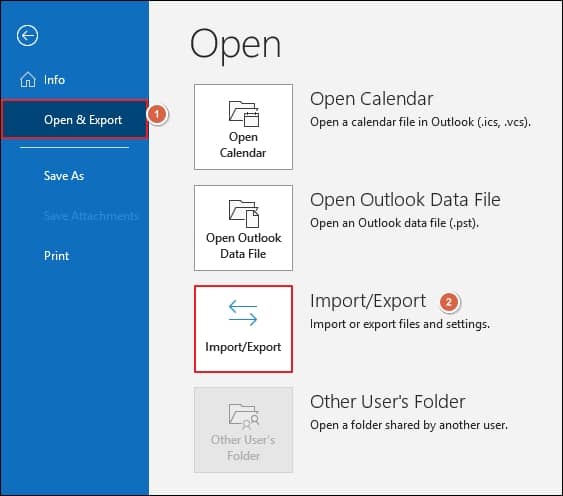
- Launch the Outlook application, then click on File tab.
- Tap on Open & Export and choose Import/Export option.
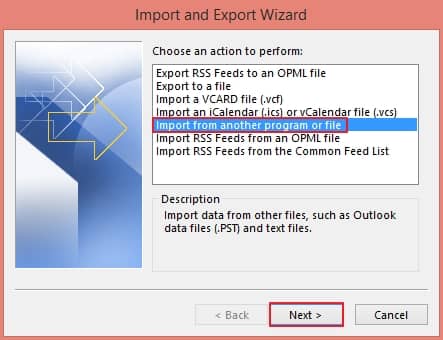
- Select Import from another program or file and press Next.
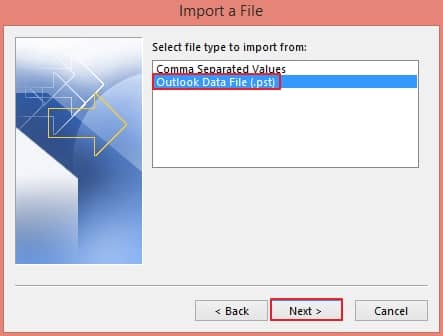
- Choose Outlook Data File (.pst), then proceed to Next.
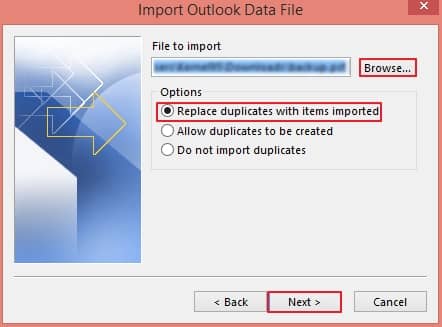
- Browse to locate PST file that you want to import, select Replace duplicates with items imported, and press the Next option.
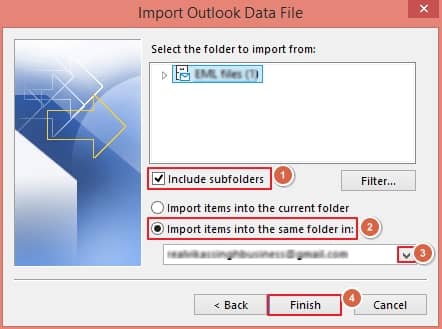
- Tick on Include subfolders>; choose Import items into the same folder in option> select the IMAP configured account from the dropdown and proceed to Finish.
Note: You can utilize filter option to import selective data from your PST file.
- Your PST files were successfully imported to the IMAP account.
Limitations of the Manual Method
The above-mentioned method might be helpful in importing your PST files into an IMAP account. However, it comes with certain limitations. Some of them are as follows:
- The method is quite confusing for novice users.
- It doesn’t allow you to import multiple files simultaneously.
- Structure of your PST files may be hampered with this method.
- Improper execution of this method will lead to data loss.
- The method isn’t useful in case of PST file corruption.
An Automated Solution to Import PST Files Quickly
To overcome the limitations of the manual method, users need to opt for an automated tool to import their PST files into an IMAP account. One such automated tool is Kernel for Outlook PST Repair, which can help you import your corrupted or damaged PST files into an IMAP account without a hassle. The tool allows its users to import their multiple PST files at the same time. Moreover, the tool comes with several advanced features, including:
- It allows you to export PST files to email servers such as Exchange, Domino, and GroupWise.
- Maintains the folder hierarchy intact throughout the conversion.
- PST converter saves PST files to Webmail such as Yahoo Mail, Gmail, AOL, etc.
- Offers advanced filter options to import selective data to your IMAP account.
- Helps you to recover your lost or deleted emails/attachments.
- With its split file feature, you can manage oversized PST file issue.
Step-by-step Guide to Import your PST Files using Automated Solution
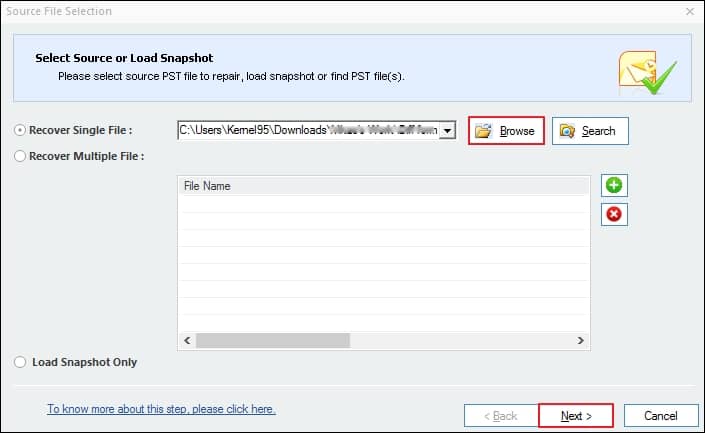
- Launch the tool and Browse to add your PST files in it, tap on Next and proceed to Finish.
- Click on Save option, choose Gmail as an output type, press on Next button, and enter your IMAP account credentials, then proceed to Finish.
- It will initiate the process of importing your emails into your IMAP account. After the completion of this process, you can access these emails in your IMAP account.
Note: Here, we are taking a Gmail account as an example; you can choose any IMAP account as per your requirements.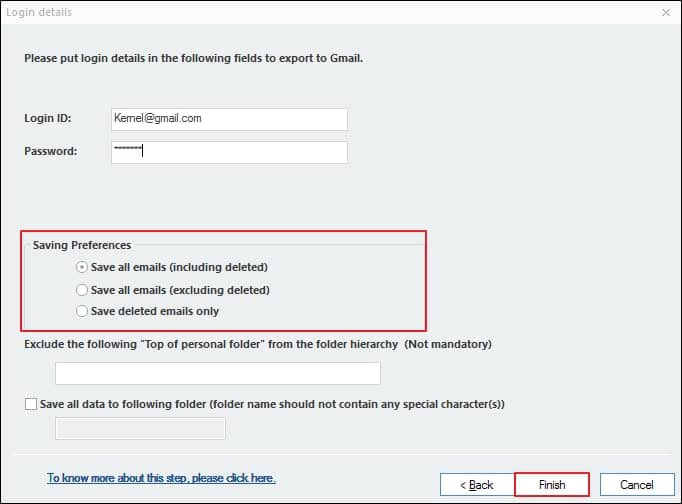
Conclusion
Importing your PST files into an IMAP account can be done by the manual method that we discussed above. But, in case of damaged or severe PST file corruption, this method isn’t effective. Therefore, opting for a professional tool like Kernel for Outlook PST Repair is the best approach, which helps you streamline the process. It allows you to utilize filters for precise data migration. Additionally, you can try out the trial version of the tool to check its credibility.