Read time: 3 minutes
When a user configures a POP3 account in MS Outlook, it creates a default PST data file for the account. Although there is a default location for the data file, it can also be created on the OneDrive account. The same can be done when you take a backup or archive the emails.
A free basic OneDrive account has a storage limit of 5GB only and cannot accommodate a PST file larger than the default size. On the other hand, the Outlook PST file has a default size limit of 50GB which can be increased as per requirement. Over time, the number of mailboxes in the PST file grows exponentially, exceeding the storage limitation of the OneDrive account, resulting in issues like the one shared below:
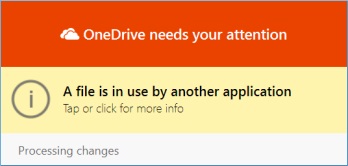
The error shows that OneDrive faces problems in synchronization because the file is in use by other applications. It occurs when the PST file has extensive data, and OneDrive takes much time to sync the file. Apart from this, you can also experience issues like a laggy Outlook interface, slow search results in Outlook, etc. To provide a smoother user experience, it is important to execute a solution to safely remove Outlook PST data file from OneDrive and resolve the issues as mentioned earlier.
In this article, we’ll show how you can remove Outlook PST data file from OneDrive and move it to a different folder. However, before beginning the transfer, let’s first understand the various scenarios leading to the migration of the PST file.
Reasons to remove Outlook PST data file
OneDrive is an application from Microsoft which offers a safe environment for storing PST files. However, various situations can arise the need to remove Outlook PST data file from OneDrive.
- PST file size crosses the size limit of your OneDrive account.
- Migrating PST file to another OneDrive account.
- Change in company policy regarding storage of Outlook files.
- Saving PST file locally to have an offline backup.
- PST file in OneDrive gets corrupted.
Safely remove PST file from OneDrive
PST file stores several crucial emails and communication along with important documents, images, and files as attachments. To remove Outlook PST data file safely from OneDrive we will discuss a proven manual method below. Follow the steps cautiously to avoid any chance of data corruption.
Follow below steps, executing one after the other:
- If Outlook is running, close the application and wait till OneDrive synchronization is complete.
- Navigate the following path/location: C:\Users\username\OneDrive\Documents\Outlook Files.
Note: If you don’t see the PST data file in the above location, you can look for file’s exact path as given below.
- Open Outlook, right-click on the account whose PST file is stored in OneDrive.
- Click on open file location to reach the file destination.
- Copy and move the PST file to a new path/location on your system but not anywhere inside OneDrive.
- Rename the file you have moved to a new location. For example,
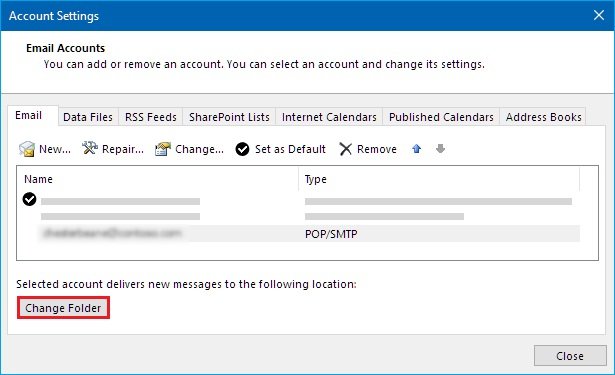
username@domain_copy.pst - Now, open Outlook again. Click on File tab and select Account Settings >Account Settings.
- Inside the Email tab, select the appropriate account and click Change Folder.
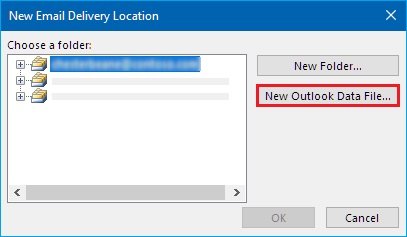
- Select the Outlook account and click New Outlook Data file.
- Browse and locate the PST file which you renamed and copied to a different location on your machine (in step 3). Select the file and click Ok.
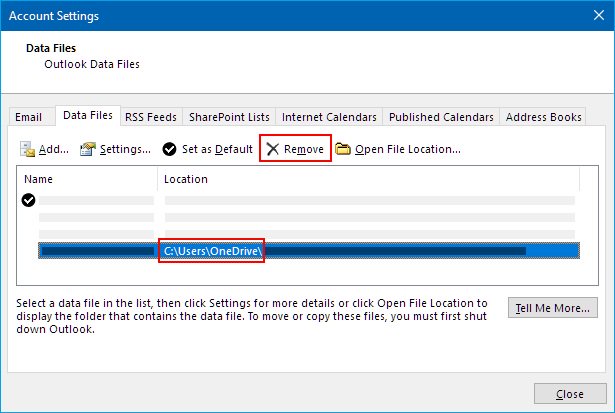
- Now, click the Data Files tab, select the file location including the string OneDrive, and click Remove; click Yes.
- The Outlook PST data file is disconnected now.
For example, C: \ Others.

Note: Sometimes you don’t see the Change Folder button; in such a case, it is possible that your selected Outlook account won’t have a PST file.
Note: For moving or deleting the OneDrive copy of PST file, you would need to exit Outlook.
How to deal with corruption within Outlook PST files?
Handling PST files casually can result in file corruption, especially overgrown PST files. Microsoft provides a free utility called Inbox Repair tool to fix damage in PST files. However, the free tool deletes the corrupted data, resulting in permanent data loss. To overcome such limitations, you must use a reliable third-party tool.
Kernel for Outlook PST Repair is a PST file recovery tool preferred by professionals and many Outlook users. You can leverage the tool’s advanced features to recover your important emails, attachments, contacts, calendar, tasks, etc. safely with no data loss from Outlook files. The tools even allow the user to restore the PST files straight to a Microsoft 365 account, Exchange Server, Domino & GroupWise Servers as well.
Conclusion
Creating PST files in OneDrive is a feasible option if you are short on disk space in your system. However, if PST file size crosses the size limit of OneDrive account use the above-mentioned procedure to safely remove Outlook PST data file. In case your PST file gets corrupted while moving or renaming , then employ the Kernel for Outlook PST Repair to quickly recover your damaged PST files.