Read time 6 minutes
Migrating from IMAP to Office 365 shared mailbox requires a series of precise steps that should be followed coherently to ensure a smooth transition. Firstly, you need to ascertain that you have the appropriate credentials to access your email server. After this, you need to convert your regular mailbox to a shared mailbox.
Once done, you can then migrate IMAP to Office 365 shared mailbox without any hitches. This migration process is essential, especially if you wish to continue enjoying the extensive functionalities that come with Office 365. The process may seem daunting at first, but with the right guidance, it can be a relatively straightforward process.
In this article, we will take a look at the different steps and procedures that you need to undertake for a successful migration.
Why Migrate IMAP to Office 365 Shared Mailbox?
Check out the most common reasons to transfer IMAP emails to Office 365 shared mailbox.
Enhance Collaboration: When you use a shared mailbox, you get instant collaboration boosts. Your team gets shared calendars, contacts, and space. Multiple team members can read and reply to emails from a single email address.
Robust Security: Microsoft uses modern and powerful security algorithms. Whether you move to a shared or standard user mailbox, you get the same enterprise-grade security mechanism everywhere.
Enjoy Microsoft Office Apps: After the migration, you can benefit from other Microsoft applications like Teams, SharePoint, and OneDrive.
Get More Storage Space: Microsoft offers a 50GB storage quota for the shared mailbox. This space can be further increased depending on your requirements.
High Availability and Reliability: Your data is stored on multiple servers with multiple passive database copies. This approach helps with high data availability without fail.
What are the IMAP settings for a shared mailbox in Office 365?
If you want to connect a shared mailbox, then you should know the correct IMAP settings parameters for the account. IMAP Settings
- Server Type: IMAP – SSL Encrypted
- Port Number: 993
- Email Address: shared@domainname.com
- IMAP Server: outlook.office365.com
- Username: username@domainname.com\shared-mailbox-alias
- Password: password of email address
How to convert a regular mailbox to shared mailbox in Office 365?
To convert a normal Office 365 mailbox to a shared Office 365 mailbox, then you need to follow the below-mentioned steps:
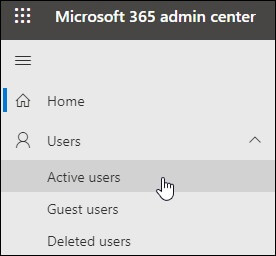
- Start with logging in to the Office 365 account.
- Go to the Office 365 admin center and select the Active Users option there.
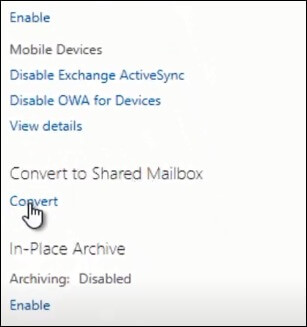
- Now, you need to select that particular mailbox that you are going to convert to the shared mailbox. After selecting the mailbox, click on the Mail Settings.
- Now locate More Settings in the new window and click on the Convert to Shared Mailbox for the conversion.
- In the next step, click on the Convert button.
- A pop-up message will come asking for the final permission to convert your mailbox. Click on Yes to continue.
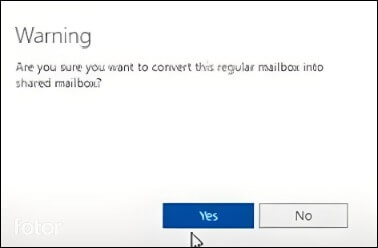
- Once the previous step is over, your mailbox is now successfully converted to a shared mailbox. Click on OK to finish the process.
Reliable Methods to Migrate IMAP to Office 365 Shared Mailbox
Now, once you have converted the regular mailbox to the shared mailbox, you can start with the migration. We can do IMAP to Office 365 shared mailbox migration using Outlook or a dedicated IMAP email migration software. Let’s start with the first one:
Method 1: Migrate Emails with Outlook
Using the Outlook email client, you can move IMAP to Office 365 shared mailbox. Follow these steps:
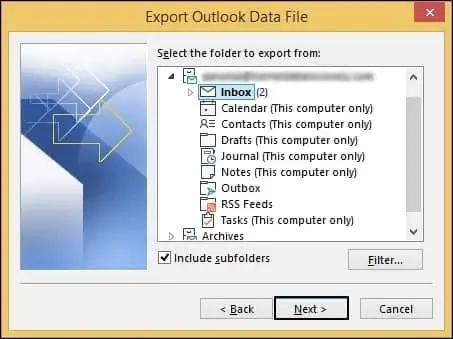
Step 1: Export your source account emails to PST
- In Outlook, add the source IMAP account.
- To export PST, go to File > Open & Export > Import/Export.
- Choose the option Export to a file > Outlook Data File (.pst).
- Select the mailbox you want to export and save it in the PST file.
Step 2: Add the Office 365 Account in Outlook
- Click on File > Add Account and enter the O365 email address.
- Enter the password and connect to the account.
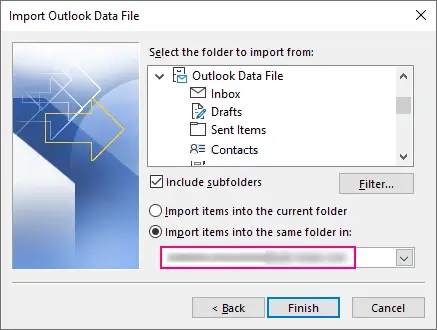
Step 3: Move emails by importing the PST to Office 365 Account
- Again, go to File > Open & Export > Import/Export.
- Select Import from another program or file.
- Choose the Outlook file (PST) (created in Step 1) and select the O365 mailbox as the destination folder. Then, import.
Alternatively, you can also drag and drop the emails from the source folder to destination (Office 365) shared mailbox folder.
However, this manual approach has certain limitations like:
- When you need to migrate IMAP accounts of multiple users, manually exporting and importing them one by one will take a considerable amount of time.
- To save large PST files on your system, you need to free up space, and in case sufficient disk space is not available, the migration can come to a halt.
- During the migration, email metadata will not be preserved. Data like the emails send/receive date may be modified along with attributes.
Method 2: Automated IMAP to Office 365 Migration Tool – Recommended Solution
The manual method available for the IMAP to Office 365 shared mailbox migration is complex and technical. I personally suggest you to not risk your data with it.
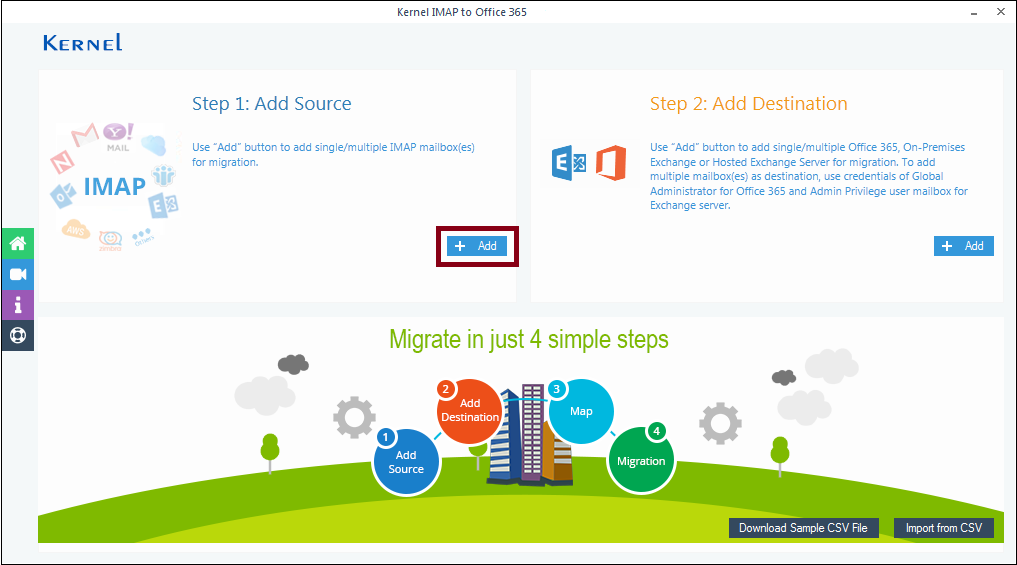
A smarter way to migrate IMAP to Office 365 shared mailbox is using an automated IMAP migration tool, Kernel IMAP to Office 365. This tool allows you to automate the complete migration process and finishes it in just a few clicks. The tool comes with a user-friendly interface which lets no trouble come to your migration experience; let’s check out how the tool works:
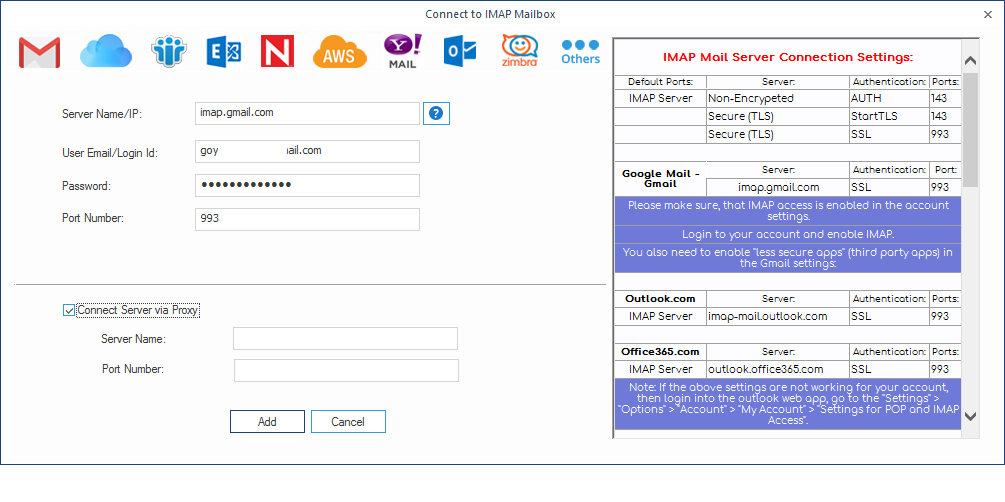
- Start the tool and click on the Add button, under the Add Source title to add the IMAP account.
- At this page, you will see that on the right there is a chart that has all the details of the IMAP servers and their Port numbers. Look for your Email client and enter the IMAP account details and credentials of that particular account. Finally, when you are done with all the details, click on the Add button to add the particular.
- Now, click on the Add button under the Add Destination section.
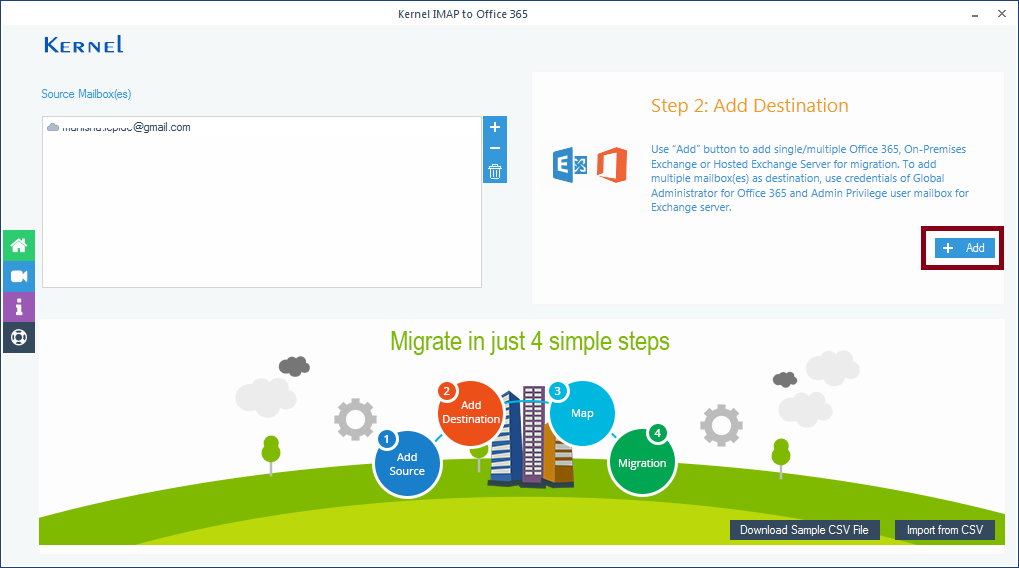
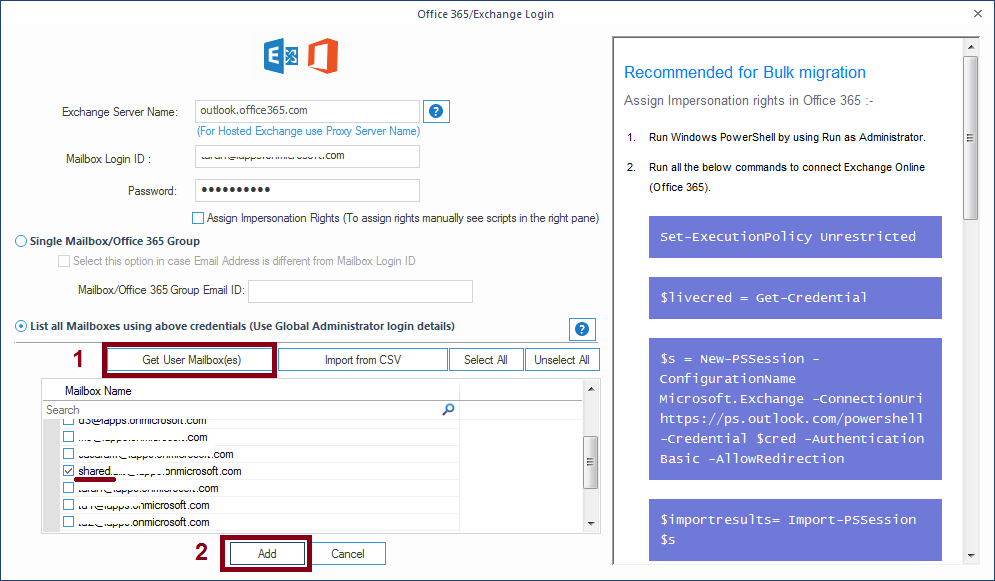
- Again, add the Office 365 account details with credentials, choose List all Mailboxes using…. option and select the shared mailbox from the retrieved list of Office 365 mailboxes. Then, click on the Add button.
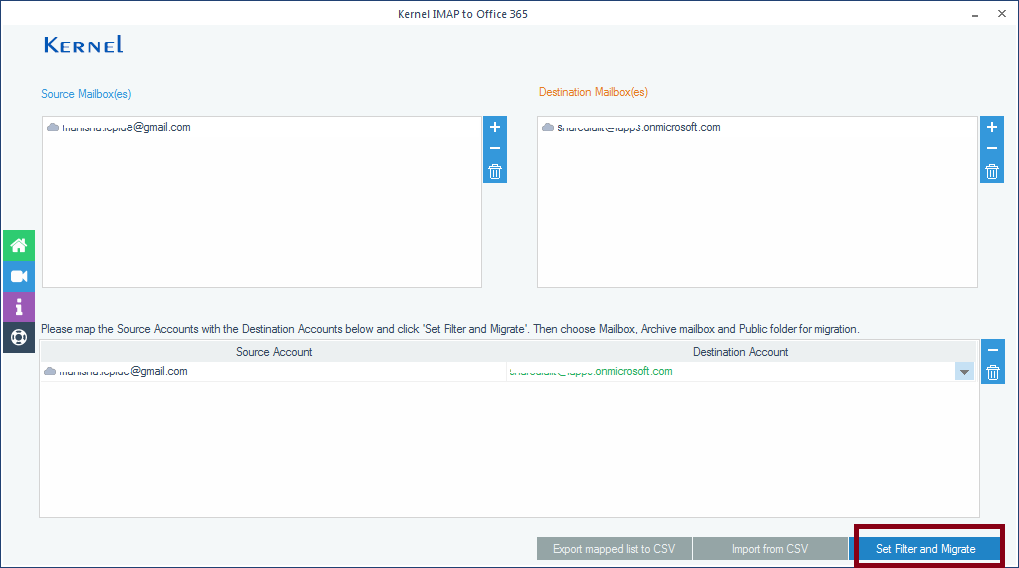
- In this step, under the Destination mailbox section, you will see a little drop-box icon, click there and select the destination shared mailbox. Once you have selected the destination mailbox, click on Set Filter and Migrate.
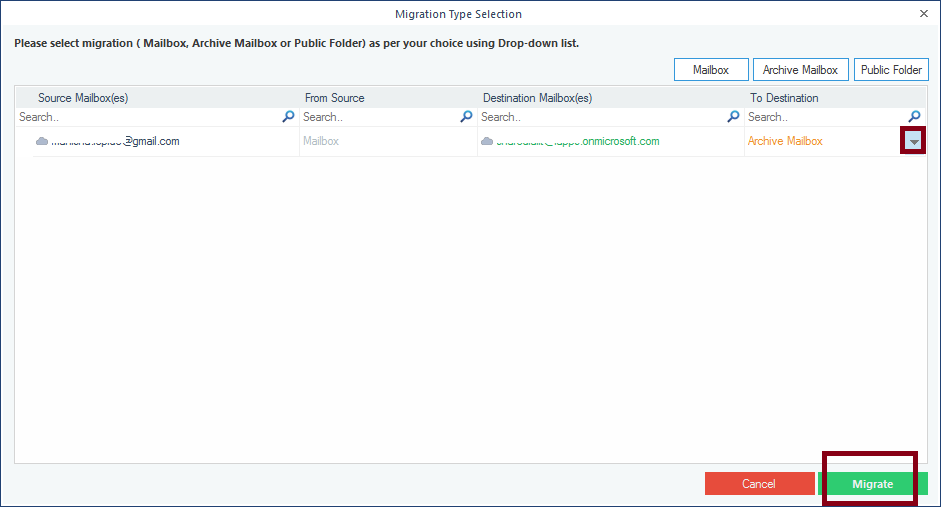
- A new window for Migration Type Selection will open, there you need to select the mailbox folder where you want the data to migrate. You will get three options: Archive mailbox, Public Folder, and Mailbox, select Mailbox and click on Migrate.
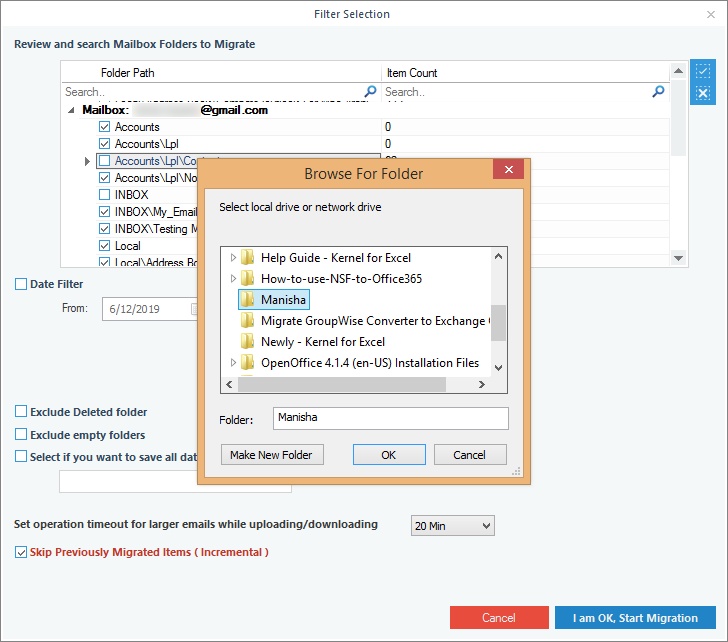
- Now, it is the time to apply filters for the migration; select date, time, and the folders you want to migrate and click on I am OK, Start Migration to proceed.

- Once the migration has started, it will take place one by one, folder by folder, wait until the process is done. When it is done, click on OK to finish.
After successfully migrating IMAP to Office 365 shared mailbox, you can find the transferred data in the shared Office 365 mailbox.
Final words
The process to migrate IMAP to Office 365 shared mailbox can be complex, but with the right tool, it can be done effortlessly. When you only need to move emails of a single user, you can use Outlook. But to migrate bulk email account without failure, we recommend using the Kernel IMAP to Office 365 tool as it guarantees a safe and quick data migration with its advanced features.
This tool eliminates the need for extensive technical knowledge, making the process easy for all users. With unique filters, users can selectively migrate their mailbox data with ease. This tool is definitely the ideal solution for a smooth migration experience.