Read time: 7 minutes
“I recently tried to open a photo using the Windows Photos app and found an error 2147219196, and I could not open the photo. I learned that this error is usually found on Windows 10 and will stop users from using the Photos app. Is there a simple way in which I can fix the issue?”
This was a query submitted by a user on Microsoft forum while trying to view their photos in Windows 10. File system error 2147219196 occurs when trying to open images in the Photos app because of issues with Windows update, broken Photos app, or due to corrupt images not opening in the system. This can be fixed by updating or resetting the Photos app. If the issue isn’t resolved, try fixing this Windows Photos app error with the Registry Editor.
Although this error can be pretty frustrating, it can be fixed pretty easily with the right approach. Read the blog till the end to know the root causes of this error and the best ways to fix file system error in Windows 10.
What Exactly is File System Error 2147219196?
After my research, I found that this file system error (-21472 photos) is triggered due to a bug in the Windows system. And after Windows Updates, this bug affects the Windows Photos application too. Users face this Windows Photos App error when they try to open their images in the Photos app, but Windows is unable to read or display the images properly.
What are the Root Causes of File System Error 2147219196?
There are a few common causes that give rise to the file system error 21472119196 in Windows 10. These causes include:
- Corrupt Windows system files.
- Corrupt or bad sectors in Disk drive.
- Issues with Microsoft Store app package.
- Errors occurring after a Windows OS update.
- Errors or glitches in the Microsoft Photos app.
- Corrupt or broken file association in Windows 10.
- Registry errors creating issues for Windows apps.
How to Fix System Error (-2147219196)?
File system error is a common issue faced by users that can be fixed with the right methods. We’ve given six fixes to help you resolve this Windows Photos app error.
Solution 1: Update the Windows Photos App
To get rid of this file system error, start by updating the Photos App. Because updating the app can resolve many issues and errors. Now follow the given steps to update the latest Photos App version.
- Press Win + Q and search for Microsoft Store.
- In the Microsoft store, select See More.
- Click on Downloads and Updates, and then click on Get Updates.
- If updates are available for the Photos app, click on Update.
After installing the latest update, check whether the error is fixed or not. Otherwise, move to the next solution.
Solution 2: Update Windows
From my personal experience, I’ll always suggest updating Windows if you encounter an error on the system. Once Windows gets updated, it will help resolve bugs and errors present in Windows. Follow the steps below to update Windows:
- In Windows Search, type “update.”
- Select the “Check for updates” option in the new window.
- Now restart your pc when the update process is completed and go to the Photos app again. If the error persists, try the next solution.
Solution 3: Try Windows Apps Troubleshooter
To resolve the issue related to the Windows apps, there is an in-built troubleshooter. We have explained how to use this Windows Apps Troubleshooter in both Windows 10 and 11. Try to resolve this issue by following the steps-
For Windows 10:
- Open Settings and select Update & Security > Troubleshoot.
- Choose Additional Troubleshooters from the top-right and select Windows Store Apps.
- Run the troubleshooter and apply all the changes and suggestions that are recommended after the scan process.
- Try viewing your photos in the Photos app to see if the error is fixed or not.
Solution 4: Uninstall the Windows Photos App and Reinstall
If you’re unable to resolve this issue even after updating the Windows Photo app and Windows, try uninstalling the Windows Photo application and reinstalling again. Follow the steps to do this:
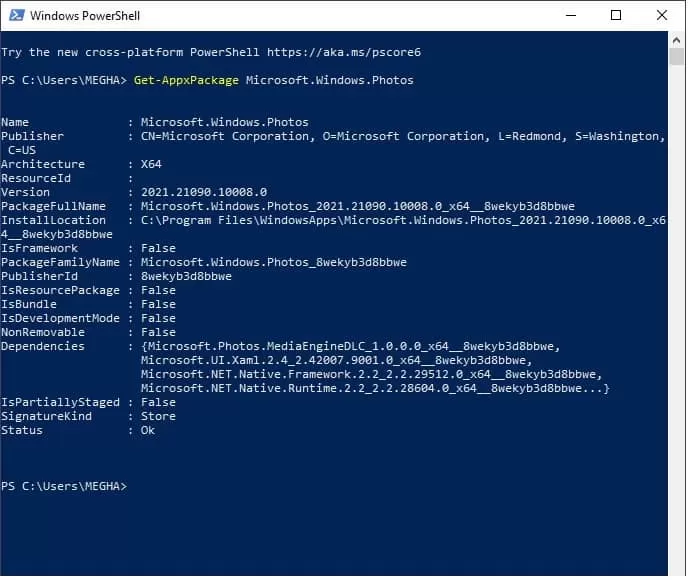
- Go to the Windows Start search box and type PowerShell.
- Right-click on Windows PowerShell and select the Run as administrator option from the menu.

- Type Get-AppxPackage Microsoft.Windows.Photos | Remove-AppxPackage. Finally, press the Enter key.
- Now again, download the Windows Photo installation package.
- After installation, open the setup file and follow the prompts.
- Now, your Window Photos app is ready to use.
Solution 5: Run SFC to Repair Corrupted System Files
If you have already tried uninstalling and installing the photo app and still getting errors, try running SFC and DISM using Command Prompt. To proceed, follow the steps below-
- In the Windows Search bar, type “cmd” and press Enter.
- Now, right-click on the Command Prompt and select “Run as administrator” from the drop-down menu.
- User Account Control (UAC) will pop up. Click yes and move forward.
- Now type “sfc /scannow” in the window that appears; press the Enter key.
- The scan process is going on; wait for it to complete.
- Try to fix if there are any damaged files after scanning and restart the PC.
Even you can also use the following commands to fix error
And now restart your PC again and make sure if the error message has gone.
Solution 6: Try a Clean Boot
One can also try this solution by executing a clean boot on the system by following the steps-
- Log in with the Administrator account on the system.
- Now press the Windows and R keys together, type msconfig in the Run Window dialog box, select System Configuration, and click on the OK key.
- Go to the Services button and uncheck the “Hide all Microsoft services” option.
- Click on the “Disable all” option and click the OK button to save the changes.
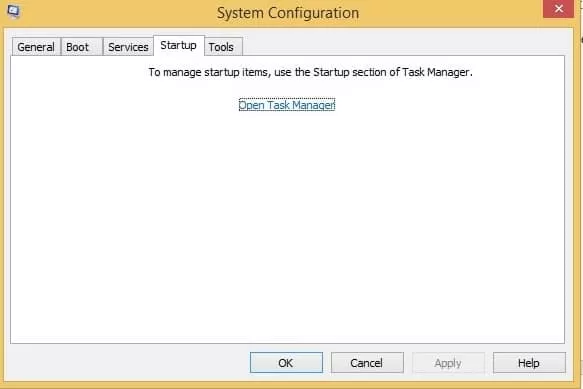
- Now open Task Manager.
- In Task Manager, click on the Startup tab.
- Click all applications with the Enabled status and select the Disable option.

- Now reboot the computer, and you can see your computer boots in the “Clean Boot” state.
Now check if the file system error (-2147219196 photos) still exists or not. If these solutions work and the error is resolved, then you can resume work. But if the Windows Photos App Error still persists, it’s because your images are corrupt. Below, I’ve suggested the best way to repair corrupt photos safely.
Try A Photo Repair Solution
If you are tired of using such lengthy manual solutions and still not getting any results. I’ll suggest switching to a professional solution to repair and recover your damaged photos. It is possible that the issue may not be with the photo viewer application but with the photos. If image files are corrupt, you may not be able to open them with any application. So, try using this Kernel Photo Repair tool, one can repair images in a few steps with total accuracy. It supports all Windows-supported image formats and fixes them without ruining the original image quality.
Author’s Verdict
Bugs and errors have always been a problem for PC users. So, try to keep updating your system regularly. You can try other solutions to fix the photo viewing error (error 2147219196) on Windows. But if your image files are corrupt, you should use the recommended Photo Repair tool. It supports images in all formats and repair corrupt RAW photos. Take the free trial today.
People Also Ask
A. The reason could be that there’s a bug in your Windows Photos app after the recent Windows update.
A. Mostly, it affects image files only. But if the underlying cause is really severe, then this error can also affect other system files.
A. Go to Settings to reset default apps or individually assign the correct app for each function.