Microsoft 365 Groups make it easier for teams to collaborate through shared email conversations, calendars, files, OneNote notebooks, Planner plans, and other connected Microsoft 365 services. But when a project ends, a department changes, or a Group is no longer required, admins or Group owners may need to remove it.
In this guide, you will learn how to delete a Microsoft 365 Group, delete Office 365 Group from Outlook, remove a Group using PowerShell, restore a deleted Group, and permanently purge a deleted Group.
What is a Microsoft 365 Group and its Resources
A Microsoft 365 Group is a collaboration object that provides a shared workspace for a group of users. Depending on how it is used, the Group can be associated with resources such as:
- Exchange Online Group mailbox and calendar
- SharePoint team site and files
- OneNote notebook
- Planner
- Microsoft Teams
- Viva Engage
- Power BI Classic workspace
Checklist Before You Delete Microsoft 365 Group
You know how crucial the Microsoft 365 Group is for business; deleting a Group can affect more data than expected. So, review the data and associated Microsoft 365 Group services like Teams, SharePoint, Outlook, Planner, OneNote, Viva Engage, and others.
- Confirm that the Group is no longer required and important users are aware of the deletion.
- If the Group is associated with a Team, then the underlying Microsoft 365 Group also deletes the associated Team.
- Review the Group’s SharePoint site and document libraries for files that need to be retained.
- Review important Group emails, conversations, and calendar information.
- If the Group is used with Planner, review its plans and tasks before deletion.
- Make sure important notebooks or other Group-connected data are not being removed unintentionally.
- If the organization’s retention policies, legal holds, or eDiscovery requirements apply to the Group’s data, verify those requirements first.
- Keep data independently of Microsoft 365, so create a backup before deleting the Group.
Ways to Delete Microsoft 365 Group: Step-by-Step Guide
There are three ways to delete Microsoft 365 Groups: Using Microsoft 365 admin center, Outlook (New, Web, classic), and Microsoft Graph PowerShell. Understand each method and choose the one that suits you:
Way 1: Delete Microsoft 365 Group from the Microsoft 365 Admin Center
Admins can manage active Microsoft 365 Groups from the Microsoft 365 admin center. Here are the steps to delete a Microsoft 365 Group via Microsoft 365 admin center:
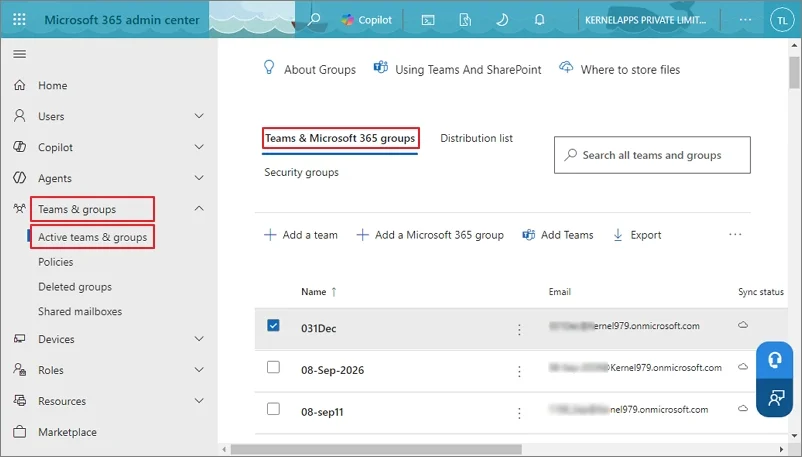
- Sign in to the Microsoft 365 admin center, then go to Teams & groups and select Active teams & groups.
- Under Microsoft Teams and Groups, tap on the Microsoft 365 Group you want to delete.
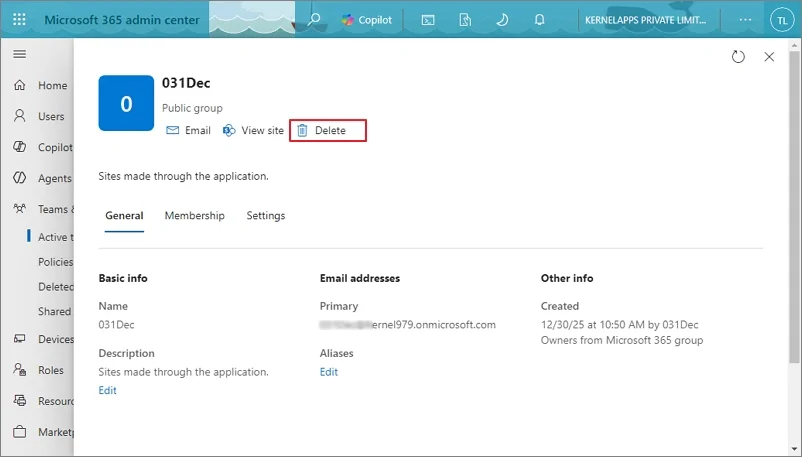
- Tap on the Delete option.
- Tap on Delete Group to confirm the deletion.
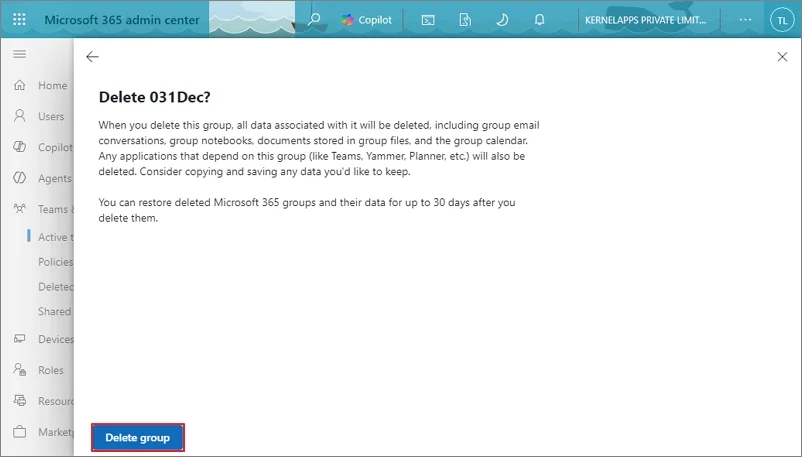
- Your selected group will be deleted and enter the 30-day soft-deletion period. During this period, the group can be restored.
Way 2: Delete Microsoft 365 Group from Outlook (New, Classic, OWA)
Admin and Group owners can also delete a Microsoft 365 Group from supported versions of Outlook when using a qualifying work or school Microsoft 365 account.
Steps to Delete a Microsoft 365 Group in New Outlook
To delete Office 365 Groups via New Outlook on the web, follow these steps:
- Log in with an admin account or group owner account in New Outlook.
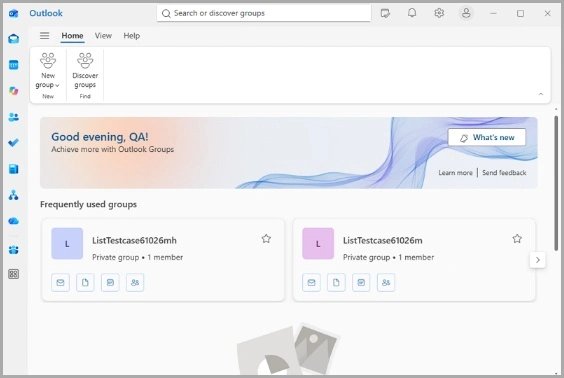
- Scroll down in the mailbox folder pane and choose Go to Groups.
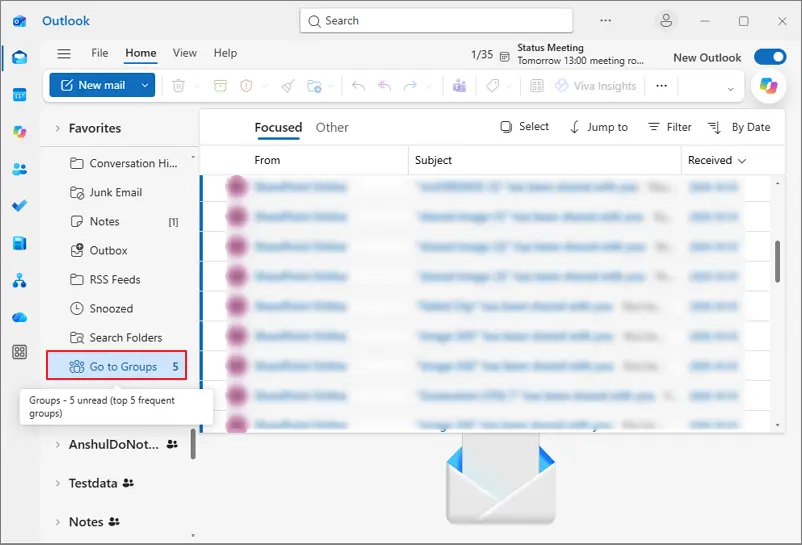
- Select and open the Office 365 Group from the listed ones that you want to delete.
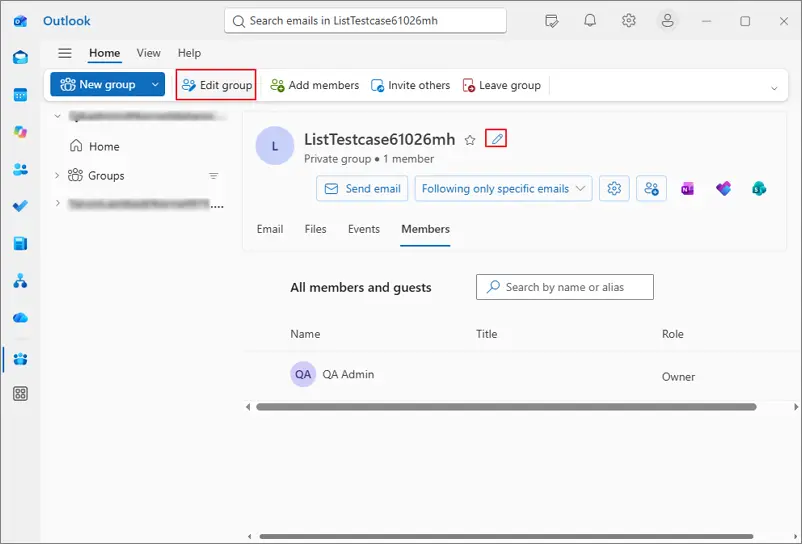
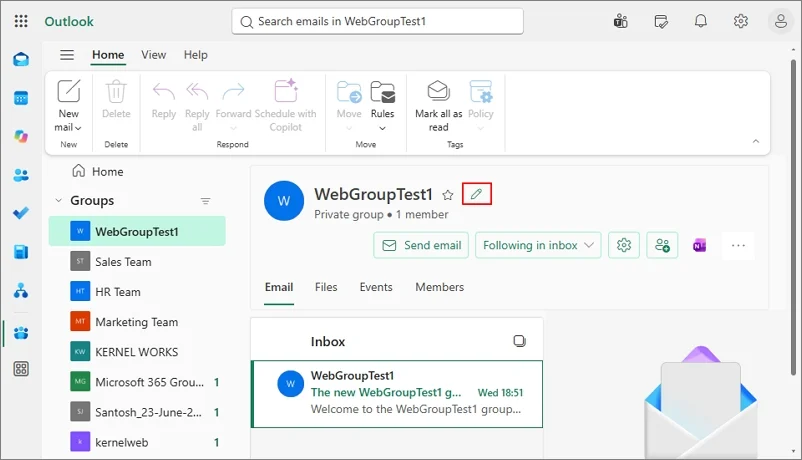
- Once opened, tap on the Edit Group icon next to the group name or the button above.
- Lastly, tap on Delete group.
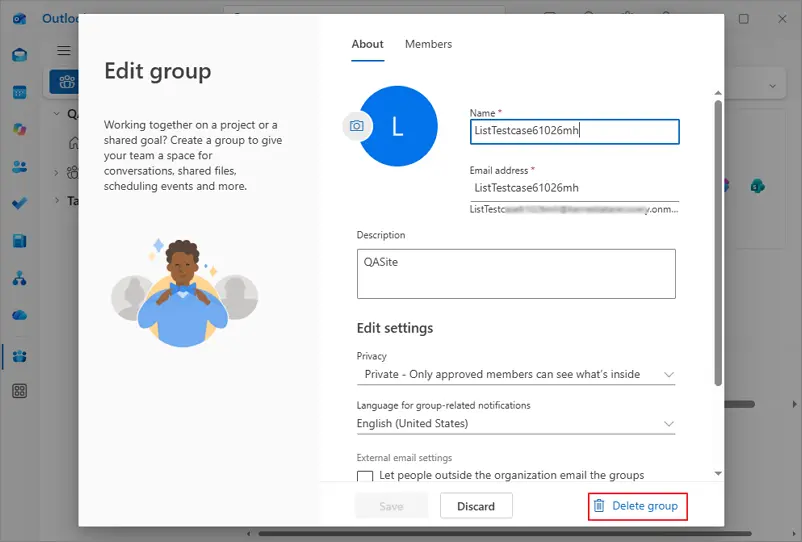
These are the steps to delete Microsoft 365 Groups in New Outlook.
Steps to Delete a Microsoft 365 Group in Outlook on the Web
To delete Office 365 Groups via Outlook on the Web, here are the steps to follow:
- Sign in to Outlook on the web with an account having group owner or admin permissions.
- In your mailbox list, tap on Go to Groups.
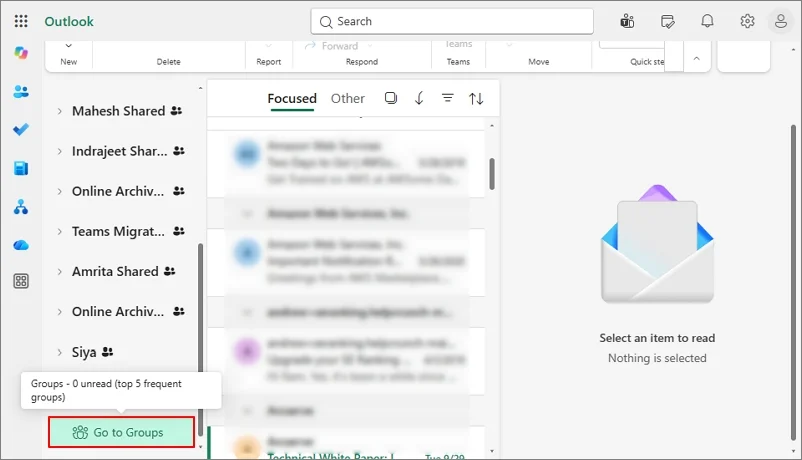
- Select the required Microsoft 365 Group and tap on the Edit Group button.
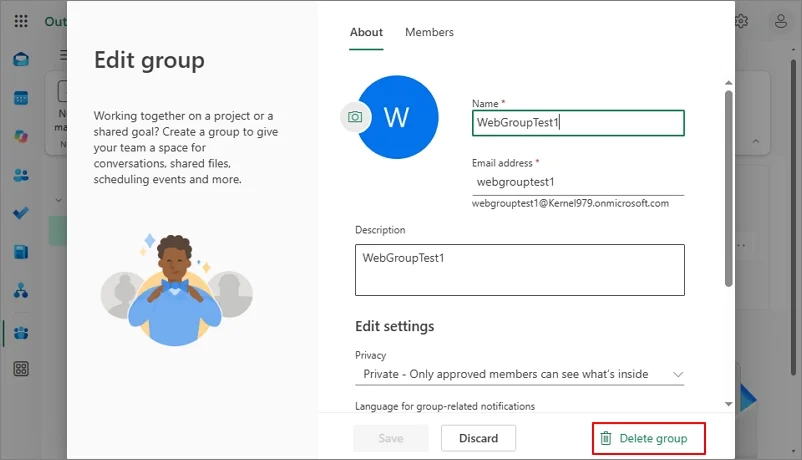
- Edit Group Window will open. Tap on Delete group.
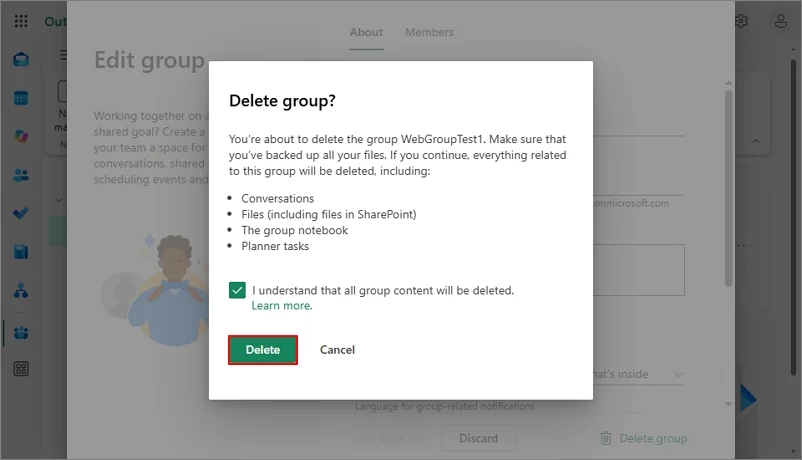
- Confirm the deletion by tapping on Delete.
Steps to Delete a Microsoft 365 Group in Classic Outlook
To delete Office 365 Groups via Classic Outlook, follow the steps below:
- Open Classic Outlook, go to the mailbox folders list, and tap on Groups.
- Select and open the required group you want to delete.
- Tap on Group Settings, then choose Edit Group.
- Scroll down and select Delete group.
- Confirm by tapping Delete when prompted.
Note: For permanent Office 365 group deletion, go to Microsoft 365 admin center, Microsoft Entra ID > Groups > All groups. Click on Deleted groups, select the groups you want to remove, and tap on Delete permanently
Note: To delete Microsoft 365, you must be the group owner or admin to delete a Microsoft 365 Group. When you delete Office 365 group, its inbox content, shared files, calendar events, and team site data get removed. However, you or your IT admin can restore a deleted Microsoft 365 group within 30 days of deletion.
Read More: How to Delete Office 365 Users Permanently.
Way 3: Delete Microsoft 365 Group Using Microsoft Graph PowerShell SDK
Microsoft Graph PowerShell SDK provides a current PowerShell-based way to manage Microsoft 365 Groups. You can use it to find a group, verify its details, delete it, check the deleted group, restore it if required, or permanently purge it. Here is a set of PowerShell Commands to delete Microsoft 365 Groups:
- Install the Microsoft Graph PowerShell SDK with the command below:
- Connect to Microsoft Graph for an interactive administrator session by running:
- List Microsoft 365 Groups before deleting anything. Run the command:
- If you know the group’s display name, run the command to search for it:
- Run the command below to verify the group before deletion
- Group name and ID are correct
- Email address is correct
- The group is actually a Microsoft 365 Group
- The group is no longer required.
- Once you have verified the correct group ID, run:
- Run the command below to verify the Microsoft Group has been deleted.
- To check whether the group is in the deleted-items container, use:
- To list deleted Microsoft 365 Groups, run the command:
- When you are finished, sign out of the Microsoft Graph PowerShell session:
If PowerShell asks whether you want to install the package from PSGallery, enter:
Y
A Microsoft sign-in window will appear. Sign in with an account that has the required permissions.
Where-Object { $_.GroupTypes -contains “Unified” } |
Select-Object Id, DisplayName, Mail, GroupTypes
Select-Object Id, DisplayName, Mail, GroupTypes
Replace Project Team with the actual group name. You can also search by mail address:
Get-MgGroup -Filter “Mail eq ‘Webtestgroup@example.com'” |
Select-Object Id, DisplayName, Mail, GroupTypes
Select-Object Id, DisplayName, Description, Mail, MailNickname, GroupTypes, Visibility, CreatedDateTime
Replace the $GroupId with the actual group ID and check that:
Note: Do not delete a group based only on its display name. First, retrieve its complete basic details.
Remove-MgGroup -GroupId $GroupId
Replace the $GroupId with the actual group ID.
Important: This command performs a soft deletion for Microsoft 365 Groups. The deleted group is placed in the deleted-items container and can normally be restored for up to 30 days.
Get-MgGroup -GroupId $GroupId
Get-MgDirectoryDeletedItem -DirectoryObjectId $GroupId
Get-MgDirectoryDeletedItem -All |
Where-Object { $_.’@odata.type’ -eq ‘#microsoft.graph.group’ } |
Select-Object Id, DeletedDateTime
Note: You need Global Administrator or Group Administrator privileges in Microsoft Entra ID to execute these permanent purge commands.
Disconnect-MgGraph
How to Permanently Delete a Microsoft 365 Group Using PowerShell
If you need to permanently remove a Group that is already in the deleted-items container, Microsoft Graph provides the Remove-MgDirectoryDeletedItem cmdlet. Note that an item that is permanently deleted from the deleted items container cannot be restored.
- Connect to Microsoft Graph, run:
- Confirm the deleted group exists; run:
- To permanently delete the group, run:
- To verify permanent deletion, run:
- Once done, sign out of the Microsoft Graph PowerShell session using command below:
For example: $GroupId = “********-****-*****-****-************”
Get-MgDirectoryDeletedItem -DirectoryObjectId $GroupId
Verify that the returned object is the group you intend to remove permanently.
For example:
$GroupId = “********-****-*****-****-************”
Remove-MgDirectoryDeletedItem -DirectoryObjectId $GroupId
Get-MgDirectoryDeletedItem -DirectoryObjectId $GroupId
Disconnect-MgGraph
Note: Before using Remove-MgDirectoryDeletedItem –
DirectoryObjectId $GroupId, make sure that:
- You have selected the correct group ID.
- The group is no longer required.
- You do not need to restore the group.
- Required data has been backed up or retained elsewhere.
- Retention policies and legal requirements have been reviewed.
- You understand that permanent deletion cannot be reversed through normal group recovery.
What Happens When You Delete Microsoft 365 Groups?
When you delete a Microsoft 365 Group, it goes into a soft-deletion period of 30 days. During this period:
- The group is no longer available as an active Group.
- The deleted Group is retained by Microsoft.
- Still, the Microsoft 365 Group can be restored along with its associated content.
- After 30 days, the Group is permanently deleted, and you cannot restore it through the standard group-recovery process.
Risks Involved When Deleting Microsoft 365 Groups Without Backup
When you delete a Microsoft 365 Group, you don’t just delete a list of names; you permanently remove a collection of shared resources, including:
- Exchange mailbox data (shared emails and group calendars)
- SharePoint team sites (stored files, folders, and document libraries)
- OneNote notebooks and Planner tasks
Microsoft only provides a 30-day retention window (soft-delete phase) during which a Group can be restored. Once that period passes, the Group and all its associated data are permanently purged and cannot be recovered through native Microsoft tools.
Is It Better to Backup Office 365 Groups Before Deleting Them?
Yes, it is much safer to backup Office 365 Groups before deleting them because deleting an Office 365 Group removes its linked resources, including the Exchange Online shared mailbox, calendar, SharePoint site, files, and Microsoft Teams or Planner data. Even human error and accidental deletion can cost you more. So you must backup Office 365 data, including Groups and other necessary data that you may need in the future.
For an independent backup copy and complete control over your Office 365 data, use Kernel Office 365 Backup and Restore tool. It helps to back up entire Office 365 mailbox data into file formats like PST, EML, MSG, PDF, etc., to local/NAS storage. Moreover, you can also restore all backed-up data anytime to Microsoft 365 when needed.
Conclusion
We hope you now understand the complete process to delete Office 365 Groups, whether through the Microsoft 365 admin center, Outlook, or Microsoft Graph PowerShell. The PowerShell command needs a little more expertise than performing other GUI-based methods.
Choose the method that you want or have expertise in. Do remember that once you delete them permanently or the retention period has passed, you can’t recover them. So, take a complete Office 365 Group backup and save it to local storage before deleting them as a safer approach.