HOW TO backup Salesforce data?
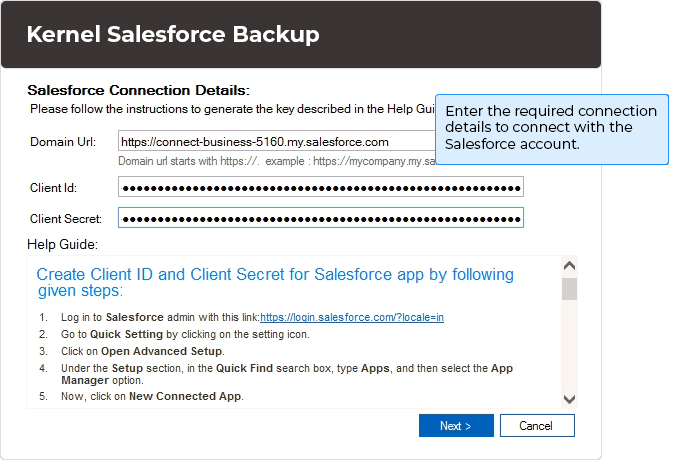
Extract Salesforce backup using the Kernel Salesforce Backup and Restore tool that allows you to save your business-critical data to the required destination in just three simple steps:


Extract Salesforce backup using the Kernel Salesforce Backup and Restore tool that allows you to save your business-critical data to the required destination in just three simple steps:


Perform flexible Salesforce backup and restore with the Kernel Salesforce Backup and Restore tool. Innovative features help to safeguard your data from threats like accidental deletion, breaches, and ransomware attacks.
Kernel Salesforce Backup and Restore tool runs comprehensive data backup to extract standard objects, custom objects, records, files, attachments, and metadata. Save all data to the specific destination for extensive data security and lower the repercussions caused by data losses due to human or system errors.
Kernel Salesforce backup and Restore supports Salesforce backup and restore organizations from existing backups in your local or network-attached storage. Get a clear preview of the Salesforce backup and restore the complete Salesforce organization, specific standard objects, custom objects, metadata, files & attachments, person accounts, etc. to ensure stability in business.
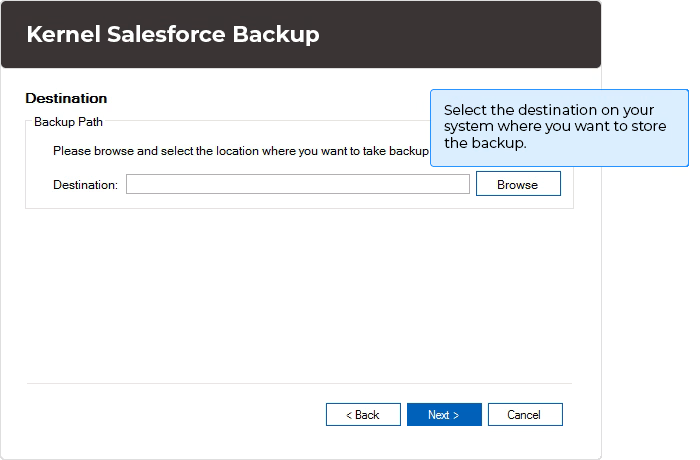
With our Salesforce data backup solution, you have the flexibility to select the destination from your system to save Salesforce backup. Save the Salesforce data backup to an existing or a new folder at the selected destination (local or network drive) with separate sub-folders for each category.
Backup data from Salesforce storage to Azure Blob Storage within a few couple of minutes. Supports hassle-free transfer of data and allows easy access to everything in the destination post-migration.
Use the Salesforce backup tool to save Salesforce data backup to AWS S3 buckets. Migrate data and metadata from Salesforce to AWS S3 buckets arranged in folders and subfolders. Provides easy access to the data once migrated to AWS S3.
Connect to the Salesforce organization (source) and Amazon S3 or Azure Blob Storage (destination) using the secured login method. Enter the credentials and connect securely with both source & destination. Once you connect with the account, you can see all the Salesforce directories (data and metadata) in the list.
Use the advanced search box of the Salesforce backup restore solution to locate particular data and metadata. It helps in running selective restore and saves time involved in looking for the directories manually. Simply enter the directory name in the search box and mark the checkbox to proceed.
Once the Salesforce account is connected with our best Salesforce backup solution, all the standard objects, custom objects, and records appear as the directories. You can preview all the configuration, data, and metadata in the hierarchy and select which folder you want to include in the data restore at the end.
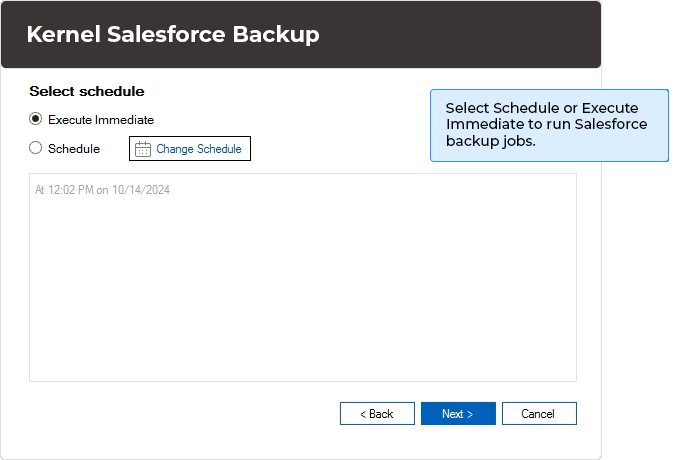
With the Salesforce backup and recovery software, you can either run immediate backups or schedule to run automated backups. Schedule the software to run Salesforce backup once, daily, weekly, or monthly as per the business needs. The scheduling feature helps in running manual backup jobs every time.
With the Salesforce backup tool, one can easily export data from Salesforce to your local storage or network drive. The data will be saved in separate folders as CSV files maintaining the structure as the source. The tool renames a file if two files are found with a same name in the backup.
Salesforce backup and restore software is compatible with all versions of the Windows Operating System, including Windows 365, 11, 10, 8.1, 8, 7, Vista, XP, 2000, 98, NT & 95, and Windows Server 2022, 2019, 2016, 2012, 2008 R2, 2008, 2003 R2, 2003 OS.
Uncover the answers to the most common queries our customers ask and learn how Kernel Salesforce Backup and Restore tool helps in taking seamless Salesforce backup.
Once done, you can go to the defined location to find the saved backup in your system.
After completion, you can see the Summary of Salesforce backup and restore.
After connecting with the Salesforce organization, the tool asks you to provide a destination path where you want to save the Salesforce data backup. When you open the running job, you can see the progress status mentioning Source Path, Destination Path, Backup Size, and other details. Go to the mentioned destination path and you can find all the data and metadata backed up in multiple folders.
Yes, you can create different jobs and run both Salesforce backup restore instances simultaneously using this tool.
Our tool comes with Salesforce backup options to allow you to run backup/ restore immediately or schedule it for later. With this one of the best Salesforce data backup solutions, you can also program to run regular backup or restore jobs daily, weekly, or monthly.
The tool supports downloading Salesforce backup to local and network drives. Moreover, it also supports direct transfer of data to AWS S3 and Azure Blob Storage.
No. There is no limit on the data that this tool can help Salesforce backup and restore.
Yes, you can download the trial version of Kernel Salesforce backup and Restore tool to understand how Salesforce backup solutions actually work. With the demo version, you get a 7-day free trial and a facility to back up 1GB of data. Once you are satisfied with the performance, you can get in touch with the team to learn about Salesforce backup and restore pricing and purchase it to save unlimited backups.
There are not many manual approaches to export data from Salesforce. Hence, you must opt for an automated Kernel Salesforce backup or restore software to export data from Salesforce in the original hierarchy. The tool lets you perform the procedure without any hassle while keeping data intact.
Importing data in Salesforce is crucial and requires technical expertise. That's why professionals recommend Kernel Salesforce Backup or Restore software to import data in Salesforce easily. Also, you can selectively restore Salesforce data or metadata according to your needs.
Version: 25.0
Release Date: Jan 2025
Salesforce: Salesforce Enterprise, Unlimited, Developer, and Performance Edition.
Hard Disk: 4 GB free space for the installation and data Information
Memory: Minimum 4GB RAM
Processor: Intel® Pentium 4 Class or higher Processor
Operating System: Windows 365 (Cloud PC)/ 11/ 10/ 8 /7 Service Pack 1, Windows Server 2022/ 2019/ 2016/ 2012 R2/ 2012/ 2008 R2/ 2008/ 2003
Virtual Environments: Hyper-V Server, VMware ESX/ ESXi Server, Microsoft Virtual PC