Exchange Online (Mailbox Migration)
Step 1: Download, install, and launch Kernel Office 365 Migration Pro software.
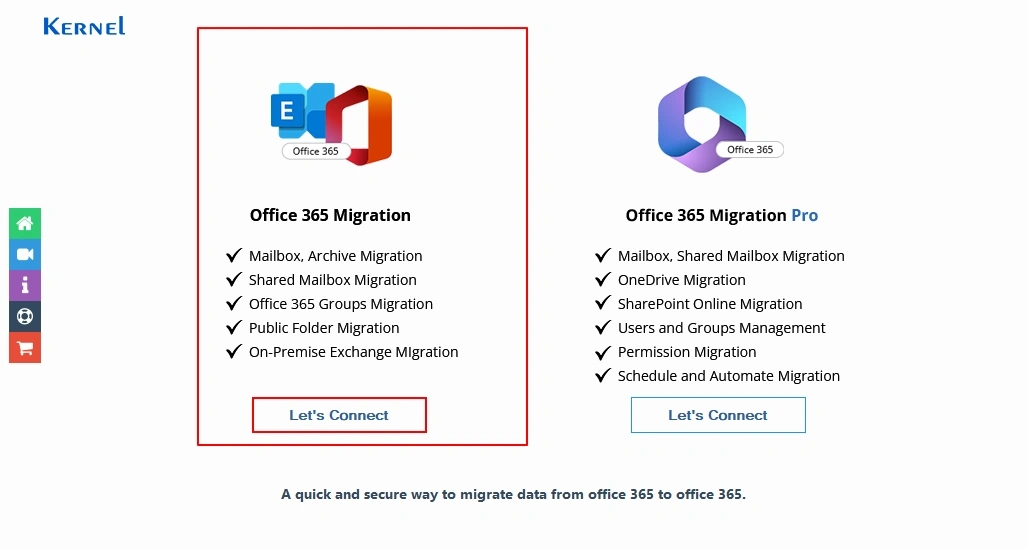
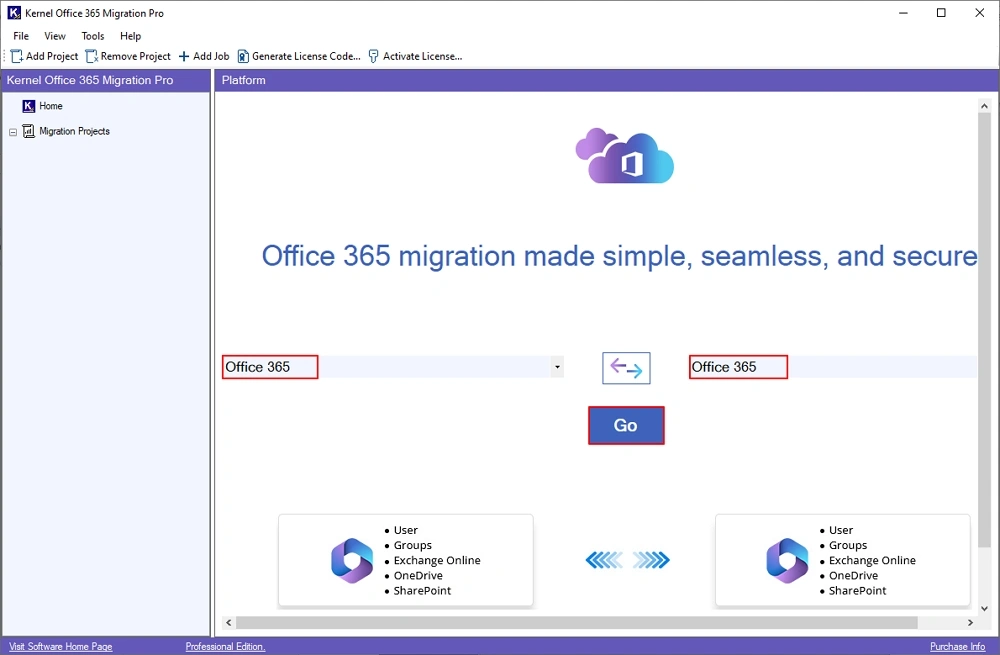
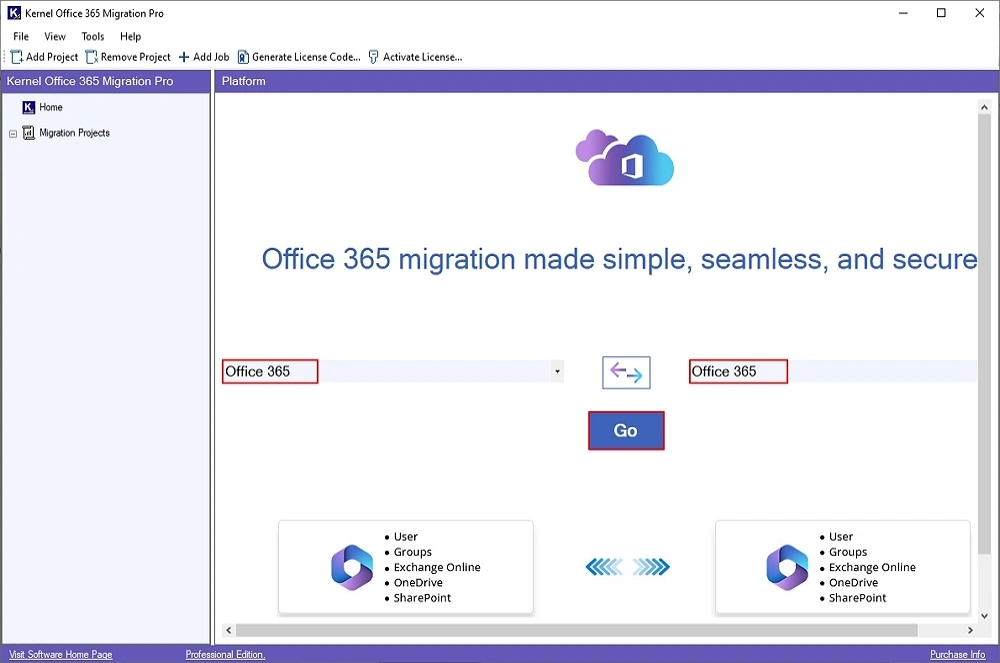
Step 2: On the software’s home screen, click on Let’s Connect in the Office 365 Migration Pro tile.

Step 3: In the following wizard, select Office 365 in source and destination. Click Go.
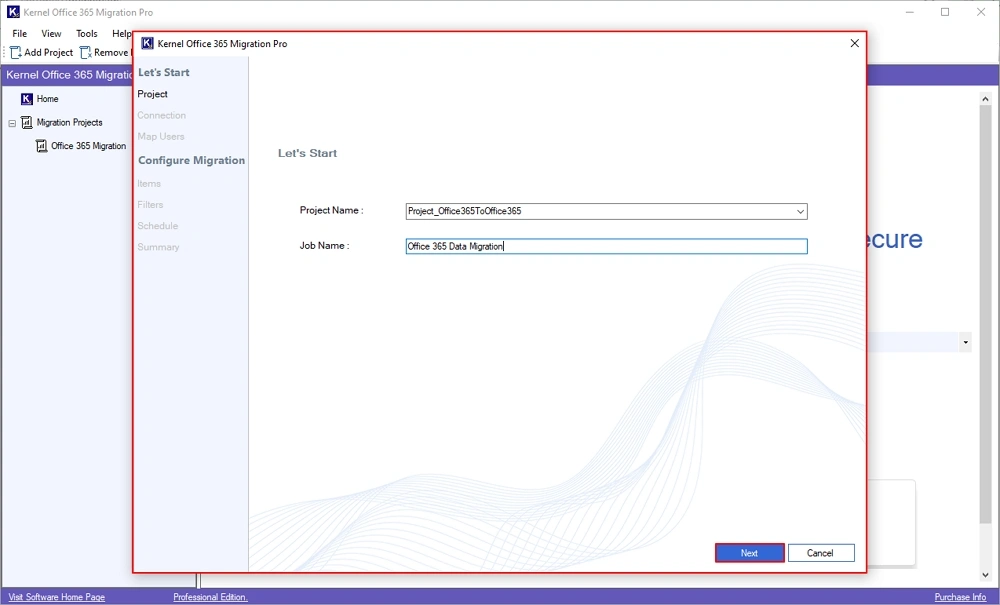
Step 4: Enter Project Name and Job Name in the following window. Click Next.
Step 5: The software will pop up “Project (Name) does not exist. Do you want to create it?” message. Click Yes.

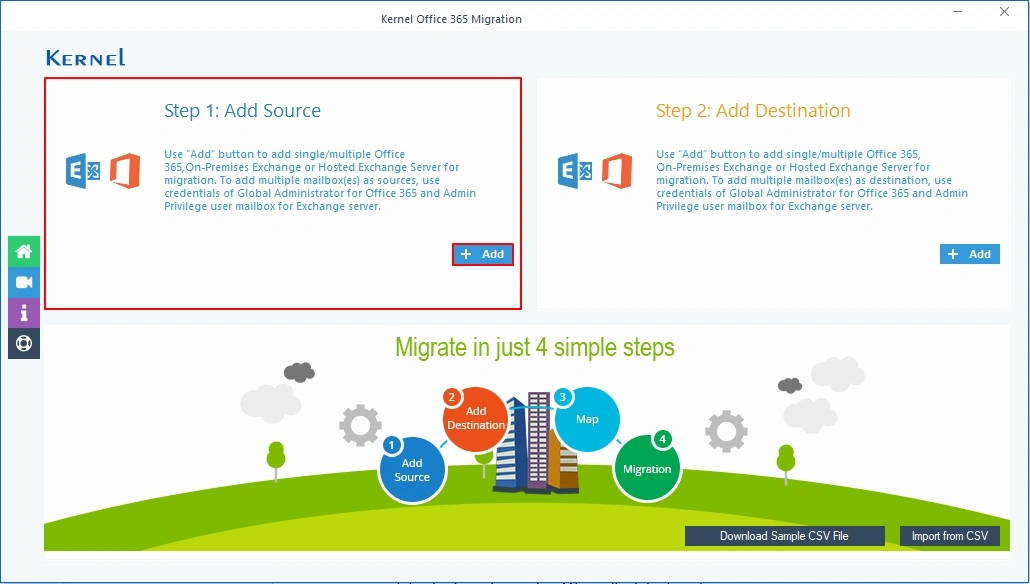
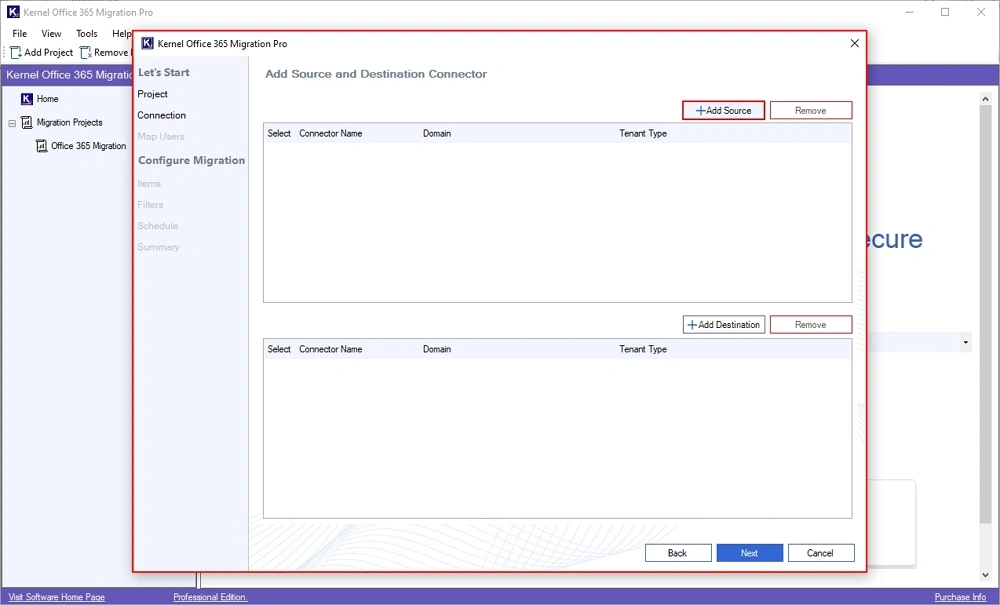
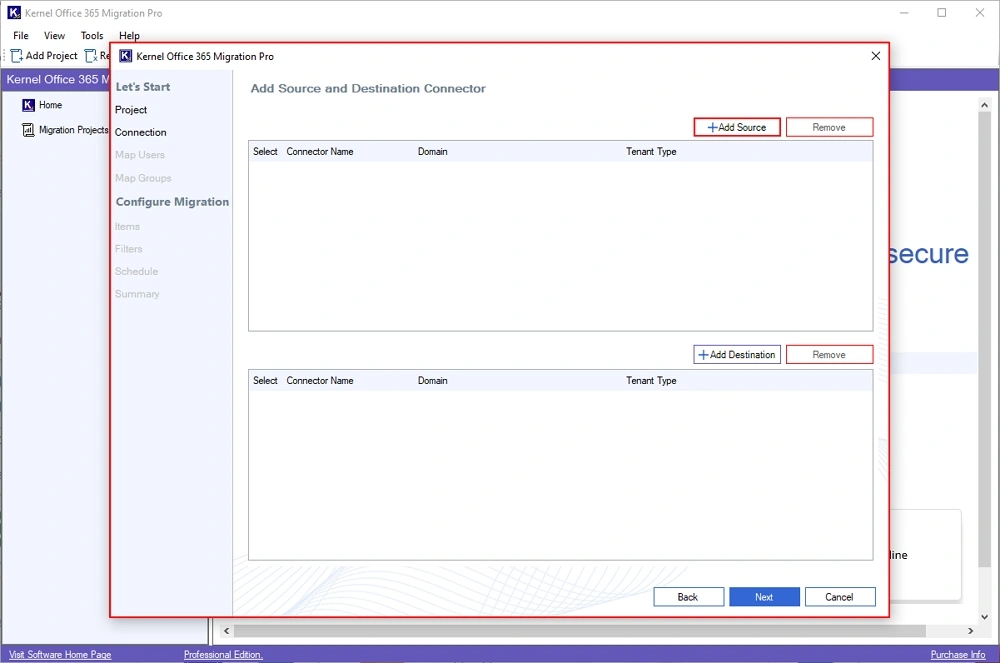
Step 6: In the Add Source and Destination Connector window, click on Add Source.
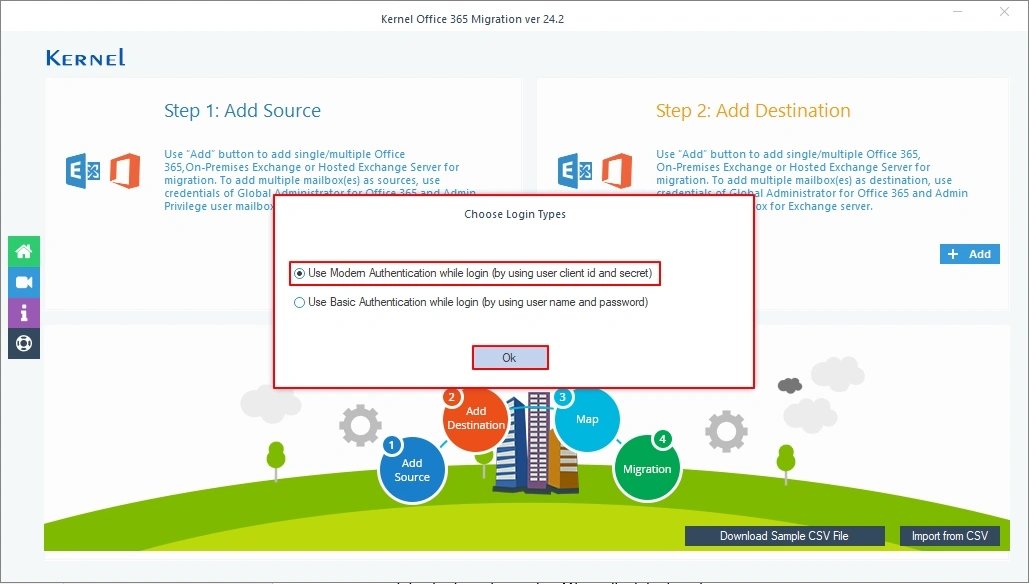
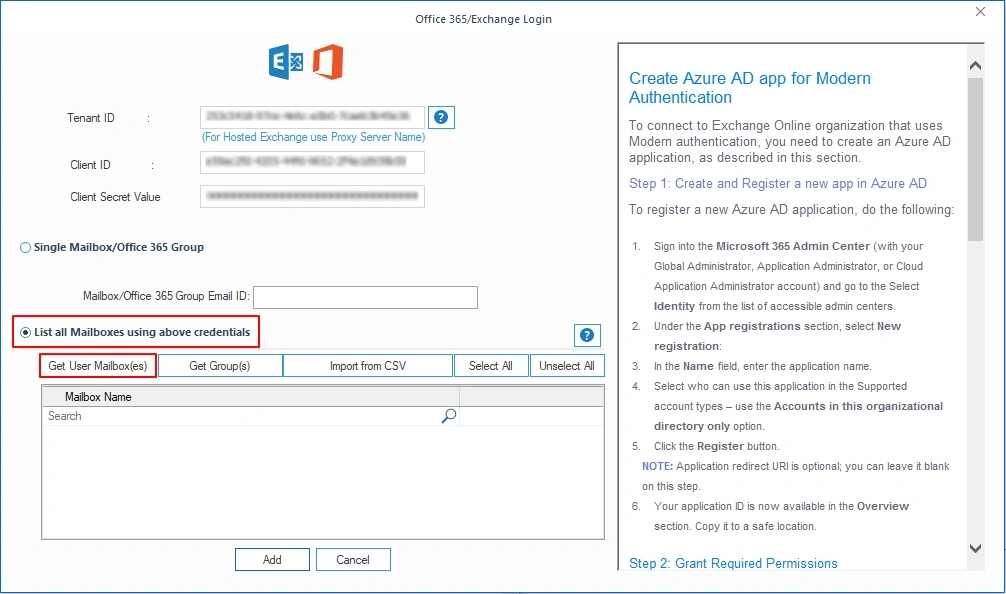
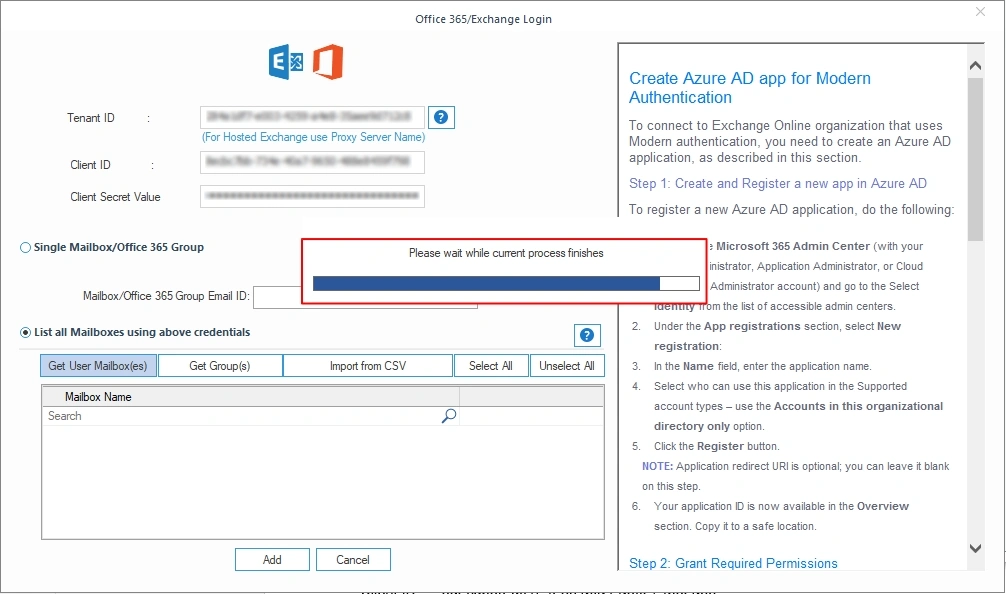
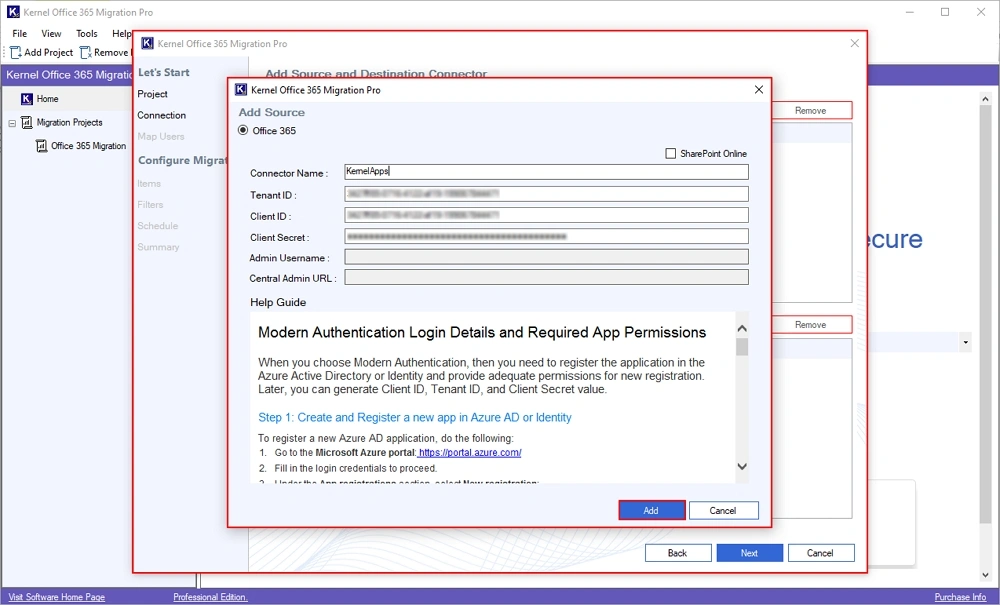
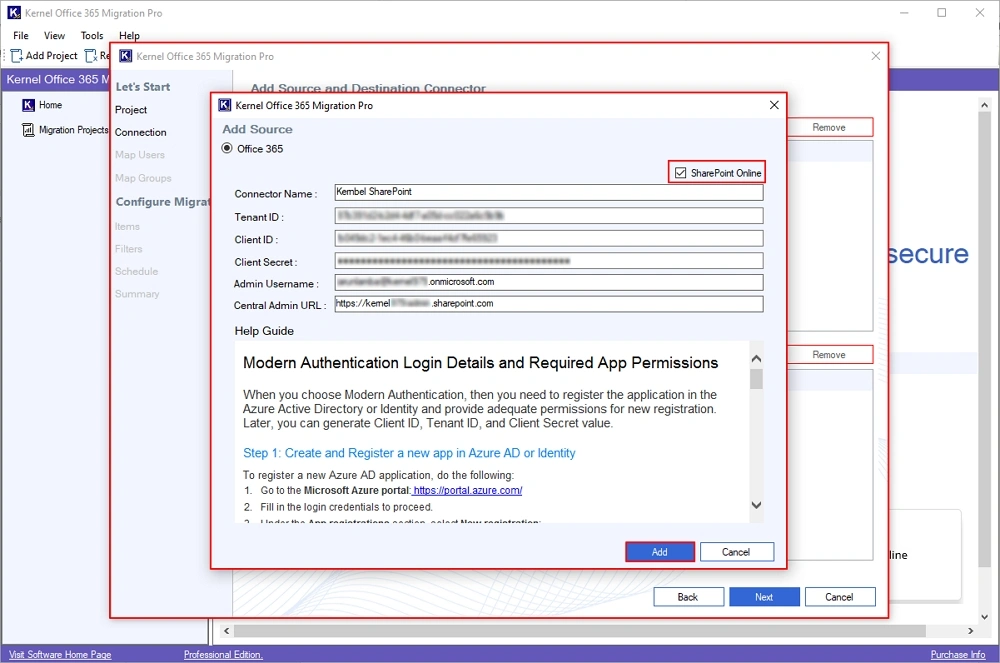
Step 7: In the Add Source section, enter Office 365 credentials, such as Tenant Name, Tenant ID, Client ID, and Client Secret. Click Add.
Note: If you also want to move SharePoint data, then check the SharePoint Online icon located at the top and provide required credentials.
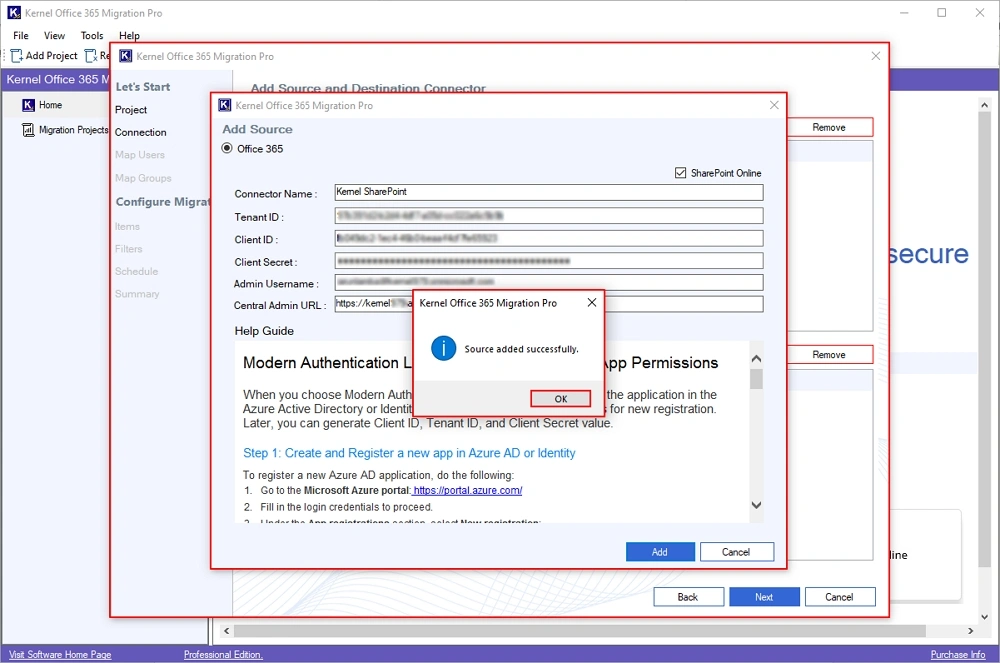
Step 8: When the software adds the source, you will get a “Source saved successfully” message and click OK.

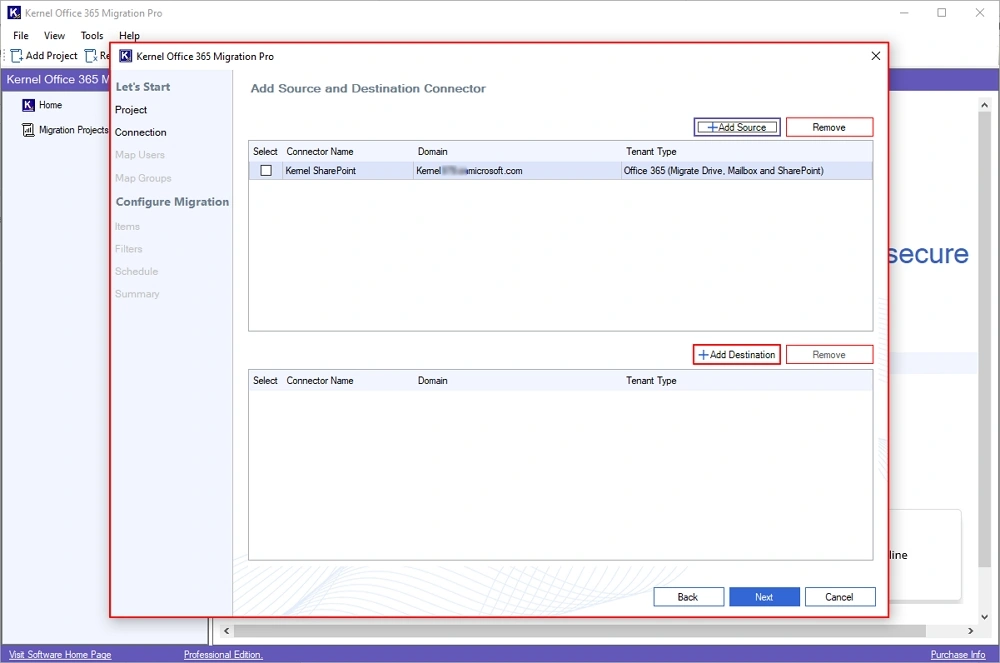
Step 9: Now, click on Add Destination.

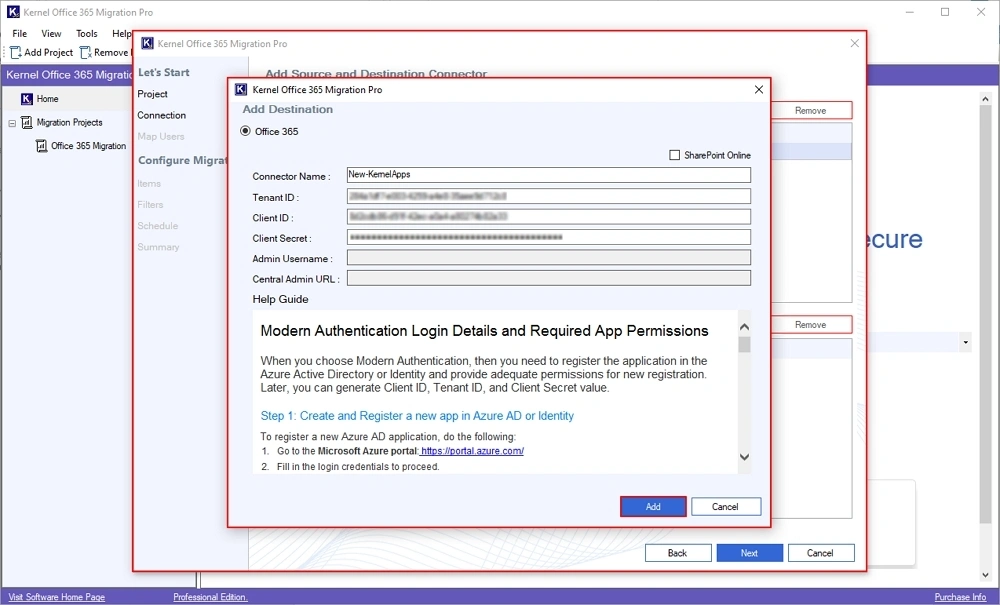
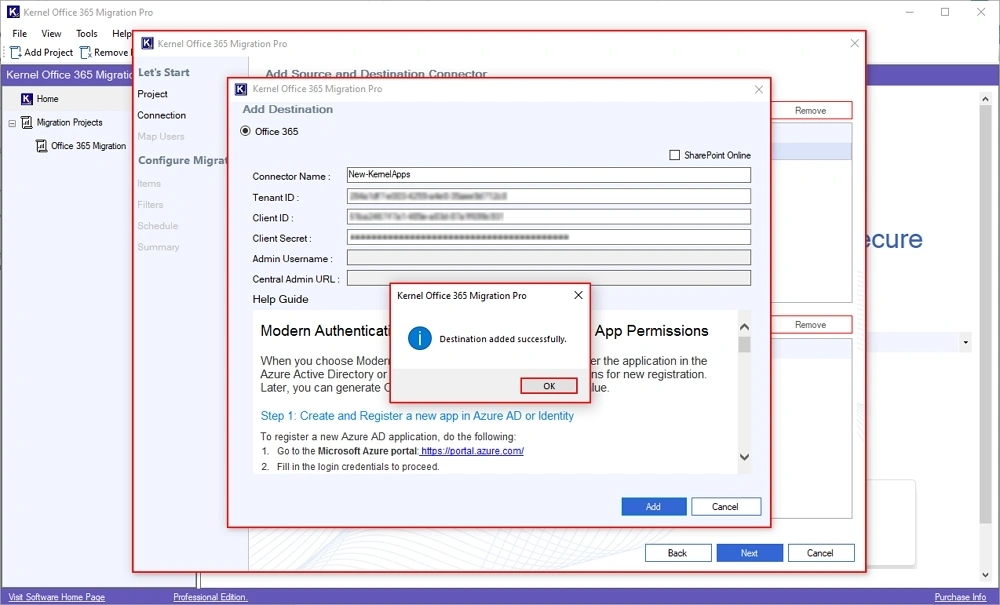
Step 10: In the Add Destination window, select Office 365. Enter destination tenant credentials, like Tenant Name, Tenant ID, Client ID, and Client Secret Click Add.
Step 11: Once the destination is added, you will get “Destination added successfully” message and click OK.
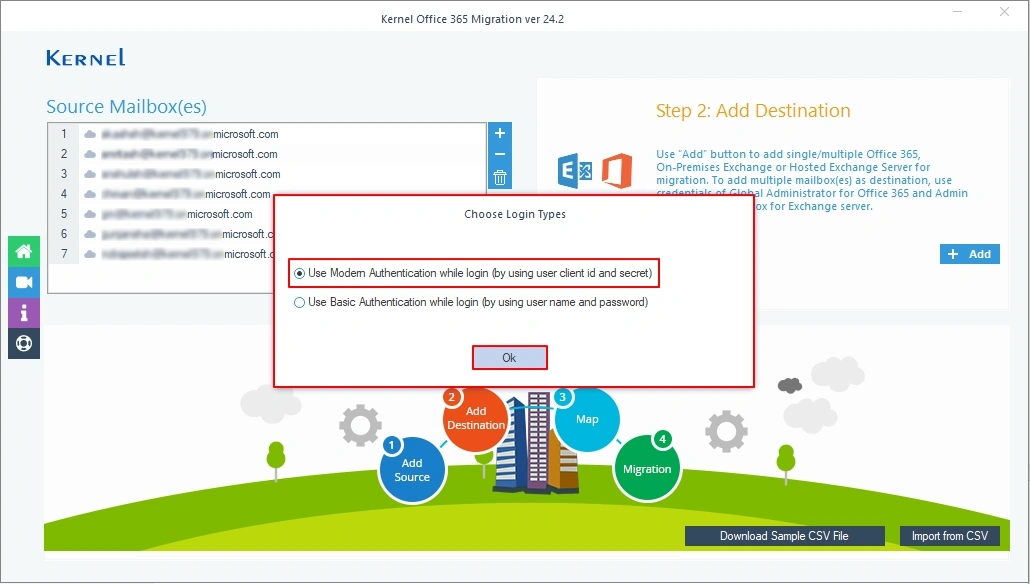
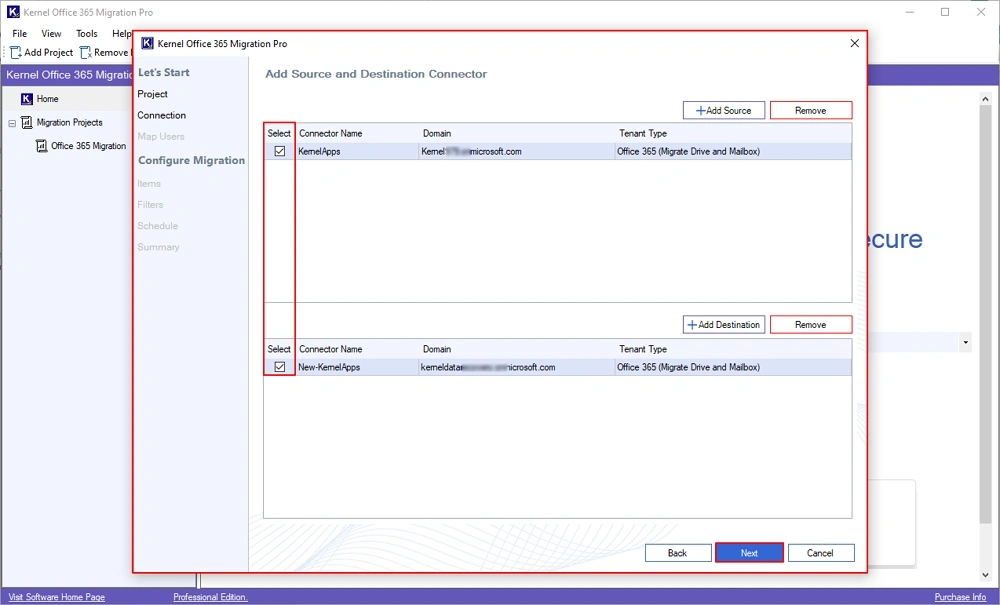
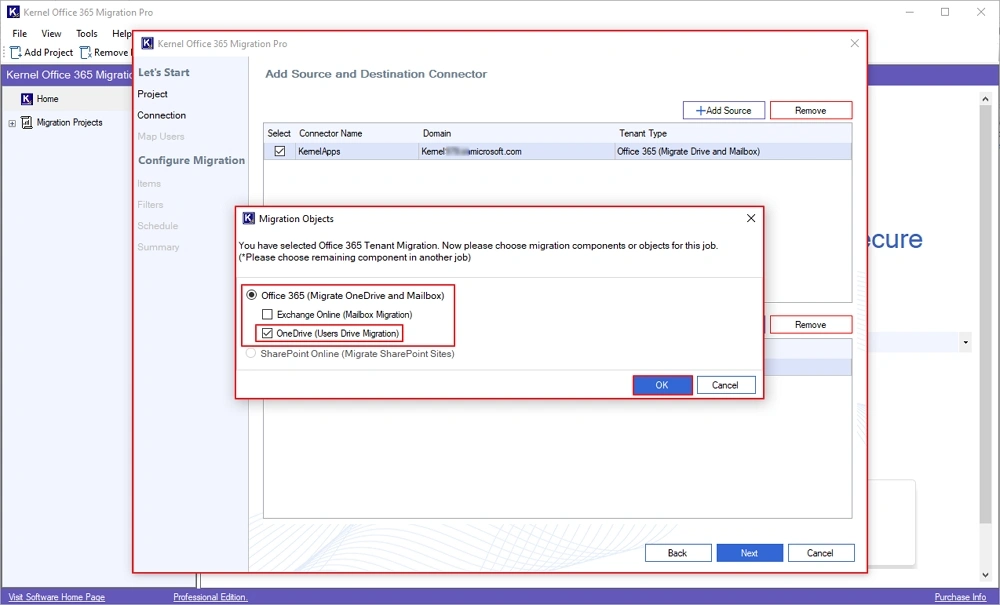
Step 12: Select the source and destination accounts and click Next.
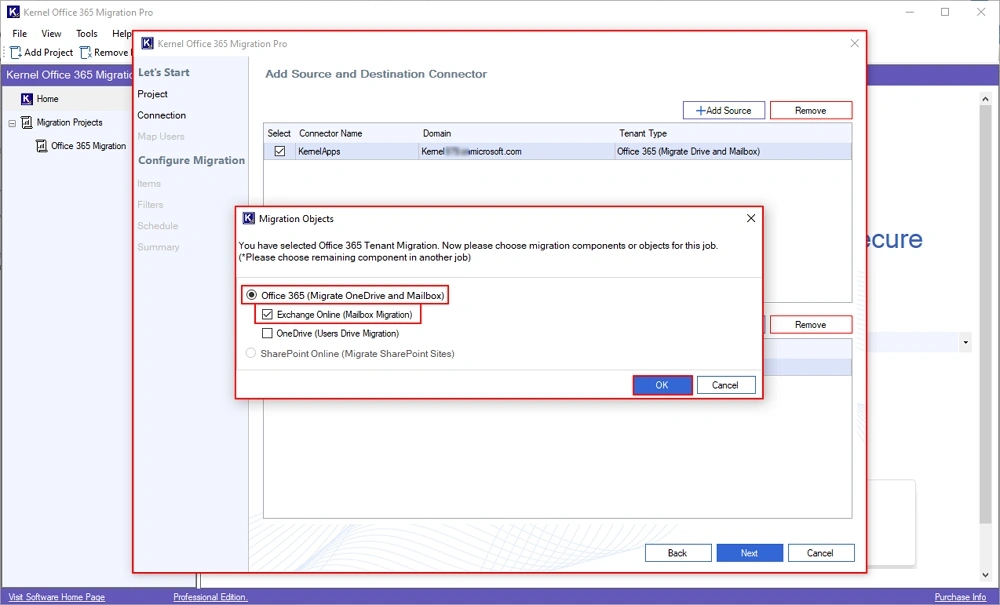
Step 13: In the following window, select Exchange Online (Mailbox Migration) and click OK.
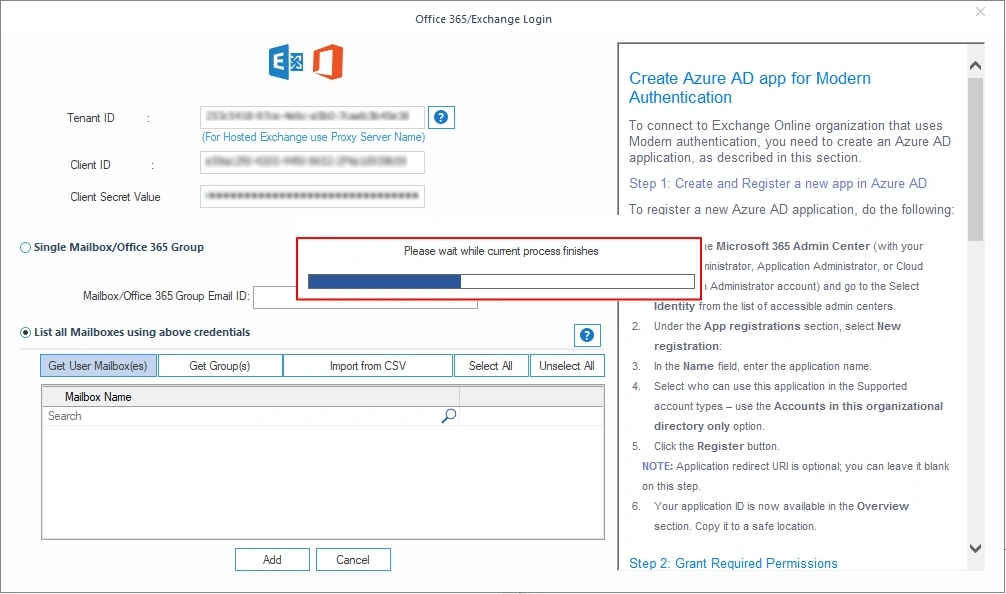
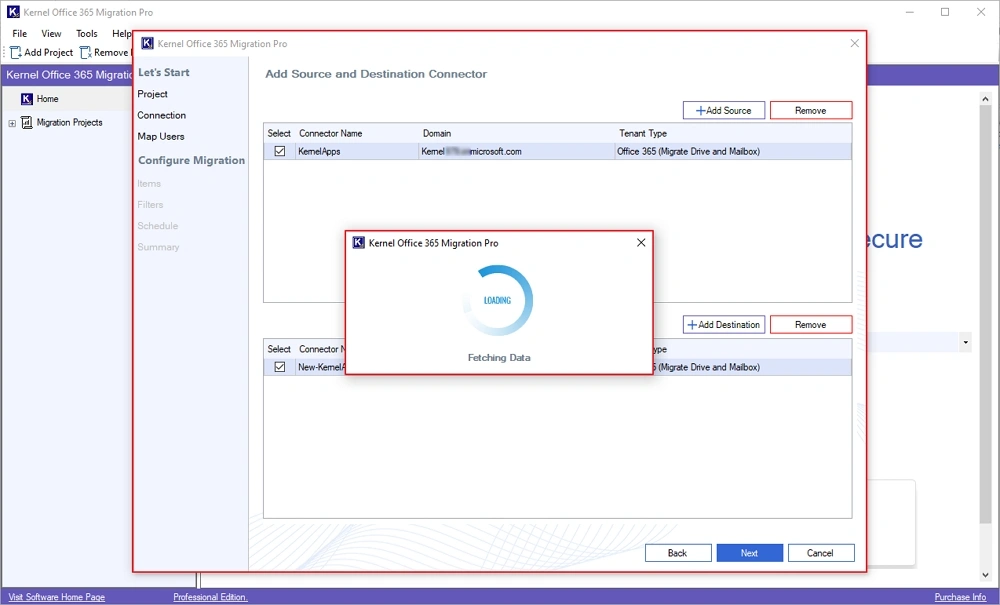
Step 14: The software will start Fetching data and extract all the users from admin ID.

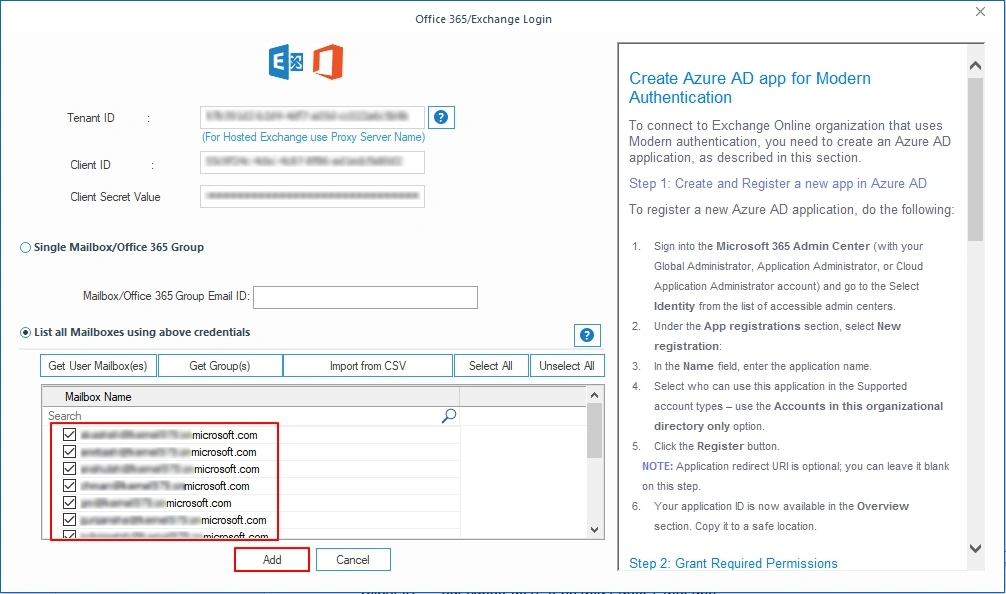
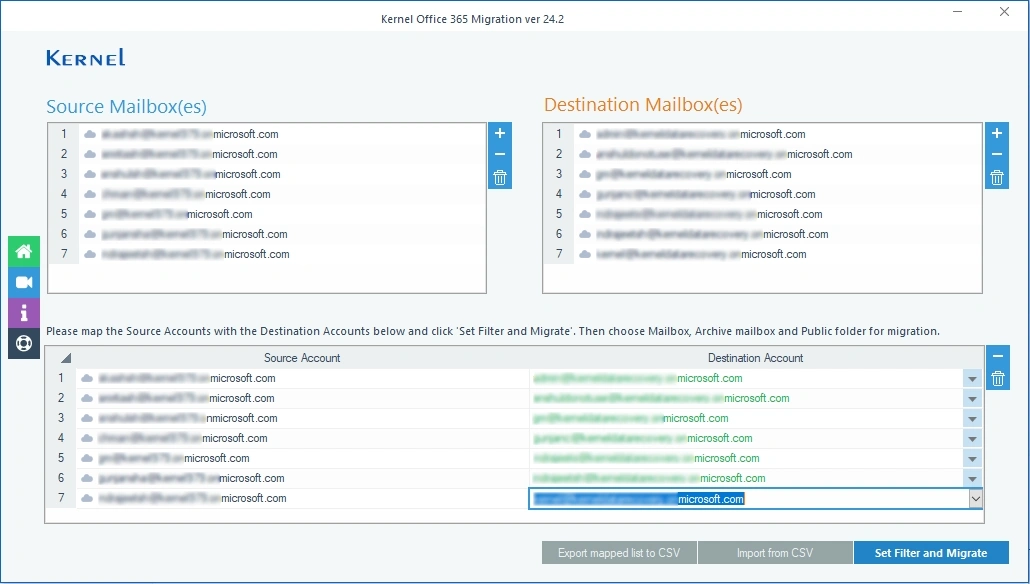
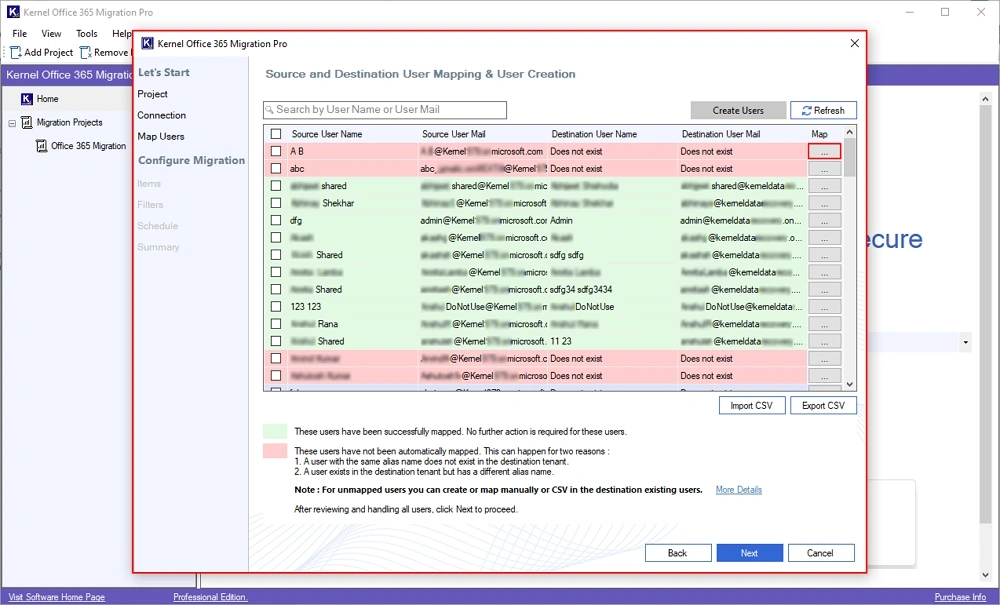
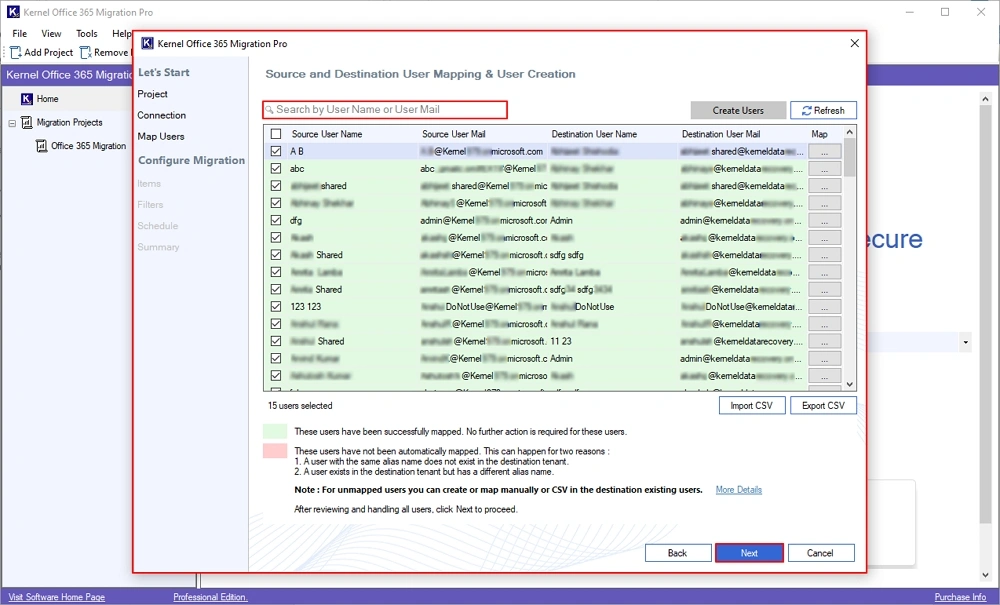
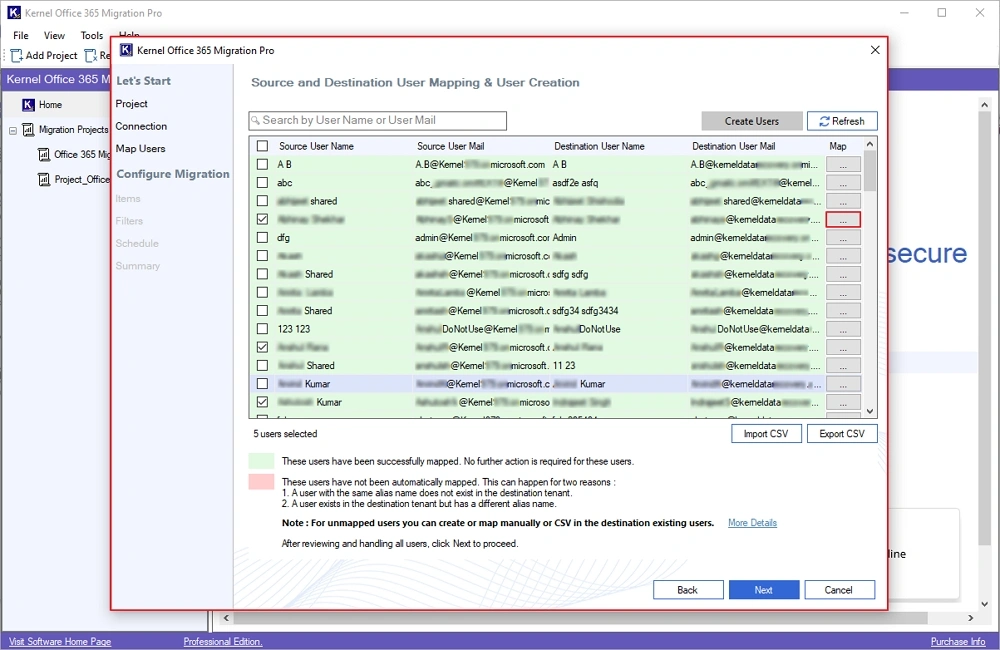
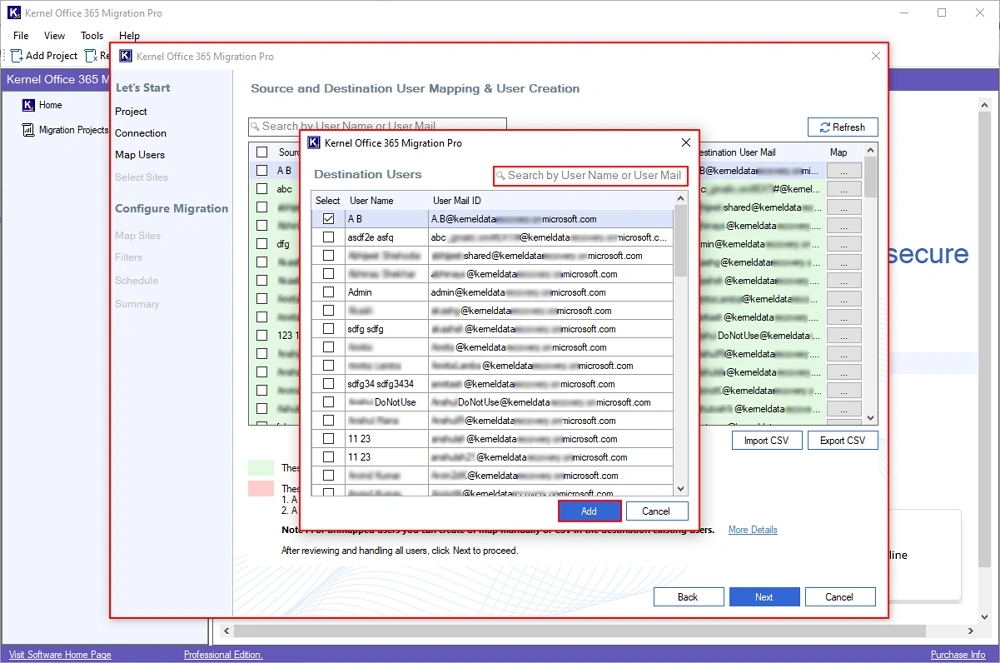
Step 15: In the Source and destination User Mapping & User Creation window, select all the necessary users, and click on the three dots under the Map column.
Note: You can even find the necessary users using the Search feature. Additionally, Create Users in the destination by the tool itself.
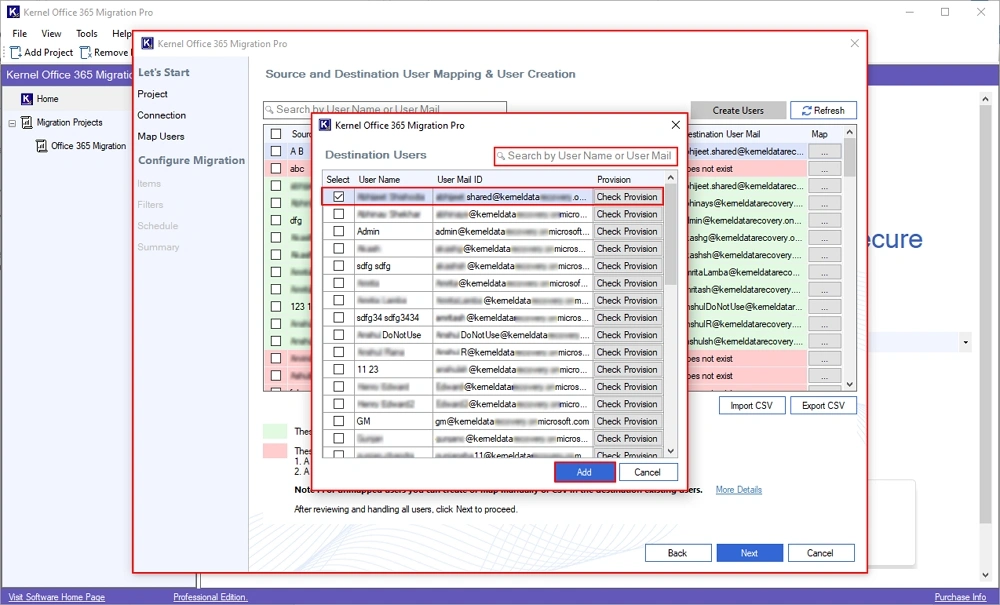
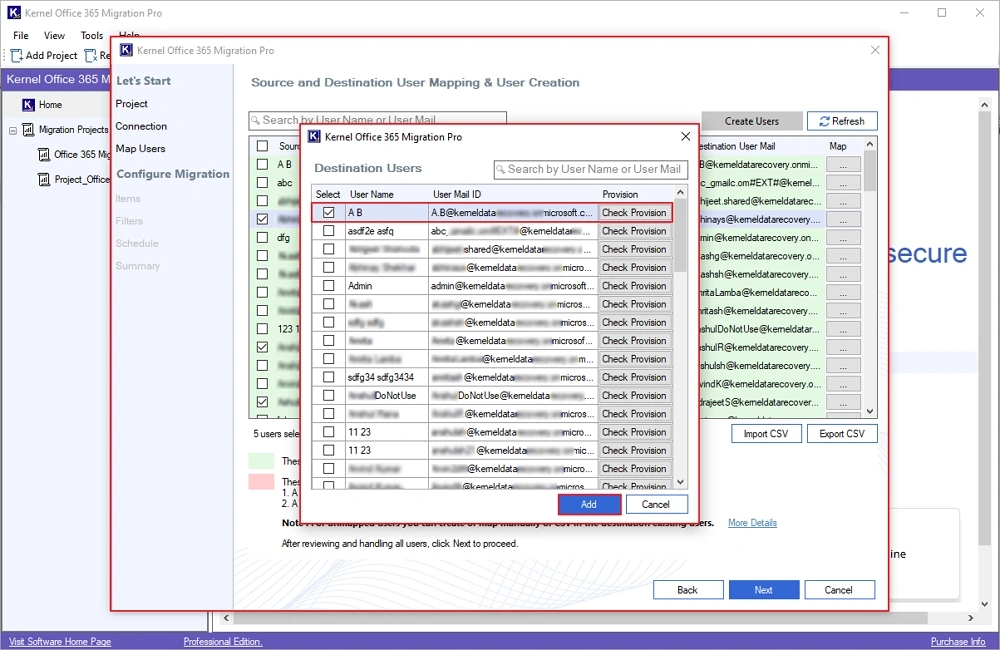
Step 16: In the Destination Users window, select a specific user to map source with destination, and click Add.
Use Search feature to find a specific user from multiple users from destination Office 365 users.
Step 17: Again, in the mapping wizard, click Next to proceed further.
Step 18: Review all the selected users in the Select Items for Migration window. Select Exchange Online Mailbox and click Next.

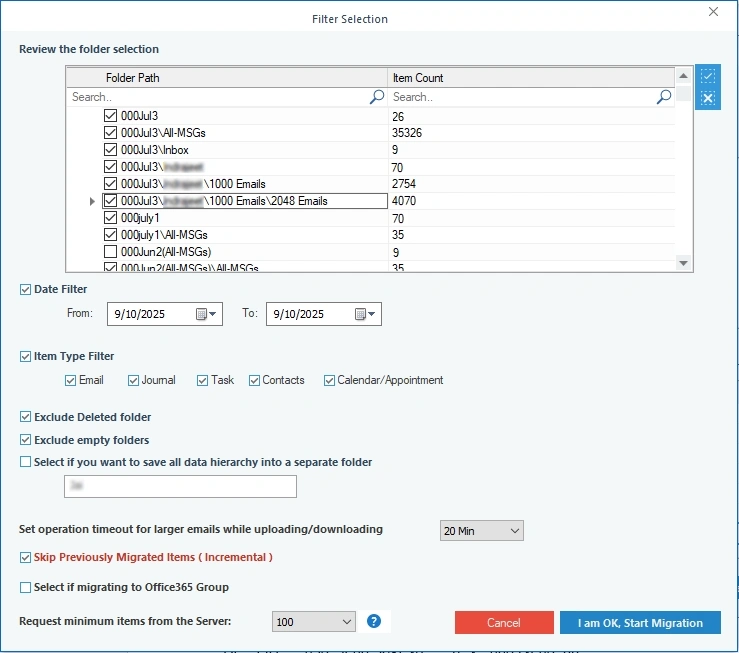
Step 19: In the Add Filters window, apply the necessary filters and click Next. Filters include:
- Folder Filter: Select from Include Folders and Exclude Folders and enter the folder name to get the folder-specific migration.
- Ignore duplicate emails: Skip migrating duplicate emails in the destination Office 365 tenant.
- Date Filters: Select Start date and End date to migrate emails of a specific time period.
- Check the Mail modification date to migrate the modified mails of the chosen dates.
- Migrate the entire Office 365 data to a specific folder in another tenant.
- Item: Migrate Emails, Calendar, Contacts, and Tasks accordingly.

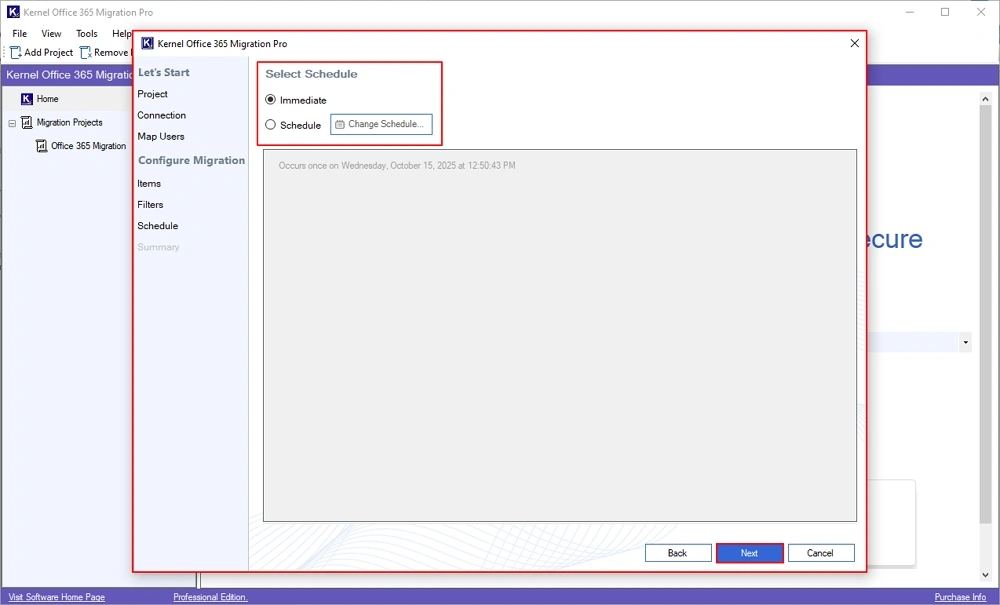
Step 20: In the Select Schedule window, select from:
Immediate: To start migration immediately.
Schedule: Select your data migration to Daily, Weekly, Monthly, and Only Once accordingly.
After automating your migration, click Next.
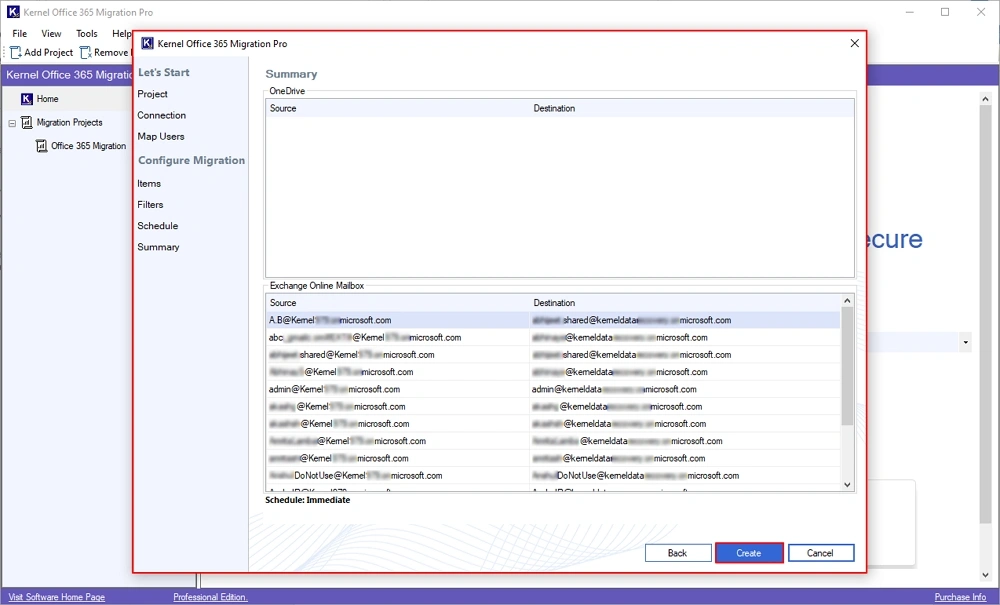
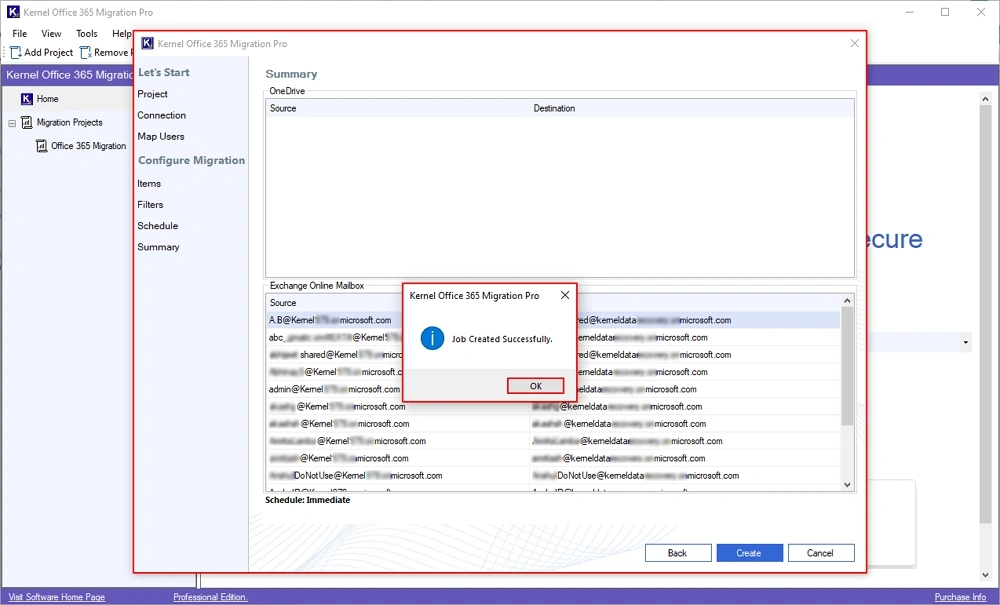
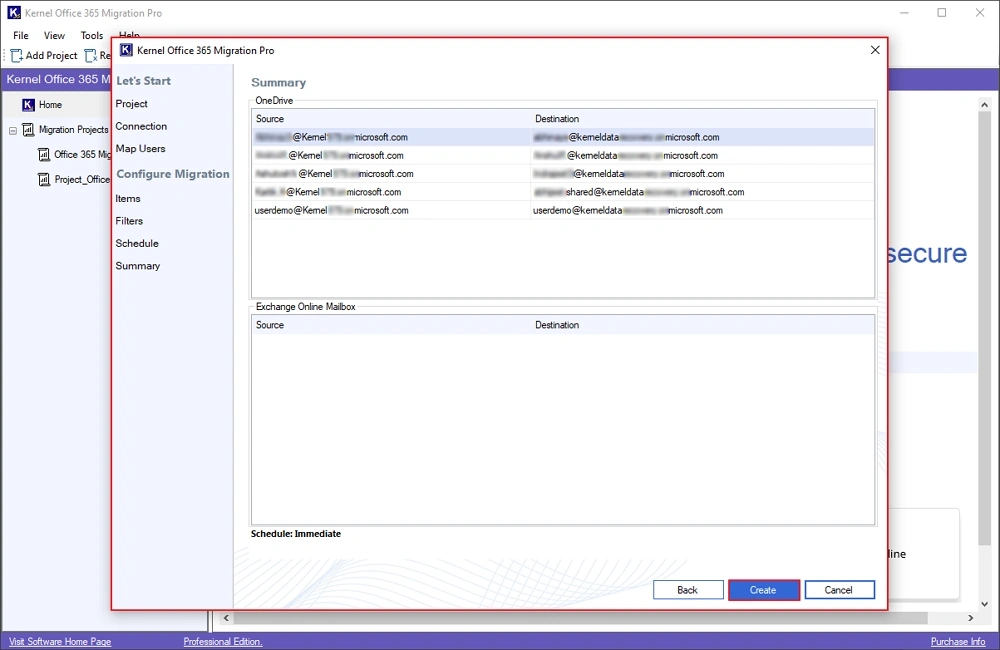
Step 21: The software will open Summary window, where you can review all your migration selections, then click Create.
Step 22: The software will create your job and pop up a “Job Created Successfully” message. Click OK.
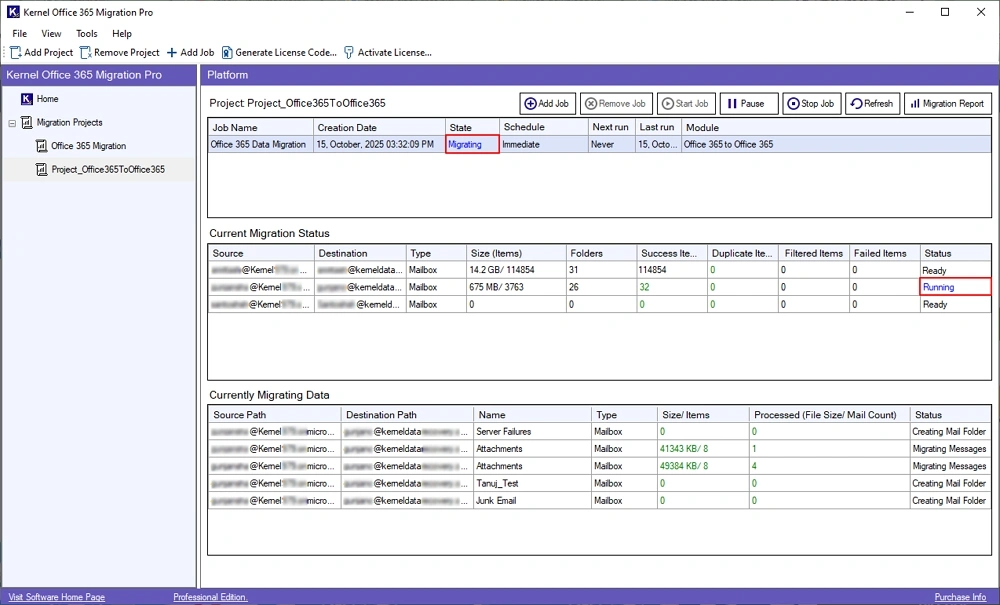
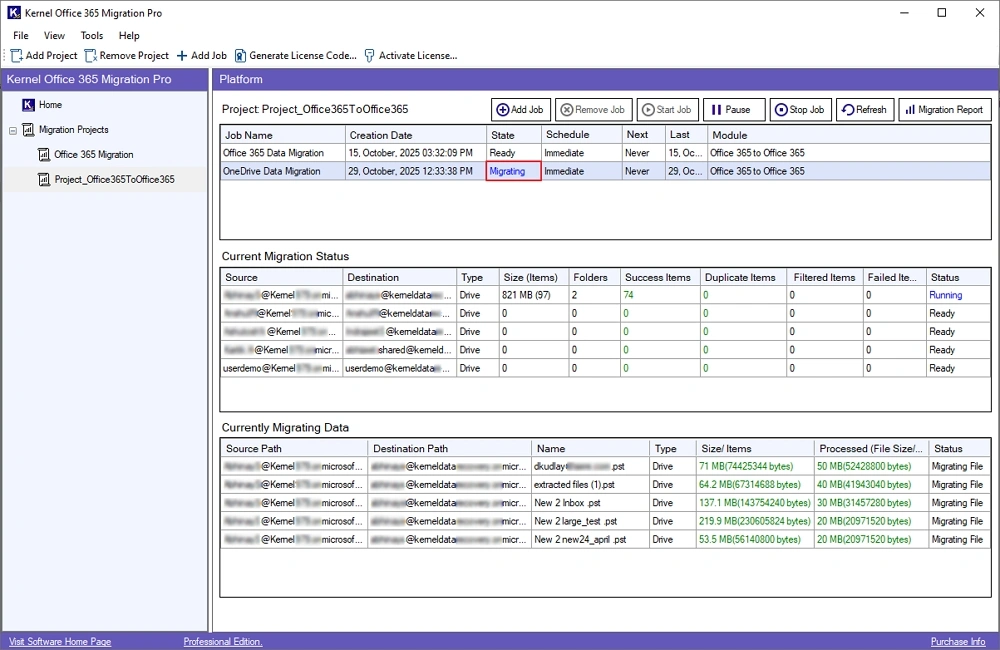
Step 23: The software will start migrating Office 365 data and show Status as Running. You can also monitor Current Migration Status and Currently Migrating Data.
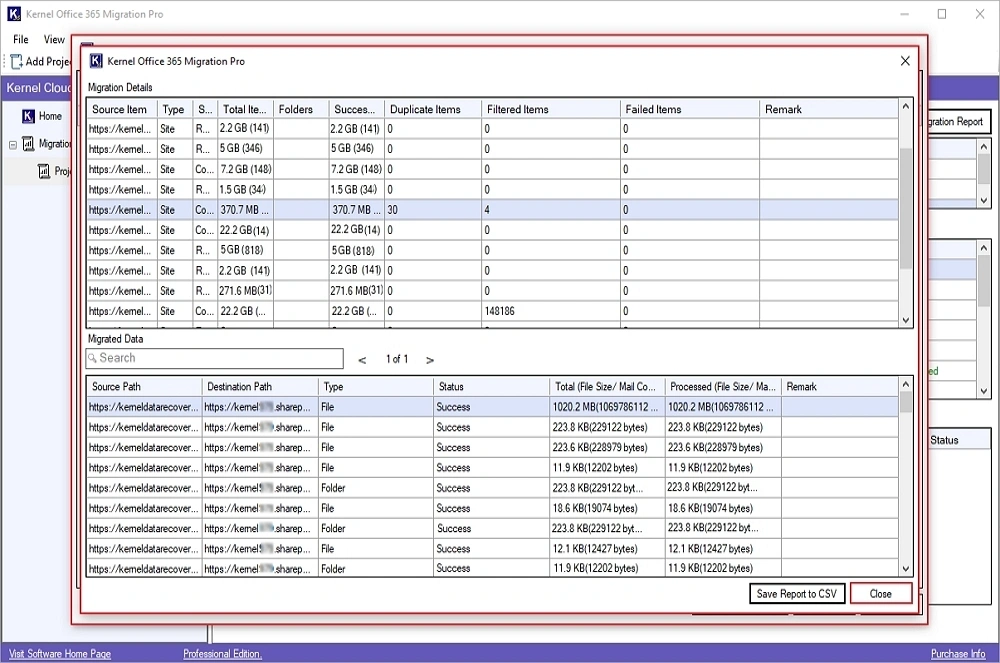
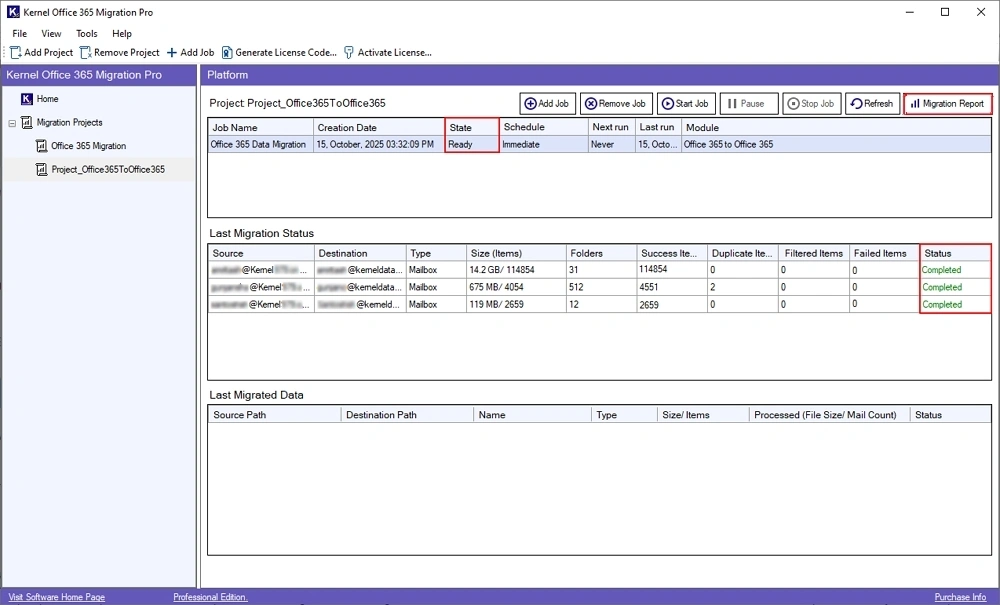
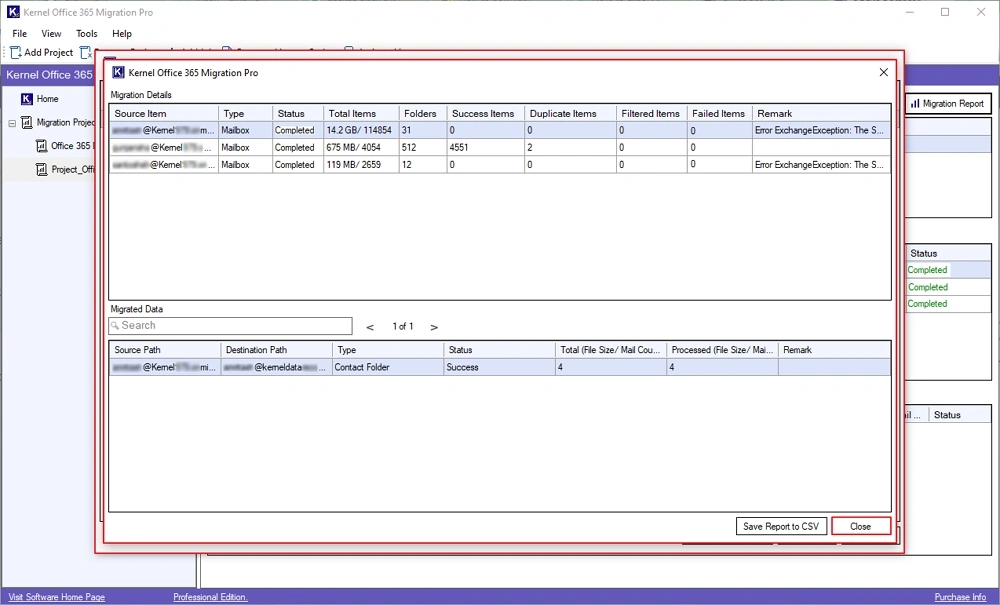
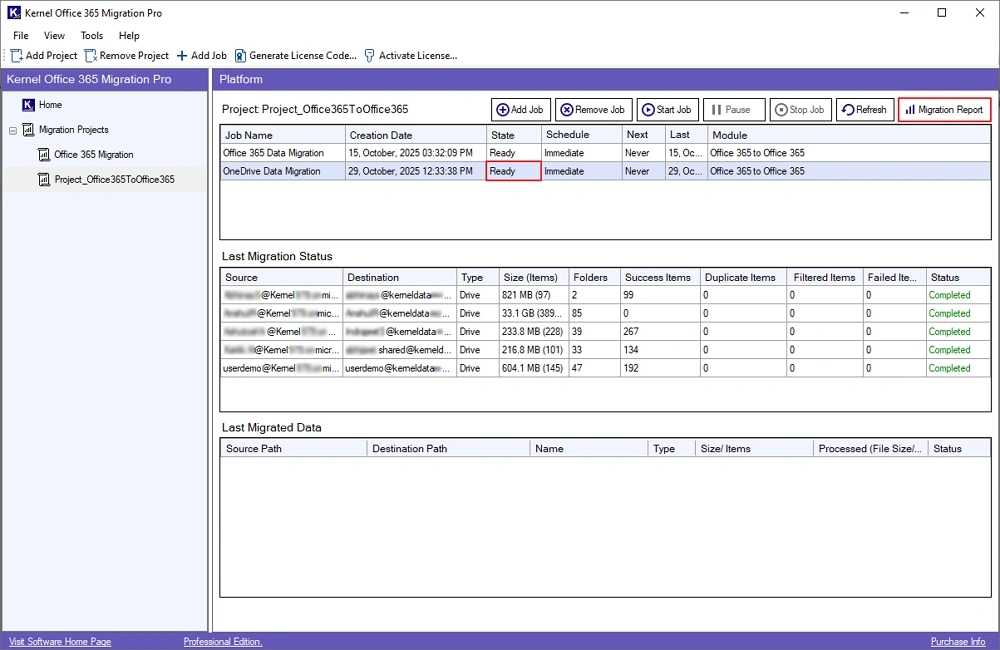
Step 24: Once the migration process is completed, the software will show a Ready status. Click on Migration Report to generate a detailed summary of migration.
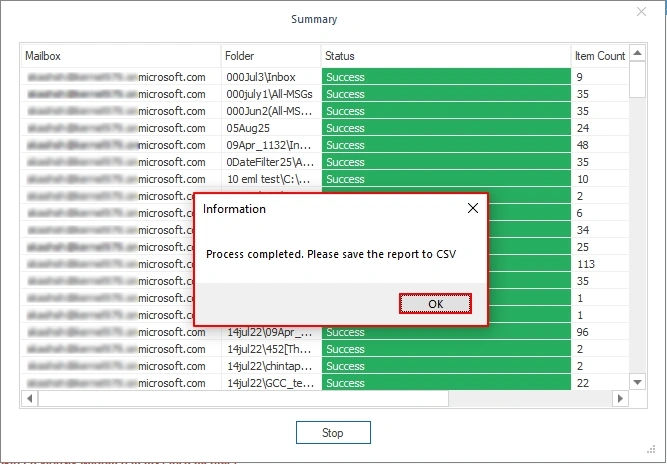
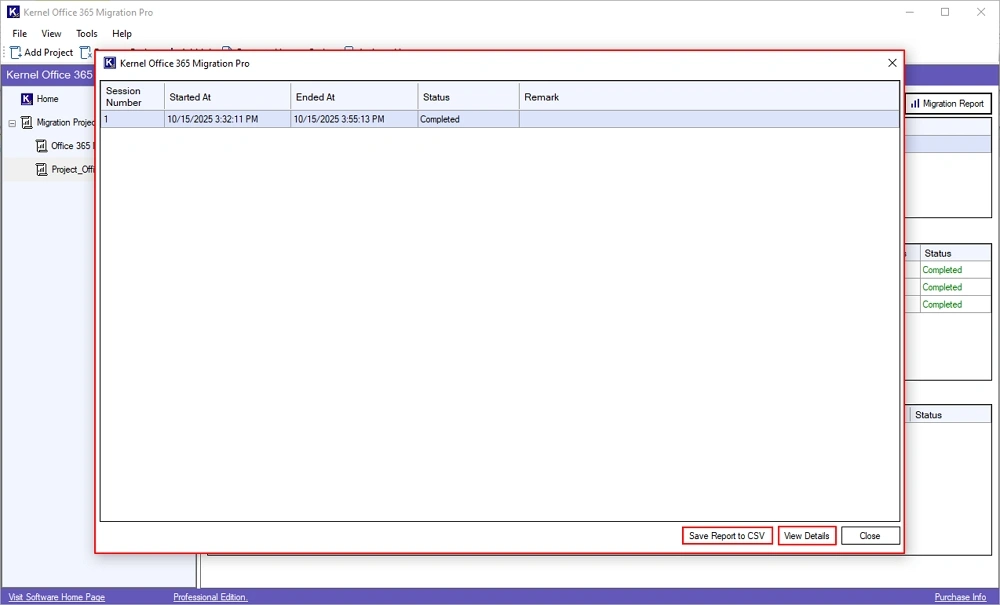
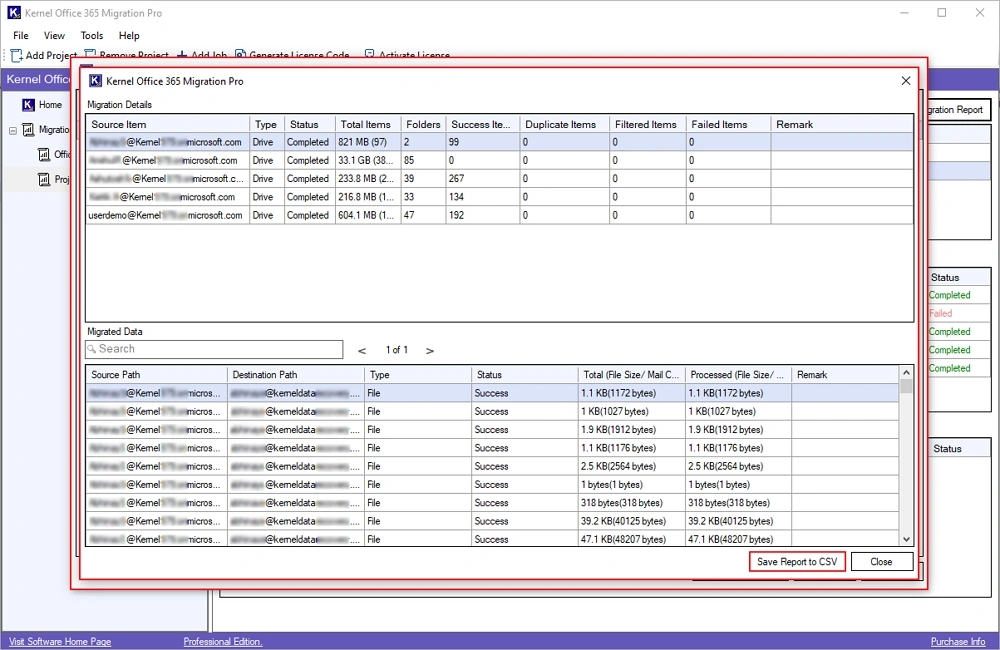
Step 25: The software will show a summary report. Click on View Details to view a detailed migration report.
Note: You can also download a summary report in CSV file by clicking on the Save Report to CSV option.
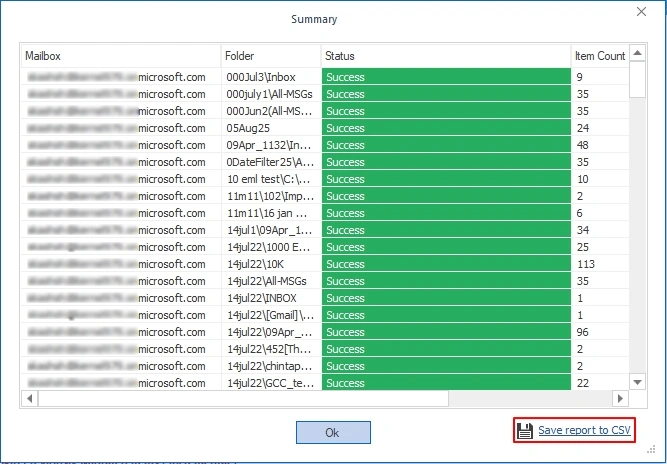
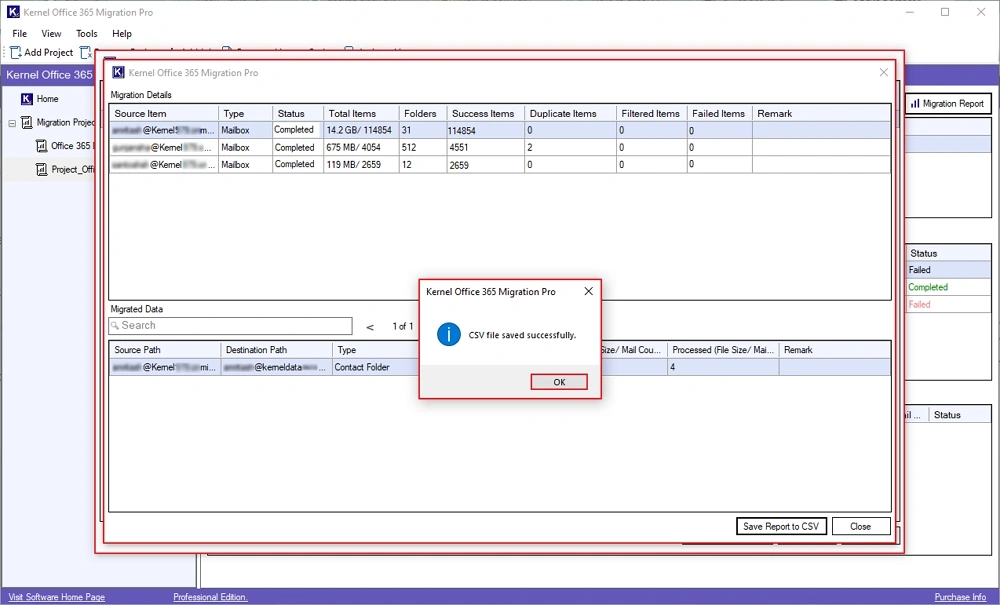
Step 26: In the detailed migration report window, click on Save Report to CSV option to download the report locally.

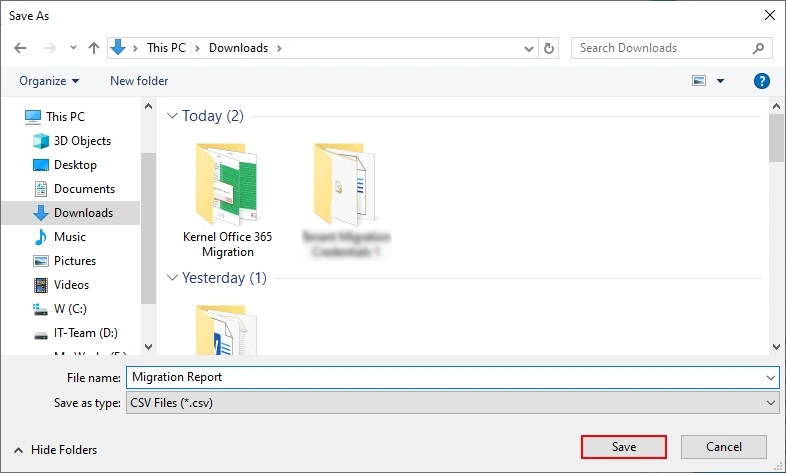
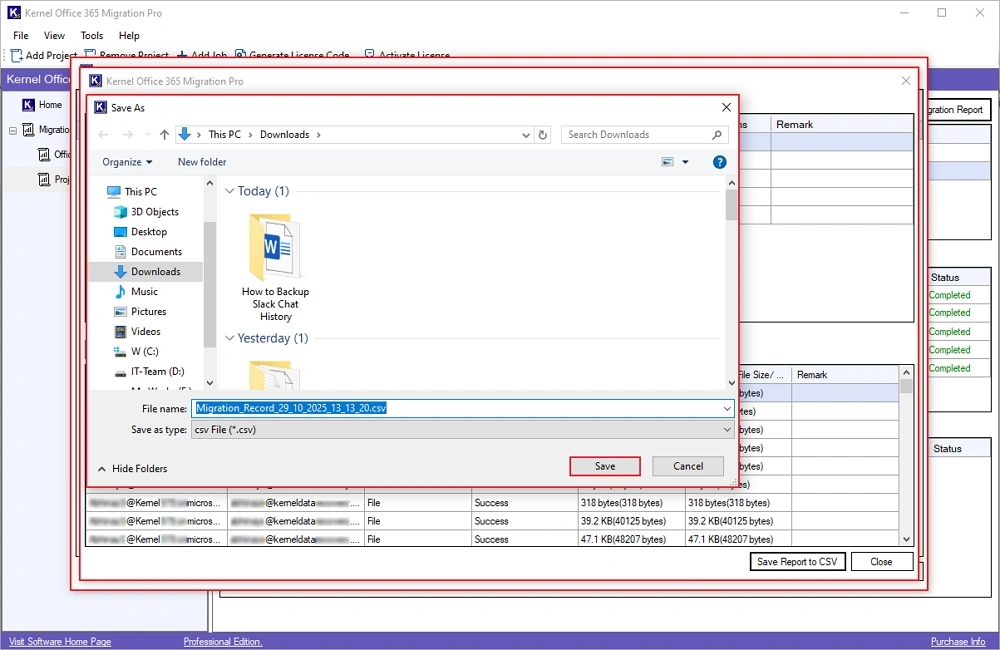
Step 27: In the Save As window, select a specific folder, enter the CSV file name, and click Save.

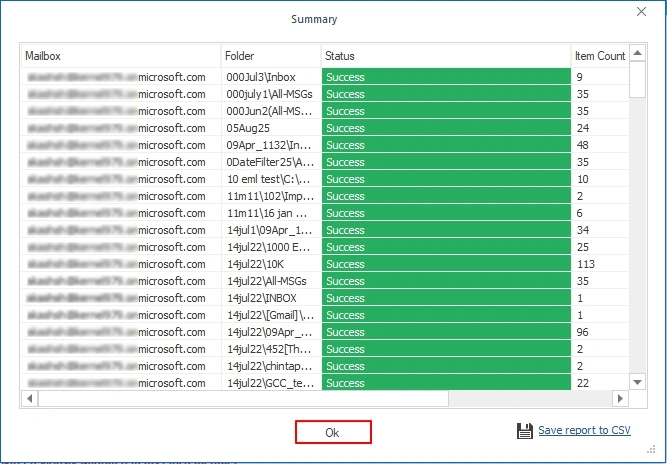
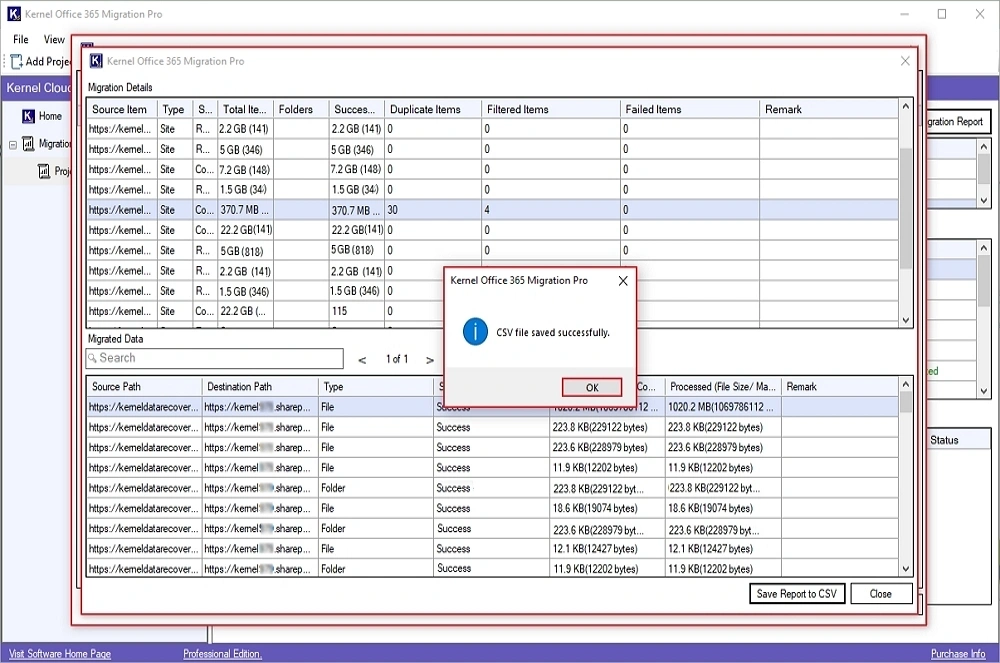
Step 28: Once the CSV file is saved, you will get the “CSV file saved successfully” message. Click OK.
Step 29: Finally, click on Close to end the migration process and software.
OneDrive Migration (User Drive Migration)
Step 1: Download, install, and launch Kernel Office 365 Migration Pro software.
Step 2: On the software’s home screen, click on Let’s Connect in the Office 365 Migration Pro tile.
Step 3: In the following wizard, select Office 365 in source and destination. Click Go.
Step 4: Enter Project Name and Job Name in the following window. Click Next.
Step 5: The software will pop up “Project (Name) does not exist. Do you want to create it?” message. Click Yes.
Step 6: In the Add Source and Destination Connector window, click on Add Source.
Step 7: In the Add Source section, enter Office 365 credentials, such as Tenant Name, Tenant ID, Client ID, and Client Secret. Click Add.
Note: If you also want to move SharePoint data, then check the SharePoint Online icon located at the top and provide required credentials.
Step 8: When the software adds the source, you will get a “Source saved successfully” message and click OK.
Step 9: Now, click on Add Destination.
Step 10: In the Add Destination window, select Office 365. Enter destination tenant credentials, like Tenant Name, Tenant ID, Client ID, and Client Secret Click Add.
Step 11: Once the destination is added, you will get “Destination added successfully” message and click OK.
Step 12: Select the source and destination accounts and click Next.
Step 13: In the following window, select OneDrive (Users Drive Migration) and click OK.
Step 14: The software will start Fetching Data from the added Office 365 account.
Step 15: In the following Map window, map the source user to specific destination users by clicking on the Three Dots.
Step 16: Select a specific destination user and click Add.
Step 17: Again, in the Map window, verify all the users' selections and click Next.

Step 18: In the Select Items for Migration window, select OneDrive users for migration and click Next.

Step 19: In the Add Filters window, select required filters from:
- Overwrite existing file(s) /Add as new version: Migrate data as a new version with another name.
- Upload only if target file exists and is older than source file: Transfer only new data with files and folders intact.
- Select if you want to migrate all data hierarchy into a separate folder: Save Office 365 data into a new specific folder in the destination.
- Folder Filters: Enter the folder name in Include Folder(s) and Exclude Folder(s) to migrate data as per your convenience.
- File Filters: Enter File names in Include File Type and Exclude File Type, such as JPG, PDF, and many more, to migrate specific data.
- Include Versions: Select from Include All Versions and Include Most Recent versions to migrate file versions.
After applying all the filters, click Next.

Step 20: In the Select Schedule wizard, select from Immediate and Schedule options to automate Office 365 data migration. Click Next.

Step 21: In the Summary wizard, verify all the migration selections and click Create.
Step 22: Once the migration job is created, the software will pop up a "Job Created Successfully” message and click OK.

Step 23: The software will start migrating OneDrive data and show Status as Running with the details of Current Migration Status and Currently Migrating Data.
Step 24: Once the migration is completed, you will get a Ready status and click Migration Report.
Step 25: On the following wizard, check the migration job, and click on View Details.
Note: You can download this job report by clicking on the "Save Report to CSV” option.

Step 26: Preview the detailed Office 365 migration report and click on the Save Report to CSV to download this report.
Step 27: In the following Save As window, select the destination folder, enter the migration report name, and click Save.
Step 28: The software will save a CSV file and pop up a “CSV file saved successfully” message, and click OK.

Step 29: Finally, click on Close to end the software.

SharePoint Online (Migrate SharePoint Sites)
Step 1: Download, install, and launch Kernel Office 365 Migration Pro software.
Step 2: Click on Let’s Connect in the Office 365 Migration Pro tile.
Step 3: In the following wizard, select Office 365 in source and destination. Click Go.
Step 4: Enter Job Name as per your choice and click Next.

Step 5: In the following wizard, click Yes to create the project.

Step 6: In the Add Source and Destination window, click on Add Source option.
Step 7: In the Add Source wizard, check SharePoint Online. Enter Office 365 SharePoint credentials, like Tenant Name, Tenant ID, Client ID, Client Secret, Admin Username, and Central Admin URL. Click Add.
Step 8: The software will show, “Source added successfully” message Click OK.
Step 9: Again, in the Add Source and Destination Connector window, click on Add Destination.
Step 10: In the following window, check SharePoint Online box and enter destination SharePoint credentials, and click Add.
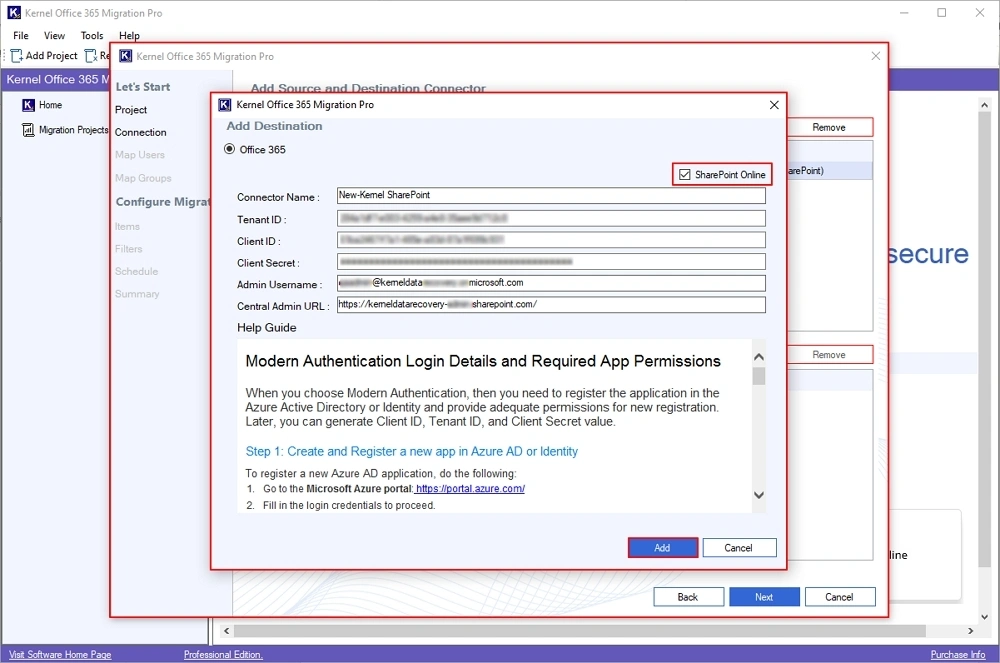
Step 11: Again, the software will pop up a “Destination added successfully” message and click OK.

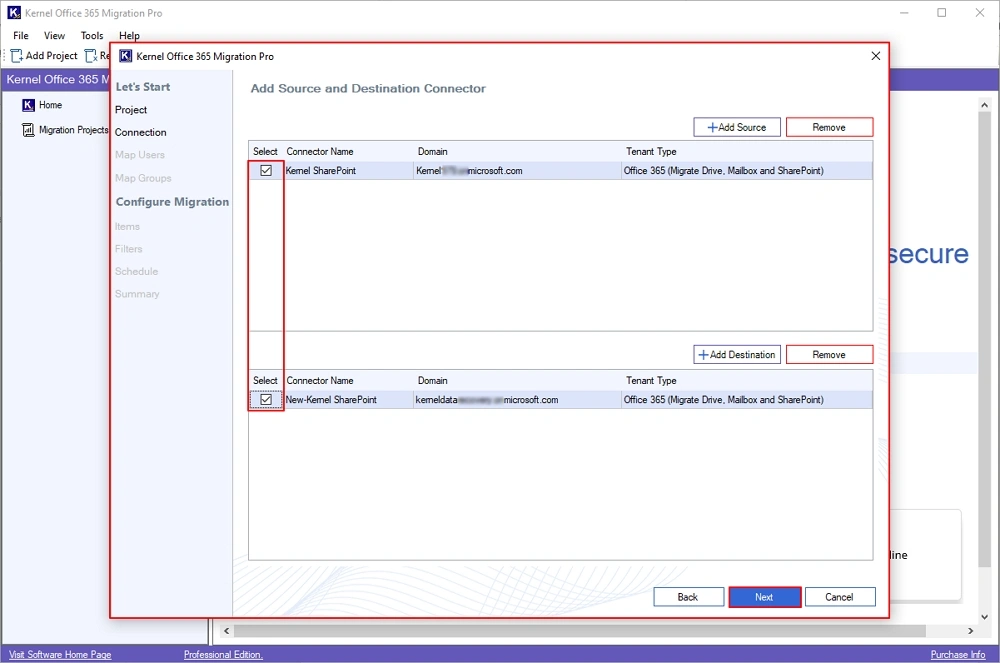
Step 12: Now, check your source and destination. Click Next to proceed further.
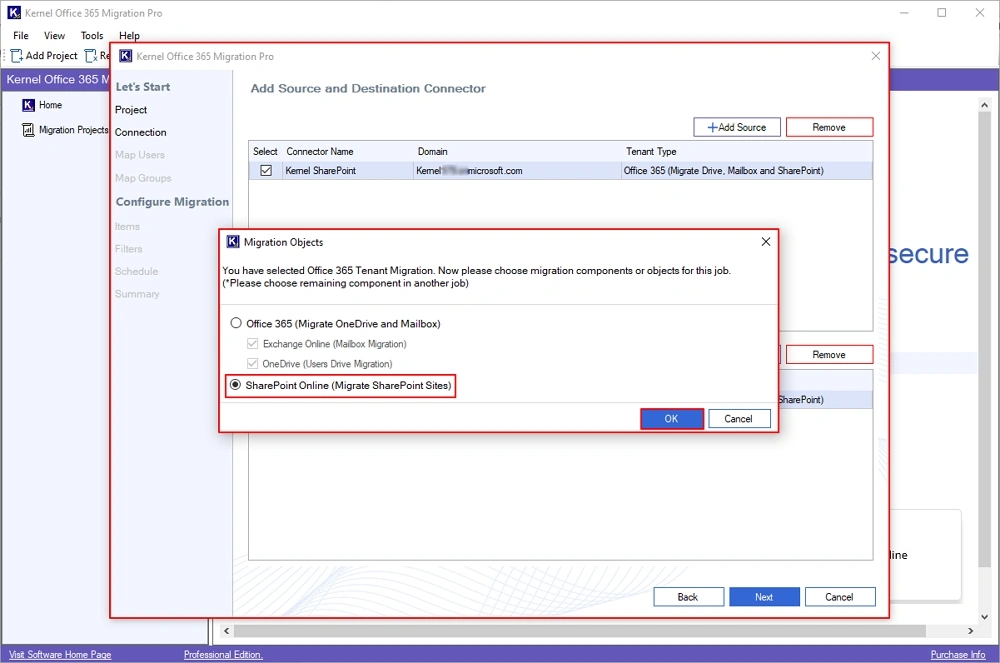
Step 13: In the Migration Objects window, select SharePoint Online (Migrate SharePoint Sites), and click OK.
Step 14: The software will start Fetching Data from the source and destination.

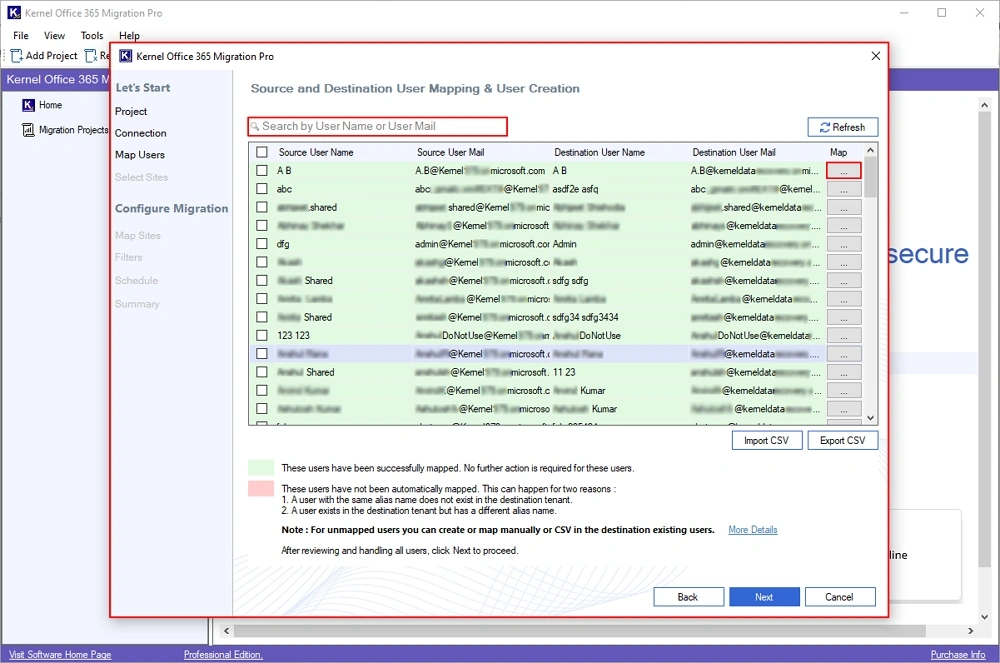
Step 15: The software will list all the Source usernames and map them with the appropriate destination users by clicking on the three dots.
Use Search option to find specific Source User.
Step 16: Select the destination user and click on Add. You can also Search for a specific destination user.
Step 17: Again, in the source and destination mapping wizard, select all necessary users and click Next.

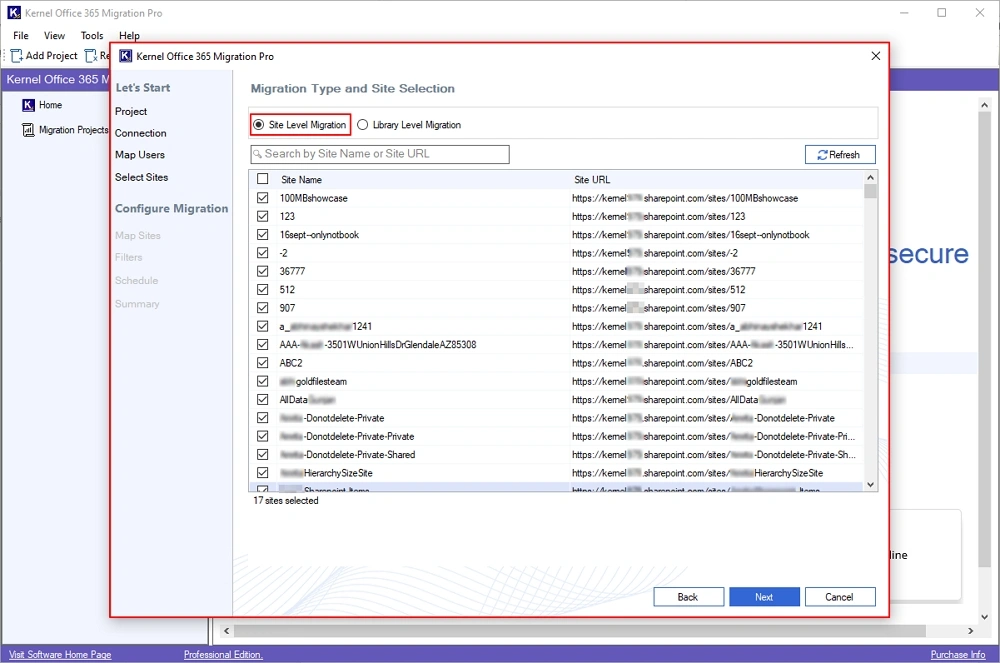
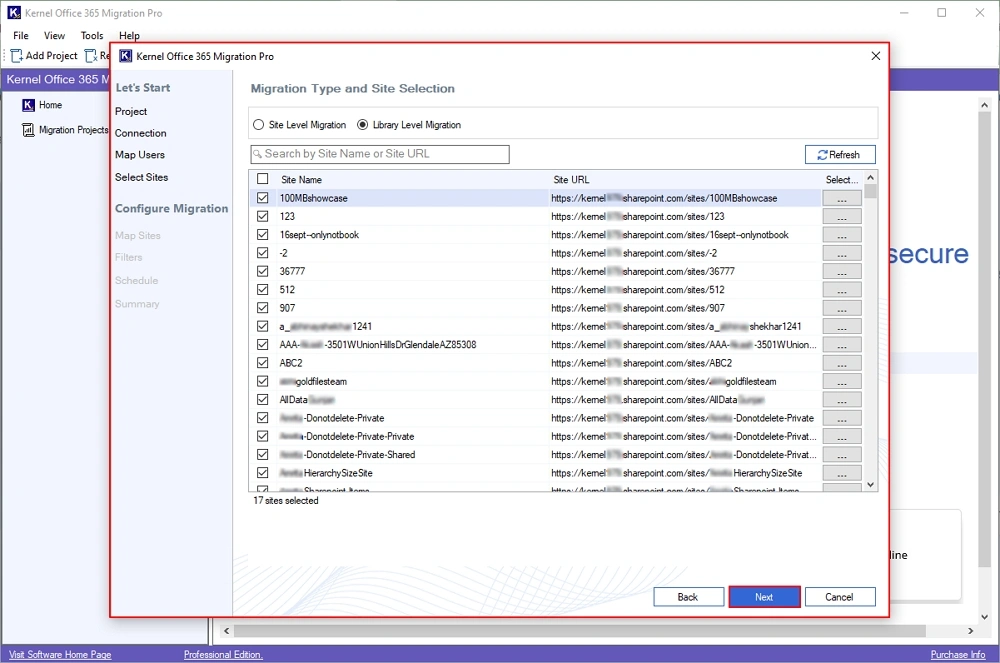
Step 18: In the Migration Type Selection wizard, go to the Site Level Migration, and select all the Site Names.
Note: Users can perform both Site Level and Library Level SharePoint migration.
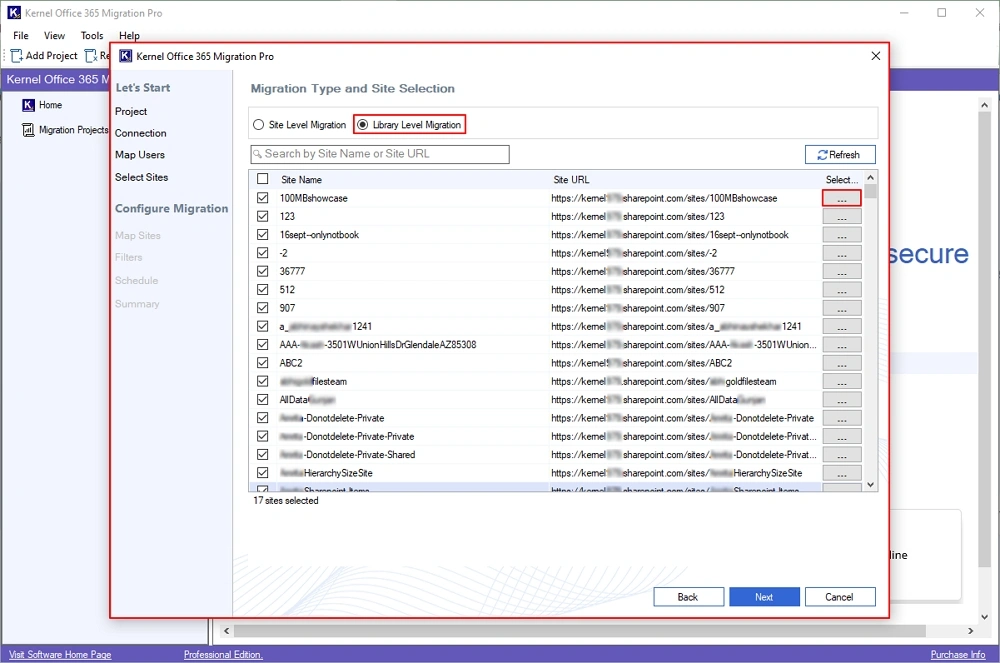
Step 19: Now, go to the Library Level Migration, select Site Names and click on the three dots to choose its Libraries.
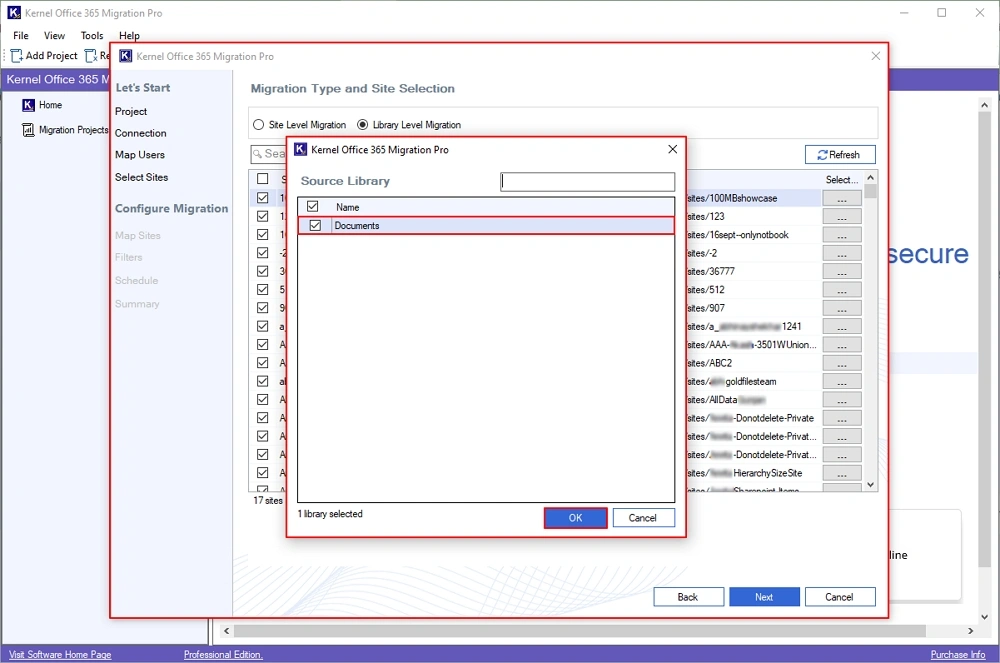
Step 20: Now, select the necessary libraries as per your needs and click OK.
Step 21: Again, in the Migration Type and Site Selection window, verify all the selections, and click Next.
Step 22: The software will open the Mapping wizard and map your Source Site Collection URL by clicking on the three dots.
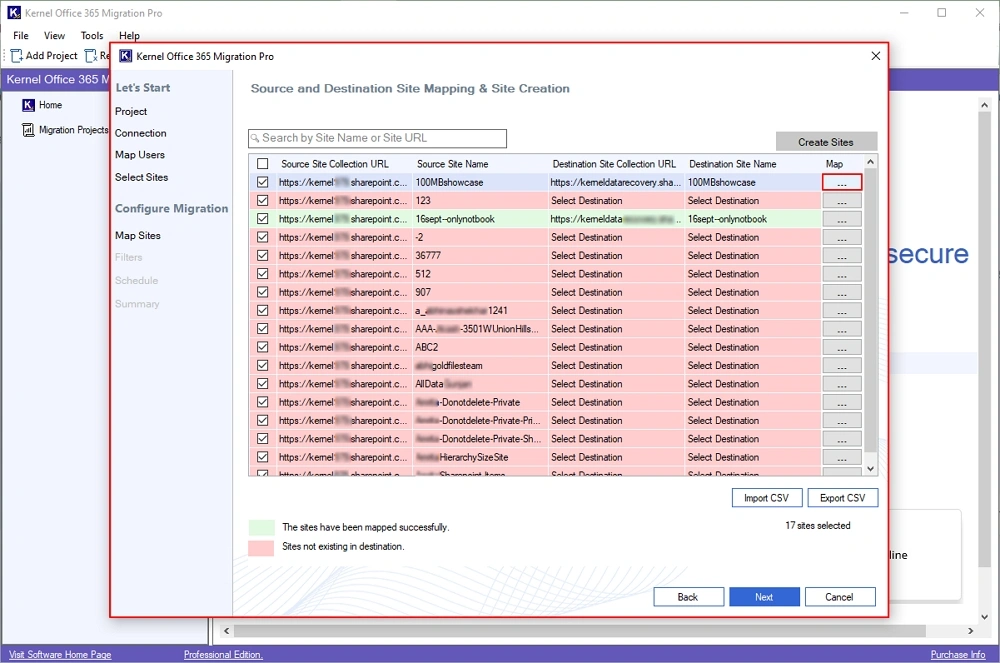
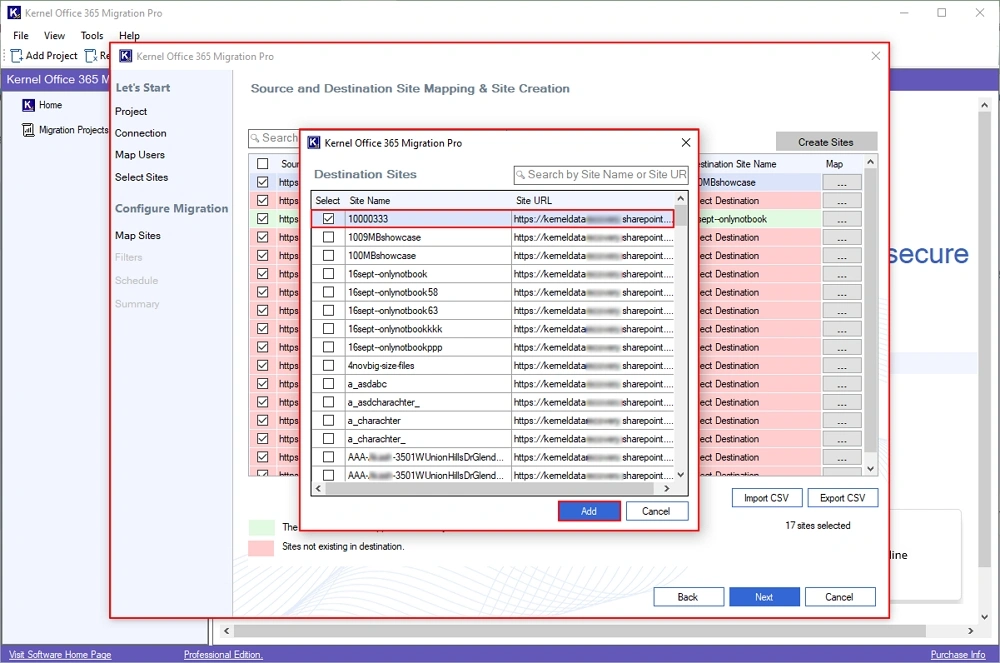
Step 23: Select destination sites and click Add to map source sites to destination sites.
Step 24: Again, in the Mapping window, verify your selections and click Next.

Step 25: In the Add Filters wizard, select the required filters from:
If destination file already exist: Migrate already existing data from:
- Add as new version if the destination file is older than the source file.
- Skip if already exists.
Include Versions: Select from Include All Versions and Include most recent version for data versions specific migration.
Date Filters: Select Start Date and End Date for specific data migration.
File Filters: Enter file types, such as PDF, DOC, JPG, in Include File Type and Exclude File Type to get the desired file type migration.
Set an operation timeout for large files while migrating: Set a time in minutes so that you can skip any large file size after exceeding that selected time limit.
After applying all the filters, click Next.

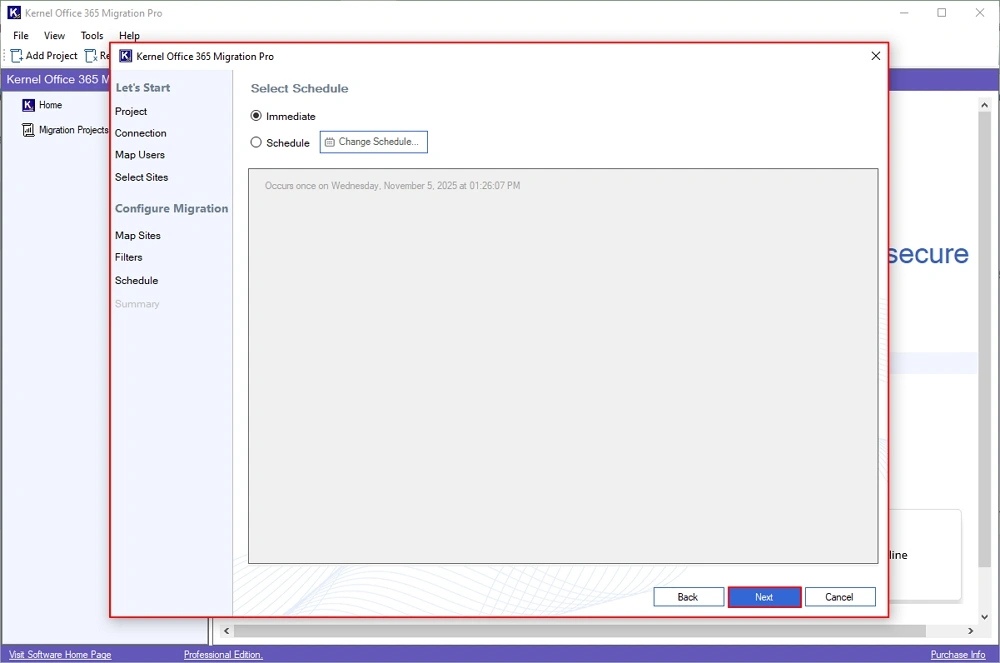
Step 26: Now, schedule your SharePoint data migration in the Select Schedule wizard. Select from Immediate and Schedule to start the migration process accordingly.
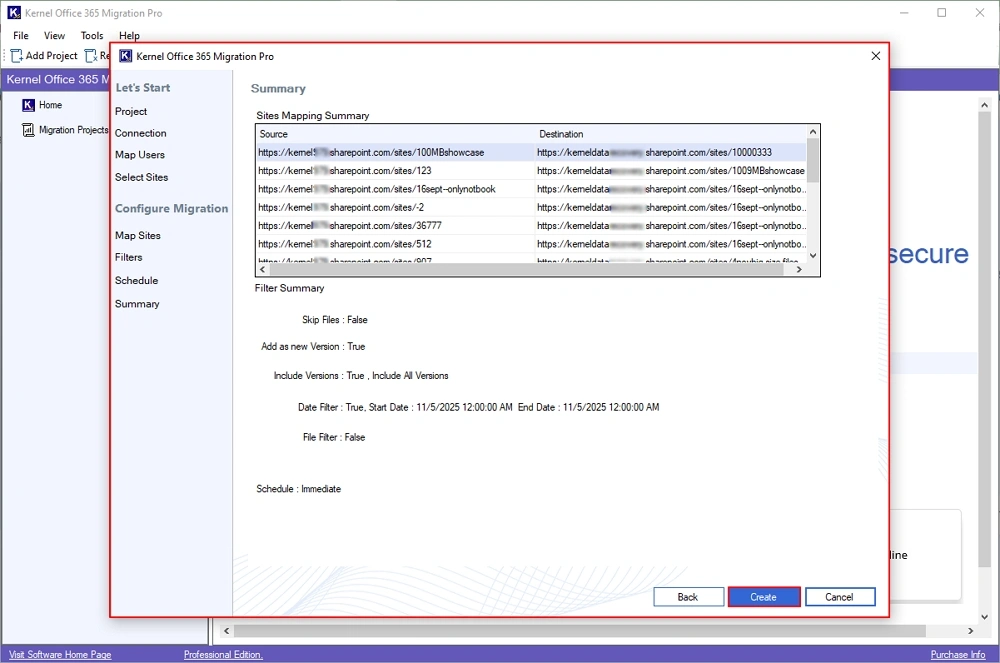
Step 27: The software will open Summary window. Verify all your migration selections and click Create.
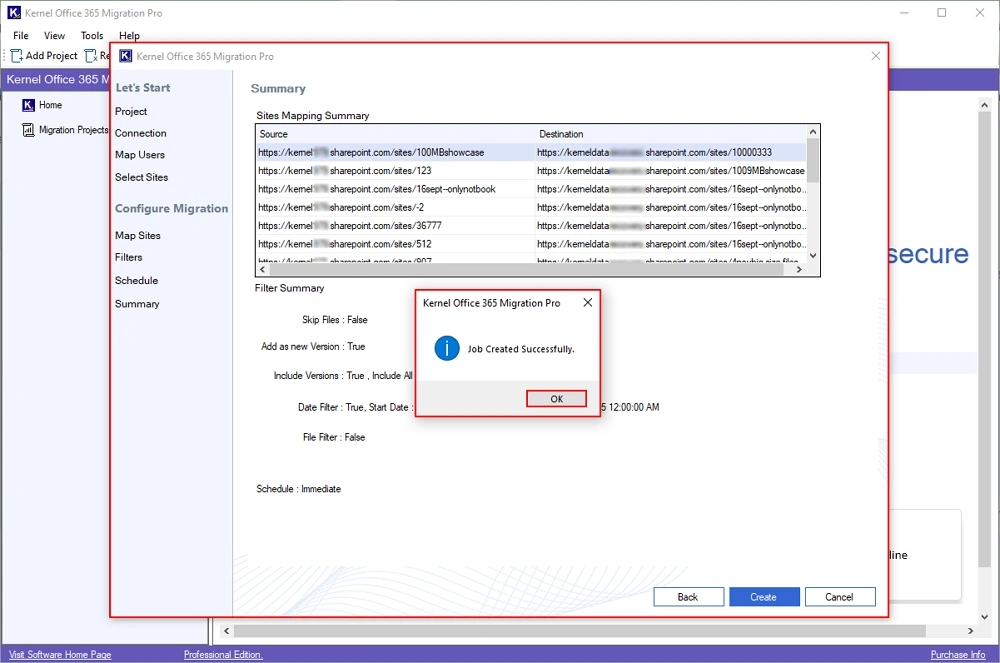
Step 28: Once the migration process is finalized, you will get a “Job Created Successfully” message. Click OK.
Step 29: The software will start the SharePoint to SharePoint migration and show the Status as Migrating. Check the live migration status in Last Migration Status and Last Migrated Data.

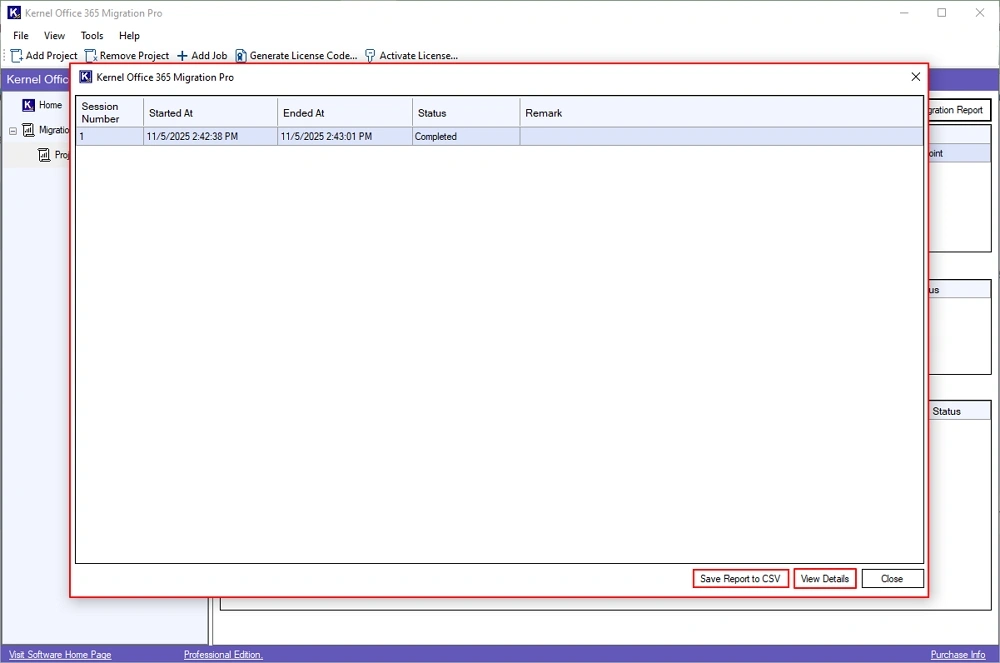
Step 30: After migrating the entire SharePoint data, you will see the Ready status. After that, click on Migration report.

Step 31: The software will open the Summary Report. To view the detailed migration report, click View details.
Note: Download Summary Report in CSV file by clicking on Save report to CSV.
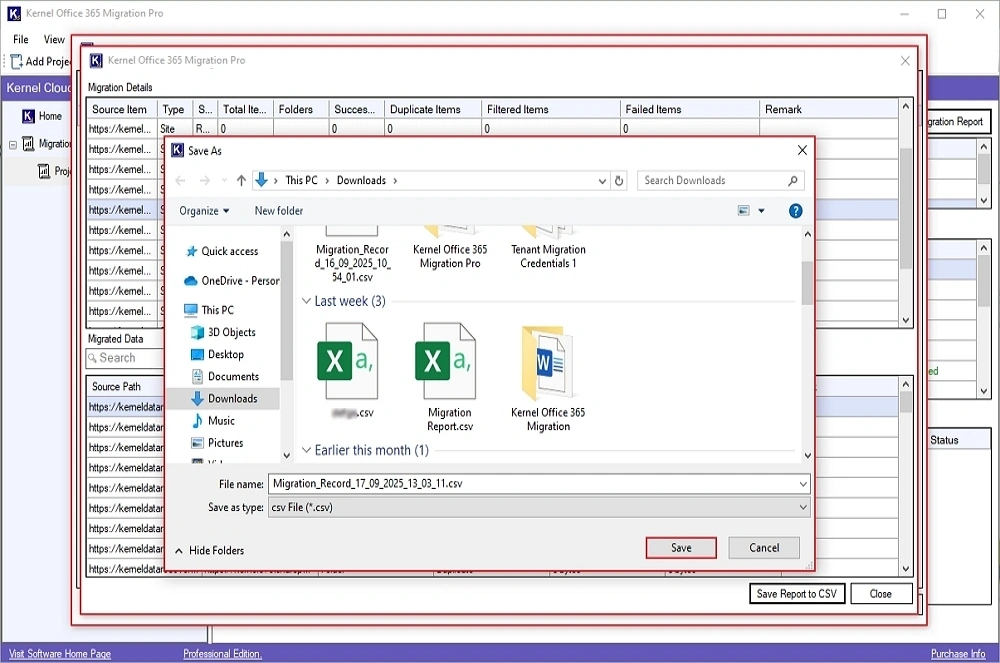
Step 32: View detailed migration report and click on Save report to CSV option.

Step 33: Select a specific drive or folder to Save the CSV file.
Step 34: After downloading the CSV file, the software will pop up a “CSV file saved successfully” message and click OK.
Step 35: Finally, click on Close to end the migration process or software.